

How to use PyTorch for neural network training

How to use PyTorch for neural network training
Introduction:
PyTorch is an open source machine learning framework based on Python. Its flexibility and simplicity make it the first choice of many researchers and engineers. . This article will introduce you to how to use PyTorch for neural network training and provide corresponding code examples.
1. Install PyTorch
Before starting, you need to install PyTorch first. You can choose the version suitable for your operating system and hardware to install through the installation guide provided on the official website (https://pytorch.org/). Once installed, you can import the PyTorch library in Python and start writing code.
2. Build a neural network model
Before using PyTorch to train a neural network, you first need to build a suitable model. PyTorch provides a class called torch.nn.Module, which you can inherit to define your own neural network model.
The following is a simple example showing how to use PyTorch to build a neural network model containing two fully connected layers:
1 2 3 4 5 6 7 8 9 10 11 12 13 14 15 16 17 |
|
In the above code, we first define a name It is a Net class and inherits the torch.nn.Module class. In the __init__ method, we define two fully connected layers fc1 and fc2. Then, we define the process of forward propagation of data in the model through the forward method. Finally, we create an instance of Net.
3. Define the loss function and optimizer
Before training, we need to define the loss function and optimizer. PyTorch provides a rich selection of loss functions and optimizers, which can be selected according to specific circumstances.
Here is an example that shows how to define a training process using the cross-entropy loss function and the stochastic gradient descent optimizer:
1 2 |
|
In the above code, we will use the cross-entropy loss function and stochastic gradient descent optimizer are assigned to the loss_fn and optimizer variables respectively. net.parameters() indicates that we want to optimize all learnable parameters in the neural network model, and the lr parameter indicates the learning rate.
4. Prepare the data set
Before training the neural network, we need to prepare the training data set and the test data set. PyTorch provides some practical tool classes to help us load and preprocess data sets.
Here is an example showing how to load the MNIST handwritten digits dataset and preprocess it:
1 2 3 4 5 6 7 8 9 10 11 12 13 |
|
In the above code, we first define a transform Variables are used to preprocess data. We then loaded the MNIST dataset using the torchvision.datasets.MNIST class and specified the training dataset and testing using the train=True and train=False parameters data set. Finally, we use the torch.utils.data.DataLoader class to convert the dataset into an iterable data loader.
5. Start training
After preparing the data set, we can start training the neural network. In a training loop, we need to complete the following steps in sequence: input input data into the model, calculate the loss function, backpropagate the updated gradient, and optimize the model.
Here is an example showing how to use PyTorch for neural network training:
1 2 3 4 5 6 7 8 9 10 11 12 13 14 15 16 17 18 |
|
In the above code, we first iterate over the training data load using the enumerate function processor, got the input data and labels. We then zero out the gradients, feed the input data into the model, and compute the predictions and loss function. Next, we calculate the gradient through the backward method, and then update the model parameters through the step method. Finally, we accumulate the losses and print them as needed.
6. Test the model
After the training is completed, we still need to test the performance of the model. We can evaluate the performance of the model by calculating its accuracy on the test data set.
Here is an example that shows how to use PyTorch to test the accuracy of the model:
1 2 3 4 5 6 7 8 9 10 11 12 13 |
|
In the above code, we first define two variables correctand total, used to calculate the number of correctly classified samples and the total number of samples. Next, we use the torch.no_grad() context manager to turn off gradient calculations, thereby reducing memory consumption. Then, we sequentially calculate the prediction results, update the number of correctly classified samples and the total number of samples. Finally, the accuracy is calculated based on the number of correctly classified samples and the total number of samples and printed.
Summary:
Through the introduction of this article, you have understood the basic steps of how to use PyTorch for neural network training, and learned how to build a neural network model, define loss functions and optimizers, prepare data sets, Start training and testing the model. I hope this article will be helpful to your work and study in using PyTorch for neural network training.
References:
- PyTorch official website: https://pytorch.org/
- PyTorch documentation: https://pytorch.org/docs/stable /index.html
The above is the detailed content of How to use PyTorch for neural network training. For more information, please follow other related articles on the PHP Chinese website!

Hot AI Tools

Undresser.AI Undress
AI-powered app for creating realistic nude photos

AI Clothes Remover
Online AI tool for removing clothes from photos.

Undress AI Tool
Undress images for free

Clothoff.io
AI clothes remover

Video Face Swap
Swap faces in any video effortlessly with our completely free AI face swap tool!
Hot Article
Hot Tools

Notepad++7.3.1
Easy-to-use and free code editor

SublimeText3 Chinese version
Chinese version, very easy to use

Zend Studio 13.0.1
Powerful PHP integrated development environment

Dreamweaver CS6
Visual web development tools

SublimeText3 Mac version
God-level code editing software (SublimeText3)
Hot Topics
 1392
1392
 52
52

 Open source! Beyond ZoeDepth! DepthFM: Fast and accurate monocular depth estimation!
Apr 03, 2024 pm 12:04 PM
Open source! Beyond ZoeDepth! DepthFM: Fast and accurate monocular depth estimation!
Apr 03, 2024 pm 12:04 PM
0.What does this article do? We propose DepthFM: a versatile and fast state-of-the-art generative monocular depth estimation model. In addition to traditional depth estimation tasks, DepthFM also demonstrates state-of-the-art capabilities in downstream tasks such as depth inpainting. DepthFM is efficient and can synthesize depth maps within a few inference steps. Let’s read about this work together ~ 1. Paper information title: DepthFM: FastMonocularDepthEstimationwithFlowMatching Author: MingGui, JohannesS.Fischer, UlrichPrestel, PingchuanMa, Dmytr
 The perfect combination of PyCharm and PyTorch: detailed installation and configuration steps
Feb 21, 2024 pm 12:00 PM
The perfect combination of PyCharm and PyTorch: detailed installation and configuration steps
Feb 21, 2024 pm 12:00 PM
PyCharm is a powerful integrated development environment (IDE), and PyTorch is a popular open source framework in the field of deep learning. In the field of machine learning and deep learning, using PyCharm and PyTorch for development can greatly improve development efficiency and code quality. This article will introduce in detail how to install and configure PyTorch in PyCharm, and attach specific code examples to help readers better utilize the powerful functions of these two. Step 1: Install PyCharm and Python
 YOLO is immortal! YOLOv9 is released: performance and speed SOTA~
Feb 26, 2024 am 11:31 AM
YOLO is immortal! YOLOv9 is released: performance and speed SOTA~
Feb 26, 2024 am 11:31 AM
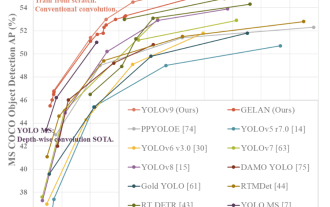
Today's deep learning methods focus on designing the most suitable objective function so that the model's prediction results are closest to the actual situation. At the same time, a suitable architecture must be designed to obtain sufficient information for prediction. Existing methods ignore the fact that when the input data undergoes layer-by-layer feature extraction and spatial transformation, a large amount of information will be lost. This article will delve into important issues when transmitting data through deep networks, namely information bottlenecks and reversible functions. Based on this, the concept of programmable gradient information (PGI) is proposed to cope with the various changes required by deep networks to achieve multi-objectives. PGI can provide complete input information for the target task to calculate the objective function, thereby obtaining reliable gradient information to update network weights. In addition, a new lightweight network framework is designed
 Hello, electric Atlas! Boston Dynamics robot comes back to life, 180-degree weird moves scare Musk
Apr 18, 2024 pm 07:58 PM
Hello, electric Atlas! Boston Dynamics robot comes back to life, 180-degree weird moves scare Musk
Apr 18, 2024 pm 07:58 PM
Boston Dynamics Atlas officially enters the era of electric robots! Yesterday, the hydraulic Atlas just "tearfully" withdrew from the stage of history. Today, Boston Dynamics announced that the electric Atlas is on the job. It seems that in the field of commercial humanoid robots, Boston Dynamics is determined to compete with Tesla. After the new video was released, it had already been viewed by more than one million people in just ten hours. The old people leave and new roles appear. This is a historical necessity. There is no doubt that this year is the explosive year of humanoid robots. Netizens commented: The advancement of robots has made this year's opening ceremony look like a human, and the degree of freedom is far greater than that of humans. But is this really not a horror movie? At the beginning of the video, Atlas is lying calmly on the ground, seemingly on his back. What follows is jaw-dropping
 Introduction to five sampling methods in natural language generation tasks and Pytorch code implementation
Feb 20, 2024 am 08:50 AM
Introduction to five sampling methods in natural language generation tasks and Pytorch code implementation
Feb 20, 2024 am 08:50 AM
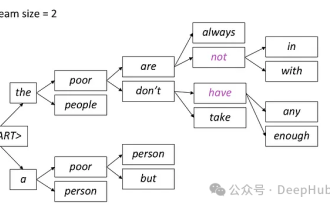
In natural language generation tasks, sampling method is a technique to obtain text output from a generative model. This article will discuss 5 common methods and implement them using PyTorch. 1. GreedyDecoding In greedy decoding, the generative model predicts the words of the output sequence based on the input sequence time step by time. At each time step, the model calculates the conditional probability distribution of each word, and then selects the word with the highest conditional probability as the output of the current time step. This word becomes the input to the next time step, and the generation process continues until some termination condition is met, such as a sequence of a specified length or a special end marker. The characteristic of GreedyDecoding is that each time the current conditional probability is the best
 The vitality of super intelligence awakens! But with the arrival of self-updating AI, mothers no longer have to worry about data bottlenecks
Apr 29, 2024 pm 06:55 PM
The vitality of super intelligence awakens! But with the arrival of self-updating AI, mothers no longer have to worry about data bottlenecks
Apr 29, 2024 pm 06:55 PM
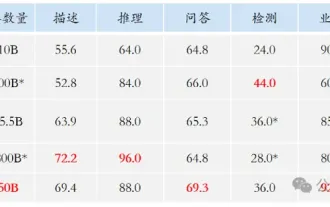
I cry to death. The world is madly building big models. The data on the Internet is not enough. It is not enough at all. The training model looks like "The Hunger Games", and AI researchers around the world are worrying about how to feed these data voracious eaters. This problem is particularly prominent in multi-modal tasks. At a time when nothing could be done, a start-up team from the Department of Renmin University of China used its own new model to become the first in China to make "model-generated data feed itself" a reality. Moreover, it is a two-pronged approach on the understanding side and the generation side. Both sides can generate high-quality, multi-modal new data and provide data feedback to the model itself. What is a model? Awaker 1.0, a large multi-modal model that just appeared on the Zhongguancun Forum. Who is the team? Sophon engine. Founded by Gao Yizhao, a doctoral student at Renmin University’s Hillhouse School of Artificial Intelligence.
 Tutorial on installing PyCharm with PyTorch
Feb 24, 2024 am 10:09 AM
Tutorial on installing PyCharm with PyTorch
Feb 24, 2024 am 10:09 AM
As a powerful deep learning framework, PyTorch is widely used in various machine learning projects. As a powerful Python integrated development environment, PyCharm can also provide good support when implementing deep learning tasks. This article will introduce in detail how to install PyTorch in PyCharm and provide specific code examples to help readers quickly get started using PyTorch for deep learning tasks. Step 1: Install PyCharm First, we need to make sure we have
 Kuaishou version of Sora 'Ke Ling' is open for testing: generates over 120s video, understands physics better, and can accurately model complex movements
Jun 11, 2024 am 09:51 AM
Kuaishou version of Sora 'Ke Ling' is open for testing: generates over 120s video, understands physics better, and can accurately model complex movements
Jun 11, 2024 am 09:51 AM
What? Is Zootopia brought into reality by domestic AI? Exposed together with the video is a new large-scale domestic video generation model called "Keling". Sora uses a similar technical route and combines a number of self-developed technological innovations to produce videos that not only have large and reasonable movements, but also simulate the characteristics of the physical world and have strong conceptual combination capabilities and imagination. According to the data, Keling supports the generation of ultra-long videos of up to 2 minutes at 30fps, with resolutions up to 1080p, and supports multiple aspect ratios. Another important point is that Keling is not a demo or video result demonstration released by the laboratory, but a product-level application launched by Kuaishou, a leading player in the short video field. Moreover, the main focus is to be pragmatic, not to write blank checks, and to go online as soon as it is released. The large model of Ke Ling is already available in Kuaiying.
