

How to use Vue for permission management and access control

How to use Vue for permission management and access control
In modern web applications, permission management and access control is a key function. As a popular JavaScript framework, Vue provides a simple and flexible way to implement permission management and access control. This article will introduce how to use Vue to implement basic permission management and access control functions, and attach code examples.
- Define roles and permissions
Before you begin, you first need to define the roles and permissions in your application. A role is a specific set of permissions, and a permission can be the ability to access a specific page or perform a specific action. For example, an administrator may have permission to edit and delete users, while a regular user may only have permission to view users.
In Vue, we can use constants or enumerations to define roles and permissions. Here is a simple example:
// 定义角色
const ROLE_ADMIN = 'admin';
const ROLE_USER = 'user';

// 定义权限
const PERMISSION_EDIT_USERS = 'edit_users';
const PERMISSION_DELETE_USERS = 'delete_users';
const PERMISSION_VIEW_USERS = 'view_users';
- Creating routes and guards
In Vue applications, routing is very important. We can use Vue Router to define each page of the application and use routing guards for permission verification. Route guards are special functions that are called before the user accesses the page.
The following is a simple routing configuration example:
import VueRouter from 'vue-router';
import { ROLE_ADMIN, PERMISSION_EDIT_USERS, PERMISSION_DELETE_USERS, PERMISSION_VIEW_USERS } from './constants';

const routes = [
  { path: '/users', component: UsersList, meta: { requiresAuth: true, permissions: [PERMISSION_VIEW_USERS] } },
  { path: '/users/:id', component: UserDetails, meta: { requiresAuth: true, permissions: [PERMISSION_VIEW_USERS] } },
  { path: '/users/create', component: CreateUser, meta: { requiresAuth: true, permissions: [PERMISSION_EDIT_USERS] } },
  { path: '/users/:id/edit', component: EditUser, meta: { requiresAuth: true, permissions: [PERMISSION_EDIT_USERS] } },
];

const router = new VueRouter({
  routes,
});

// 路由守卫
router.beforeEach((to, from, next) => {
  const requiresAuth = to.matched.some((route) => route.meta.requiresAuth);
  const permissions = to.meta.permissions;

  if (requiresAuth) {
    // 验证用户是否登录
    if (!isLoggedIn()) {
      next('/login');
    }
    // 验证用户是否有访问权限
    else if (!hasPermissions(permissions)) {
      next('/403');
    } else {
      next();
    }
  } else {
    next();
  }
});In the above example, we defined several routes and used the meta field to specify What permissions are required to access this page. Then, we perform permission verification in the beforeEach function. If the user is not logged in or does not have the required permissions, we can redirect the user to a different page.
- Implement permission verification logic
To implement access control and permission management, we need to write some logic to verify the user's role and permissions. Here is a simple example:
// 验证用户是否登录
function isLoggedIn() {
  const token = localStorage.getItem('token');
  return token !== null;
}

// 验证用户是否具有所需的权限
function hasPermissions(permissions) {
  const userPermissions = getUserPermissions(); // 从API或其他地方获取用户权限

  return permissions.every((permission) => userPermissions.includes(permission));
} In this example, we use the isLoggedIn function to check if the user is logged in. Normally we get a token from the server and store it in local storage. If the user is logged in, we can perform the logic of getting the user's permissions and use the hasPermissions function to verify that the user has the required permissions.
- Using permission management and access control in components
Now that we have set up the routing and permission verification logic, the next step is to use them in the Vue component.
The following is a simple example:
export default {
  name: 'UsersList',
  computed: {
    canEditUsers() {
      return hasPermissions([PERMISSION_EDIT_USERS]);
    },
    canDeleteUsers() {
      return hasPermissions([PERMISSION_DELETE_USERS]);
    },
  },
};In the above example, we define a component named UsersList and use The computed attribute is used to calculate whether the user has permission to edit and delete users. We can then use these computed properties in the template to show or hide some action buttons or content.
Summary
By using Vue's routing and routing guards, we can easily implement basic permission management and access control functions. We can define roles and permissions and specify the permissions required by the page in the routing configuration. We can then perform permission verification logic in the route guard. Finally, in the component, we can use computed properties to perform some dynamic showing and hiding operations based on the user's role and permissions.
The above is a simple example of how to use Vue for permission management and access control. I hope it will be helpful to you!
The above is the detailed content of How to use Vue for permission management and access control. For more information, please follow other related articles on the PHP Chinese website!

Hot AI Tools

Undresser.AI Undress
AI-powered app for creating realistic nude photos

AI Clothes Remover
Online AI tool for removing clothes from photos.

Undress AI Tool
Undress images for free

Clothoff.io
AI clothes remover

AI Hentai Generator
Generate AI Hentai for free.

Hot Article
Hot Tools

Notepad++7.3.1
Easy-to-use and free code editor

SublimeText3 Chinese version
Chinese version, very easy to use

Zend Studio 13.0.1
Powerful PHP integrated development environment

Dreamweaver CS6
Visual web development tools

SublimeText3 Mac version
God-level code editing software (SublimeText3)
Hot Topics
 1377
1377
 52
52

 How to use Vue for permission management and access control
Aug 02, 2023 pm 09:01 PM
How to use Vue for permission management and access control
Aug 02, 2023 pm 09:01 PM
How to use Vue for permission management and access control In modern web applications, permission management and access control is a critical feature. As a popular JavaScript framework, Vue provides a simple and flexible way to implement permission management and access control. This article will introduce how to use Vue to implement basic permission management and access control functions, and attach code examples. Defining Roles and Permissions Before you begin, you first need to define the roles and permissions in your application. A role is a specific set of permissions, and
 How Nginx implements access control configuration based on request source IP
Nov 08, 2023 am 10:09 AM
How Nginx implements access control configuration based on request source IP
Nov 08, 2023 am 10:09 AM
How Nginx implements access control configuration based on the request source IP requires specific code examples. In network application development, protecting the server from malicious attacks is a very important step. Using Nginx as a reverse proxy server, we can configure IP access control to restrict access to specific IP addresses to improve server security. This article will introduce how to implement access control configuration based on request source IP in Nginx and provide specific code examples. First, we need to edit the Nginx configuration file
 Use Go language to solve large-scale access control problems
Jun 15, 2023 pm 02:59 PM
Use Go language to solve large-scale access control problems
Jun 15, 2023 pm 02:59 PM
With the development of the Internet, access control issues have increasingly become an important topic. In traditional permission management, role authorization or access control lists are generally used to control resources. However, this method is often unable to adapt to large-scale access control needs because it is difficult to flexibly implement access control for different roles and resources. To solve this problem, using Go language to solve large-scale access control problems has become an effective method. Go language is a language for concurrent programming. It has excellent concurrency performance and fast compilation.
 How does PHP handle cross-domain requests and access control?
Jun 30, 2023 pm 11:04 PM
How does PHP handle cross-domain requests and access control?
Jun 30, 2023 pm 11:04 PM
How does PHP handle cross-domain requests and access control? Abstract: With the development of Internet applications, cross-domain requests and access control have become an important issue in PHP development. This article will introduce methods and techniques on how PHP handles cross-domain requests and access control, aiming to help developers better understand and deal with these issues. What is a cross-domain request? Cross-domain request means that in the browser, a web page in one domain requests to access resources in another domain. Cross-domain requests generally occur in AJAX requests, image/script/css references, etc. Depend on
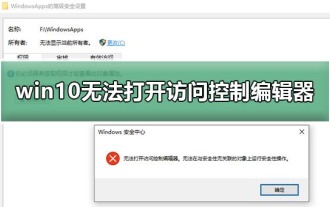 Access Control Editor cannot be opened in Win10
Jan 03, 2024 pm 10:05 PM
Access Control Editor cannot be opened in Win10
Jan 03, 2024 pm 10:05 PM
The inability to open the access control editor in win10 is an uncommon problem. This problem usually occurs in external hard drives and USB flash drives. In fact, the solution is very simple. Just open it in safe mode and take a look. Let’s take a look at the details below. tutorial. Win10 cannot open the access control editor 1. In the login interface, hold down shift, click the button, click 2.--, click 3. After restarting, press F5 to try to enter and see if you can enter. Articles related to win10 safe mode>>>How to enter win10 safe mode<<<>>>How to repair the system in win10 safe mode<<<
 An in-depth exploration of Nginx's traffic analysis and access control methods
Aug 05, 2023 pm 05:46 PM
An in-depth exploration of Nginx's traffic analysis and access control methods
Aug 05, 2023 pm 05:46 PM
An in-depth discussion of Nginx's traffic analysis and access control methods. Nginx is a high-performance open source web server. It is powerful and scalable, so it is widely used in the Internet field. In practical applications, we usually need to analyze Nginx traffic and control access. This article will delve into Nginx's traffic analysis and access control methods and provide corresponding code examples. 1. Nginx traffic analysis Nginx provides many built-in variables that can be used to analyze traffic. Among them, commonly used
 Implementing Role-Based Access Control (RBAC): Using PHP and RBAC
Jun 20, 2023 pm 10:39 PM
Implementing Role-Based Access Control (RBAC): Using PHP and RBAC
Jun 20, 2023 pm 10:39 PM
With the popularity of Internet applications, we hope to protect data within the application to ensure that sensitive data is not misused or stolen. One of the solutions is to use role-based access control (RBAC). Role-based access control (RBAC) is an access control model based on the relationship between users and roles. The core idea of this model is to link the user's role to the access control operation, rather than linking the access control operation directly to the user. This approach improves the flexibility of access control,
 Nginx access control configuration to restrict access to specified users
Jul 04, 2023 am 10:37 AM
Nginx access control configuration to restrict access to specified users
Jul 04, 2023 am 10:37 AM
Nginx access control configuration to restrict access to specified users. In a web server, access control is an important security measure used to restrict access rights to specific users or IP addresses. As a high-performance web server, Nginx also provides powerful access control functions. This article will introduce how to use Nginx configuration to limit the access permissions of specified users, and provide code examples for reference. First, we need to prepare a basic Nginx configuration file. Assume we already have a website with a configuration file path of
