

How to leave S mode on Windows 10/11

Window in S mode is designed to provide enhanced security and performance by allowing installation of apps only from the Microsoft Store. While this feature helps prevent malware and ensure a secure computing environment, it may limit users who want to install apps from sources other than the Microsoft Store.
If you find yourself in this situation and keep asking yourself how to switch out of S Mode in Windows 10/11, then you are in the right place because we will walk you through how to use two different methods Steps to switch out of S mode in Windows 10/11 to ensure you enjoy the freedom of installing apps from anywhere you choose.
How to switch out of S Mode
By following the steps outlined in this guide, you can easily exit S Mode in Windows 10/11, whether you have a Microsoft account or not. Keep in mind that the switch is permanent and once you make the change, you will not be able to turn S Mode back on.
Exit S Mode with a Microsoft Account
To start the process, click the Windows menu and select the Settings icon that looks like a gear. Alternatively, you can use the keyboard shortcut Windows key I to quickly access the Settings panel.
After entering the "Settings" panel, please follow the steps below:
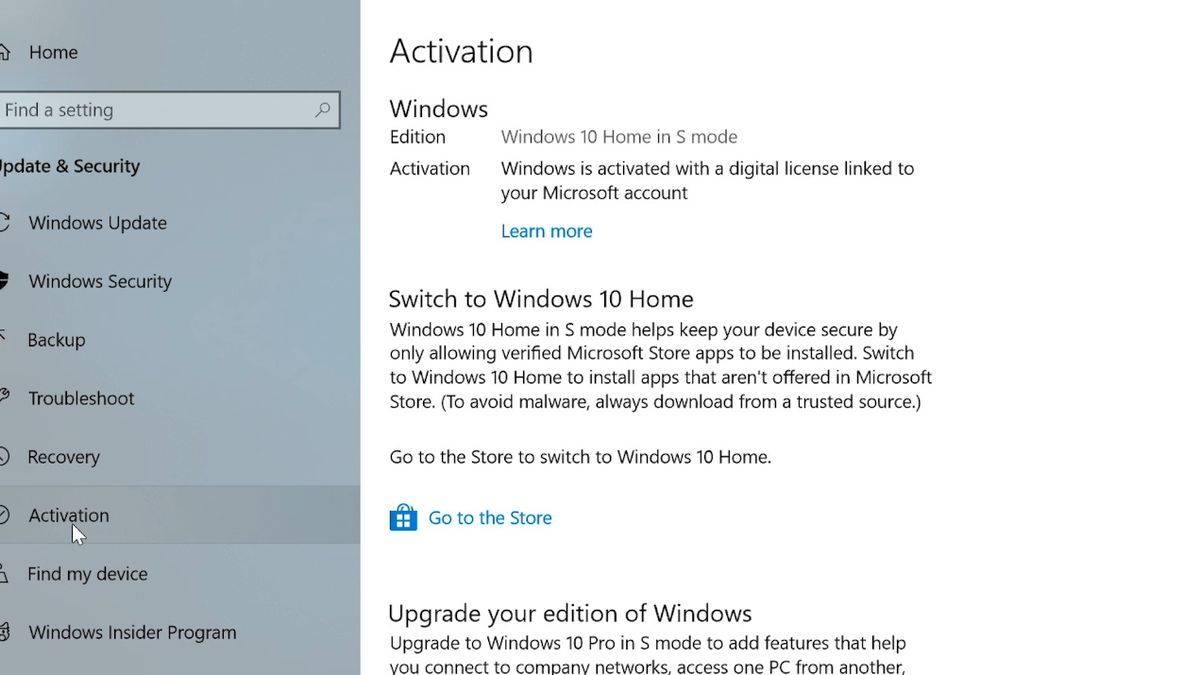
- Find and select the "Activate" option
- Confirm that you see Go to the "Windows 10/11 Home Edition is in S mode" message, which means your computer is currently in S mode and meets the switching conditions
- Select "Switch to Windows 10/ 11 Pro" and then select the "Go to Store" link
- Select "Upgrade your version of Windows"
- Click " Exit S Mode" button under the "Get" banner
After confirming the operation, your computer will no longer be in S mode and you will be able to Install apps outside the Microsoft Store.
Exiting S Mode using the BIOS
If If you do not have a Microsoft account and wish to disable S mode, you will need to turn off Secure Boot in UEFI (BIOS).
First boot your PC into Advanced Startup by following these steps:
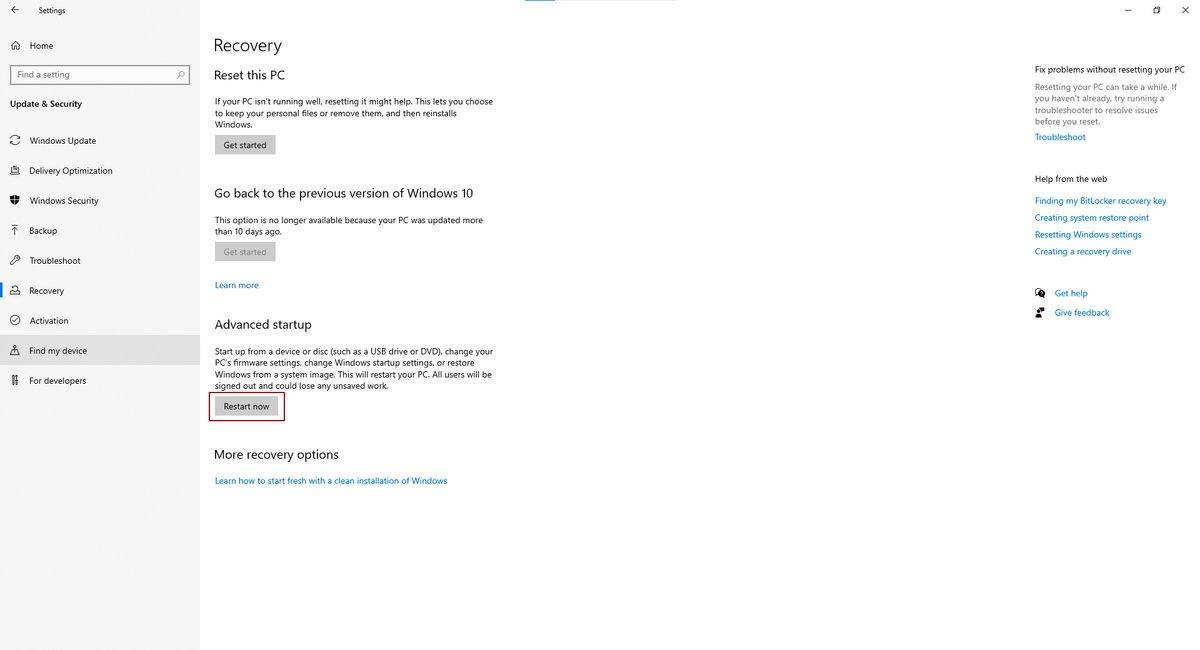
- Click the Start menu and select "Settings""
- Go to "System" and click "Recovery" "
- Select "Restart Now" next to "Advanced Startup" "
- Confirm the restart and your PC will boot to a blue screen with various options
In Advanced Startup Options, click "Troubleshoot ” and select “Advanced Options” and then select “UEFI Firmware Settings”. Your PC will now reboot to UEFI.
Location of Secure Boot Options Varies by computer model. For Dell PCs, it may be available in the "Secure Boot" method. For other manufacturers, check the "Boot" or "Boot Options" menu in UEFI.
Once you find the Secure Boot option, disable it. This will also disable features like Windows Hello and Bitlocker, but you can re-enable Secure Boot later.
After disabling Secure Boot, save your changes and exit UEFI. Your PC will boot to a standard version of Windows 10/11 without S mode.
The above is the detailed content of How to leave S mode on Windows 10/11. For more information, please follow other related articles on the PHP Chinese website!

Hot AI Tools

Undresser.AI Undress
AI-powered app for creating realistic nude photos

AI Clothes Remover
Online AI tool for removing clothes from photos.

Undress AI Tool
Undress images for free

Clothoff.io
AI clothes remover

Video Face Swap
Swap faces in any video effortlessly with our completely free AI face swap tool!
Hot Article
Hot Tools

Notepad++7.3.1
Easy-to-use and free code editor

SublimeText3 Chinese version
Chinese version, very easy to use

Zend Studio 13.0.1
Powerful PHP integrated development environment

Dreamweaver CS6
Visual web development tools

SublimeText3 Mac version
God-level code editing software (SublimeText3)
Hot Topics


 How to solve application startup error 0xc000012d problem
Jan 02, 2024 pm 12:53 PM
How to solve application startup error 0xc000012d problem
Jan 02, 2024 pm 12:53 PM
When a friend's computer is missing certain files, the application cannot start normally with error code 0xc000012d. In fact, it can be solved by re-downloading the files and installing them. The application cannot start normally 0xc000012d: 1. First, the user needs to download ".netframework". 2. Then find the download address and download it to your computer. 3. Then double-click on the desktop to start running. 4. After the installation is completed, return to the wrong program location and open the program again.
 What does WeChat's Do Not Disturb mode do?
Feb 23, 2024 pm 10:48 PM
What does WeChat's Do Not Disturb mode do?
Feb 23, 2024 pm 10:48 PM
What does WeChat Do Not Disturb mode mean? Nowadays, with the popularity of smartphones and the rapid development of mobile Internet, social media platforms have become an indispensable part of people's daily lives. WeChat is one of the most popular social media platforms in China, and almost everyone has a WeChat account. We can communicate with friends, family, and colleagues in real time through WeChat, share moments in our lives, and understand each other’s current situation. However, in this era, we are also inevitably faced with the problems of information overload and privacy leakage, especially for those who need to focus or
 What is sleep mode used for on iPhone?
Nov 04, 2023 am 11:13 AM
What is sleep mode used for on iPhone?
Nov 04, 2023 am 11:13 AM
iOS devices have long been able to track your sleep patterns and more using the Health app. But isn’t it annoying when you’re disturbed by notifications while you’re sleeping? These notifications may be irrelevant and therefore disrupt your sleep patterns in the process. While Do Not Disturb mode is a great way to avoid distractions while sleeping, it can cause you to miss important calls and messages you receive during the night. Thankfully, this is where sleep mode comes in. Let’s learn more about it and how to use it on iPhone. What role does sleep mode play on the iPhone? Sleep mode is a dedicated focus mode in iOS that is automatically activated based on your sleep schedule in the "Health" App. It helps you set an alarm and then
 How to set default camera focus on iPhone 15 Pro
Sep 22, 2023 pm 11:53 PM
How to set default camera focus on iPhone 15 Pro
Sep 22, 2023 pm 11:53 PM
On the iPhone 15 Pro model, Apple has introduced three focal length options for shooting with the main camera. This article explains what these options are and how to set your preferred default focal length for taking photos. To take full advantage of the enhanced camera system on iPhone 15 Pro and iPhone 15 Pro Max, Apple has added three different focal length options to the main camera’s optical zoom. In addition to the standard default 1x (24mm) mode, Apple has added 1.2x (28mm) and 1.5x (35mm) settings. iPhone 15 Pro users can choose from these focal lengths when taking photos by simply tapping the 1x button in the Camera app. However, due to technical reasons, these focal
 How to solve the computer prompt 'reboot and select proper boot device'
Jan 15, 2024 pm 02:00 PM
How to solve the computer prompt 'reboot and select proper boot device'
Jan 15, 2024 pm 02:00 PM
Reinstalling the system may not be a foolproof solution, but after reinstalling, I found that when the computer is turned on, it will display white text on a black background, and then give a prompt: rebootandselectproperbootdevice, what is going on? Such a prompt is usually caused by a boot error. In order to help everyone, the editor has brought you a solution. Computer use is becoming more and more popular, and computer failures are becoming more and more common. No, recently some users encountered a black screen when turning on the computer, and prompted Reboot and Select Proper Boot device, and the computer system could not start normally. What's going on? How to solve it? The user is confused. Next, the editor will follow
 Effective solutions and techniques for Ubuntu startup black screen problem
Dec 29, 2023 am 10:30 AM
Effective solutions and techniques for Ubuntu startup black screen problem
Dec 29, 2023 am 10:30 AM
Practical tips and methods to solve the black screen on Ubuntu startup Introduction: Ubuntu is a popular Linux operating system, but sometimes you may encounter a black screen problem during the startup process. This problem can be caused by a variety of reasons, such as graphics card driver issues, software conflicts, or system errors. This article will introduce some practical tips and methods to help solve the black screen problem at Ubuntu startup to ensure the stable operation of the system. 1. Update and reinstall the graphics card driver to enter recovery mode: press the Shift key during startup to enter
 What should I do if wps cannot start the source application of this object?
Mar 13, 2024 pm 09:13 PM
What should I do if wps cannot start the source application of this object?
Mar 13, 2024 pm 09:13 PM
WPS is a very widely used office software, including documents, forms and PPT, and supports multi-terminal synchronization. If the prompt "The source application for this object cannot be launched" appears when editing wps, how to solve it? This problem may occur because you are trying to open a link or file, but its source application no longer exists or has been deleted. Here are some fixes: 1. Reinstall WPS software: Try reinstalling WPSOffice to fix the problem and make sure you are using the latest version. 2. Manually change the default program: Try to change the default program to WPS. You can right-click the file you want to open, select "Open with", and then
 How to use block quotes in Apple Notes
Oct 12, 2023 pm 11:49 PM
How to use block quotes in Apple Notes
Oct 12, 2023 pm 11:49 PM
In iOS 17 and macOS Sonoma, Apple has added new formatting options for Apple Notes, including block quotes and a new Monostyle style. Here's how to use them. With additional formatting options in Apple Notes, you can now add block quotes to your notes. The block quote format makes it easy to visually offset sections of writing using the quote bar to the left of the text. Just tap/click the "Aa" format button and select the block quote option before typing or when you are on the line you want to convert to a block quote. This option applies to all text types, style options, and lists, including checklists. In the same Format menu you can find the new Single Style option. This is a revision of the previous "equal-width"