
 Web Front-end
JS Tutorial
Example analysis of the method of adding DOM nodes to the document using javascript
Web Front-end
JS Tutorial
Example analysis of the method of adding DOM nodes to the document using javascript
Example analysis of the method of adding DOM nodes to the document using javascript

This article mainly introduces the method of adding DOM nodes to documents in JavaScript, and compares and analyzes the two methods of node creation in JavaScript, involving related techniques of JavaScript node operation and running time calculation. Friends in need can refer to it. The details are as follows:
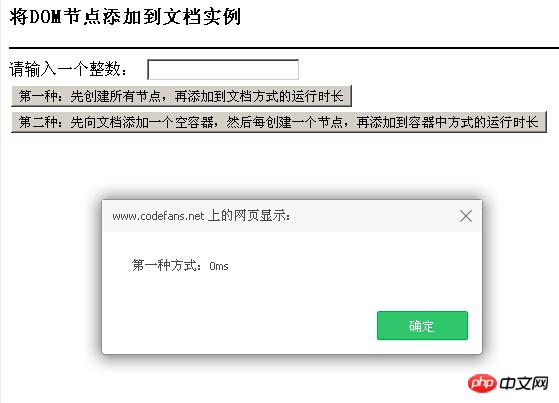
Here are two methods compared: the first one: create all nodes first, and then add them to the running time of the document; the second one: first add an empty container to the document, and then add each The running time of creating a node and then adding it to the container. From the test point of view, the second method is better than the first!
The operation effect is shown in the figure below:
The specific code is as follows:
<html xmlns="http://www.w3.org/1999/xhtml">
<head>
<meta http-equiv="Content-Type" content="text/html; charset=gb2312" />
<title>将DOM节点添加到文档实例</title>
</head>
<script type="text/javascript">
//第一种:先创建所有节点,再添加到文档
function createAdd(count)
{
  var start=new Date();
  var container=document.createElement("p");
  var obj=document.getElementById("main");
  for(var i=0;i<count;i++)
  {
    var node=document.createElement("p");
    node.style.position="absolute";
    node.style.left=(6+parseInt(Math.random()*100))+"px";
    node.style.top=(6+parseInt(Math.random()*100))+"px";
    container.appendChild(node);
  }
  obj.appendChild(container);
  var end=new Date();
  var duration=end-start;
  alert("第一种方式:"+duration+"ms");
}
//第二种:先添加到文档一个空容器,再创建所有接点,并分别添加到容器中
function addCreate(count)
{
  var start=new Date();
  var container=document.createElement("p");
  var obj=document.getElementById("main");
  obj.appendChild(container);
  for(var i=0;i<count;i++)
  {
    var node=document.createElement("p");
    node.style.position="absolute";
    node.style.left=(6+parseInt(Math.random()*100))+"px";
    node.style.top=(6+parseInt(Math.random()*100))+"px";
    container.appendChild(node);
  }
  var end=new Date();
  var duration=end-start;
  alert("第二种方式:"+duration+"ms");
}
//检测输入的数据是否正确
function checkData()
{
  var number=parseInt(document.getElementById("count").value);
  return number;
}
//调用createAdd()函数
function callCreateAdd()
{
  var count=checkData();
  createAdd(count);
}
//调用addCreate()函数
function callAddCreate()
{
  var count=checkData();
  addCreate(count);
}
</script>
<body>
<h3>将DOM节点添加到文档实例</h3>
<hr style="border:1px solid #000000;" />
请输入一个整数:
<input type="text" id="count" name="count" />
<br />
<input type="button" id="createadd" name="createadd" value="第一种:先创建所有节点,再添加到文档方式的运行时长" onClick="callCreateAdd();" />
<input type="button" id="one" name="one" value="第二种:先向文档添加一个空容器,然后每创建一个节点,再添加到容器中方式的运行时长" onClick="callAddCreate();" />
<br />
<p id="main" style="position:absolute;"></p>
</body>
</html>The above is the entire content of this chapter, more For related tutorials, please visit JavaScript Video Tutorial!

Hot AI Tools

Undresser.AI Undress
AI-powered app for creating realistic nude photos

AI Clothes Remover
Online AI tool for removing clothes from photos.

Undress AI Tool
Undress images for free

Clothoff.io
AI clothes remover

AI Hentai Generator
Generate AI Hentai for free.

Hot Article
Hot Tools

Notepad++7.3.1
Easy-to-use and free code editor

SublimeText3 Chinese version
Chinese version, very easy to use

Zend Studio 13.0.1
Powerful PHP integrated development environment

Dreamweaver CS6
Visual web development tools

SublimeText3 Mac version
God-level code editing software (SublimeText3)
Hot Topics


 Tutorial on adding a new hard drive in win11
Jan 05, 2024 am 09:39 AM
Tutorial on adding a new hard drive in win11
Jan 05, 2024 am 09:39 AM
When buying a computer, we may not necessarily choose a large hard drive. At this time, if we want to add a new hard drive to win11, we can first install the new hard drive we purchased, and then add partitions to the computer. Tutorial on adding a new hard drive in win11: 1. First, we disassemble the host and find the slot of the hard drive. 2. After finding it, we first connect the "data cable", which usually has a fool-proof design. If it cannot be inserted, just reverse the direction. 3. Then insert the new hard drive into the hard drive slot. 4. After inserting, connect the other end of the data cable to the computer's motherboard. 5. After the installation is completed, you can put it back into the host and turn it on. 6. After booting, we right-click "This Computer" and open "Computer Management" 7. After opening, click "Disk Management" in the lower left corner 8. Then on the right you can
 How to add a TV to Mijia
Mar 25, 2024 pm 05:00 PM
How to add a TV to Mijia
Mar 25, 2024 pm 05:00 PM
Many users are increasingly favoring the electronic ecosystem of Xiaomi smart home interconnection in modern life. After connecting to the Mijia APP, you can easily control the connected devices with your mobile phone. However, many users still don’t know how to add Mijia to their homes. app, then this tutorial guide will bring you the specific connection methods and steps, hoping to help everyone in need. 1. After downloading Mijia APP, create or log in to Xiaomi account. 2. Adding method: After the new device is powered on, bring the phone close to the device and turn on the Xiaomi TV. Under normal circumstances, a connection prompt will pop up. Select "OK" to enter the device connection process. If no prompt pops up, you can also add the device manually. The method is: after entering the smart home APP, click the 1st button on the lower left
 How to implement an online speech recognition system using WebSocket and JavaScript
Dec 17, 2023 pm 02:54 PM
How to implement an online speech recognition system using WebSocket and JavaScript
Dec 17, 2023 pm 02:54 PM
How to use WebSocket and JavaScript to implement an online speech recognition system Introduction: With the continuous development of technology, speech recognition technology has become an important part of the field of artificial intelligence. The online speech recognition system based on WebSocket and JavaScript has the characteristics of low latency, real-time and cross-platform, and has become a widely used solution. This article will introduce how to use WebSocket and JavaScript to implement an online speech recognition system.
 WebSocket and JavaScript: key technologies for implementing real-time monitoring systems
Dec 17, 2023 pm 05:30 PM
WebSocket and JavaScript: key technologies for implementing real-time monitoring systems
Dec 17, 2023 pm 05:30 PM
WebSocket and JavaScript: Key technologies for realizing real-time monitoring systems Introduction: With the rapid development of Internet technology, real-time monitoring systems have been widely used in various fields. One of the key technologies to achieve real-time monitoring is the combination of WebSocket and JavaScript. This article will introduce the application of WebSocket and JavaScript in real-time monitoring systems, give code examples, and explain their implementation principles in detail. 1. WebSocket technology
 Tutorial to quickly create desktop shortcuts in Win11
Dec 27, 2023 pm 04:29 PM
Tutorial to quickly create desktop shortcuts in Win11
Dec 27, 2023 pm 04:29 PM
In win11, we can quickly start software or files on the desktop by adding desktop shortcuts, and we only need to right-click the required files to operate. Add a desktop shortcut in win11: 1. Open "This PC" and find the file or software you want to add a desktop shortcut to. 2. After finding it, right-click to select it and click "Show more options" 3. Then select "Send to" - "Desktop Shortcut" 4. After the operation is completed, you can find the shortcut on the desktop.
 How to implement an online reservation system using WebSocket and JavaScript
Dec 17, 2023 am 09:39 AM
How to implement an online reservation system using WebSocket and JavaScript
Dec 17, 2023 am 09:39 AM
How to use WebSocket and JavaScript to implement an online reservation system. In today's digital era, more and more businesses and services need to provide online reservation functions. It is crucial to implement an efficient and real-time online reservation system. This article will introduce how to use WebSocket and JavaScript to implement an online reservation system, and provide specific code examples. 1. What is WebSocket? WebSocket is a full-duplex method on a single TCP connection.
 How to add a new script in Tampermonkey-How to delete a script in Tampermonkey
Mar 18, 2024 pm 12:10 PM
How to add a new script in Tampermonkey-How to delete a script in Tampermonkey
Mar 18, 2024 pm 12:10 PM
Tampermonkey Chrome extension is a user script management plug-in that improves user efficiency and browsing experience through scripts. So how does Tampermonkey add new scripts? How to delete the script? Let the editor give you the answer below! How to add a new script to Tampermonkey: 1. Take GreasyFork as an example. Open the GreasyFork web page and enter the script you want to follow. The editor here chooses one-click offline download. 2. Select a script. , after entering the script page, you can see the button to install this script. 3. Click to install this script to come to the installation interface. Just click here to install. 4. We can see the installed one-click in the installation script.
 How to connect to Polygon network in MetaMask wallet? Tutorial guide for connecting MetaMask wallet to Polygon network
Jan 19, 2024 pm 04:36 PM
How to connect to Polygon network in MetaMask wallet? Tutorial guide for connecting MetaMask wallet to Polygon network
Jan 19, 2024 pm 04:36 PM
How to add a PolygonMainnet network To use MATIC (Polygon) with Metamask, you need to add a private network called "PolygonMainnet". Transferring in with the wrong network address can cause problems, so be sure to use the "PolygonMainnet" network before transferring out of $MATIC. The Metamask wallet is connected to the Ethereum mainnet by default, but we can simply add "PolygonMainnet" and use $MATIC. Just a few simple copy and paste steps and you're done. First, in the Metamask wallet, click on the network option in the upper right corner and select "C
