

How to fix device disabled (error code 22) in Windows 10/11

Is the “This device is disabled” code 22 error in Device Manager preventing you from using a new or old device on your PC? Don’t worry because we are here to help you solve this problem. A code 22 error means the device has been manually disabled and sometimes re-enabling it does not help. Whatever the cause, here are 10 ways to fix the “This device is disabled” code 22 error on Windows 10/PC and make that hardware work again.
1. Unplug and Reinsert New Hardware
The new hardware you plug into your PC may start working again after a quick removal and reinstallation. So if it's a device plugged in via USB, go ahead and unplug it. Then, wait a few seconds and plug it back in. Now, check if the device is showing up in Device Manager without error code.

If it is hardware installed in the motherboard slot inside the desktop computer, you must uninstall the device by opening it and performing and reinstall to perform the same operation.
2. Re-enable the hardware in Device Manager
If you haven't tried this fix yet, we recommend that you check to see if the device has been accidentally disabled. If this is the case, you need to enable it. So, follow these steps:
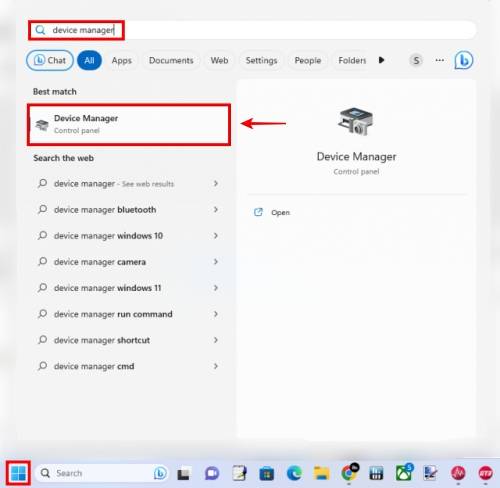
1. First, launch the search and open the Device Manager using the "Windows S" keyboard shortcut in Windows 11/10.
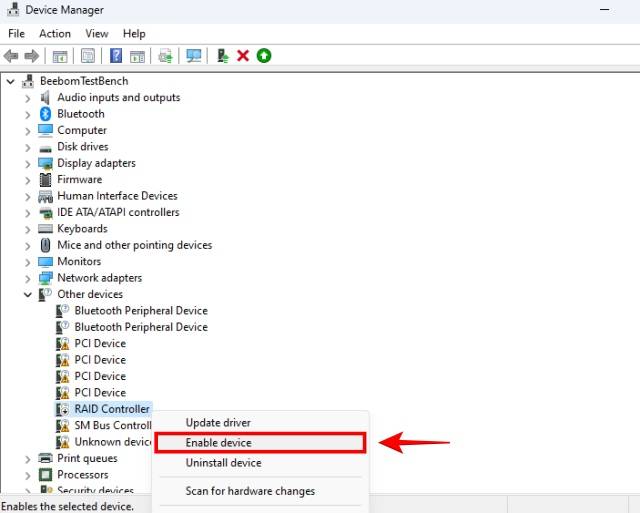
2. Next, right-click on the problematic device and click Enable Device.
3. Update your device
Another common reason why you may encounter a Code 22 error could be due to outdated drivers. We have a dedicated guide on how to update drivers in Windows 10/11, which includes native and third-party tools for downloading newer drivers. Windows Update also provides a driver repository for most drivers, so just update the driver in Device Manager.
1. Use the Windows S shortcut again to start the search and open Device Manager.
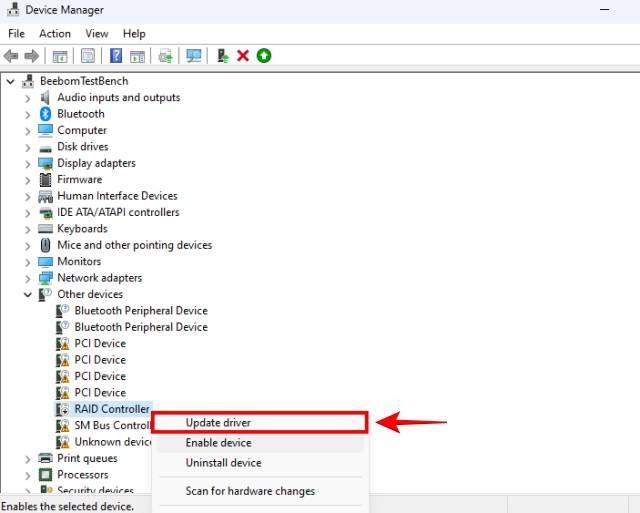
2. In Device Manager, right-click on the device suffering from Code 22 error. Now, click Update Driver.
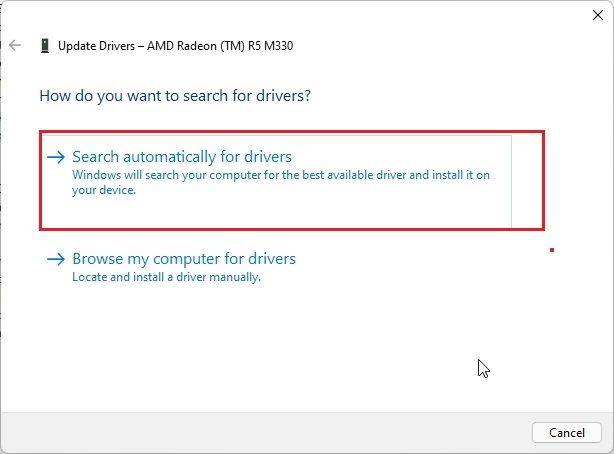
3. Next, click Search automatically for drivers.
4. Then, click "Search for updated drivers using Windows Update".
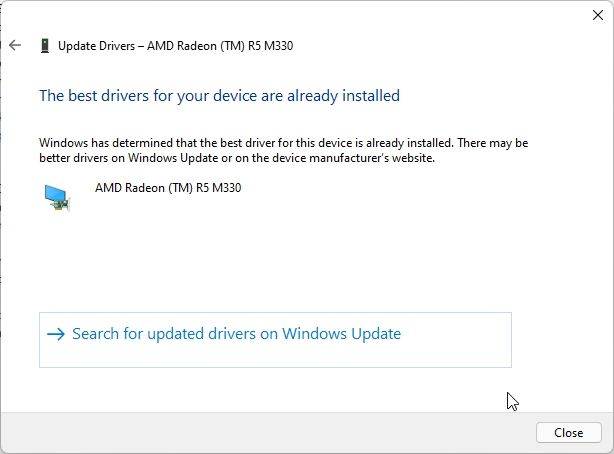
4. Windows will automatically download the latest, stable version of the driver for your hardware. This will hopefully fix the “This device is disabled” code 22 error on Windows 10/11.
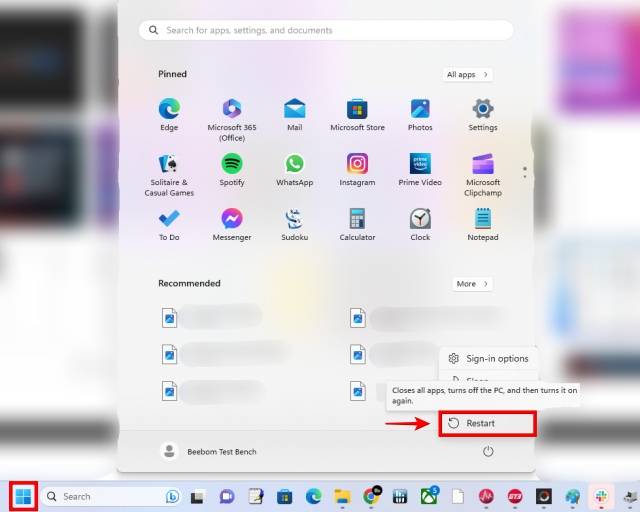
4. Restart your PC
Restarting your PC may be a mandatory step when setting up a new device, so try this now. You can restart your PC by clicking the Start menu and then clicking the power button. Here, click "Restart". Just turning the PC off and on will work too.
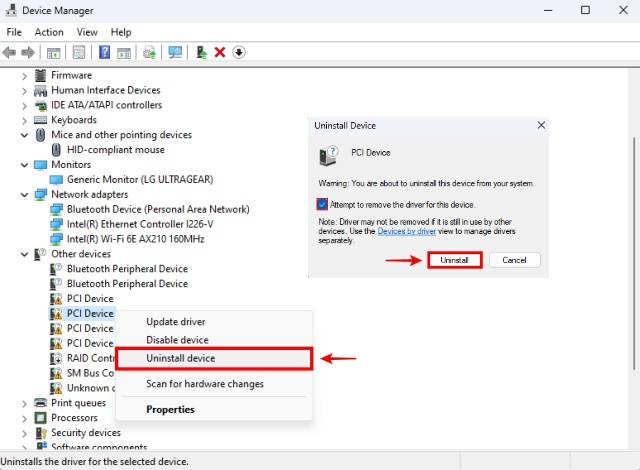
5. Completely uninstall the device driver
1. Open the Device Manager on your Windows 10/11 PC again.
2. Next, right-click on the device showing the code 22 error. Then, click "Uninstall device".
3. Additionally, you may choose to completely remove the driver for the device. Make sure this specific checkbox is checked.
6. Install older drivers
Newer drivers can cause problems, making them the culprit rather than the solution. Therefore, rolling back to an earlier version of the driver may fix the "This device is disabled" code 22 error for you. This is especially true if the device used to work fine but now has errors for some reason.
1. To roll back a driver, you need to find the manufacturer's web page, which contains a list of drivers released for your specific hardware.
2. Once you find this problem, find an older driver (months or weeks depending on when you started having problems) and download it from the manufacturer's website.
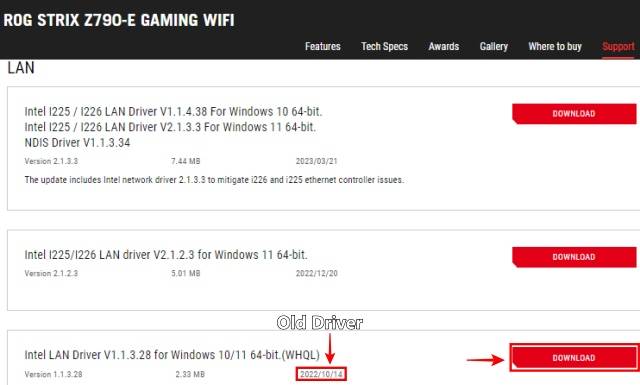
#2. Use the previous fix (fifth) to completely uninstall the device driver before proceeding to the next step. After uninstalling, do not update the driver.
3. Go to the location where you downloaded the old device driver and open the installation package. You may need to unzip (.zip) the file on Windows to access it. Follow the on-screen instructions to install the legacy driver.
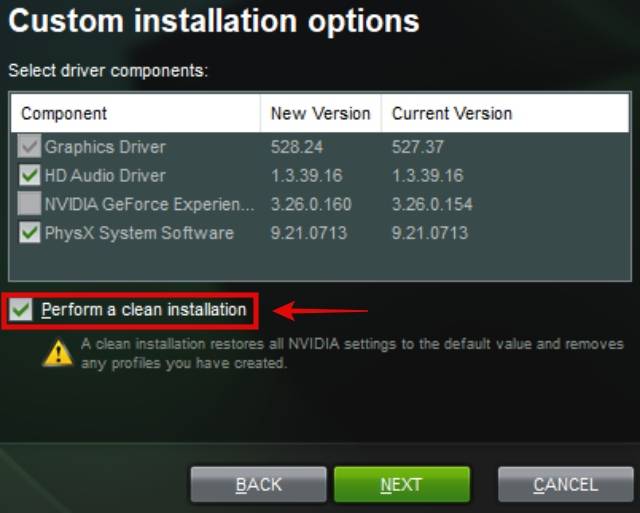
NOTE: By the way, if it is the GPU driver that is causing the Code 22 error, make sure to click the checkbox next to "Perform a clean installation." Once done, check if your device has started running optimally.
7. Perform a System Restore
If the "This device is disabled" code 22 error has recently started occurring, and your device was previously working fine, performing a system restore may resolve the issue . To perform a system restore, you need to already have a restore point. If you don't remember making a restore point, you can still perform this step because Windows and other programs tend to create restore points before making changes to the system.
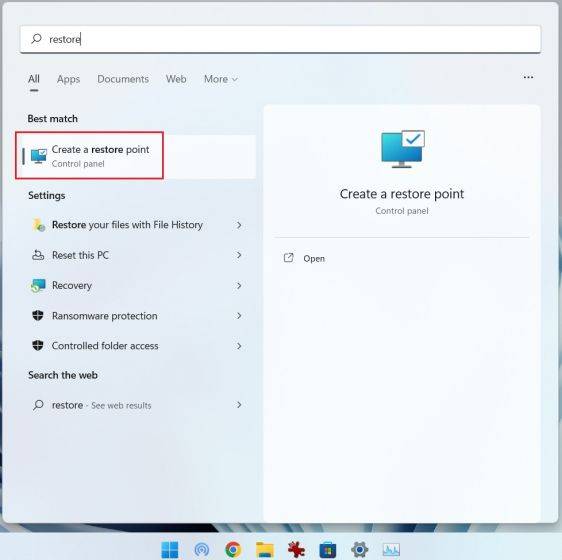
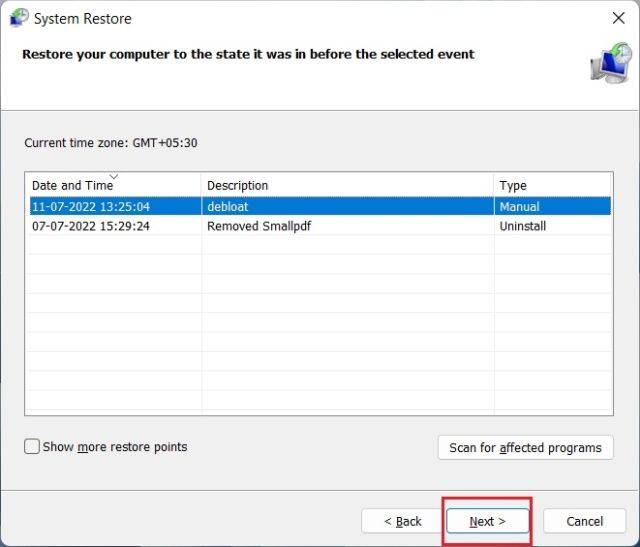
1. Use the keyboard shortcut Windows S to launch Windows Search. Then, type the words "Restore".
2. When the suggested result "Create a restore point" pops up, click it.
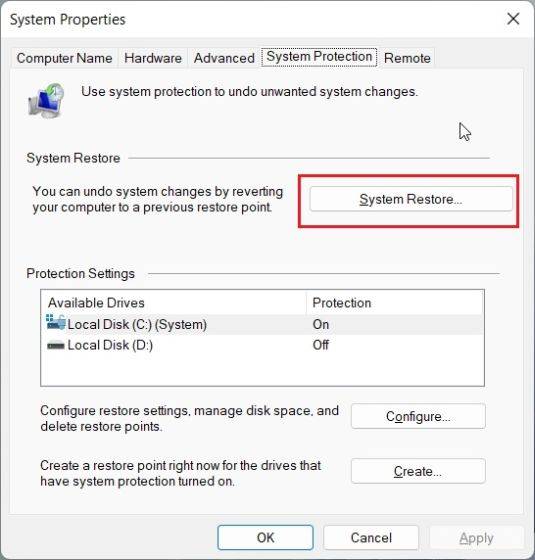
3. Next, click “System Restore”. When the "System Restore" window pops up, click "Next".
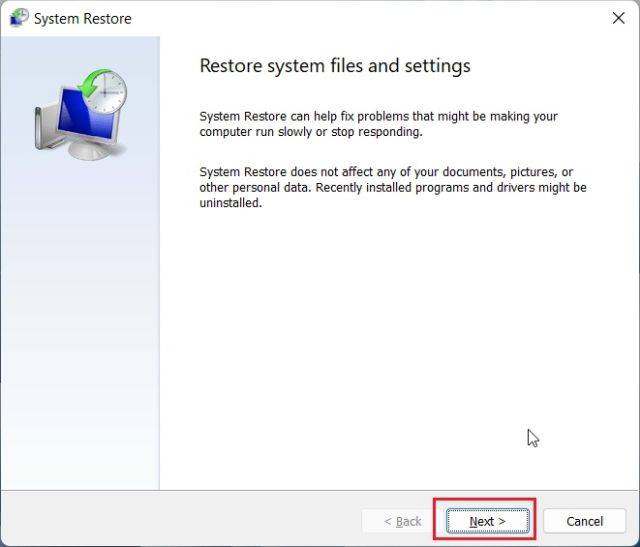
4. Find a restore point with a suitable date and time that is close to showing the Code 22 error The device did not have any issues within the time frame. Once you find the right one, click on it and then click Next. On the last screen, it will ask you to confirm the restore point. Click "Done".
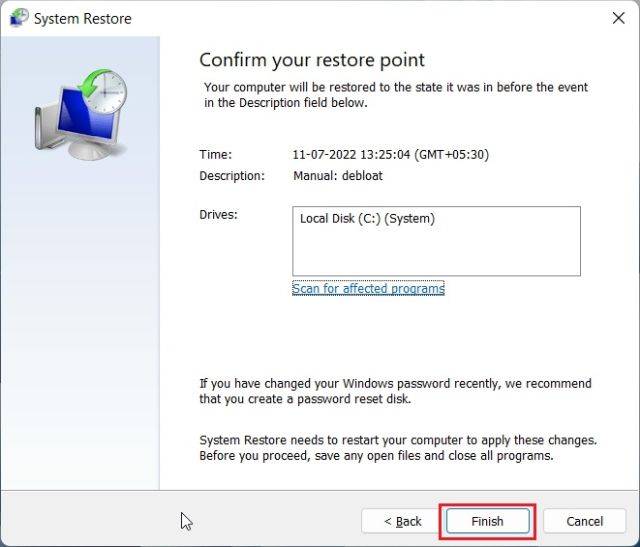
5. Windows will now perform a system restore, which may take some time. After that, the "This device is disabled with code 22" error will disappear as long as the problem did not occur at the specific time when the restore point was created.
6. If you don’t have any system restore points, you need to reset your PC. This involves factory resetting your PC from Windows Setup, or performing a clean installation of Windows 11 using a media creation tool or a USB drive. This is your only option if you don't have a system restore point
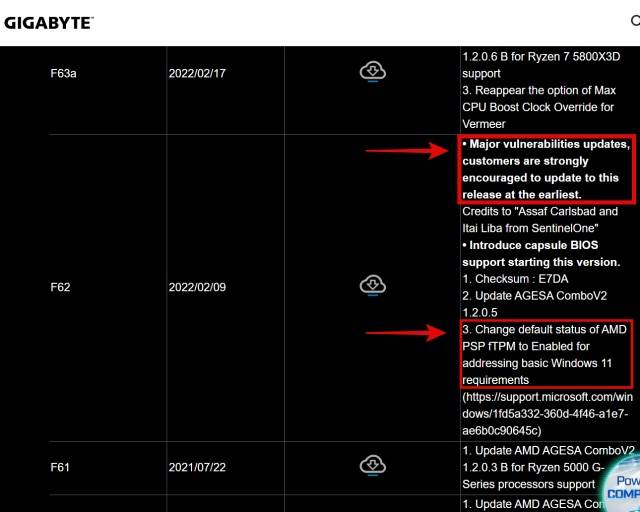
8. Update your BIOS
Updating your BIOS/UEFI to the latest version is optional in most cases, but In some cases, the latest BIOS updates contain necessary vulnerability patches, firmware updates, and hotfixes for your hardware. Therefore, please follow the recommended instructions recommended by the manufacturer to update your BIOS.
9. Reset BIOS settings
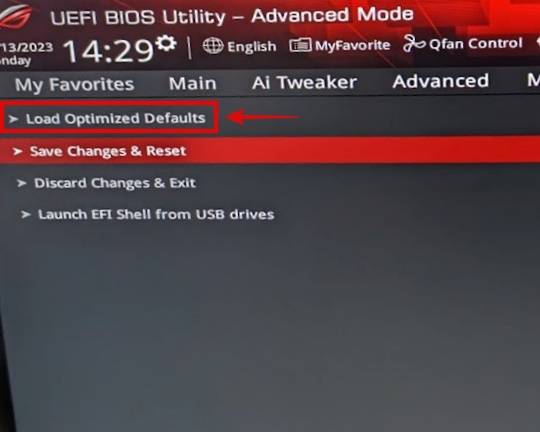
Resetting BIOS settings to default can definitely help solve the code 22 error, especially if recent changes in settings are causing the problem. So, when your PC boots up press F2/Delete to enter the BIOS (here are more ways to enter BIOS/EUFI in Windows PC) and then navigate to the last menu.
In most cases you will find the "Reset BIOS settings to defaults" option here. In our case (ROG Z790-E motherboard) it's called "Load Optimized Default". When you find this setting in your PC's BIOS, go ahead and select it. After resetting the BIOS, your PC will restart. If necessary, refer to the official instruction manual to reset the BIOS.
10. Replace the device
If all else fails, you may need to replace the device with a new one to resolve the problem in Windows 22 or 10 "Code is disabled for this device" 11 error.
The above is the detailed content of How to fix device disabled (error code 22) in Windows 10/11. For more information, please follow other related articles on the PHP Chinese website!

Hot AI Tools

Undresser.AI Undress
AI-powered app for creating realistic nude photos

AI Clothes Remover
Online AI tool for removing clothes from photos.

Undress AI Tool
Undress images for free

Clothoff.io
AI clothes remover

AI Hentai Generator
Generate AI Hentai for free.

Hot Article
Hot Tools

Notepad++7.3.1
Easy-to-use and free code editor

SublimeText3 Chinese version
Chinese version, very easy to use

Zend Studio 13.0.1
Powerful PHP integrated development environment

Dreamweaver CS6
Visual web development tools

SublimeText3 Mac version
God-level code editing software (SublimeText3)
Hot Topics


 How to enable or disable DLNA on Windows 11
Sep 28, 2023 pm 11:05 PM
How to enable or disable DLNA on Windows 11
Sep 28, 2023 pm 11:05 PM
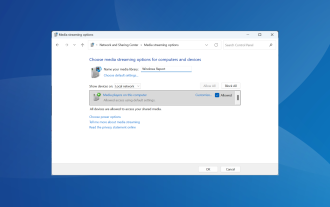
DLNA streaming has been around for a long time and is considered one of the more user-friendly options. Given its compatibility with a variety of devices and systems, you shouldn’t have problems connecting to one. So, let us understand how to enable DLNA in Windows 11. There are two methods, use the built-in Windows DLNA (Digital Living Network Alliance) feature or install a third-party application. While the former works well and provides the best experience, you can try the app with its enhanced feature set. We will list both options. What are the benefits of using DLNA? DLNA allows media streaming across devices on the network, provided the streaming device is compatible with the standard. Once set up on a smart TV or other system, you can
 Windows 11 Guide: How to adjust the display resolution in Hyper-V
Sep 23, 2023 pm 08:25 PM
Windows 11 Guide: How to adjust the display resolution in Hyper-V
Sep 23, 2023 pm 08:25 PM
If you are using Hyper-V to run virtual machines on a Windows 11 machine, you may need to change the display resolution of one or both VMs. In this guide, we will introduce simple methods and step-by-step instructions to adjust and optimize display resolution in Hyper-V environment. How to adjust screen resolution in Hyper-V? Before moving on to the detailed steps to change Hyper-V screen resolution on Windows 11, be sure to complete the following checks for smoother operation: Make sure you are logged in with an administrator account. Make sure graphics drivers are updated. Back up important data in the VM. Make sure Hyper-V is enabled. 1. Setting up using Hyper-V First, we will enable enhanced session mode; for this
 Solution: Your organization requires you to change your PIN
Oct 04, 2023 pm 05:45 PM
Solution: Your organization requires you to change your PIN
Oct 04, 2023 pm 05:45 PM
The message "Your organization has asked you to change your PIN" will appear on the login screen. This happens when the PIN expiration limit is reached on a computer using organization-based account settings, where they have control over personal devices. However, if you set up Windows using a personal account, the error message should ideally not appear. Although this is not always the case. Most users who encounter errors report using their personal accounts. Why does my organization ask me to change my PIN on Windows 11? It's possible that your account is associated with an organization, and your primary approach should be to verify this. Contacting your domain administrator can help! Additionally, misconfigured local policy settings or incorrect registry keys can cause errors. Right now
 Error code 801c03ed: How to fix it on Windows 11
Oct 04, 2023 pm 06:05 PM
Error code 801c03ed: How to fix it on Windows 11
Oct 04, 2023 pm 06:05 PM
Error 801c03ed is usually accompanied by the following message: Administrator policy does not allow this user to join the device. This error message will prevent you from installing Windows and joining a network, thereby preventing you from using your computer, so it is important to resolve this issue as soon as possible. What is error code 801c03ed? This is a Windows installation error that occurs due to the following reason: Azure setup does not allow new users to join. Device objects are not enabled on Azure. Hardware hash failure in Azure panel. How to fix error code 03c11ed on Windows 801? 1. Check Intune settings Log in to Azure portal. Navigate to Devices and select Device Settings. Change "Users can
 How to show folder size on Windows 11?
Sep 23, 2023 pm 06:13 PM
How to show folder size on Windows 11?
Sep 23, 2023 pm 06:13 PM
By default, Windows 11 does not display folder sizes in File Explorer, however, you can make certain changes in Explorer settings to make them visible. In this guide, we will discuss some of the easiest ways to display folder sizes so that you can effectively manage disk space on your PC. How to check the size of a folder on Windows 11? 1. Use the folder's Properties window to open a Windows Explorer window by pressing +. WindowsE Go to the folder whose size you want to check, right-click on it and select "Properties" from the context menu. In the folder properties window, go to the "General" tab and find the "Size" section to find out how much space the folder takes up. 2. Enable "
 Detailed introduction to the difference between NVIDIA graphics card driver Game ready and Studio
Mar 14, 2024 am 10:00 AM
Detailed introduction to the difference between NVIDIA graphics card driver Game ready and Studio
Mar 14, 2024 am 10:00 AM
NVIDIA is a graphics card brand used by many users, that is, N card. However, some users found that there are Gameready and Studio when downloading the graphics card driver. Is there any difference? Let’s take a look at the detailed introduction of the difference between NVIDIA graphics card driver Gameready and Studio. Gameready is a product of NVIDIA graphics cards optimized for the gaming field, while the Studio series is aimed at professional users and optimizes the experience of using productivity software. These two series of graphics cards provide the best performance and stability for different application fields to meet users' needs for games and professional software. 2. The frequency of updates is different: gameready is updated frequently and will be released
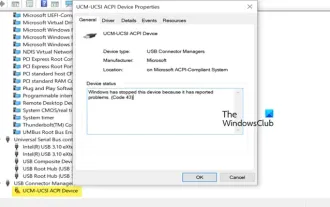 UCM in Windows 11/10 - UCSI VPI device driver error
Mar 24, 2024 am 09:50 AM
UCM in Windows 11/10 - UCSI VPI device driver error
Mar 24, 2024 am 09:50 AM
UCM-UCSIVPI is crucial to your computer because it is responsible for managing the USB Type-C port. When you encounter error messages for this driver in Device Manager, it will affect the normal working of your USB Type-C port. Therefore, it is crucial to resolve this issue promptly and this article will guide you on how to resolve the issues caused by this error message. UCM-UCSIACPI, Windows has stopped this device because it reported a problem (code 43). What is UCM—UCSIVPI device driver? Microsoft provides a driver that complies with the USB Type-C Connector System Software Interface (UCSI) specification for TPI transmission. If your system is configured
 How to Completely Remove Unwanted Display Languages on Windows 11
Sep 24, 2023 pm 04:25 PM
How to Completely Remove Unwanted Display Languages on Windows 11
Sep 24, 2023 pm 04:25 PM
Work on the same setup for too long or share your PC with others. You may have some language packs installed, which often create conflicts. So, it’s time to remove unwanted display languages in Windows 11. Speaking of conflicts, when there are multiple language packs, inadvertently pressing Ctrl+Shift changes the keyboard layout. If not taken care of, this can be a hindrance to the task at hand. So, let’s jump right into the method! How to remove display language from Windows 11? 1. From Settings press + to open the Settings app, go to Time & Language from the navigation pane and click on Language & Region. WindowsI click the ellipsis next to the display language you want to remove and select Remove from the pop-up menu. Click "