
 Web Front-end
H5 Tutorial
Example tutorial HTML5 Canvas super cool fireworks bloom animation implementation code_html5 tutorial skills
Web Front-end
H5 Tutorial
Example tutorial HTML5 Canvas super cool fireworks bloom animation implementation code_html5 tutorial skills
Example tutorial HTML5 Canvas super cool fireworks bloom animation implementation code_html5 tutorial skills

This is a cool HTML5 Canvas animation. It will simulate the animated special effects of fireworks blooming in our real life. The effect is very realistic, but after all, it is a computer simulation. Even if you take your girlfriend to watch it, the effect is still a bit poor. ,hehe. One thing that is outstanding about this HTML5 Canvas animation is its performance. There is basically no lag on Chrome, even if you set off a lot of fireworks.
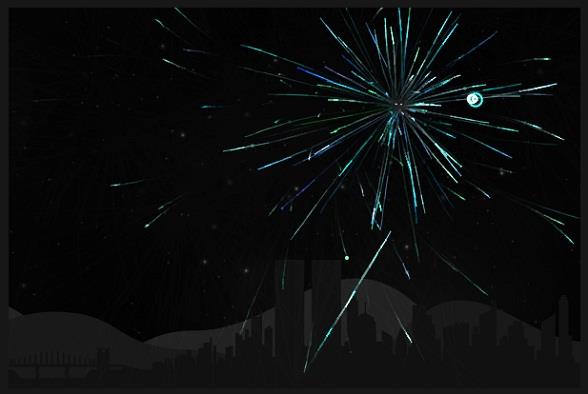
Let’s briefly analyze the process and code to implement this HTML5 firework special effect. It is mainly composed of HTML code, CSS code and Javascript code. Of course, the javascript code is the most important.
HTML code:
- <div id=”gui”>div>
- <div id=”canvas-container”> <div id=”mountains2″>div>
- <div id=”mountains1″ >div><div id=”skyline”>div> div>
The structure of HTML is very simple, that is, a canvas container is constructed, and we will use JS to generate a Canvas object in this container. You will know it by looking at the final JS code.
CSS code:
- #canvas-container { background: #000 url(bg.jpg); height: 400px; left: 50%; margin: -200px 0 0 -300px; position: absolute; top: 50%; width: 600px; z-index: 2;
- } canvas { cursor: crosshair; display: block; position: relative; z-index: 3;
- } canvas:active { cursor: crosshair;
- } #skyline { background: url(skyline.png) repeat-x 50% 0; bottombottom: 0; height: 135px; left: 0; position: absolute; width: 100%; z-index: 1;
- } #mountains1 { background: url(mountains1.png) repeat-x 40% 0; bottombottom: 0; height: 200px; left: 0; position: absolute; width: 100%; z-index: 1;
- } #mountains2 { background: url(mountains2.png) repeat-x 30% 0; bottombottom: 0; height: 250px; left: 0; position: absolute; width: 100%; z-index: 1;
- } #gui { rightright: 0; position: fixed; top: 0; z-index: 3;
- }
The CSS code is nothing special, it mainly defines the background color and border.
Next is the most important Javascript code.
Javascript code:
- self.init = function(){
- self.dt = 0;
- self.oldTime = Date.now();
- self.canvas = document.createElement('canvas');
- self.canvasContainer = $('#canvas-container'); var canvasContainerDisabled = document.getElementById('canvas-container');
- self.canvas.onselectstart = function() { return false;
- };
- self.canvas.width = self.cw = 600;
- self.canvas.height = self.ch = 400;
- self.particles = [];
- self.partCount = 30;
- self.fireworks = [];
- self.mx = self.cw/2;
- self.my = self.ch/2;
- self.currentHue = 170;
- self.partSpeed = 5;
- self.partSpeedVariance = 10;
- self.partWind = 50;
- self.partFriction = 5;
- self.partGravity = 1;
- self.hueMin = 150;
- self.hueMax = 200;
- self.fworkSpeed = 2;
- self.fworkAccel = 4;
- self.hueVariance = 30;
- self.flickerDensity = 20;
- self.showShockwave = false;
- self.showTarget = true;
- self.clearAlpha = 25;
- self.canvasContainer.append(self.canvas);
- self.ctx = self.canvas.getContext('2d');
- self.ctx.lineCap = 'round';
- self.ctx.lineJoin = 'round';
- self.lineWidth = 1;
- self.bindEvents();
- self.canvasLoop();
- self.canvas.onselectstart = function() { return false;
- };
- };
This JS code mainly constructs a Canvas object in the canvas container, and initializes the appearance and animation properties of the canvas object.
- var Particle = function(x, y, hue){ this.x = x; this.y = y; this.coordLast = [
- {x: x, y: y},
- {x: x, y: y},
- {x: x, y: y}
- ]; this.angle = rand(0, 360); this.speed = rand(((self.partSpeed - self.partSpeedVariance) <= 0) ? 1 : self.partSpeed - self.partSpeedVariance, (self.partSpeed self.partSpeedVariance)); this.friction = 1 - self.partFriction/100; this.gravity = self.partGravity/2; this.hue = rand(hue-self.hueVariance, hue self.hueVariance); this.brightness = rand(50, 80); this.alpha = rand(40,100)/100; this.decay = rand(10, 50)/1000; this.wind = (rand(0, self.partWind) - (self.partWind/2))/25; this.lineWidth = self.lineWidth;
- };
- Particle.prototype.update = function(index){ var radians = this.angle * Math.PI / 180; var vx = Math.cos(radians) * this.speed; var vy = Math.sin(radians) * this.speed this.gravity; this.speed *= this.friction; this.coordLast[2].x = this.coordLast[1].x; this.coordLast[2].y = this.coordLast[1].y; this.coordLast[1].x = this.coordLast[0].x; this.coordLast[1].y = this.coordLast[0].y; this.coordLast[0].x = this.x; this.coordLast[0].y = this.y; this.x = vx * self.dt; this.y = vy * self.dt; this.angle = this.wind; this.alpha -= this.decay; if(!hitTest(0,0,self.cw,self.ch,this.x-this.radius, this.y-this.radius, this.radius*2, this.radius*2) || this.alpha < .05){
- self.particles.splice(index, 1);
- }
- };
- Particle.prototype.draw = function(){ var coordRand = (rand(1,3)-1);
- self.ctx.beginPath();
- self.ctx.moveTo(Math.round(this.coordLast[coordRand].x), Math.round(this.coordLast[coordRand].y));
- self.ctx.lineTo(Math.round(this.x), Math.round(this.y));
- self.ctx.closePath();
- self.ctx.strokeStyle = 'hsla(' this.hue ', 100%, ' this.brightness '%, ' this.alpha ')';
- self.ctx.stroke(); if(self.flickerDensity > 0){ var inverseDensity = 50 - self.flickerDensity; if(rand(0, inverseDensity) === inverseDensity){
- self.ctx.beginPath();
- self.ctx.arc(Math.round(this.x), Math.round(this.y), rand(this.lineWidth,this.lineWidth 3)/2, 0, Math.PI*2, false) self.ctx.closePath(); var randAlpha = rand(50,100)/100;
- self.ctx.fillStyle = 'hsla(' this.hue ', 100%, ' this.brightness '%, ' randAlpha ')';
- self.ctx.fill();
- }
- }
- };
这段JS代码的功能是实现烟花爆炸后的小颗粒的绘制,从draw方法中可以看出,创建几个随机点,烟花颗粒即可在这个范围的随机点中散落。
- var Firework = function(startX, startY, targetX, targetY){ this.x = startX; this.y = startY; this.startX = startX; this.startY = startY; this.hitX = false; this.hitY = false; this.coordLast = [
- {x: startX, y: startY},
- {x: startX, y: startY},
- {x: startX, y: startY}
- ]; this.targetX = targetX; this.targetY = targetY; this.speed = self.fworkSpeed; this.angle = Math.atan2(targetY - startY, targetX - startX); this.shockwaveAngle = Math.atan2(targetY - startY, targetX - startX) (90*(Math.PI/180)); this.acceleration = self.fworkAccel/100; this.hue = self.currentHue; this.brightness = rand(50, 80); this.alpha = rand(50,100)/100; this.lineWidth = self.lineWidth; this.targetRadius = 1;
- };
- Firework.prototype.update = function(index){
- self.ctx.lineWidth = this.lineWidth;
- vx = Math.cos(this.angle) * this.speed,
- vy = Math.sin(this.angle) * this.speed; this.speed *= 1 this.acceleration; this.coordLast[2].x = this.coordLast[1].x; this.coordLast[2].y = this.coordLast[1].y; this.coordLast[1].x = this.coordLast[0].x; this.coordLast[1].y = this.coordLast[0].y; this.coordLast[0].x = this.x; this.coordLast[0].y = this.y; if(self.showTarget){ if(this.targetRadius < 8){ this.targetRadius = .25 * self.dt;
- } else { this.targetRadius = 1 * self.dt;
- }
- } if(this.startX >= this.targetX){ if(this.x vx <= this.targetX){ this.x = this.targetX; this.hitX = true;
- } else { this.x = vx * self.dt;
- }
- } else { if(this.x vx >= this.targetX){ this.x = this.targetX; this.hitX = true;
- } else { this.x = vx * self.dt;
- }
- } if(this.startY >= this.targetY){ if(this.y vy <= this.targetY){ this.y = this.targetY; this.hitY = true;
- } else { this.y = vy * self.dt;
- }
- } else { if(this.y vy >= this.targetY){ this.y = this.targetY; this.hitY = true;
- } else { this.y = vy * self.dt;
- }
- } if(this.hitX && this.hitY){ var randExplosion = rand(0, 9);
- self.createParticles(this.targetX, this.targetY, this.hue);
- self.fireworks.splice(index, 1);
- }
- };
- Firework.prototype.draw = function(){
- self.ctx.lineWidth = this.lineWidth; var coordRand = (rand(1,3)-1);
- self.ctx.beginPath();
- self.ctx.moveTo(Math.round(this.coordLast[coordRand].x), Math.round(this.coordLast[coordRand].y));
- self.ctx.lineTo(Math.round(this.x), Math.round(this.y));
- self.ctx.closePath();
- self.ctx.strokeStyle = 'hsla(' this.hue ', 100%, ' this.brightness '%, ' this.alpha ')';
- self.ctx.stroke(); if(self.showTarget){
- self.ctx.save();
- self.ctx.beginPath();
- self.ctx.arc(Math.round(this.targetX), Math.round(this.targetY), this.targetRadius, 0, Math.PI*2, false)
- self.ctx.closePath();
- self.ctx.lineWidth = 1;
- self.ctx.stroke();
- self.ctx.restore();
- } if(self.showShockwave){
- self.ctx.save();
- self.ctx.translate(Math.round(this.x), Math.round(this.y));
- self.ctx.rotate(this.shockwaveAngle);
- self.ctx.beginPath();
- self.ctx.arc(0, 0, 1*(this.speed/5), 0, Math.PI, true);
- self.ctx.strokeStyle = 'hsla(' this.hue ', 100%, ' this.brightness '%, ' rand(25, 60)/100 ')';
- self.ctx.lineWidth = this.lineWidth;
- self.ctx.stroke();
- self.ctx.restore();
- }
- };
这段JS代码是创建烟花实例的,我们也可以从draw方法中看出,当我们鼠标点击画布中的某点时,烟花发射的目的地就在那个点上。
这款HTML5 Canvas烟花效果的核心代码就是这样,谢谢阅读,希望能帮到大家,请继续关注脚本之家,我们会努力分享更多优秀的文章。

Hot AI Tools

Undresser.AI Undress
AI-powered app for creating realistic nude photos

AI Clothes Remover
Online AI tool for removing clothes from photos.

Undress AI Tool
Undress images for free

Clothoff.io
AI clothes remover

AI Hentai Generator
Generate AI Hentai for free.

Hot Article
Hot Tools

Notepad++7.3.1
Easy-to-use and free code editor

SublimeText3 Chinese version
Chinese version, very easy to use

Zend Studio 13.0.1
Powerful PHP integrated development environment

Dreamweaver CS6
Visual web development tools

SublimeText3 Mac version
God-level code editing software (SublimeText3)
Hot Topics
 1376
1376
 52
52

 How do I use viewport meta tags to control page scaling on mobile devices?
Mar 13, 2025 pm 08:00 PM
How do I use viewport meta tags to control page scaling on mobile devices?
Mar 13, 2025 pm 08:00 PM
The article discusses using viewport meta tags to control page scaling on mobile devices, focusing on settings like width and initial-scale for optimal responsiveness and performance.Character count: 159
 How to run the h5 project
Apr 06, 2025 pm 12:21 PM
How to run the h5 project
Apr 06, 2025 pm 12:21 PM
Running the H5 project requires the following steps: installing necessary tools such as web server, Node.js, development tools, etc. Build a development environment, create project folders, initialize projects, and write code. Start the development server and run the command using the command line. Preview the project in your browser and enter the development server URL. Publish projects, optimize code, deploy projects, and set up web server configuration.
 How do I handle user location privacy and permissions with the Geolocation API?
Mar 18, 2025 pm 02:16 PM
How do I handle user location privacy and permissions with the Geolocation API?
Mar 18, 2025 pm 02:16 PM
The article discusses managing user location privacy and permissions using the Geolocation API, emphasizing best practices for requesting permissions, ensuring data security, and complying with privacy laws.
 How do I use the HTML5 Page Visibility API to detect when a page is visible?
Mar 13, 2025 pm 07:51 PM
How do I use the HTML5 Page Visibility API to detect when a page is visible?
Mar 13, 2025 pm 07:51 PM
The article discusses using the HTML5 Page Visibility API to detect page visibility, improve user experience, and optimize resource usage. Key aspects include pausing media, reducing CPU load, and managing analytics based on visibility changes.
 How do I use the HTML5 Drag and Drop API for interactive user interfaces?
Mar 18, 2025 pm 02:17 PM
How do I use the HTML5 Drag and Drop API for interactive user interfaces?
Mar 18, 2025 pm 02:17 PM
The article explains how to use the HTML5 Drag and Drop API to create interactive user interfaces, detailing steps to make elements draggable, handle key events, and enhance user experience with custom feedback. It also discusses common pitfalls to a
 Does H5 page production require continuous maintenance?
Apr 05, 2025 pm 11:27 PM
Does H5 page production require continuous maintenance?
Apr 05, 2025 pm 11:27 PM
The H5 page needs to be maintained continuously, because of factors such as code vulnerabilities, browser compatibility, performance optimization, security updates and user experience improvements. Effective maintenance methods include establishing a complete testing system, using version control tools, regularly monitoring page performance, collecting user feedback and formulating maintenance plans.
 What exactly does H5 page production mean?
Apr 06, 2025 am 07:18 AM
What exactly does H5 page production mean?
Apr 06, 2025 am 07:18 AM
H5 page production refers to the creation of cross-platform compatible web pages using technologies such as HTML5, CSS3 and JavaScript. Its core lies in the browser's parsing code, rendering structure, style and interactive functions. Common technologies include animation effects, responsive design, and data interaction. To avoid errors, developers should be debugged; performance optimization and best practices include image format optimization, request reduction and code specifications, etc. to improve loading speed and code quality.
 How to make h5 click icon
Apr 06, 2025 pm 12:15 PM
How to make h5 click icon
Apr 06, 2025 pm 12:15 PM
The steps to create an H5 click icon include: preparing a square source image in the image editing software. Add interactivity in the H5 editor and set the click event. Create a hotspot that covers the entire icon. Set the action of click events, such as jumping to the page or triggering animation. Export H5 documents as HTML, CSS, and JavaScript files. Deploy the exported files to a website or other platform.
