 Backend Development
 Python Tutorial
 Recommended collection | 1 Python library, 4 awesome functions!
Recommended collection | 1 Python library, 4 awesome functions!
Today I introduce a Python library[filestools], which is written by a very familiar person Developed by a boss.
Ⅰ Tree directory Display; Ⅱ Text file difference comparison; Ⅲ Picture watermark; Ⅳ Convert the curl network request command into the requests library request code;
pip install filestools -i https://pypi.org/simple/ -U
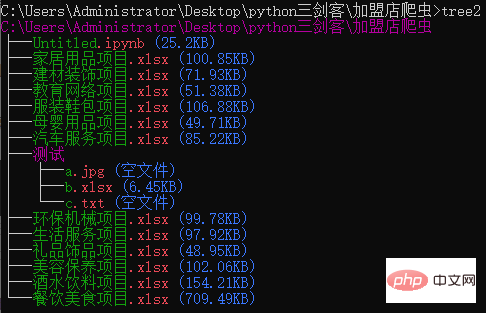
This function can help us display recursively , all files and folders in the specified directory, and the size of each file and folder is displayed at a glance.
# 这样即可将C盘,切换到D盘
C:\Users\Administrator>D:

# 使用cd命令,可以切换到指定盘的指定目录
C:\Users\Administrator>cd C:\Users\Administrator\Desktop\python三剑客\加盟店爬虫
- If in your system, the local python priority is higher than the priority of the system environment, directly execute the tree command;
- If your system has a higher priority than the local python environment, in addition to adjusting the order of environment variables to modify the priority, you can also use the tree2 command, which is consistent with tree.But if you execute the tree command at this time, you will not see the effect;


from treedir.tree import tree_dir
tree_dir(r"C:\Users\Administrator\Desktop\python三剑客\加盟店爬虫", m_level=7, no_calc=False)
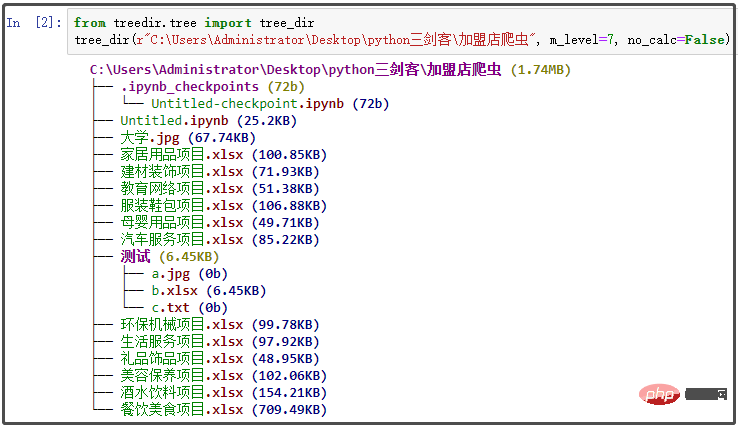
path:递归显示的目录路径,默认为当前目录; m_level:递归展示的最大层数,默认为7层; no_calc:指定该参数后,对于超过递归显示的最大层数的文件夹,不再继续递归计算文件夹大小;
2. 文本文件差异比较
<span style="font-size: 15px;">a.txt</span>文件,经过一段时间后,我对其中的内容做了修改,得到了最后的<span style="font-size: 15px;">b.txt</span>。
from filediff.diff import file_diff_compare
file_diff_compare("a.txt", "b.txt")<span style="font-size: 15px;">html</span>网页文件。
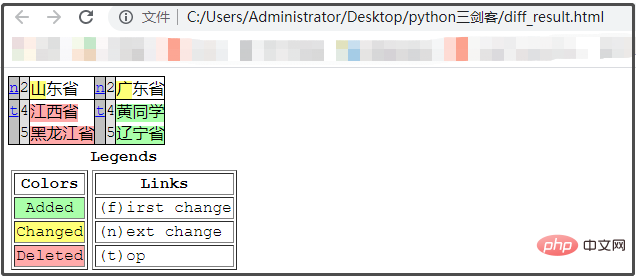
<span style="font-size: 15px;">黄色</span>表示改动过的内容,<span style="font-size: 15px;">绿色</span>表示新添加过的内容,<span style="font-size: 15px;">红色</span>表示已经删除过的内容。from filediff.diff import file_diff_compare file_diff_compare(file1, file2, diff_out='diff_result.html', max_width=70, numlines=0, show_all=False, no_browser=False)
file1 / file2:待比较的两个文件,必须文本文件; diff_out:差异结果保存的文件名(网页格式),默认值diff_result.html; max_width:每行超过多少字符就自动换行,默认值70; numlines:在差异行基础上前后显示多少行,默认是0; show_all:只要设置这个参数就表示显示全部原始数据,此时-n参数无效,默认不显示全部; no_browser:设置这个参数,在生成结果后,不会自动打开游览器。When set to False, the browser will automatically open;
3. Add watermark to pictures
<span style="font-size: 15px;">Picture with watermark</span>Code, the add_mark() function is called to add watermark to the picture.from watermarker.marker import add_mark # 注意:有些参数是默认参数,你可以随意修改的; add_mark(file, mark, out='output', color='#8B8B1B', size=30, opacity=0.15, space=75, angle=30)
file:待添加水印的照片; mark:使用哪些字作为水印; out:添加水印后保存的位置; color:水印字体的颜色,默认颜色#8B8B1B; size:水印字体的大小,默认50; opacity:水印字体的透明度,默认0.15; space:水印字体之间的间隔, 默认75个空格; angle:水印字体的旋转角度,默认30度;
from watermarker.marker import add_mark
add_mark(file=r"C:\Users\Administrator\Desktop\大学.jpg", out=r"C:\Users\Administrator\Desktop\python三剑客\加盟店爬虫", mark="黄同学", opacity=0.2, angle=30, space=30)
<span style="font-size: 15px;">大学.jpg</span>添加一个<span style="font-size: 15px;">黄同学</span>水印,保存的位置在<span style="font-size: 15px;">加盟店爬虫</span>文件夹下,透明度是<span style="font-size: 15px;">0.2</span>,旋转角度是<span style="font-size: 15px;">30°</span>,字体之间的间隔是<span style="font-size: 15px;">30</span>。

When we write crawlers, we often use some parameter information, such as this:
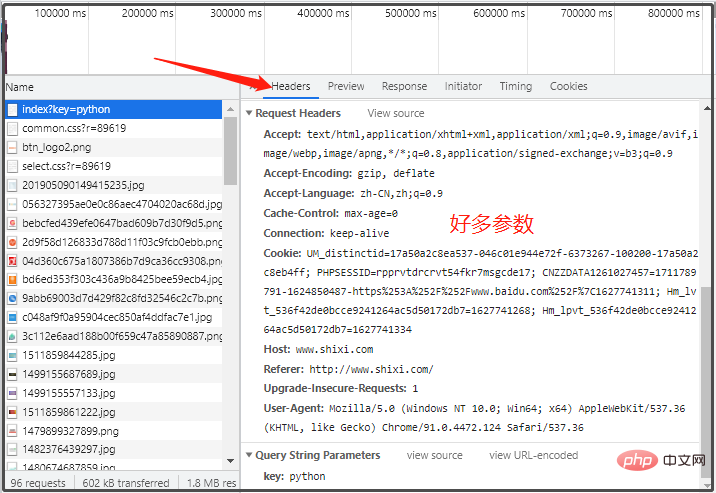
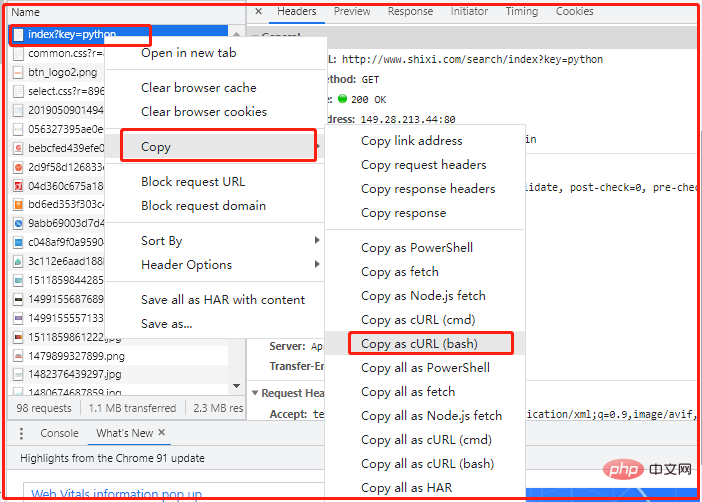
- Ⅰ First, copy the captured network in Google browser The request is cURL (bash);
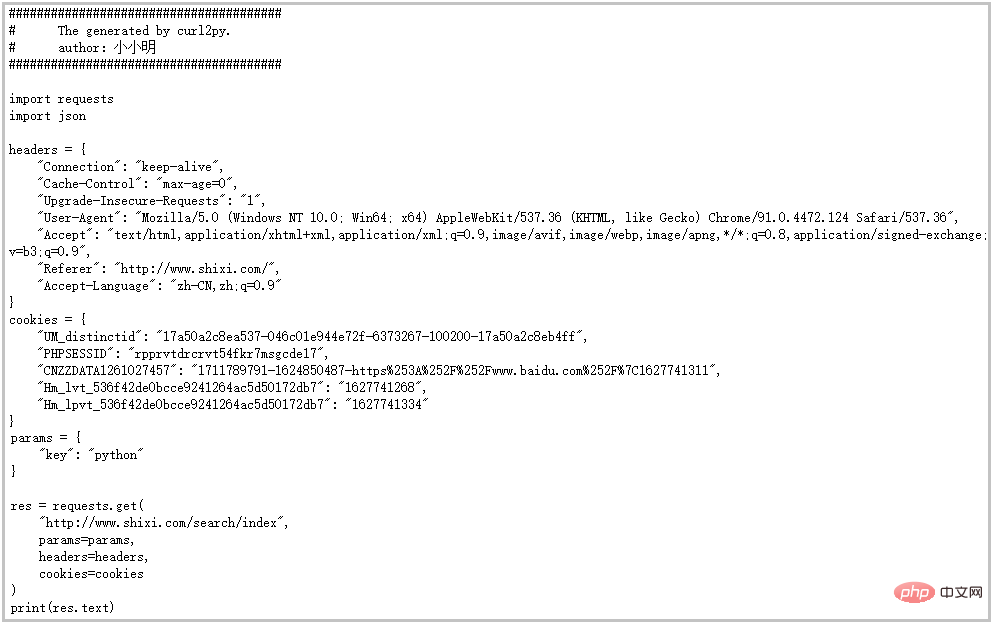
- Ⅱ Convert it to python code through the curl2py command;
<span style="font-size: 15px;"></span> as an example for explanation. http://www.shixi.com/search/index?key=pythonFollow the picture below Operation, we copied curl for a single request.
可以看到: 这里有各种不同的请求url,然后 <span style="font-size: 12px;">-H</span>后面是该请求对应的各种参数。我们需要请求哪个链接,就复制对应的curl。
curl 'http://www.shixi.com/search/index?key=python' \
  -H 'Connection: keep-alive' \
  -H 'Cache-Control: max-age=0' \
  -H 'Upgrade-Insecure-Requests: 1' \
  -H 'User-Agent: Mozilla/5.0 (Windows NT 10.0; Win64; x64) AppleWebKit/537.36 (KHTML, like Gecko) Chrome/91.0.4472.124 Safari/537.36' \
  -H 'Accept: text/html,application/xhtml+xml,application/xml;q=0.9,image/avif,image/webp,image/apng,*/*;q=0.8,application/signed-exchange;v=b3;q=0.9' \
  -H 'Referer: http://www.shixi.com/' \
  -H 'Accept-Language: zh-CN,zh;q=0.9' \
  -H 'Cookie: UM_distinctid=17a50a2c8ea537-046c01e944e72f-6373267-100200-17a50a2c8eb4ff; PHPSESSID=rpprvtdrcrvt54fkr7msgcde17; CNZZDATA1261027457=1711789791-1624850487-https%253A%252F%252Fwww.baidu.com%252F%7C1627741311; Hm_lvt_536f42de0bcce9241264ac5d50172db7=1627741268; Hm_lpvt_536f42de0bcce9241264ac5d50172db7=1627741334' \
  --compressed \
  --insecure
from curl2py.curlParseTool import curlCmdGenPyScript

curl_cmd = """curl 'http://www.shixi.com/search/index?key=python' \
  -H 'Connection: keep-alive' \
  -H 'Cache-Control: max-age=0' \
  -H 'Upgrade-Insecure-Requests: 1' \
  -H 'User-Agent: Mozilla/5.0 (Windows NT 10.0; Win64; x64) AppleWebKit/537.36 (KHTML, like Gecko) Chrome/91.0.4472.124 Safari/537.36' \
  -H 'Accept: text/html,application/xhtml+xml,application/xml;q=0.9,image/avif,image/webp,image/apng,*/*;q=0.8,application/signed-exchange;v=b3;q=0.9' \
  -H 'Referer: http://www.shixi.com/' \
  -H 'Accept-Language: zh-CN,zh;q=0.9' \
  -H 'Cookie: UM_distinctid=17a50a2c8ea537-046c01e944e72f-6373267-100200-17a50a2c8eb4ff; PHPSESSID=rpprvtdrcrvt54fkr7msgcde17; CNZZDATA1261027457=1711789791-1624850487-https%253A%252F%252Fwww.baidu.com%252F%7C1627741311; Hm_lvt_536f42de0bcce9241264ac5d50172db7=1627741268; Hm_lpvt_536f42de0bcce9241264ac5d50172db7=1627741334' \
  --compressed \
  --insecure"""

output = curlCmdGenPyScript(curl_cmd)
print(output)
The above is the detailed content of Recommended collection | 1 Python library, 4 awesome functions!. For more information, please follow other related articles on the PHP Chinese website!

Hot AI Tools

Undresser.AI Undress
AI-powered app for creating realistic nude photos

AI Clothes Remover
Online AI tool for removing clothes from photos.

Undress AI Tool
Undress images for free

Clothoff.io
AI clothes remover

Video Face Swap
Swap faces in any video effortlessly with our completely free AI face swap tool!

Hot Article

Hot Tools

Notepad++7.3.1
Easy-to-use and free code editor

SublimeText3 Chinese version
Chinese version, very easy to use

Zend Studio 13.0.1
Powerful PHP integrated development environment

Dreamweaver CS6
Visual web development tools

SublimeText3 Mac version
God-level code editing software (SublimeText3)

Hot Topics
 1389
1389
 52
52
 Choosing Between PHP and Python: A Guide
Apr 18, 2025 am 12:24 AM
PHP is suitable for web development and rapid prototyping, and Python is suitable for data science and machine learning. 1.PHP is used for dynamic web development, with simple syntax and suitable for rapid development. 2. Python has concise syntax, is suitable for multiple fields, and has a strong library ecosystem.
 PHP and Python: Different Paradigms Explained
Apr 18, 2025 am 12:26 AM
PHP is mainly procedural programming, but also supports object-oriented programming (OOP); Python supports a variety of paradigms, including OOP, functional and procedural programming. PHP is suitable for web development, and Python is suitable for a variety of applications such as data analysis and machine learning.
 Can vs code run in Windows 8
Apr 15, 2025 pm 07:24 PM
VS Code can run on Windows 8, but the experience may not be great. First make sure the system has been updated to the latest patch, then download the VS Code installation package that matches the system architecture and install it as prompted. After installation, be aware that some extensions may be incompatible with Windows 8 and need to look for alternative extensions or use newer Windows systems in a virtual machine. Install the necessary extensions to check whether they work properly. Although VS Code is feasible on Windows 8, it is recommended to upgrade to a newer Windows system for a better development experience and security.
 Is the vscode extension malicious?
Apr 15, 2025 pm 07:57 PM
VS Code extensions pose malicious risks, such as hiding malicious code, exploiting vulnerabilities, and masturbating as legitimate extensions. Methods to identify malicious extensions include: checking publishers, reading comments, checking code, and installing with caution. Security measures also include: security awareness, good habits, regular updates and antivirus software.
 How to run programs in terminal vscode
Apr 15, 2025 pm 06:42 PM
In VS Code, you can run the program in the terminal through the following steps: Prepare the code and open the integrated terminal to ensure that the code directory is consistent with the terminal working directory. Select the run command according to the programming language (such as Python's python your_file_name.py) to check whether it runs successfully and resolve errors. Use the debugger to improve debugging efficiency.
 Can visual studio code be used in python
Apr 15, 2025 pm 08:18 PM
VS Code can be used to write Python and provides many features that make it an ideal tool for developing Python applications. It allows users to: install Python extensions to get functions such as code completion, syntax highlighting, and debugging. Use the debugger to track code step by step, find and fix errors. Integrate Git for version control. Use code formatting tools to maintain code consistency. Use the Linting tool to spot potential problems ahead of time.
 Can vscode be used for mac
Apr 15, 2025 pm 07:36 PM
VS Code is available on Mac. It has powerful extensions, Git integration, terminal and debugger, and also offers a wealth of setup options. However, for particularly large projects or highly professional development, VS Code may have performance or functional limitations.
 Can vscode run ipynb
Apr 15, 2025 pm 07:30 PM
The key to running Jupyter Notebook in VS Code is to ensure that the Python environment is properly configured, understand that the code execution order is consistent with the cell order, and be aware of large files or external libraries that may affect performance. The code completion and debugging functions provided by VS Code can greatly improve coding efficiency and reduce errors.


