
Before going through today’s knowledge points, do you know about threads, processes and coroutines? Let’s first have a preliminary understanding.
The scheduling unit of the central processor is simply the terminal execution in the program. The latter is equivalent to the position of younger brother.
Some people say that threads in python are useless. This is because of the GIL, but it is not blindly useless. After all, it is quite useful when performing io operations, and it is only used to perform calculations. It seems unsatisfactory. Let’s take a look at the specific usage of threads:
import threading as t
tt=t.Thread(group=None,target=None,name=None,args=(),kwargs={},name='',daemon=None)
group:线程组,必须是None
target:运行的函数
args:传入函数的参数元组
kwargs:传入函数的参数字典
name:线程名
daemon:线程是否随主线程退出而退出(守护线程)


Thread方法的返回值还有以下方法:
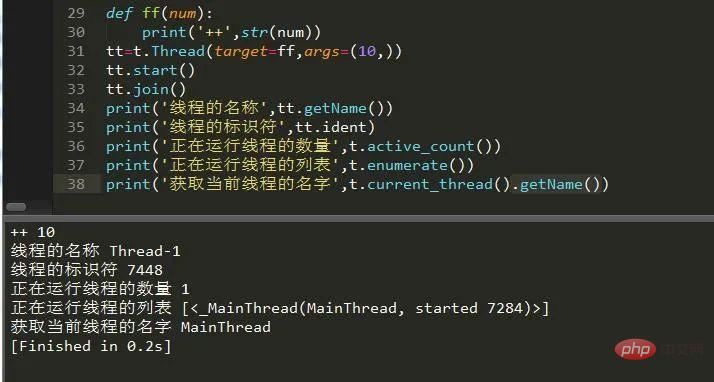
tt.start() : 激活线程,
tt.getName() : 获取线程的名称
tt.setName() :设置线程的名称
tt.name : 获取或设置线程的名称
tt.is_alive() :判断线程是否为激活状态
tt.isAlive() :判断线程是否为激活状态
tt.setDaemon() 设置为守护线程(默认:False)
tt.isDaemon() :判断是否为守护线程
tt.ident :获取线程的标识符。只有在调用了start()方法之后该属性才有效
tt.join() :逐个执行每个线程,执行完毕后继续往下执行
tt.run() :自动执行线程对象


t的方法也有:
t.active_count(): 返回正在运行线程的数量
t.enumerate(): 返回正在运行线程的列表
t.current_thread().getName() 获取当前线程的名字
t.TIMEOUT_MAX 设置t的全局超时时间 Let’s take a look:
为什么要加锁,看了这个你就知道了: 多线程在运行时同时访问一个对象会产生抢占资源的情况,所以我们必须得束缚它,所以就要给他加一把锁把他锁住,这就是同步锁。要了解锁,我们得先创建锁,线程中有两种锁:Lock和RLock。 使用方法: 互斥锁,同步数据,解决多线程的安全问题: 这样就显得有条理了,而且输出也是先+后-。Lock在一个线程中多次使用同一资源会造成死锁。 死锁问题: 相比Lock它可以递归,支持在同一线程中多次请求同一资源,并允许在同一线程中被多次锁定,但是acquire和release必须成对出现。 使用递归锁来解决死锁: 这时候,输出变量就变得仅仅有条了,不在随意抢占资源。关于线程锁,还可以使用with更加方便: 等待通过,Condition(lock=None),可以传入lock或者Rlock,默认Rlock,使用方法: 这样就可以在等待的时候唤醒函数里唤醒其他函数里所存在的其他线程了。 信号量可以分为有界信号量和无解信号量,下面我们来具体看看他们的用法: 它不允许使用release超出初始值的范围,否则,抛出ValueError异常。 可以看到了多了个release后报错了。 它不检查release的上限情况,只是单纯的加减计数器。 可以看到虽然多了个release,但是没有问题,而且信号量的数量不受限制。 线程间通信,通过线程设置的信号标志(flag)的False 还是True来进行操作,常见方法有: 下面通过一个例子具体讲述: 设置延迟后可以看到效果相当明显,我们让他干什么事他就干什么事。 可以为各个线程创建完全属于它们自己的变量(线程局部变量),而且它们的值都在当前调用它的线程当中,以字典的形式存在。下面我们来看下: 那么,可以将变量的x方法设为全局变量吗?我们来看下: 可以看出他报错了,产生错误的原因是因为这个类中没有属性x,我们可以简单的理解为局部变量就只接受局部。 设置定时计划,可以在规定的时间内反复执行某个方法。他的使用方法是: 下面我们来看下: 这样就达到了每三秒执行一次f函数的效果。3.1 使用Thread方法来创建:
3.1.1 单线程
def xc():
    for y in range(100):
        print('运行中'+str(y))
tt=t.Thread(target=xc,args=()) #方法加入到线程
tt.start()  #开始线程
tt.join() #等待子线程结束3.1.2 多线程
def xc(num):
    print('运行:'+str(num))
c=[]
for y in range(100):
    tt=t.Thread(target=xc,args=(y,))
    tt.start() #开始线程
    c.append(tt) #创建列表并添加线程
for x in c:
x.join() #等待子线程结束3.2 重写线程的类方法
3.2.1 单线程
class Xc(t.Thread): #继承Thread类
    def __init__(self):
        super(Xc, self).__init__()
    def run(self):  #重写run方法
        for y in range(100):
            print('运行中'+str(y))
x=Xc()
x.start() #开始线程
x.join()  #等待子线程结束


也可以这么写:
Xc().run() 和上面的效果是一样的3.2.2 多线程
class Xc(t.Thread): #继承Thread类
    def __init__(self):
        super(Xc, self).__init__()
    def run(self,num):  #重写run方法
        print('运行:'+str(num))
x=Xc()
for y in range(10):
x.run(y) #运行4.线程锁
4.1 Lock
# 获取锁
当获取不到锁时,默认进入阻塞状态,设置超时时间,直到获取到锁,后才继续。非阻塞时,timeout禁止设置。如果超时依旧未获取到锁,返回False。
Lock.acquire(blocking=True,timeout=1)


#释放锁,已上锁的锁,会被设置为unlocked。如果未上锁调用,会抛出RuntimeError异常。
Lock.release()
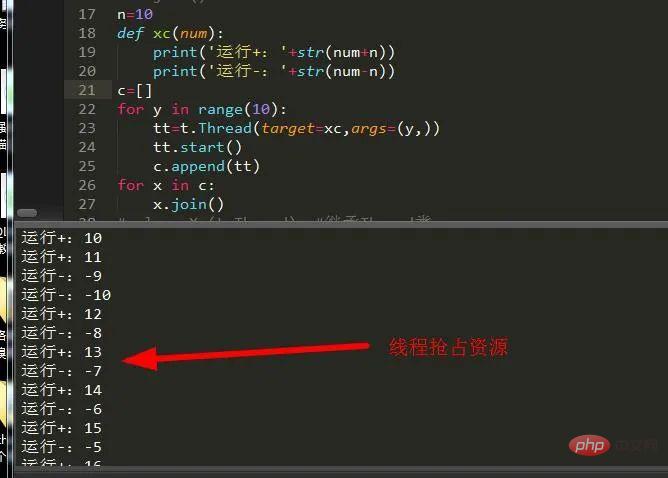
n=10
lock=t.Lock()
def xc(num):
    lock.acquire()
    print('运行+:'+str(num+n))
    print('运行-:'+str(num-n))
    lock.release()
c=[]
for y in range(10):
    tt=t.Thread(target=xc,args=(y,))
    tt.start()
    c.append(tt)
for x in c:
x.join()n=10
lock1=t.Lock()
lock2=t.Lock()
def xc(num):
lock1.acquire()
print('运行+:'+str(num+n))
lock2.acquire()
print('运行-:'+str(num-n))
lock2.release()
lock1.release()
c=[]
for y in range(10):
tt=t.Thread(target=xc,args=(y,))
tt.start()
c.append(tt)
for x in c:
x.join()
4.2 RLock
n=10
lock1=t.RLock()
lock2=t.RLock()
def xc(num):
  lock1.acquire()
  print('运行+:'+str(num+n))
  lock2.acquire()
  print('运行-:'+str(num-n))
  lock2.release()
  lock1.release()
c=[]
for y in range(10):
  tt=t.Thread(target=xc,args=(y,))
  tt.start()
  c.append(tt)
for x in c:
  x.join()
#with上下文管理,锁对象支持上下文管理
with lock:   #with表示自动打开自动释放锁
  for i in range(10): #锁定期间,其他人不可以干活
    print(i)
  #上面的和下面的是等价的
if lock.acquire(1):#锁住成功继续干活,没有锁住成功就一直等待,1代表独占
  for i in range(10): #锁定期间,其他线程不可以干活
    print(i)
lock.release() #释放锁4.3 条件锁
Condition.acquire(*args)      获取锁


Condition.wait(timeout=None)  等待通知,timeout设置超时时间


Condition.notify(num)唤醒至多指定数目个数的等待的线程,没有等待的线程就没有任何操作


Condition.notify_all()  唤醒所有等待的线程 或者notifyAll()
def ww(c):
  with c:
    print('init')
    c.wait(timeout=5) #设置等待超时时间5
    print('end')
def xx(c):
  with c:
    print('nono')
    c.notifyAll() #唤醒所有线程
    print('start')
    c.notify(1) #唤醒一个线程
    print('21')
c=t.Condition() #创建条件
t.Thread(target=ww,args=(c,)).start()
t.Thread(target=xx,args=(c,)).start()5.信号量
5.1 有界信号量
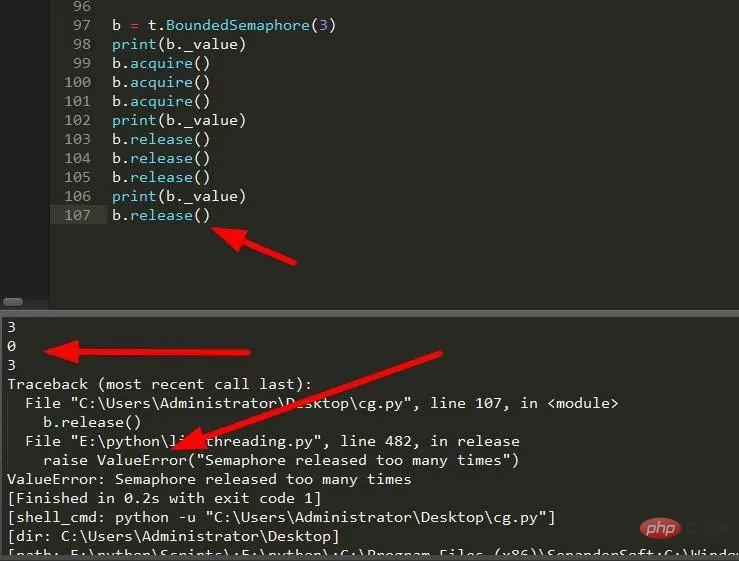
#构造方法。value为初始信号量。value小于0,抛出ValueError异常
b=t.BoundedSemaphore(value=1)


#获取信号量时,计数器减1,即_value的值减少1。如果_value的值为0会变成阻塞状态。获取成功返回True
BoundedSemaphore.acquire(blocking=True,timeout=None)


#释放信号量,计数器加1。即_value的值加1,超过初始化值会抛出异常ValueError。
BoundedSemaphore.release()


#信号量,当前信号量
BoundedSemaphore._value
5.2 无界信号量
6.Event
event.set()      flag设置为True
event.clear()  flag设置为False
event.is_set()  flag是否为True,如果 event.isSet()==False将阻塞线程;
设置等待flag为True的时长,None为无限等待。等到返回True,未等到超时则返回False
event.wait(timeout=None)
import time
e=t.Event()
def ff(num):
while True:
if num<5:
e.clear() #清空信号标志
print('清空')
if num>=5:
e.wait(timeout=1) #等待信号标志为真
e.set()
print('启动')
if e.isSet(): #如果信号标志为真则清除标志
e.clear()
print('停止')
if num==10:
e.wait(timeout=3)
e.clear()
print('退出')
break
num+=1
time.sleep(2)
ff(1)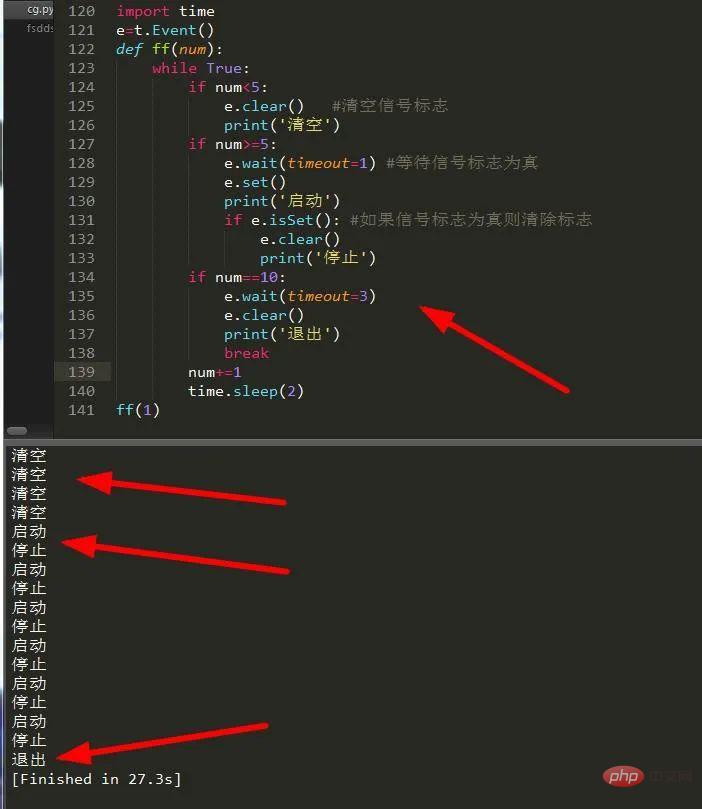
7.local
l=t.local()  #创建一个线程局部变量
def ff(num):
  l.x=100  #设置l变量的x方法的值为100
  for y in range(num):
    l.x+=3 #改变值
  print(str(l.x))


for y in range(10):
  t.Thread(target=ff,args=(y,)).start() #开始执行线程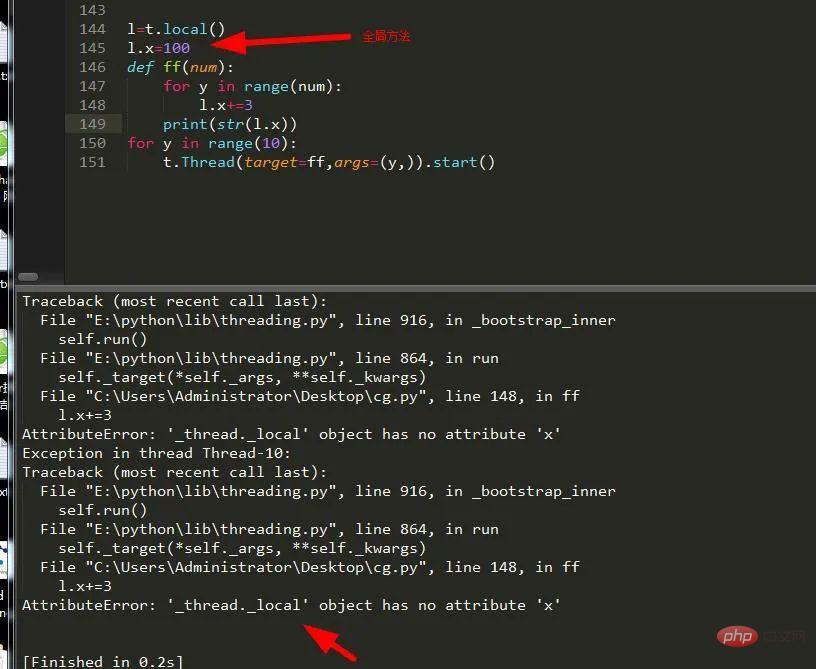
8.Timer
t.Timer(num,func,*args,**kwargs) #在指定时间内再次重启程序
def f():
  print('start')
  global t #防止造成线程堆积导致最终程序退出
  tt= t.Timer(3, f)
  tt.start()
f()
总结
The above is the detailed content of An article will give you a comprehensive analysis of different threads. For more information, please follow other related articles on the PHP Chinese website!


