
Why do we need to limit the current?
As I said above, a lot of traffic is indeed a good thing, but if it is overloaded and the system hangs up, everyone will suffer.

Therefore, before various major promotion activities, it is necessary to conduct a stress test on the system and evaluate the peak QPS of the entire system. Some current limiting settings will refuse to process or delay processing if it exceeds a certain threshold to avoid hanging the system.
What is the difference between current limiting and circuit breaker?
Traffic limiting occurs before the traffic comes in, and the excess traffic is restricted.
Circuit breaker is a mechanism to deal with faults. It occurs after traffic comes in. If a system failure or abnormality occurs, the fuse will automatically cut off the request to prevent the fault from further expanding and causing a service avalanche.
What is the difference between current limiting and peak clipping?
Peak clipping is a smooth processing of traffic, which avoids instantaneous overload of the system by slowly increasing the processing rate of requests.
Peak cutting is probably a reservoir, which stores the flow and flows slowly. Flow limiting is probably a gate, which rejects excess flow.
So how to implement specific current limiting? It can be summarized into the following steps:

It should be noted that the specific current limiting algorithm implementation may be adjusted and optimized according to different scenarios and needs, such as using the token bucket algorithm, leaky bucket algorithm, etc.
We noticed that in the general process of current limiting, it is necessary to count the request volume and update the statistics, then this request Quantity statistics and updates must be maintained in a storage.
If it is just a stand-alone environment, it is easy to handle and store it directly locally.
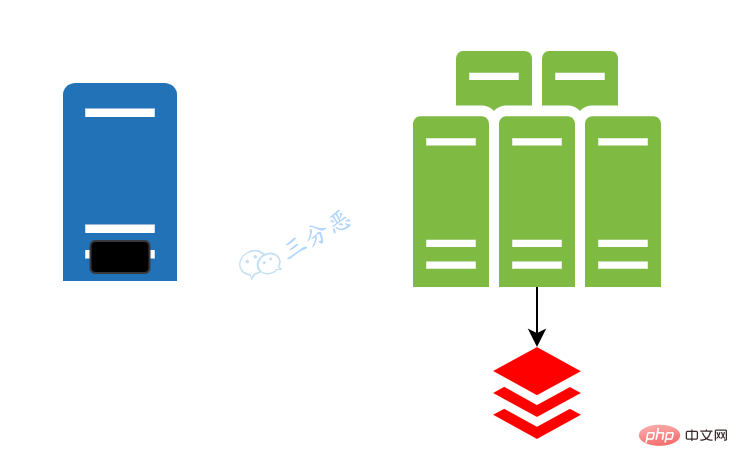
But generally speaking, our services are deployed in clusters. How to achieve overall current limiting among multiple machines? Woolen cloth?
At this time, we can put our statistical information into distributed K-V storage such as Tair or Redis.
Next, we start to implement some common current limiting algorithms. Here we use Redis as distributed storage. Needless to say, Redis is the final Popular distributed cache DB; Redission is a Redis client. Redission is only used for distributed locks. It is somewhat "unqualified", but it is actually very easy to use as a Redis client.

Before we begin, let’s briefly prepare the environment. We won’t go into details about Redis installation and project creation. .
        <dependency>
            <groupId>org.redisson</groupId>
            <artifactId>redisson</artifactId>
            <version>3.16.2</version>
</dependency>public class RedissonConfig {
private static final String REDIS_ADDRESS = "redis://127.0.0.1:6379";
private static volatile RedissonClient redissonClient;
public static RedissonClient getInstance(){
if (redissonClient==null){
synchronized (RedissonConfig.class){
if (redissonClient==null){
Config config = new Config();
config.useSingleServer().setAddress(REDIS_ADDRESS);
redissonClient = Redisson.create(config);
return redissonClient;
}
}
}
return redissonClient;
}
}Fixed window algorithm, many reference materials are also called counters Algorithm, of course I personally understand that the counter algorithm is a special case of the fixed window algorithm, of course we don’t worry about it that much.
The fixed window algorithm is a relatively simple current limiting algorithm. It divides time into fixed time windows and sets a limit on the number of requests allowed in each window. If the number of requests exceeds the upper limit within a time window, current limiting will be triggered.
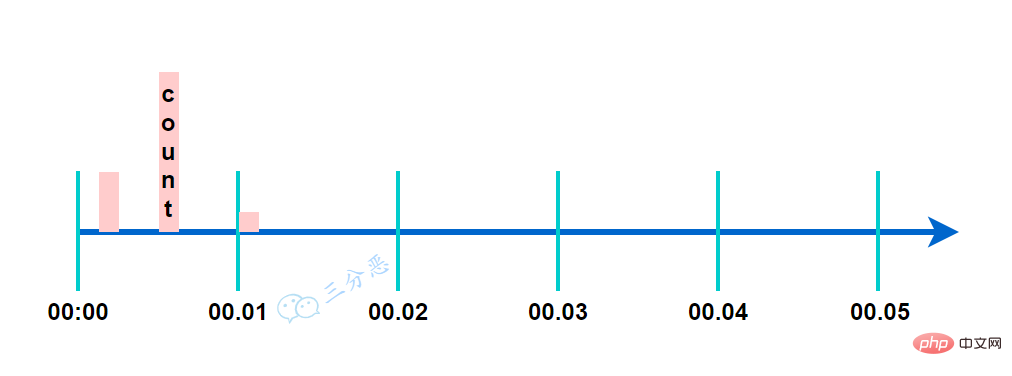
The implementation of a fixed window based on Redisson is quite simple. Within each window period, we can count the number of requests through the incrementAndGet operation. Once the window period is over, we can leverage Redis's key expiration feature to automatically reset the count.
public class FixedWindowRateLimiter {
    public static final String KEY = "fixedWindowRateLimiter:";
    /**
     * 请求限制数量
     */
    private Long limit;
    /**
     * 窗口大小(单位:S)
     */
    private Long windowSize;

    public FixedWindowRateLimiter(Long limit, Long windowSize) {
        this.limit = limit;
        this.windowSize = windowSize;
    }

    /**
     * 固定窗口限流
     */
    public boolean triggerLimit(String path) {
        RedissonClient redissonClient = RedissonConfig.getInstance();
        //加分布式锁,防止并发情况下窗口初始化时间不一致问题
        RLock rLock = redissonClient.getLock(KEY + "LOCK:" + path);
        try {
            rLock.lock(100, TimeUnit.MILLISECONDS);
            String redisKey = KEY + path;
            RAtomicLong counter = redissonClient.getAtomicLong(redisKey);
            //计数
            long count = counter.incrementAndGet();
            //如果为1的话,就说明窗口刚初始化
            if (count == 1) {
                //直接设置过期时间,作为窗口
                counter.expire(windowSize, TimeUnit.SECONDS);
            }
            //触发限流
            if (count > limit) {
                //触发限流的不记在请求数量中
                counter.decrementAndGet();
                return true;
            }
            return false;
        } finally {
            rLock.unlock();
        }
    }

}An additional distributed lock is used here to solve the initialization of the window in concurrent situations. question.
class FixedWindowRateLimiterTest {
    ThreadPoolExecutor threadPoolExecutor = new ThreadPoolExecutor(20, 50, 10, TimeUnit.SECONDS, new LinkedBlockingDeque<>(10));

    @Test
    @DisplayName("1min限制10次请求固定窗口测试")
    void triggerLimit() throws InterruptedException {
        FixedWindowRateLimiter fixedWindowRateLimiter = new FixedWindowRateLimiter(10L,60L);
        //模拟不同窗口内的调用
        for (int i = 0; i < 3; i++) {
            CountDownLatch countDownLatch = new CountDownLatch(20);
            //20个线程并发调用
            for (int j = 0; j < 20; j++) {
                threadPoolExecutor.execute(() -> {
                    boolean isLimit = fixedWindowRateLimiter.triggerLimit("/test");
                    System.out.println(isLimit);
                    countDownLatch.countDown();
                });
            }
            countDownLatch.await();
            //休眠1min
            TimeUnit.MINUTES.sleep(1);
        }
    }
}Of course, you can also write an interface and use stress testing tools such as Jmeter to test.
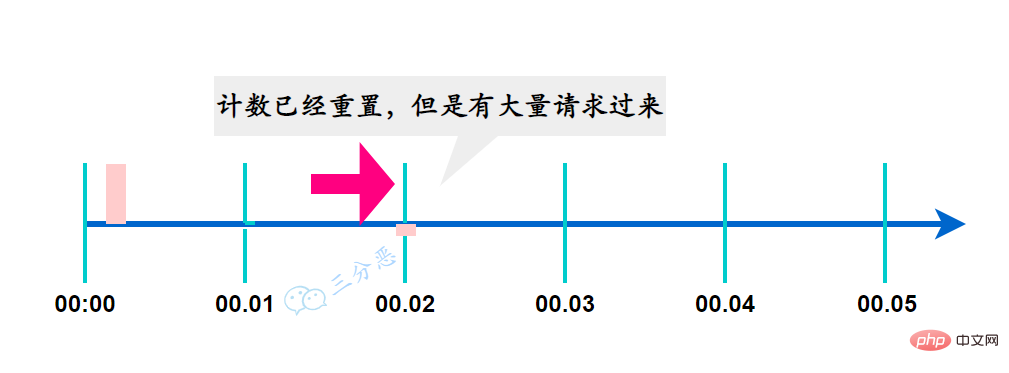
The advantage of the fixed window algorithm is that it is simple to implement and takes up little space. However, it has critical problems. Since the window switching is completed instantaneously, the request processing is not smooth and may occur at the moment of window switching. Severe fluctuations in traffic.
For example, in this example, if a large number of requests suddenly come in at 00:02, but we reset the count at this time, then we cannot limit the sudden traffic.
In order to alleviate the burst traffic problem of fixed window, sliding window can be used Algorithm, TCP flow control in computer networks uses the sliding window algorithm.
The principle of the sliding window current limiting algorithm is to divide a large time window into multiple small time windows, and each small window has an independent count.
When a request comes in, determine whether the number of requests exceeds the limit of the entire window. The movement of the window is to slide a small unit window forward each time.
For example, the following sliding window divides the large time window of 1 minute into 5 small windows, and the time of each small window is 12 seconds.
Each cell has its own independent counter, which will move forward one cell every 12 seconds.
If a request comes at 00:01, the window count at this time is 3 12 9 15 = 39, which can also play a role in current limiting.
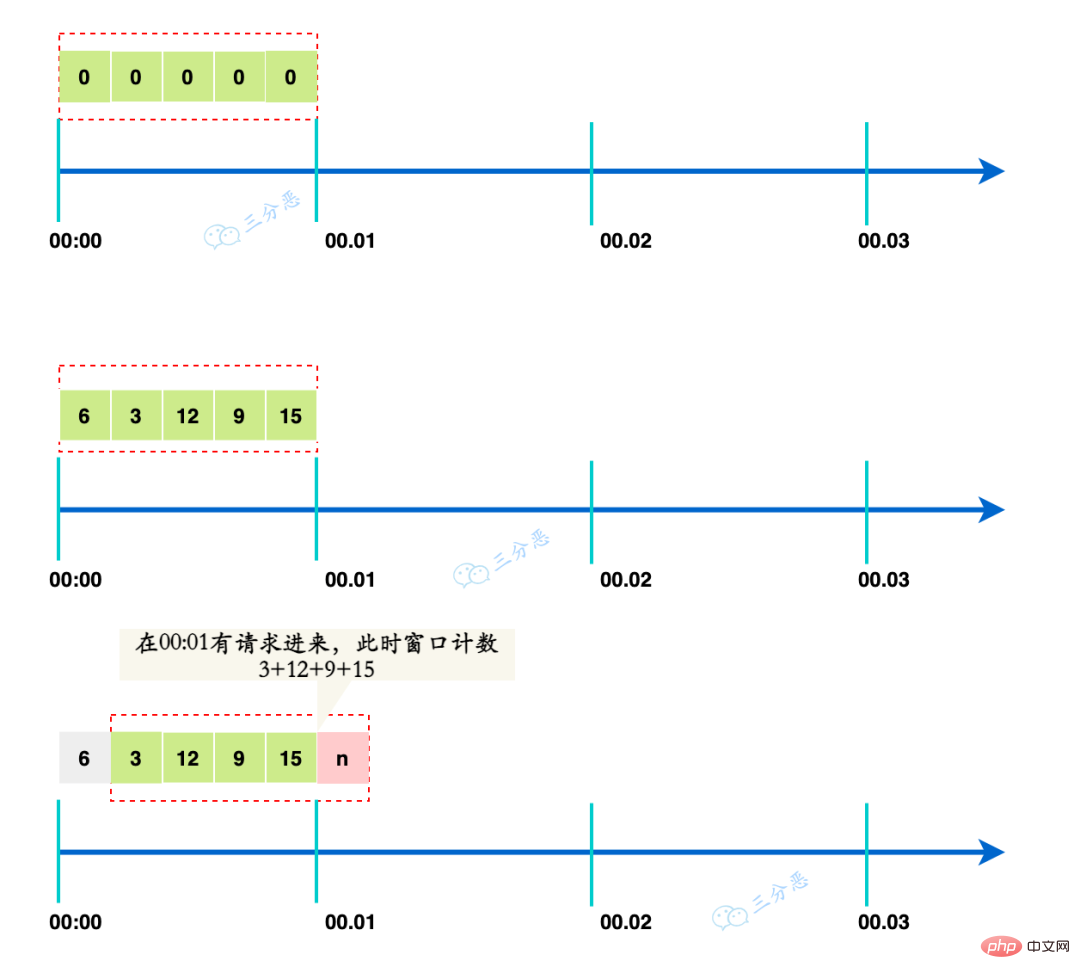
This is why the sliding window can solve critical problems. The more sliding grids, the greater the overall sliding Smooth, the more accurate the current limiting effect will be.
So how do we implement the sliding window current limiting algorithm here? It's very simple, we can directly use Redis's ordered set (zset) structure.
We use timestamp as score and member. When a request comes, the current timestamp is added to the ordered set. Then for requests outside the window, we can calculate the starting timestamp based on the window size and delete the requests outside the window. In this way, the size of the ordered set is the number of requests in our window.

public class SlidingWindowRateLimiter {
    public static final String KEY = "slidingWindowRateLimiter:";

    /**
     * 请求次数限制
     */
    private Long limit;
    /**
     * 窗口大小(单位:S)
     */
    private Long windowSize;

    public SlidingWindowRateLimiter(Long limit, Long windowSize) {
        this.limit = limit;
        this.windowSize = windowSize;
    }


    public boolean triggerLimit(String path) {
        RedissonClient redissonClient = RedissonConfig.getInstance();
        //窗口计数
        RScoredSortedSet<Long> counter = redissonClient.getScoredSortedSet(KEY + path);
        //使用分布式锁,避免并发设置初始值的时候,导致窗口计数被覆盖
        RLock rLock = redissonClient.getLock(KEY + "LOCK:" + path);
        try {
            rLock.lock(200, TimeUnit.MILLISECONDS);
            // 当前时间戳
            long currentTimestamp = System.currentTimeMillis();
            // 窗口起始时间戳
            long windowStartTimestamp = currentTimestamp - windowSize * 1000;
            // 移除窗口外的时间戳,左闭右开
            counter.removeRangeByScore(0, true, windowStartTimestamp, false);
            // 将当前时间戳作为score,也作为member,
            // TODO:高并发情况下可能没法保证唯一,可以加一个唯一标识
            counter.add(currentTimestamp, currentTimestamp);
            //使用zset的元素个数,作为请求计数
            long count = counter.size();
            // 判断时间戳数量是否超过限流阈值
            if (count > limit) {
                System.out.println("[triggerLimit] path:" + path + " count:" + count + " over limit:" + limit);
                return true;
            }
            return false;
        } finally {
            rLock.unlock();
        }
    }

}这里还有一个小的可以完善的点,zset在member相同的情况下,是会覆盖的,也就是说高并发情况下,时间戳可能会重复,那么就有可能统计的请求偏少,这里可以用时间戳+随机数来缓解,也可以生成唯一序列来解决,比如UUID、雪花算法等等。
class SlidingWindowRateLimiterTest {
    ThreadPoolExecutor threadPoolExecutor = new ThreadPoolExecutor(30, 50, 10, TimeUnit.SECONDS, new LinkedBlockingDeque<>(10));

    @Test
    @DisplayName("滑动窗口限流")
    void triggerLimit() throws InterruptedException {
        SlidingWindowRateLimiter slidingWindowRateLimiter = new SlidingWindowRateLimiter(10L, 1L);
        //模拟在不同时间片内的请求
        for (int i = 0; i < 8; i++) {
            CountDownLatch countDownLatch = new CountDownLatch(20);
            for (int j = 0; j < 20; j++) {
                threadPoolExecutor.execute(() -> {
                    boolean isLimit = slidingWindowRateLimiter.triggerLimit("/test");
                    System.out.println(isLimit);
                    countDownLatch.countDown();
                });
            }
            countDownLatch.await();
            //休眠10s
            TimeUnit.SECONDS.sleep(10L);
        }
    }
}用Redis实现了滑动窗口限流,解决了固定窗口限流的边界问题,当然这里也带来了新的问题,因为我们存储了窗口期的所有请求,所以高并发的情况下,可能会比较占内存。
我们可以看到,计数器类的限流,体现的是一个“戛然而止”,超过限制,立马决绝,但是有时候,我们可能只是希望请求平滑一些,追求的是“波澜不惊”,这时候就可以考虑使用其它的限流算法。
漏桶算法(Leaky Bucket),名副其实,就是请求就像水一样以任意速度注入漏桶,而桶会按照固定的速率将水漏掉。
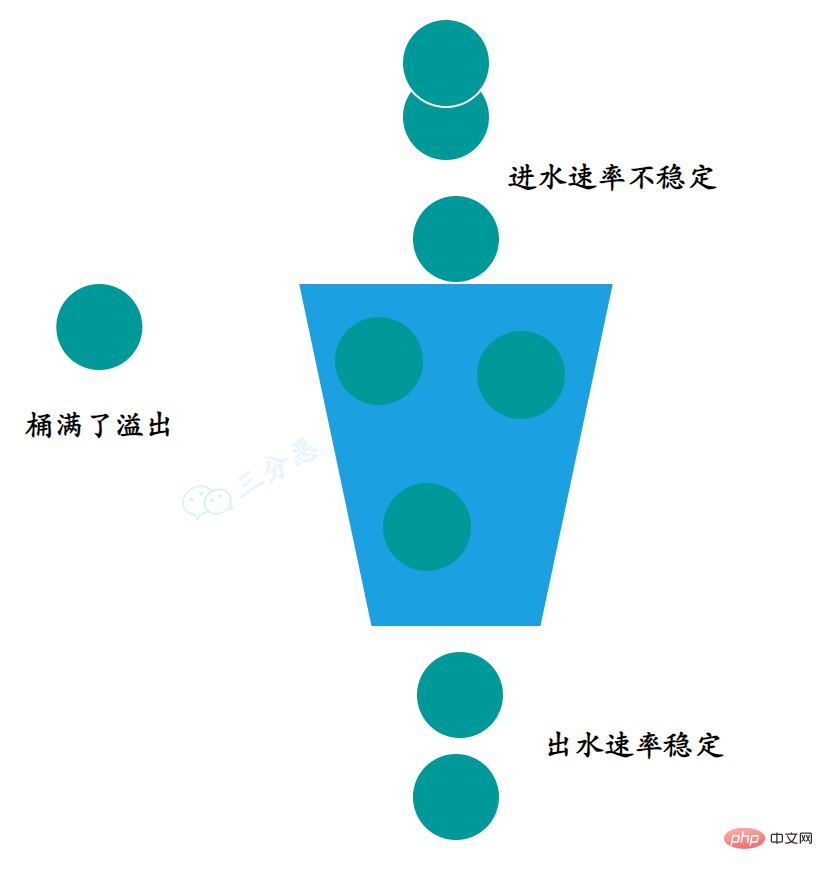
当进水速率大于出水速率的时候,漏桶会变满,此时新进入的请求将会被丢弃。
漏桶算法的两大作用是网络流量整形(Traffic Shaping)和速度限制(Rate Limiting)。
我们接着看看具体应该怎么实现。
在滑动窗口限流算法里我们用到了RScoredSortedSet,非常好用对不对,这里也可以用这个结构,直接使用ZREMRANGEBYSCORE命令来删除旧的请求。
进水就不用多说了,请求进来,判断桶有没有满,满了就拒绝,没满就往桶里丢请求。
那么出水怎么办呢?得保证稳定速率出水,可以用一个定时任务,来定时去删除旧的请求。
public class LeakyBucketRateLimiter {
    private RedissonClient redissonClient = RedissonConfig.getInstance();
    private static final String KEY_PREFIX = "LeakyBucket:";

    /**
     * 桶的大小
     */
    private Long bucketSize;
    /**
     * 漏水速率,单位:个/秒
     */
    private Long leakRate;


    public LeakyBucketRateLimiter(Long bucketSize, Long leakRate) {
        this.bucketSize = bucketSize;
        this.leakRate = leakRate;
        //这里启动一个定时任务,每s执行一次
        ScheduledExecutorService executorService = Executors.newScheduledThreadPool(1);
        executorService.scheduleAtFixedRate(this::leakWater, 0, 1, TimeUnit.SECONDS);
    }

    /**
     * 漏水
     */
    public void leakWater() {
        RSet<String> pathSet=redissonClient.getSet(KEY_PREFIX+":pathSet");
        //遍历所有path,删除旧请求
        for(String path:pathSet){
            String redisKey = KEY_PREFIX + path;
            RScoredSortedSet<Long> bucket = redissonClient.getScoredSortedSet(KEY_PREFIX + path);
            // 获取当前时间
            long now = System.currentTimeMillis();
            // 删除旧的请求
            bucket.removeRangeByScore(0, true,now - 1000 * leakRate,true);
        }
    }

    /**
     * 限流
     */
    public boolean triggerLimit(String path) {
        //加锁,防止并发初始化问题
        RLock rLock = redissonClient.getLock(KEY_PREFIX + "LOCK:" + path);
        try {
            rLock.lock(100,TimeUnit.MILLISECONDS);
            String redisKey = KEY_PREFIX + path;
            RScoredSortedSet<Long> bucket = redissonClient.getScoredSortedSet(redisKey);
            //这里用一个set,来存储所有path
            RSet<String> pathSet=redissonClient.getSet(KEY_PREFIX+":pathSet");
            pathSet.add(path);
            // 获取当前时间
            long now = System.currentTimeMillis();
            // 检查桶是否已满
            if (bucket.size() < bucketSize) {
                // 桶未满,添加一个元素到桶中
                bucket.add(now,now);
                return false;
            }
            // 桶已满,触发限流
            System.out.println("[triggerLimit] path:"+path+" bucket size:"+bucket.size());
            return true;
        }finally {
            rLock.unlock();
        }
    }

}在代码实现里,我们用了RSet来存储path,这样一来,一个定时任务,就可以搞定所有path对应的桶的出水,而不用每个桶都创建一个一个定时任务。
这里我直接用ScheduledExecutorService启动了一个定时任务,1s跑一次,当然集群环境下,每台机器都跑一个定时任务,对性能是极大的浪费,而且不好管理,我们可以用分布式定时任务,比如xxl-job去执行leakWater。
class LeakyBucketRateLimiterTest {

    ThreadPoolExecutor threadPoolExecutor = new ThreadPoolExecutor(30, 50, 10, TimeUnit.SECONDS, new LinkedBlockingDeque<>(10));

    @Test
    @DisplayName("漏桶算法")
    void triggerLimit() throws InterruptedException {
        LeakyBucketRateLimiter leakyBucketRateLimiter = new LeakyBucketRateLimiter(10L, 1L);
        for (int i = 0; i < 8; i++) {
            CountDownLatch countDownLatch = new CountDownLatch(20);
            for (int j = 0; j < 20; j++) {
                threadPoolExecutor.execute(() -> {
                    boolean isLimit = leakyBucketRateLimiter.triggerLimit("/test");
                    System.out.println(isLimit);
                    countDownLatch.countDown();
                });
            }
            countDownLatch.await();
            //休眠10s
            TimeUnit.SECONDS.sleep(10L);
        }
    }
}漏桶算法能够有效防止网络拥塞,实现也比较简单。
但是,因为漏桶的出水速率是固定的,假如突然来了大量的请求,那么只能丢弃超量的请求,即使下游能处理更大的流量,没法充分利用系统资源。
令牌桶算法来了!
令牌桶算法是对漏桶算法的一种改进。
它的主要思想是:系统以一种固定的速率向桶中添加令牌,每个请求在发送前都需要从桶中取出一个令牌,只有取到令牌的请求才被通过。因此,令牌桶算法允许请求以任意速率发送,只要桶中有足够的令牌。
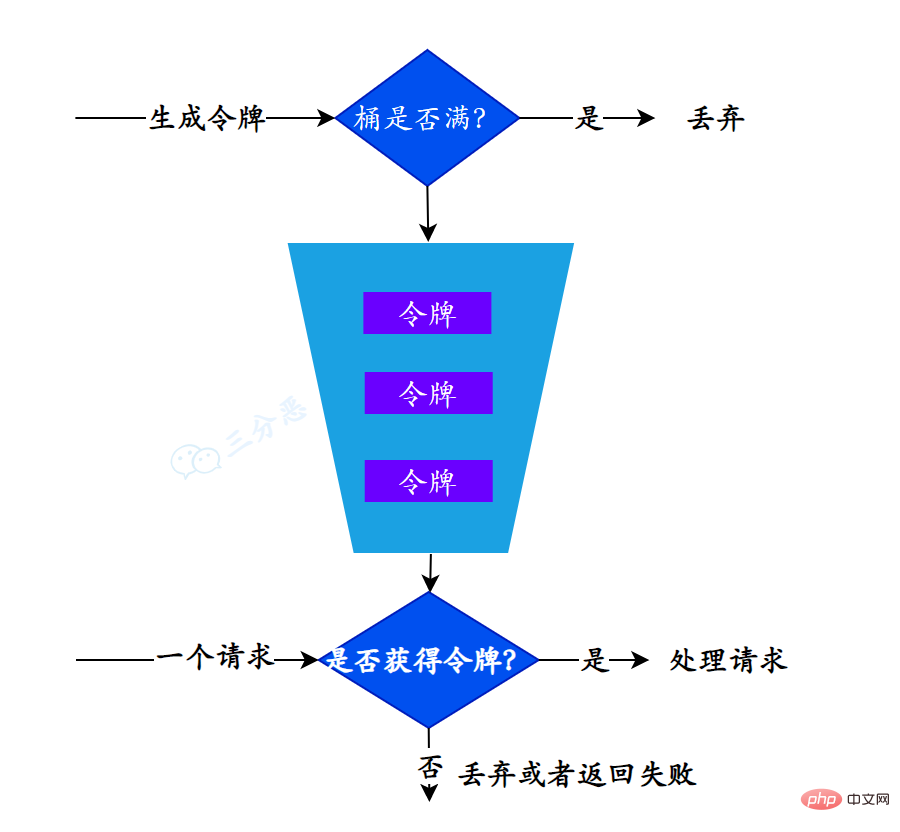
我们继续看怎么实现,首先是要发放令牌,要固定速率,那我们又得开个线程,定时往桶里投令牌,然后……
——然后Redission提供了令牌桶算法的实现,舒不舒服?

拿来就用!
public class TokenBucketRateLimiter {

    public static final String KEY = "TokenBucketRateLimiter:";

    /**
     * 阈值
     */
    private Long limit;
    /**
     * 添加令牌的速率,单位:个/秒
     */
    private Long tokenRate;

    public TokenBucketRateLimiter(Long limit, Long tokenRate) {
        this.limit = limit;
        this.tokenRate = tokenRate;
    }

    /**
     * 限流算法
     */
    public boolean triggerLimit(String path){
        RedissonClient redissonClient=RedissonConfig.getInstance();
        RRateLimiter rateLimiter = redissonClient.getRateLimiter(KEY+path);
        // 初始化,设置速率模式,速率,间隔,间隔单位
        rateLimiter.trySetRate(RateType.OVERALL, limit, tokenRate, RateIntervalUnit.SECONDS);
        // 获取令牌
        return rateLimiter.tryAcquire();
    }
}Redisson实现的,还是比较稳的,这里就不测试了。
关于Redission是怎么实现这个限速器的,大家可以看一下参考[3],还是Redisson家的老传统——Lua脚本,设计相当巧妙。
在这篇文章里,我们对四(三)种限流算法进行了分布式实现,采用了非常好用的Redission客户端,当然我们也有不完善的地方:
如果后面有机会,希望可以继续完善这个简单的Demo,达到工程级的应用。
除此之外,市面上也有很多好用的开源限流工具:
Spring Cloud Gateway、NginxThe above is the detailed content of Four distributed current limiting algorithms and code implementation. For more information, please follow other related articles on the PHP Chinese website!
