
Today we will explain how to operate Elasticsearch in a Spring boot project. The API used in this chapter is the official Java High Level REST Client v7.9.1. Before studying this chapter, you should have mastered basic Java back-end development knowledge and be able to use the Spring boot development framework. Due to space limitations, this chapter only explains the more commonly used code implementations. Many codes can be reused, and you can draw inferences in actual projects.
(1)boot.spring.config: Contains global configuration classes, such as allowing cross-domain configuration of interfaces.
(2) boot.spring.controller: Controller containing various background interfaces.
(3) boot.spring,elastic.client: Contains the client configuration class for connecting to Elasticsearch.
(4) boot.spring.elastic.service: Contains common method services for reading and writing Elasticsearch, including three service classes for indexing, search and statistical analysis.
(5) boot.spring.pagemodel: Contains object classes mainly used for delivery to the front end.
(6) boot.spring.po: Object containing the index field structure.
(7)boot.spring.util: Contains commonly used tool classes.
In pom.xml, you need to introduce relevant dependencies:
<dependency>
  <groupId>org.elasticsearch.client</groupId>
  <artifactId>elasticsearch-rest-high-level-client</artifactId>
  <version>7.9.1</version>
</dependency>

<dependency>
  <groupId>org.elasticsearch</groupId>
  <artifactId>elasticsearch</artifactId>
  <version>7.9.1</version>
</dependency>
In the package boot.spring.elastic.client, there is a RestHighLevelClient client, which will read application.yml es.url in, send a request to the configured Elasticsearch address. When using, please change the configuration of es.url to the actual address, and separate multiple nodes with commas. The code of the client configuration class is as follows:
@Configuration
public class Client {
  @Value("${es.url}")
  private String esUrl;

  @Bean
  RestHighLevelClient configRestHighLevelClient() throws Exception {
    String[] esUrlArr = esUrl.split(",");
    List<HttpHost> httpHosts = new ArrayList<>();
    for(String es : esUrlArr){
      String[] esUrlPort = es.split(":");
      httpHosts.add(new HttpHost(esUrlPort[0], Integer.parseInt(esUrlPort[1]), "http"));
    }
    return new RestHighLevelClient(RestClient.builder(httpHosts.toArray(new HttpHost[0])));
  }
}Now run the Spring boot project and access http://localhost:8080/index to enter the home page of the project. The interface is shown in Figure 8.1. In the following chapters, each function in the navigation menu will be introduced one after another to complete index establishment, search and statistical analysis.
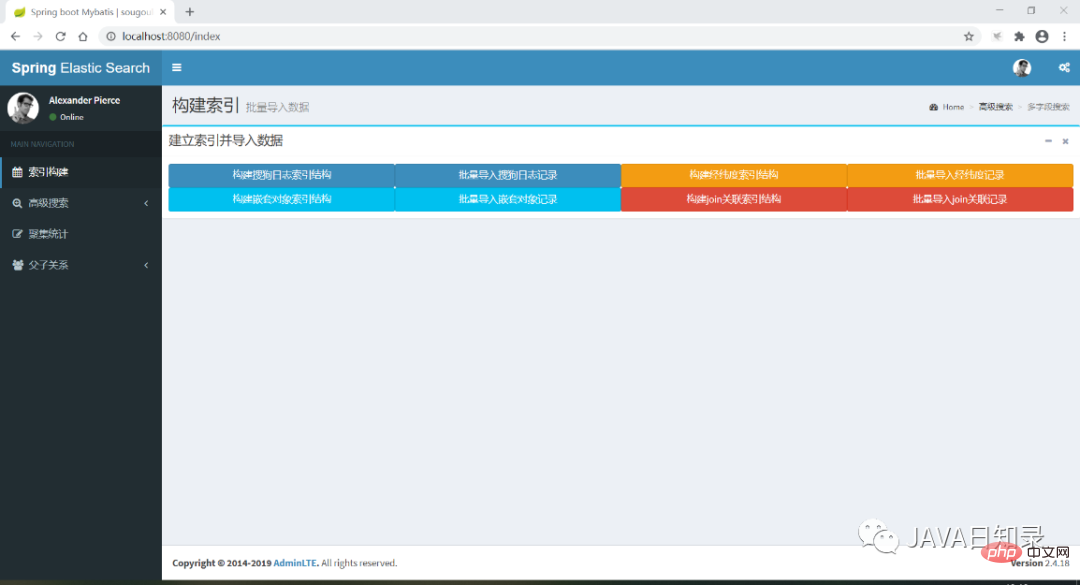
This section discusses how to use Java code Create an index mapping and write data to the index. The example demonstrated includes four indexes: the index sougoulog that uses the finest-grained analyzer for word segmentation, the index shop that contains latitude and longitude coordinate points, the index city that contains nested objects, and the join field that contains The index of cityjoincountry.
#1. Custom analyzer mapping sougoulog
The mapping interface for creating sougoulog index is in the IndexController class. You can use the XContentBuilder object to create a mapping in json format very elegantly. The key code is as follows:
@ApiOperation("创建索引sougoulog")
@RequestMapping(value="/createIndexMapping",method = RequestMethod.GET)
@ResponseBody
MSG createMapping() throws Exception{
    // 创建sougoulog索引映射
    boolean exsit = indexService.existIndex("sougoulog");
    if ( exsit == false ) {
        XContentBuilder builder = XContentFactory.jsonBuilder();
        builder.startObject();
        {
            …...
            builder.startObject("analyzer");
            {
                builder.startObject("my_analyzer");
                {
                    builder.field("filter", "my_filter");
                    builder.field("char_filter", "");
                    builder.field("type", "custom");
                    builder.field("tokenizer", "my_tokenizer");
                }
                builder.endObject();
            }
            builder.endObject();
            …...
            builder.startObject("keywords");
            {
                builder.field("type", "text");
                builder.field("analyzer", "my_analyzer");
                builder.startObject("fields");
                {
                    builder.startObject("keyword");
                    {
                        builder.field("type", "keyword");
                        builder.field("ignore_above", "256");
                    }
                    builder.endObject();
                }
                builder.endObject();
            }
            builder.endObject();
            ......
        }
        builder.endObject();
        System.out.println(builder.prettyPrint());
        indexService.createMapping("sougoulog", builder);
    }
    return new MSG("index success");
}In this interface, the created mapping sougoulog contains a name It is the analyzer of my_tokenizer, and this analyzer is applied to the three fields of keywords, url, and userid. It will cut the text of these three fields to the finest granularity for the multi-text field search function. At the end of the interface, the createMapping method will create a mapping named sougoulog based on the written json structure. The content of the method createMapping of indexService is as follows:
@Override
public void createMapping(String indexname, XContentBuilder mapping) {
  try {
    CreateIndexRequest index = new CreateIndexRequest(indexname);
    index.source(mapping);
    client.indices().create(index, RequestOptions.DEFAULT);
  } catch (IOException e) {
    // TODO Auto-generated catch block
    e.printStackTrace();
  }
}When creating a mapping, you need to create a new CreateIndexRequest object, set the XContentBuilder for the object to load the specific field information of the mapping, and finally use the RestHighLevelClient object to initiate a request to build the mapping.
2. Mapping containing latitude and longitude coordinates
The following interface createShopMapping creates an index named shop, which contains a latitude and longitude coordinate field. Part of its code is as follows:
@ApiOperation("创建shop索引")
@RequestMapping(value="/createShopMapping",method = RequestMethod.GET)
@ResponseBody
MSG createShopMapping() throws Exception{
  // 创建shop索引映射
  boolean exsit = indexService.existIndex("shop");
  if ( exsit == false ) {
    XContentBuilder builder = XContentFactory.jsonBuilder();
    builder.startObject();
    {
      ……
      builder.startObject("location");
      {
       builder.field("type", "geo_point");
      }
      builder.endObject();
      ……
    }
    builder.endObject();
    System.out.println(builder.prettyPrint());
    indexService.createMapping("shop",builder);
  }
  return new MSG("index success");
}它的实现过程跟sougoulog索引是一样的,都是先用XContentBuilder构建映射内容,然后由客户端发起CreateIndexRequest请求把索引创建出来。
3.包含嵌套对象的映射
下面的接口createCityMapping创建了一个名为city的索引,它包含一个嵌套对象,用于存放城市所属的国家数据,部分代码如下:
@ApiOperation("创建城市索引")
@RequestMapping(value="/createCityMapping",method = RequestMethod.GET)
@ResponseBody
MSG createCityMapping() throws Exception{
// 创建shop索引映射
    boolean exsit=indexService.existIndex("city");
    if(exsit==false){
        XContentBuilder builder=XContentFactory.jsonBuilder();
        builder.startObject();
        {
            ……
            builder.startObject("country");
            {
                builder.field("type","nested");
                builder.startObject("properties");
                {
                    ……
                }
                ……
                indexService.createMapping("city",builder);
            }
            return new MSG("index success");
        }
    }
}4.包含join类型的映射
接口createJoinMapping创建一个带有join字段的索引cityjoincountry,该索引包含父关系country、子关系city,其创建方法也是类似的:
@ApiOperation("创建一对多关联索引")
@RequestMapping(value="/createJoinMapping",method = RequestMethod.GET)
@ResponseBody
MSG createJoinMapping() throws Exception {
    // 创建shop索引映射
    boolean exsit = indexService.existIndex("cityjoincountry");
    if ( exsit == false ) {
        XContentBuilder builder = XContentFactory.jsonBuilder();
        builder.startObject();
        {
            ……
            builder.startObject("joinkey");
            {
                builder.field("type", "join");
                builder.startObject("relations");
                {
                    builder.field("country", "city");
                }
                builder.endObject();
            }
            builder.endObject();
            ……
        }
        builder.endObject();
        indexService.createMapping("cityjoincountry",builder);
    }
    return new MSG("index success");
}向索引写入数据的格式通常有两种,一种是使用json字符串格式,另一种是使用Hashmap对象写入各个字段。
1.使用json字符串写入一条数据
向索引写入数据的请求需要使用IndexRequest对象,它可以接收一个索引名称作为参数,通过方法id为索引指定主键,你还需要使用source方法指定传入的数据格式和数据本身的json字符串:
@ApiOperation("索引一个日志文档")
@RequestMapping(value="/indexSougoulog", method = RequestMethod.POST)
@ResponseBody
MSG indexDoc(@RequestBody Sougoulog log){
    IndexRequest indexRequest = new IndexRequest("sougoulog").id(String.valueOf(log.getId()));
    indexRequest.source(JSON.toJSONString(log), XContentType.JSON);
    try {
        client.index(indexRequest, RequestOptions.DEFAULT);
    } catch(ElasticsearchException e ) {
        if (e.status() == RestStatus.CONFLICT) {
            System.out.println("写入索引产生冲突"+e.getDetailedMessage());
        }
    } catch(IOException e) {
        e.printStackTrace();
    }
    return new MSG("index success");
}2.使用Hashmap格式写入数据
使用Hashmap写入数据时,最大的区别是在使用source方法时,要传入Hashmap对象,在IndexServiceImpl中包含了这一方法:
@Override
public void indexDoc(String indexName, String id, Map<String, Object> doc) {
    IndexRequest indexRequest = new IndexRequest(indexName).id(id).source(doc);
    try {
        IndexResponse response = client.index(indexRequest, RequestOptions.DEFAULT);
        System.out.println("新增成功" + response.toString());
    } catch(ElasticsearchException e ) {
        if (e.status() == RestStatus.CONFLICT) {
            System.out.println("写入索引产生冲突"+e.getDetailedMessage());
        }
    } catch(IOException e) {
        e.printStackTrace();
    }
}3.批量写入数据
批量写入数据在实际应用中更为常见,也支持json格式或Hashmap格式,需要用到批量请求对象BulkRequest。这里列出使用Hashmap批量写入数据的关键代码:
@Override
public void indexDocs(String indexName, List<Map<String, Object>> docs) {
    try {
        if (null == docs || docs.size() <= 0) {
            return;
        }
        BulkRequest request = new BulkRequest();
        for (Map<String, Object> doc : docs) {
            request.add(new IndexRequest(indexName).id((String)doc.get("key")).source(doc));
        }
        BulkResponse bulkResponse = client.bulk(request, RequestOptions.DEFAULT);
        ……
    } catch (IOException e) {
        e.printStackTrace();
    }
}在这个方法中,传入的参数是包含多个Hashmap的列表,BulkRequest需要循环将每个Hashmap数据载入进来,最后通过客户端的bulk方法一次性提交写入所有的数据。
实际上,四个索引的数据导入都是采用Hashmap格式进行批量导入,数据源在resources文件夹下,有四个txt文件,有四个接口会分别读取这四个文本文件导入到对应的索引中。当你在写入嵌套对象的字段时,你需要将嵌入的文本作为一个单独的Hashmap来写入。
4.写入带有路由的数据
当你想为join字段写入数据时,需要先写入父文档,再写入子文档,并且写入子文档时会带有路由参数,写入数据时,需要给indexRequest对象设置routing参数来指定路由,关键的代码如下:
@Override
public void indexDocWithRouting(String indexName, String route, Map<String, Object> doc) {
    IndexRequest indexRequest = new IndexRequest(indexName).id((String)doc
    .get("key")).source(doc);
    indexRequest.routing(route);
    try {
        IndexResponse response = client.index(indexRequest, RequestOptions.DEFAULT);
        System.out.println("新增成功" + response.toString());
    } catch(ElasticsearchException e ) {
        if (e.status() == RestStatus.CONFLICT) {
            System.out.println("写入索引产生冲突"+e.getDetailedMessage());
        }
    } catch(IOException e) {
        e.printStackTrace();
    }
}5.修改数据
修改数据的请求需要使用UpdateRequest对象来实现,该对象需要指定修改数据的主键,如果主键不存在则会报错。为了达到upsert的效果,也就是主键不存在时执行添加操作,需要设置docAsUpsert参数为true。最后调用客户端的update方法即可更新成功:
@Override
public void updateDoc(String indexName, String id, Map<String, Object> doc) {
    UpdateRequest request = new UpdateRequest(indexName, id).doc(doc);
    request.docAsUpsert(true);
    try {
        UpdateResponse updateResponse = client.update(request, RequestOptions.DEFAULT);
        long version = updateResponse.getVersion();
        if (updateResponse.getResult() == DocWriteResponse.Result.CREATED) {
            System.out.println("insert success, version is " + version);
        } else if (updateResponse.getResult() == DocWriteResponse.Result.UPDATED) {
            System.out.println("update success, version is " + version);
        }
    } catch (IOException e) {
        // TODO Auto-generated catch block
        e.printStackTrace();
    }
}6.删除数据
要删除数据,需要使用DeleteRequest对象,传入索引的名称和主键,调用客户端的删除方法即可,代码如下:
@Override
public int deleteDoc(String indexName, String id) {
    DeleteResponse deleteResponse = null;
    DeleteRequest request = new DeleteRequest(indexName, id);
    try {
        deleteResponse = client.delete(request, RequestOptions.DEFAULT);
        System.out.println("删除成功" + deleteResponse.toString());
        if (deleteResponse.getResult() == DocWriteResponse.Result.NOT_FOUND) {
            System.out.println("删除失败,文档不存在" + deleteResponse.toString());
            return -1;
        }
    } catch (ElasticsearchException e) {
        if (e.status() == RestStatus.CONFLICT) {
            System.out.println("删除失败,版本号冲突" + deleteResponse.toString());
            return -2;
        }
    } catch (IOException e) {
        e.printStackTrace();
        return -3;
    }
    return 1;
}以上就是几种常规的数据写入方式,请进入工程首页,在“索引构建”菜单下,点击各个按钮,就可以完成每个索引的建立和数据的导入,下一节将演示如何搜索这些索引的数据。
本节演示前面四个索引数据的几种常规的搜索方法,搜索时,为了实现5.4.1节描述的通用搜索结构模板,需要使用的布尔查询代码如下:
// 创建搜索请求对象
SearchRequest searchRequest = new SearchRequest(request.getQuery().getIndexname());

// 创建搜索请求的构造对象
SearchSourceBuilder searchSourceBuilder = new SearchSourceBuilder();

// 设置布尔查询的内容
BoolQueryBuilder builder;

// 添加搜索上下文
builder = QueryBuilders.boolQuery().must(QueryBuilders.matchQuery("name", "zhangsan"));

// 添加过滤上下文
builder.filter(QueryBuilders.rangeQuery("born").from("2010-01-01").to("2011-01-01"));

// 设置布尔查询的结构体到搜索请求
searchSourceBuilder.query(builder);

// 载入搜索请求的参数
searchRequest.source(searchSourceBuilder);

// 由客户端发起布尔查询请求并得到结果
searchResponse = client.search(searchRequest, RequestOptions.DEFAULT);SearchSourceBuilder用于构建搜索请求的查询条件,为了创建布尔查询,这里使用了BoolQueryBuilder的must方法创建了一个搜索上下文,然后使用了filter方法创建了一个过滤上下文,你可以把实际用到的查询条件都放入这些上下文中组成需要的业务逻辑。搜索条件的参数设置好以后需要将其载入到SearchSourceBuilder对象中,除了搜索条件,排序、高亮、字段折叠有关的其它搜索参数也可以添加到SearchSourceBuilder中。设置完毕后,将构建好的搜索请求结构写入SearchRequest,最后由客户端发起search请求拿到搜索结果。
1.多文本字段搜索
在类SearchServiceImpl中,包含了各种不同的搜索方法,为了对sougoulog数据做多文本字段检索,在搜索上下文使用QueryBuilders创建了queryStringQuery,并且在过滤上下文添加了范围查询rangeQuery,核心代码如下:
@Override
public SearchResponse query_string(ElasticSearchRequest request){
    SearchRequest searchRequest=new SearchRequest(request.getQuery().getIndexname());
    // 如果关键词为空,则返回所有
    String content=request.getQuery().getKeyWords();
    Integer rows=request.getQuery().getRows();
    if(rows==null||rows==0){
        rows=10;
    }
    Integer start=request.getQuery().getStart();
    if(content==null||"".equals(content)){
        // 查询所有
        content="*";
    }
    SearchSourceBuilder searchSourceBuilder=new SearchSourceBuilder();
    // 提取搜索内容
    BoolQueryBuilder builder;
    if("*".equalsIgnoreCase(content)){
        builder=QueryBuilders.boolQuery().must(QueryBuilders.queryStringQuery(content));
    }else{
        builder=QueryBuilders.boolQuery()
        .must(QueryBuilders.queryStringQuery(ToolUtils.handKeyword(content)));
    }
// 提取过滤条件
    FilterCommand filter=request.getFilter();
    if(filter!=null){
        if(filter.getStartdate()!=null&&filter.getEnddate()!=null){
            builder.filter(QueryBuilders.rangeQuery(filter.getField())
            .from(filter.getStartdate()).to(filter.getEnddate()));
        }
    }
    ……
    searchSourceBuilder.query(builder);
    searchRequest.source(searchSourceBuilder);
    SearchResponse searchResponse=null;
    try{
        searchResponse=client.search(searchRequest,RequestOptions.DEFAULT);
    }catch(IOException e){
    // TODO Auto-generated catch block
        e.printStackTrace();
    }
    return searchResponse;
}这个方法先使用SearchRequest对象创建一个搜索请求,它接收索引名称的参数用于确定搜索范围,然后使用了BoolQueryBuilder创建了一个布尔查询,若要添加搜索的排序,需要给SearchSourceBuilder设置排序的参数:
searchSourceBuilder.sort(request.getQuery().getSort(), SortOrder.ASC);
第一个参数是排序的字段,第二个参数可以控制升序或降序。
为了添加搜索的高亮,需要使用HighlightBuilder,在field方法中指定高亮的字段列表,这里设置了对所有字段高亮,最后也要将高亮参数添加到SearchSourceBuilder中:
// 处理高亮
HighlightBuilder highlightBuilder = new HighlightBuilder();
highlightBuilder.field("*");
searchSourceBuilder.highlighter(highlightBuilder);为了搜索全部数据并设置分页参数,需要在SearchSourceBuilder中设置以下参数:
// 查询全部
searchSourceBuilder.trackTotalHits(true);
searchSourceBuilder.from(start);
searchSourceBuilder.size(rows);
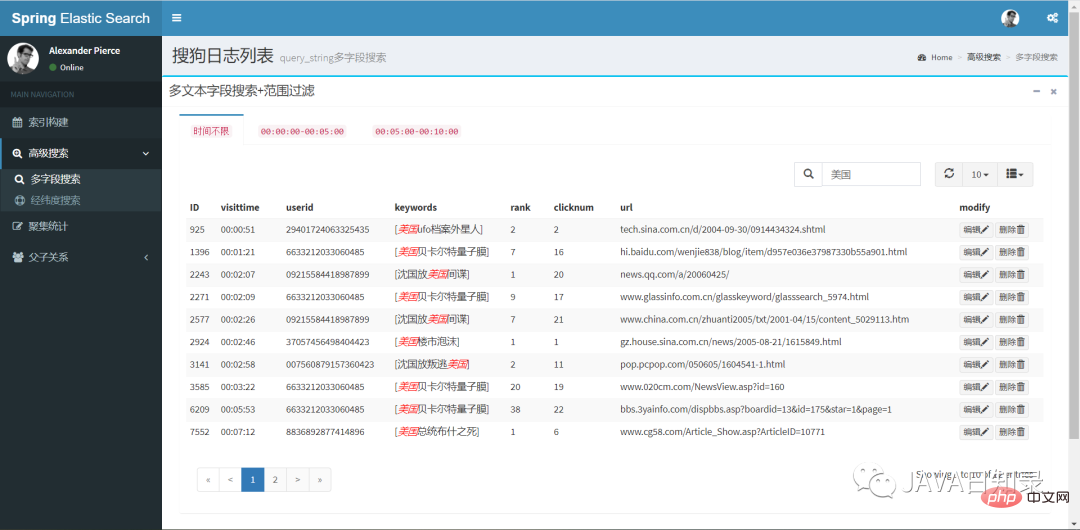
Query_string是功能强大的多文本字段搜索方法,具体的使用方式在5.2.6节介绍过,它的搜索效果如图8.2所示。
2.经纬度圆形搜索
为了实现5.3.1节中的经纬度圆形搜索,需要给QueryBuilders使用geoDistanceQuery,其它的部分与之前类似,其关键代码如下:
@Override
public SearchResponse geoDistanceSearch(String index, GeoDistance geo, Integer pagenum, Integer pagesize) {
    SearchRequest searchRequest = new SearchRequest("shop");
    SearchSourceBuilder searchSourceBuilder = new SearchSourceBuilder();
    BoolQueryBuilder builder;
    builder = QueryBuilders.boolQuery().must(QueryBuilders.geoDistanceQuery("location")
    .point(geo.getLatitude(), geo.getLongitude())
    .distance(geo.getDistance(), DistanceUnit.KILOMETERS));
    SearchResponse searchResponse = null;
    try {
        searchSourceBuilder.query(builder);
        searchSourceBuilder.trackTotalHits(true);
        searchRequest.source(searchSourceBuilder);
        int start = (pagenum - 1) * pagesize;
        searchSourceBuilder.from(start);
        searchSourceBuilder.size(pagesize);
        searchResponse = client.search(searchRequest, RequestOptions.DEFAULT);
    } catch (IOException e) {
        // TODO Auto-generated catch block
        e.printStackTrace();
    }
    return searchResponse;
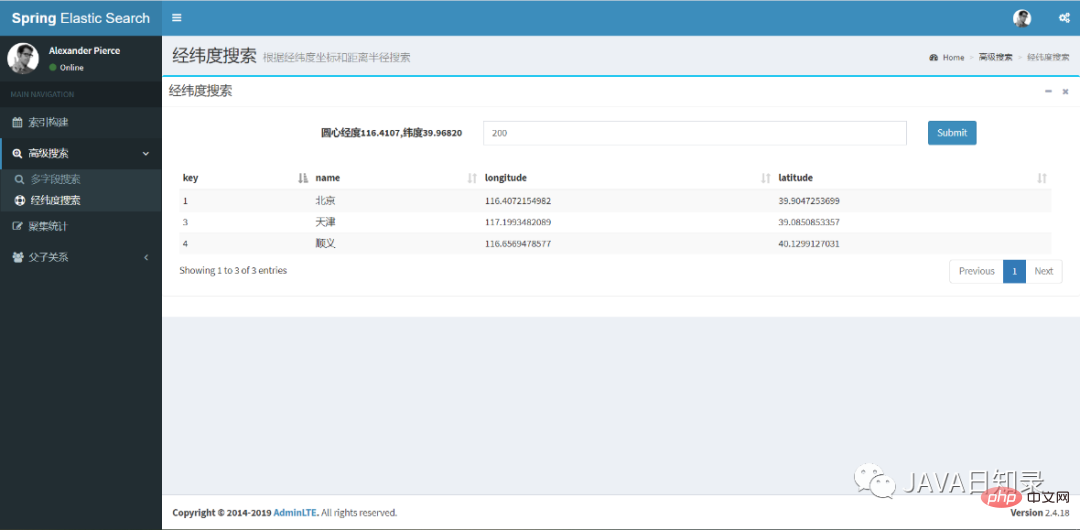
}经纬度搜索的前端效果如图8.3所示,你只需要填入检索半径就能找到中心点之内的城市列表。
3.嵌套对象搜索
嵌套对象的搜索与其他搜索的重要区别是需要给QueryBuilders使用nestedQuery,该查询需要传入嵌套对象的路径参数,其关键代码如下:
BoolQueryBuilder builder = QueryBuilders.boolQuery()
.must(QueryBuilders.nestedQuery(path, QueryBuilders.matchQuery(field, value),
ScoreMode.None));
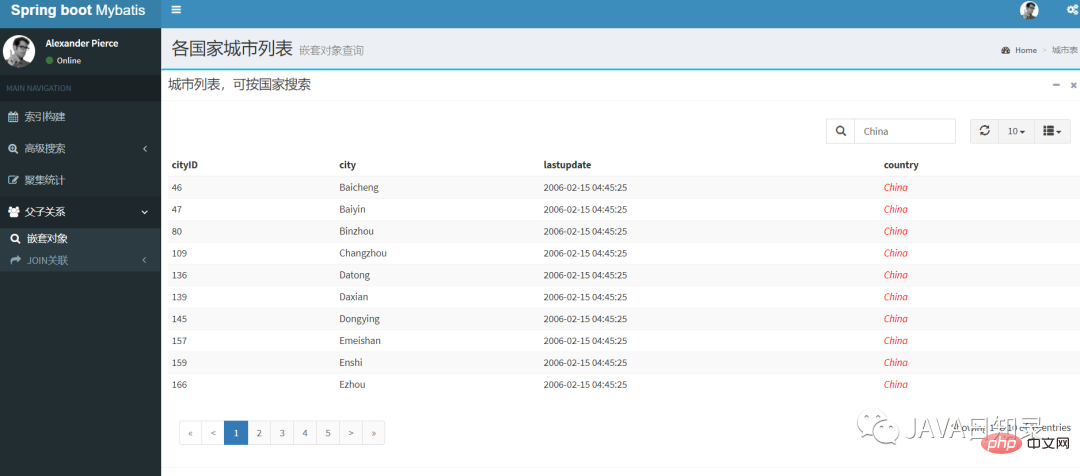
点击工程首页的“嵌套对象”导航菜单,你可以在该页面用国家作为搜索条件搜索嵌套对象,其效果如图8.4所示。
4.以父搜子
索引cityjoincountry已经包含了join类型的父子关联数据,要实现以父搜子,需要使用对象JoinQueryBuilders的hasParentQuery来构建查询条件:
builder = JoinQueryBuilders.hasParentQuery(parenttype, QueryBuilders
.termQuery(field, value), false);
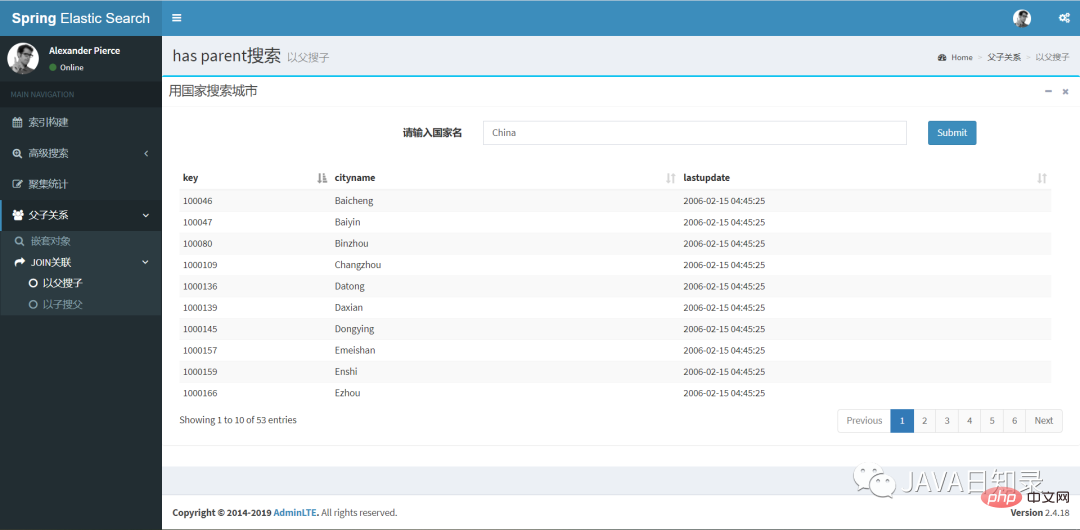
这个搜索的hasParentQuery需要传入父关系的名称,然后对父文档做了一个term搜索,参数false表示父文档的相关度不影响子文档的相关度得分。在页面“以父搜子”中,用国家搜索城市的效果如图8.5所示。
5.以子搜父
反过来,你可以使用hasChildQuery完成以子搜父的效果,其关键代码如下:
builder = JoinQueryBuilders.hasChildQuery(childtype, QueryBuilders.termQuery(field, value),
ScoreMode.None);
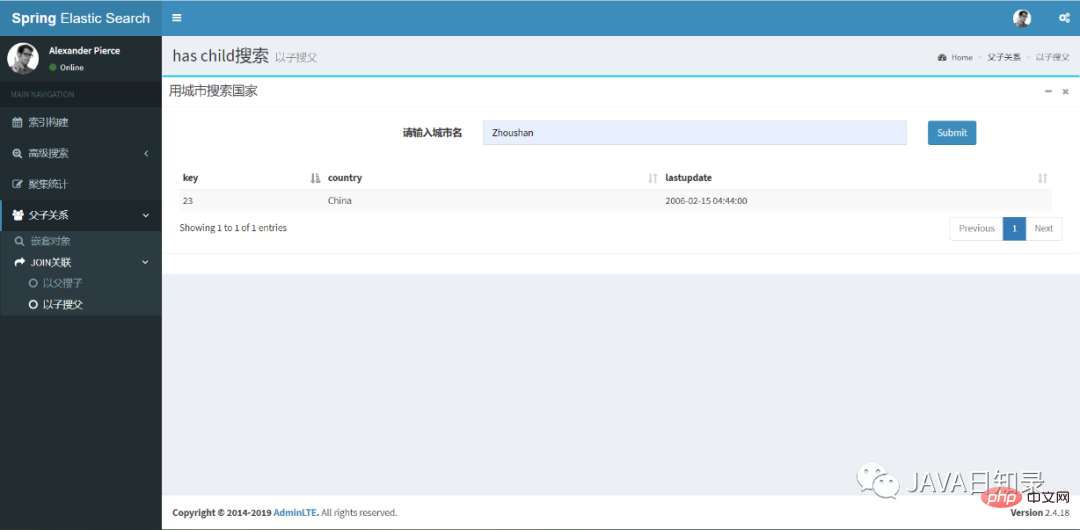
对应的前端搜索效果,如图8.6所示。
以上就是几种常规的搜索方法的实现,搜索请求返回的SearchResponse可以用于取出搜索结果下发到前端,常规的方法如下:
SearchHits hits = searchResponse.getHits();
SearchHit[] searchHits = hits.getHits();
for (SearchHit hit : searchHits) {
  Map<String, Object> map = hit.getSourceAsMap();
  ……
}除了这种使用Map的方式拿到搜索结果,还可以直接以json字符串的方式得到搜索结果:
String result = hit.getSourceAsString();
如果要取出高亮结果,可以使用SearchHit对象的getHighlightFields方法,最后得到的fragmentString就是高亮的内容文本:
// 获取高亮结果
Map<String, HighlightField> highlightFields = hit.getHighlightFields();
for (Map.Entry<String, HighlightField> entry : highlightFields.entrySet()) {
  String mapKey = entry.getKey();
  HighlightField mapValue = entry.getValue();
  Text[] fragments = mapValue.fragments();
  String fragmentString = fragments[0].string();
  ……
}这一节来对上面的四个索引做常用的统计分析,你只需要给前面的SearchSourceBuilder传递聚集统计的参数就能达到目的,实现聚集统计的方法在源码的类AggsServiceImpl中。
1.词条聚集
使用TermsAggregationBuilder可以创建一个词条聚集,关键代码如下:
TermsAggregationBuilder aggregation = AggregationBuilders.terms("countnumber")
.field(content.getAggsField()).size(10)
.order(BucketOrder.key(true));
searchSourceBuilder.query(queryBuilder).aggregation(aggregation);这里创建了一个名为countnumber的词条聚集,field参数用于指定聚集的字段,桶的数目为10个,返回的桶按照key的升序排列。
发送请求后,你需要在SearchResponse中使用聚集的名称取出每个桶的聚集结果:
Aggregations result = searchResponse.getAggregations();
Terms byCompanyAggregation = result.get("countnumber");
List<? extends Terms.Bucket> bucketList = byCompanyAggregation.getBuckets();
List<BucketResult> list = new ArrayList<>();
for (Terms.Bucket bucket : bucketList) {
  BucketResult br = new BucketResult(bucket.getKeyAsString(), bucket.getDocCount());
  list.add(br);
}这个例子选择了日期字段visittime做词条聚集,它会选择前十秒的数据统计出每个时间点的文档数,如图8.7所示。

2.日期直方图聚集
日期直方图聚集需要使用DateHistogramAggregationBuilder进行构建,实现的关键代码如下:
DateHistogramAggregationBuilder dateHistogramAggregationBuilder = AggregationBuilders
.dateHistogram("aggsName")
.field(dateField)
.fixedInterval(DateHistogramInterval.seconds(step))
// .extendedBounds(new ExtendedBounds("2020-09-01 00:00:00", "2020-09-02 05:00:00")
.minDocCount(0L);

searchSourceBuilder.query(queryBuilder).aggregation(dateHistogramAggregationBuilder);上面代码传入的参数分别是聚集的名称,聚集的字段、固定的步长以及最小文档数。如果需要控制返回桶的上下界,则需要添加注释中的参数extendedBounds。
然后,你需要使用聚集的名称取出该请求的结果:
Aggregations jsonAggs = searchResponse.getAggregations();
Histogram dateHistogram = (Histogram) jsonAggs.get("aggsName");
List<? extends Histogram.Bucket> bucketList = dateHistogram.getBuckets();
List<BucketResult> list = new ArrayList<>();

for (Histogram.Bucket bucket : bucketList) {
 BucketResult br = new BucketResult(bucket.getKeyAsString(), bucket.getDocCount());
 list.add(br);
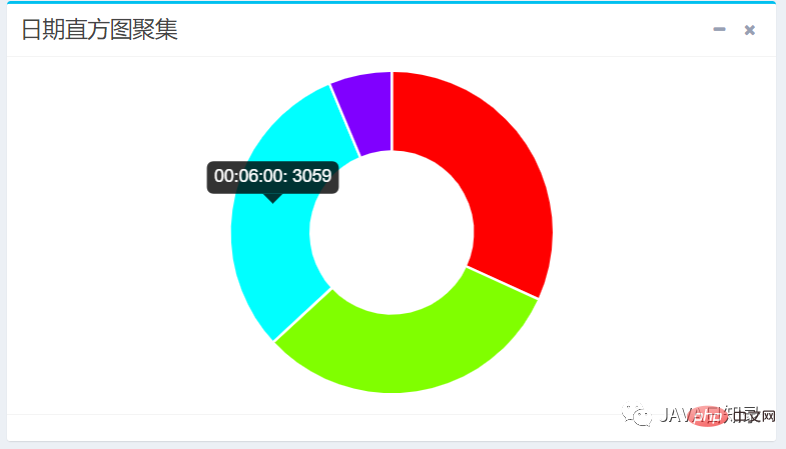
}以三分钟为时间间隔,在sougoulog索引的visittime字段统计出的日期直方图效果如图8.8所示。
3.范围聚集
使用DateRangeAggregationBuilder可以构建一个范围聚集,你只需传入聚集名称、聚集的字段和一组区间就可以完成:
DateRangeAggregationBuilder dateRangeAggregationBuilder = AggregationBuilders
 .dateRange("aggsName")
 .field(dateField);

//添加只有下界的区间
dateRangeAggregationBuilder.addUnboundedFrom(from);
//添加只有上界的区间
dateRangeAggregationBuilder.addUnboundedTo(to);
//添加上下界都有的区间
dateRangeAggregationBuilder.addRange(from, to);

searchSourceBuilder.query(queryBuilder).aggregation(dateRangeAggregationBuilder);要取出范围聚集的桶结果,可以使用的下面的代码:
Aggregations jsonAggs = searchResponse.getAggregations();
Range range = (Range) jsonAggs.get("aggsName");
List<? extends Range.Bucket> bucketList = range.getBuckets();
List<BucketResult> list = new ArrayList<>();
for (Range.Bucket bucket : bucketList) {
  BucketResult br = new BucketResult(bucket.getKeyAsString(), bucket.getDocCount());
  list.add(br);
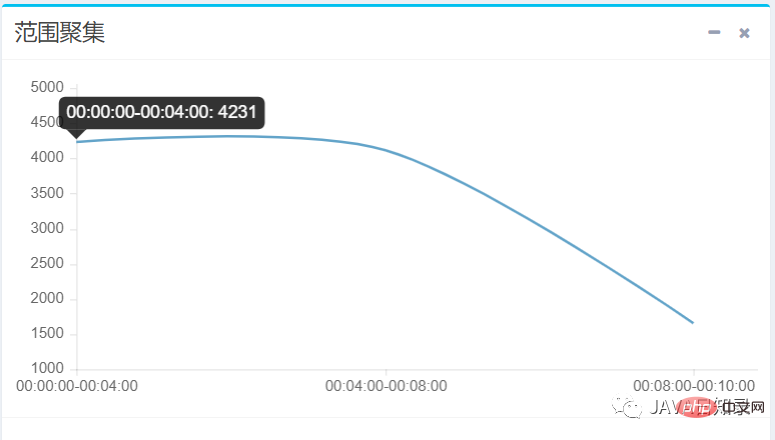
}在本实例中,前端向聚集请求传递了三个时间范围区间,得到sougoulog在每个时间区间的文档数量,效果如图8.9所示。
4.嵌套聚集
嵌套聚集请求要使用NestedAggregationBuilder进行构造,它的nested方法需要传入聚集的名称和嵌套对象的路径,然后使用subAggregation来添加子聚集完成对嵌套对象的统计,其关键代码如下:
NestedAggregationBuilder aggregation = AggregationBuilders.nested("nestedAggs", "country")
  .subAggregation(AggregationBuilders.terms("groupbycountry")
  .field("country.countryname.keyword").size(100)
  .order(BucketOrder.count(false)));

searchSourceBuilder.query(queryBuilder).aggregation(aggregation);这个请求配置了嵌套对象的路径为country,然后在子聚集中配置了一个词条聚集,它会统计出每个国家出现的次数,从而得到各国家的城市数目的统计。为了取出聚集桶的结果,需要先获取嵌套聚集对象,然后再获取子聚集对象,代码如下:
Nested result = searchResponse.getAggregations().get("nestedAggs");
Terms groupbycountry = result.getAggregations().get("groupbycountry");
List<? extends Terms.Bucket> bucketList = groupbycountry.getBuckets();
List<BucketResult> list = new ArrayList<>();
for (Terms.Bucket bucket : bucketList) {
  BucketResult br = new BucketResult(bucket.getKeyAsString(), bucket.getDocCount());
  list.add(br);
}该嵌套聚集会统计出各国家拥有城市数量的前十名,用柱状图展示的效果如图8.10所示。

The above is the detailed content of A 20,000-word long article reveals the advanced uses of SpringBoot's integration of ElasticSearch!. For more information, please follow other related articles on the PHP Chinese website!


