
 Common Problem
How to solve the problem that the local connection does not have a valid IP configuration
Common Problem
How to solve the problem that the local connection does not have a valid IP configuration
How to solve the problem that the local connection does not have a valid IP configuration

The solutions for local connection without valid IP configuration are: 1. Restart the network device; 2. Set to automatically obtain an IP address; 3. Disable and re-enable the local connection; 4. Refresh the IP configuration; 5. Check the network cables and physical connections; 6. Reset the network adapter.

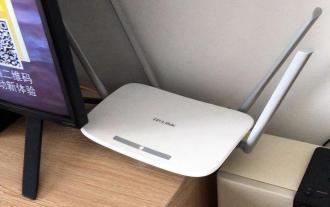
# Operating system for this tutorial: Windows 10 system, Dell G3 computer.
If the "No valid IP configuration" error occurs in the local connection, it means that your computer cannot obtain a valid IP address. This may result in the inability to connect to the network or prevent normal network communication. Here are some common ways to fix this problem:
Restart your network device: First try restarting your router, switch, or modem. Sometimes a temporary failure of the equipment may cause IP configuration problems. Wait for the device to restart and check whether a valid IP address can be obtained.
Obtain an IP address automatically: Make sure your computer is set to obtain an IP address automatically. Open Control Panel, go to "Network and Internet" and then select "Network and Sharing Center". Click "Change Adapter Settings", find the local area connection, right-click and select "Properties". Find "Internet Protocol Version 4 (TCP/IPv4)" in the properties window and double-click to open it. Make sure "Get IP address automatically" and "Get DNS server address automatically" are selected, save the changes and try to reconnect to the network.
Disable and re-enable Local Area Connection: Find Local Area Connection in "Network and Sharing Center", right-click and select "Disable", then right-click again and select "Enable". This will reinitialize the network connection and attempt to reacquire an IP address.
Refresh IP configuration: Open the command prompt (run as administrator), enter the command "ipconfig /release", and then press the Enter key. Wait for the command to be executed, then enter the command "ipconfig /renew" and press the Enter key. This will release the current IP configuration and try to obtain a new IP address.
Check network cables and physical connections: Make sure your network cables are properly connected to your computer and network devices (such as routers). Check if the cable is damaged or loose and try to replace the cable.
Reset the network adapter: Open the command prompt (run as administrator), enter the command "netsh int ip reset" and press the Enter key. This will reset the network adapter settings to default and may resolve IP configuration issues.
If the above method still does not solve the problem, there may be other network failures or configuration errors. In this case, it is recommended to contact your network administrator or technical support for further assistance.
The above is the detailed content of How to solve the problem that the local connection does not have a valid IP configuration. For more information, please follow other related articles on the PHP Chinese website!

Hot AI Tools

Undresser.AI Undress
AI-powered app for creating realistic nude photos

AI Clothes Remover
Online AI tool for removing clothes from photos.

Undress AI Tool
Undress images for free

Clothoff.io
AI clothes remover

AI Hentai Generator
Generate AI Hentai for free.
Hot Article
Hot Tools

Notepad++7.3.1
Easy-to-use and free code editor

SublimeText3 Chinese version
Chinese version, very easy to use

Zend Studio 13.0.1
Powerful PHP integrated development environment

Dreamweaver CS6
Visual web development tools

SublimeText3 Mac version
God-level code editing software (SublimeText3)
Hot Topics
 1359
1359
 52
52

 How to solve the problem that DHCP is not enabled in the local connection. Recommended solutions to the problem that the computer cannot access the Internet and prompts that the DHCP service is not enabled.
Mar 13, 2024 pm 12:07 PM
How to solve the problem that DHCP is not enabled in the local connection. Recommended solutions to the problem that the computer cannot access the Internet and prompts that the DHCP service is not enabled.
Mar 13, 2024 pm 12:07 PM
When many users use computers to connect to Ethernet, they will see the prompt "DHCP is not enabled" and don't know what to do. This is because the DHCP function is not enabled on the router. This article teaches you how to solve this problem. 1. Check the login information. To solve the problem of "DHCP is not enabled on the Ethernet", you need to log in to the router first. When logging in to a router, you usually need to obtain the router's gateway, username, and password information. This information is usually marked on the back of the router. The IP of the router is the so-called gateway address. The default gateway address of some routers is 192.168.1.1 or 192.168.0.1. The login account generally defaults to admin and the password is admin or 123456. 2. Log in to router management
 How to create a local connection in win11
Jun 29, 2023 pm 12:55 PM
How to create a local connection in win11
Jun 29, 2023 pm 12:55 PM
How to create a local connection in win11? After upgrading to the win11 system, some friends found that some functions could not be used normally. When some friends used local connection, they found that they could not connect normally. If they could not connect normally, they would not be able to access the Internet. So how should we solve it. The editor below has compiled the steps to create a local connection in win11. If you are interested, follow the editor to read below! Steps to create a local connection in win11: 1. Click the desktop start menu to open the settings panel, as shown in the figure. 2. Find the Network and Internet options, as shown in the figure. 3. Click the Set Dial-up Connection button, as shown in the figure. 4. Click Set New Connection Options under this column, as shown in the figure. 5. Finally click Set New Network Diagram
 Delete redundant local connections in Win7 system 2
Jul 19, 2023 pm 06:21 PM
Delete redundant local connections in Win7 system 2
Jul 19, 2023 pm 06:21 PM
When checking the computer network connection of the Win7 system, sometimes you will find that in addition to the local connection, there is also a local connection 2. After understanding, we know that this is a redundant network card local connection address. Due to the existence of local connection 2, sometimes the local connection cannot be connected and therefore cannot access the Internet. How do we remove redundant local area connection 2? Win7 system deletes redundant local connections 2. 1. Click the Start menu, search for Run and press the Enter key or directly press the Windows key (window) + R key to open the Run dialog box; 2. Enter regedit in the Run dialog box, and Press the OK key; 3. In the registry editor, expand to HKEY_LOCAL_MCHINE\SYSTEM\Curentcontrol
 Tutorial on how to deal with the problem of not being able to access WiFi after reinstalling win7
Jul 09, 2023 pm 02:29 PM
Tutorial on how to deal with the problem of not being able to access WiFi after reinstalling win7
Jul 09, 2023 pm 02:29 PM
What should I do if I can’t access WiFi after reinstalling win7? After installation, many friends' computers cannot open the Internet. This is because the computer is missing the network card driver. If your computer cannot access WiFi after reinstalling Win7, you can refer to the following steps to reinstall and upgrade the wireless network card driver. Tutorial on how to deal with WiFi problems when you cannot access the Internet after reinstalling win7. 1. Use a browser to search for Driver Wizard on other computers, enter the official website and download [Driver Wizard Network Port Version] to a USB flash drive. 2. Then reinstall the driver wizard network port version for win7 computers that cannot access the Internet, open the software, and click one-click installation. 3. Click feeling immediately after installation. 4. Click Check Now, and then automatically install the driver, and then you can surf the Internet normally. The above is w
 What to do if there is no local connection in win7 system
Jun 29, 2023 pm 01:46 PM
What to do if there is no local connection in win7 system
Jun 29, 2023 pm 01:46 PM
What should I do if there is no local connection in win7 system? Win7 system cannot make local connection. How to solve the problem and share the tutorial. After reinstalling win7 system or just installing a new system on the computer, the user finds that his computer cannot connect to the network. Many users will encounter this situation. The reason is that the computer does not have the corresponding driver, and they need to update it or download the driver. Win7 system cannot perform local connection solution operation tutorial sharing 1. If you find that there is no exclamation mark and question mark in front of the network card driver in the device manager, and the driver is normal, then you should consider the error of the network connection management service program. 2. Press and hold the Win key + R key to open the run window. 3. In order
 Where is the local connection in win7?
Dec 23, 2023 pm 10:59 PM
Where is the local connection in win7?
Dec 23, 2023 pm 10:59 PM
Although many friends have been using computers for a long time, they don’t know where the local connection is in Windows 7. Today, the editor will bring you how to open the local connection in Windows 7! Let’s take a look. How to open local connection on Win7 computer: 1. First, click "Network" on the Win7 desktop to enter the network settings. 2. Click "Network and Sharing Center" at the top. 3. Then click "Change Adapter Settings" on the left. 4. Click "Change Adapter" settings to find the local connection. (The above is all the content about where is the local connection in win7 brought by the editor! If the above content is helpful to your problem, please pay attention to this site, we will bring you continuous high-quality content)
 How to restore local connection missing in win7
Jul 02, 2023 pm 04:17 PM
How to restore local connection missing in win7
Jul 02, 2023 pm 04:17 PM
How to restore local connection lost in win7? When using win7, some friends find that the local connection is missing. How to retrieve the local connection in this case? Many friends don't know how to retrieve it. Many friends don’t know how to operate it. The editor has compiled the method to restore the local connection in Windows 7 system. If you are interested, follow the editor to take a look below! Method to restore local connection in Windows 7 system 1. Right-click on the computer and click Properties. As shown in the figure: 2. A dialog box pops up and click Device Manager. As shown in the figure: 3. A dialog box pops up and expand the network adapter. As shown in the figure: 4. Right-click on RealtekPCleGBEFamilyController. If
 How to solve the problem that the local connection does not have a valid IP configuration
Aug 17, 2023 am 10:51 AM
How to solve the problem that the local connection does not have a valid IP configuration
Aug 17, 2023 am 10:51 AM
The solutions to the local connection without valid IP configuration are: 1. Restart the network device; 2. Set to automatically obtain an IP address; 3. Disable and re-enable the local connection; 4. Refresh the IP configuration; 5. Check the network cable and physical Connect; 6. Reset the network adapter.