

Alibaba interviewer: Please handwrite an RPC framework for me.
Interviewers like to ask:
How to design a registration center? How to design a message queue? How to design a persistence framework? How to design an RPC framework? ......
Today, let’s talk about “RPC implementation principle” (other related topics: how to design an XX series, It has been published in Knowledge Planet)So first let’s clarify a question: What is RPC?
RPC is the abbreviation of Remote Procedure Call, that is, remote procedure call.
RPC is a computer communication protocol. This protocol allows a program running on one computer to call a subroutine on another computer without the developer having to additionally program this interaction.
It is worth noting that two or more applications are distributed on different servers, and calls between them are like local method calls. Next, let's analyze what happens in an RPC call?
Basic process of RPC calls
Some of the more popular RPC frameworks in the industry, such as those provided by Dubbo Interface-based remote method invocation means that the client only needs to know the definition of the interface to call remote services. In Java, interfaces cannot directly call instance methods. This operation must be done through their implementation class objects, which means that the client must generate proxy objects for these interfaces. For this purpose, Java provides support for Proxy and InvocationHandler to generate dynamic proxies; generate If you have a proxy object, how is each specific method called? When the proxy object generated by the JDK dynamic proxy calls the specified method, it will actually execute the #invoke method defined in the InvocationHandler, in which the remote method call is completed and the result is obtained.
Putting aside the client, looking back, RPC is a call between two computers. It is essentially a network communication between two hosts. When it comes to network communication, there must be serialization, deserialization, encoding and decoding, etc. Some issues that must be considered; at the same time, in fact, most systems are deployed in clusters. Multiple hosts/containers provide the same services to the outside world. If the number of nodes in the cluster is large, managing service addresses will also be very cumbersome. A common practice is that each service node registers its address and provided service list to a registration center, and the registration center manages the service list in a unified manner; this approach solves some problems and adds a new feature to the client. The job - that is, service discovery, generally speaking, is to find the service list corresponding to the remote method from the registration center and select a service address from it through a certain strategy to complete network communication.
After talking about the client and the registration center, another important role is naturally the server. The most important task of the server is to provide the real implementation of the service interface and monitor network requests on a certain port. After the request, the corresponding parameters (such as service interface, method, request parameters, etc.) are obtained from the network request, and then based on these parameters, the real implementation of the interface is called through reflection to obtain the result and written into the corresponding response stream.
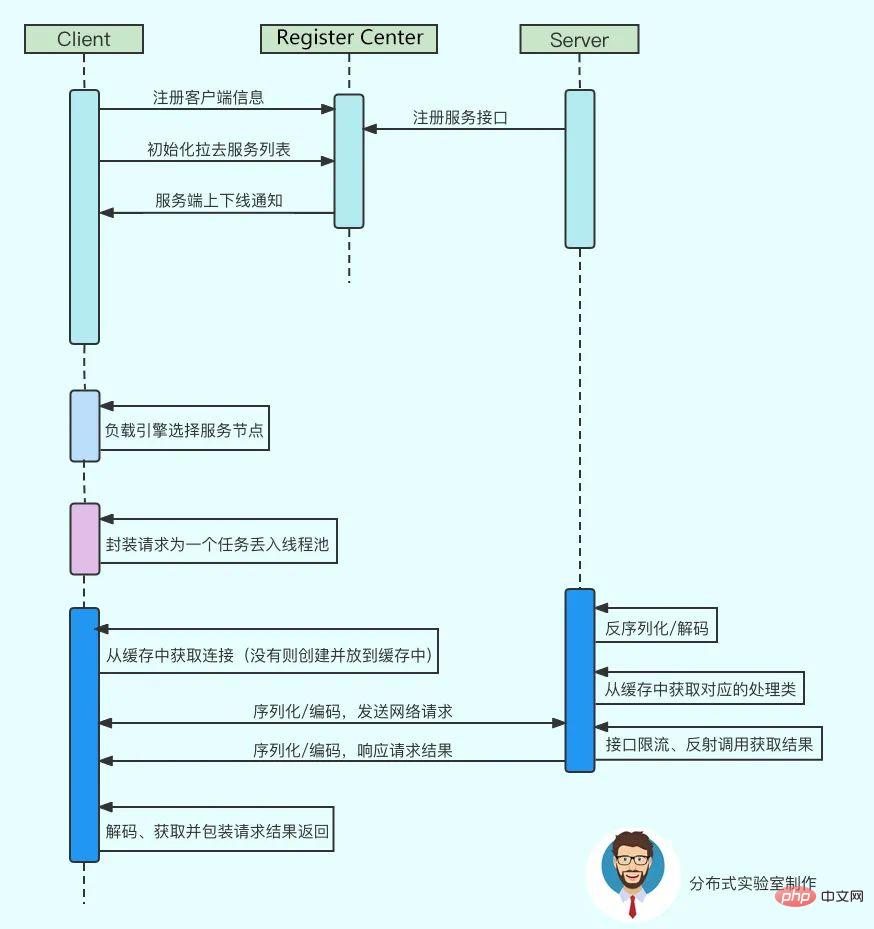
To sum up, a basic RPC call process is roughly as follows:
Basic implementation
Server (producer)
Service interface:
In RPC, production Authors and consumers have a common service interface API. As follows, define a HelloService interface.
/**
 * @Descrption  服务接口
 ***/
public interface HelloService {
    String sayHello(String somebody);
}Service implementation:
The producer needs to provide the implementation of the service interface and create the HelloServiceImpl implementation class.
/**
 * @Descrption 服务实现
 ***/
public class HelloServiceImpl implements HelloService {
    @Override
    public String sayHello(String somebody) {
        return "hello " + somebody + "!";
    }
}Service registration:
This example uses Spring to manage beans, and uses custom XML and parsers to load the service implementation class into the container (of course, custom annotations can also be used method (not discussed here) and register the service interface information to the registration center.
First customize the XSD:
<xsd:element name="service">
    <xsd:complexType>
        <xsd:complexContent>
            <xsd:extension base="beans:identifiedType">
                <xsd:attribute name="interface" type="xsd:string" use="required"/>
                <xsd:attribute name="timeout" type="xsd:int" use="required"/>
                <xsd:attribute name="serverPort" type="xsd:int" use="required"/>
                <xsd:attribute name="ref" type="xsd:string" use="required"/>
                <xsd:attribute name="weight" type="xsd:int" use="optional"/>
                <xsd:attribute name="workerThreads" type="xsd:int" use="optional"/>
                <xsd:attribute name="appKey" type="xsd:string" use="required"/>
                <xsd:attribute name="groupName" type="xsd:string" use="optional"/>
            </xsd:extension>
        </xsd:complexContent>
    </xsd:complexType>
</xsd:element>Specify Schema and XSD respectively, Schema and the mapping of the corresponding Handler.
Schema:
http\://www.storm.com/schema/storm-service.xsd=META-INF/storm-service.xsd
http\://www.storm.com/schema/storm-reference.xsd=META-INF/storm-reference.xsd
Handler:
http\://www.storm.com/schema/storm-service=com.hsunfkqm.storm.framework.spring.StormServiceNamespaceHandler
http\://www.storm.com/schema/storm-reference=com.hsunfkqm.storm.framework.spring.StormRemoteReferenceNamespaceHandler
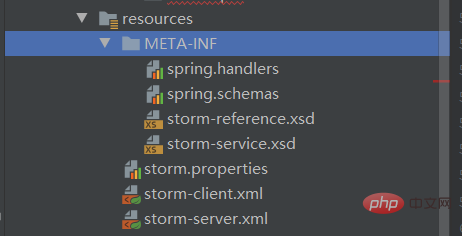
Put the written file into the META-INF directory under Classpath:
在 Spring 配置文件中配置服务类:
<!-- 发布远程服务 -->
 <bean id="helloService" class="com.hsunfkqm.storm.framework.test.HelloServiceImpl"/>
 <storm:service id="helloServiceRegister"
                     interface="com.hsunfkqm.storm.framework.test.HelloService"
                     ref="helloService"
                     groupName="default"
                     weight="2"
                     appKey="ares"
                     workerThreads="100"
                     serverPort="8081"
timeout="600"/>编写对应的 Handler 和 Parser:
StormServiceNamespaceHandler:
import org.springframework.beans.factory.xml.NamespaceHandlerSupport;

/**
 * @author 孙浩
 * @Descrption 服务发布自定义标签
 ***/
public class StormServiceNamespaceHandler extends NamespaceHandlerSupport {
    @Override
    public void init() {
        registerBeanDefinitionParser("service", new ProviderFactoryBeanDefinitionParser());
    }
}ProviderFactoryBeanDefinitionParser:
protected Class getBeanClass(Element element) {
        return ProviderFactoryBean.class;
    }

    protected void doParse(Element element, BeanDefinitionBuilder bean) {

        try {
            String serviceItf = element.getAttribute("interface");
            String serverPort = element.getAttribute("serverPort");
            String ref = element.getAttribute("ref");
            // ....
            bean.addPropertyValue("serverPort", Integer.parseInt(serverPort));
            bean.addPropertyValue("serviceItf", Class.forName(serviceItf));
            bean.addPropertyReference("serviceObject", ref);
            //...
            if (NumberUtils.isNumber(weight)) {
                bean.addPropertyValue("weight", Integer.parseInt(weight));
            }
            //...
       } catch (Exception e) {
            // ...
      }
}ProviderFactoryBean:
/**
 * @Descrption 服务发布
 ***/
public class ProviderFactoryBean implements FactoryBean, InitializingBean {

    //服务接口
    private Class<?> serviceItf;
    //服务实现
    private Object serviceObject;
    //服务端口
    private String serverPort;
    //服务超时时间
    private long timeout;
    //服务代理对象,暂时没有用到
    private Object serviceProxyObject;
    //服务提供者唯一标识
    private String appKey;
    //服务分组组名
    private String groupName = "default";
    //服务提供者权重,默认为 1 , 范围为 [1-100]
    private int weight = 1;
    //服务端线程数,默认 10 个线程
    private int workerThreads = 10;

    @Override
    public Object getObject() throws Exception {
        return serviceProxyObject;
    }

    @Override
    public Class<?> getObjectType() {
        return serviceItf;
    }

    @Override
    public void afterPropertiesSet() throws Exception {
        //启动 Netty 服务端
        NettyServer.singleton().start(Integer.parseInt(serverPort));
        //注册到 zk, 元数据注册中心
        List<ProviderService> providerServiceList = buildProviderServiceInfos();
        IRegisterCenter4Provider registerCenter4Provider = RegisterCenter.singleton();
        registerCenter4Provider.registerProvider(providerServiceList);
    }
}

//================RegisterCenter#registerProvider======================
@Override
public void registerProvider(final List<ProviderService> serviceMetaData) {
    if (CollectionUtils.isEmpty(serviceMetaData)) {
        return;
    }

    //连接 zk, 注册服务
    synchronized (RegisterCenter.class) {
        for (ProviderService provider : serviceMetaData) {
            String serviceItfKey = provider.getServiceItf().getName();

            List<ProviderService> providers = providerServiceMap.get(serviceItfKey);
            if (providers == null) {
                providers = Lists.newArrayList();
            }
            providers.add(provider);
            providerServiceMap.put(serviceItfKey, providers);
        }

        if (zkClient == null) {
            zkClient = new ZkClient(ZK_SERVICE, ZK_SESSION_TIME_OUT, ZK_CONNECTION_TIME_OUT, new SerializableSerializer());
        }

        //创建 ZK 命名空间/当前部署应用 APP 命名空间/
        String APP_KEY = serviceMetaData.get(0).getAppKey();
        String ZK_PATH = ROOT_PATH + "/" + APP_KEY;
        boolean exist = zkClient.exists(ZK_PATH);
        if (!exist) {
            zkClient.createPersistent(ZK_PATH, true);
        }

        for (Map.Entry<String, List<ProviderService>> entry : providerServiceMap.entrySet()) {
            //服务分组
            String groupName = entry.getValue().get(0).getGroupName();
            //创建服务提供者
            String serviceNode = entry.getKey();
            String servicePath = ZK_PATH + "/" + groupName + "/" + serviceNode + "/" + PROVIDER_TYPE;
            exist = zkClient.exists(servicePath);
            if (!exist) {
                zkClient.createPersistent(servicePath, true);
            }

            //创建当前服务器节点
            int serverPort = entry.getValue().get(0).getServerPort();//服务端口
            int weight = entry.getValue().get(0).getWeight();//服务权重
            int workerThreads = entry.getValue().get(0).getWorkerThreads();//服务工作线程
            String localIp = IPHelper.localIp();
            String currentServiceIpNode = servicePath + "/" + localIp + "|" + serverPort + "|" + weight + "|" + workerThreads + "|" + groupName;
            exist = zkClient.exists(currentServiceIpNode);
            if (!exist) {
                //注意,这里创建的是临时节点
                zkClient.createEphemeral(currentServiceIpNode);
            }
            //监听注册服务的变化,同时更新数据到本地缓存
            zkClient.subscribeChildChanges(servicePath, new IZkChildListener() {
                @Override
                public void handleChildChange(String parentPath, List<String> currentChilds) throws Exception {
                    if (currentChilds == null) {
                        currentChilds = Lists.newArrayList();
                    }
                    //存活的服务 IP 列表
                    List<String> activityServiceIpList = Lists.newArrayList(Lists.transform(currentChilds, new Function<String, String>() {
                        @Override
                        public String apply(String input) {
                            return StringUtils.split(input, "|")[0];
                        }
                    }));
                    refreshActivityService(activityServiceIpList);
                }
            });

        }
    }
}至此服务实现类已被载入 Spring 容器中,且服务接口信息也注册到了注册中心。
网络通信:
作为生产者对外提供 RPC 服务,必须有一个网络程序来来监听请求和做出响应。在 Java 领域 Netty 是一款高性能的 NIO 通信框架,很多的框架的通信都是采用 Netty 来实现的,本例中也采用它当做通信服务器。
构建并启动 Netty 服务监听指定端口:
public void start(final int port) {
        synchronized (NettyServer.class) {
            if (bossGroup != null || workerGroup != null) {
                return;
            }

            bossGroup = new NioEventLoopGroup();
            workerGroup = new NioEventLoopGroup();
            ServerBootstrap serverBootstrap = new ServerBootstrap();
            serverBootstrap
                    .group(bossGroup, workerGroup)
                    .channel(NioServerSocketChannel.class)
                    .option(ChannelOption.SO_BACKLOG, 1024)
                    .childOption(ChannelOption.SO_KEEPALIVE, true)
                    .childOption(ChannelOption.TCP_NODELAY, true)
                    .handler(new LoggingHandler(LogLevel.INFO))
                    .childHandler(new ChannelInitializer<SocketChannel>() {
                        @Override
                        protected void initChannel(SocketChannel ch) throws Exception {
                            //注册解码器 NettyDecoderHandler
                            ch.pipeline().addLast(new NettyDecoderHandler(StormRequest.class, serializeType));
                            //注册编码器 NettyEncoderHandler
                            ch.pipeline().addLast(new NettyEncoderHandler(serializeType));
                            //注册服务端业务逻辑处理器 NettyServerInvokeHandler
                            ch.pipeline().addLast(new NettyServerInvokeHandler());
                        }
                    });
            try {
                channel = serverBootstrap.bind(port).sync().channel();
            } catch (InterruptedException e) {
                throw new RuntimeException(e);
            }
        }
}上面的代码中向 Netty 服务的 Pipeline 中添加了编解码和业务处理器,当接收到请求时,经过编解码后,真正处理业务的是业务处理器,即 NettyServerInvokeHandler,该处理器继承自 SimpleChannelInboundHandler,当数据读取完成将触发一个事件,并调用 NettyServerInvokeHandler#channelRead0 方法来处理请求。
@Override
protected void channelRead0(ChannelHandlerContext ctx, StormRequest request) throws Exception {
    if (ctx.channel().isWritable()) {
        //从服务调用对象里获取服务提供者信息
        ProviderService metaDataModel = request.getProviderService();
        long consumeTimeOut = request.getInvokeTimeout();
        final String methodName = request.getInvokedMethodName();

        //根据方法名称定位到具体某一个服务提供者
        String serviceKey = metaDataModel.getServiceItf().getName();
        //获取限流工具类
        int workerThread = metaDataModel.getWorkerThreads();
        Semaphore semaphore = serviceKeySemaphoreMap.get(serviceKey);
        if (semaphore == null) {
            synchronized (serviceKeySemaphoreMap) {
                semaphore = serviceKeySemaphoreMap.get(serviceKey);
                if (semaphore == null) {
                    semaphore = new Semaphore(workerThread);
                    serviceKeySemaphoreMap.put(serviceKey, semaphore);
                }
            }
        }

        //获取注册中心服务
        IRegisterCenter4Provider registerCenter4Provider = RegisterCenter.singleton();
        List<ProviderService> localProviderCaches = registerCenter4Provider.getProviderServiceMap().get(serviceKey);

        Object result = null;
        boolean acquire = false;

        try {
            ProviderService localProviderCache = Collections2.filter(localProviderCaches, new Predicate<ProviderService>() {
                @Override
                public boolean apply(ProviderService input) {
                    return StringUtils.equals(input.getServiceMethod().getName(), methodName);
                }
            }).iterator().next();
            Object serviceObject = localProviderCache.getServiceObject();

            //利用反射发起服务调用
            Method method = localProviderCache.getServiceMethod();
            //利用 semaphore 实现限流
            acquire = semaphore.tryAcquire(consumeTimeOut, TimeUnit.MILLISECONDS);
            if (acquire) {
                result = method.invoke(serviceObject, request.getArgs());
                //System.out.println("---------------"+result);
            }
        } catch (Exception e) {
            System.out.println(JSON.toJSONString(localProviderCaches) + "  " + methodName+" "+e.getMessage());
            result = e;
        } finally {
            if (acquire) {
                semaphore.release();
            }
        }
        //根据服务调用结果组装调用返回对象
        StormResponse response = new StormResponse();
        response.setInvokeTimeout(consumeTimeOut);
        response.setUniqueKey(request.getUniqueKey());
        response.setResult(result);
        //将服务调用返回对象回写到消费端
        ctx.writeAndFlush(response);
    } else {
        logger.error("------------channel closed!---------------");
    }
}此处还有部分细节如自定义的编解码器等,篇幅所限不在此详述,继承 MessageToByteEncoder 和 ByteToMessageDecoder 覆写对应的 encode 和 decode 方法即可自定义编解码器,使用到的序列化工具如 Hessian/Proto 等可参考对应的官方文档。
请求和响应包装:
为便于封装请求和响应,定义两个 bean 来表示请求和响应。
请求:
/**
 * @author 孙浩
 * @Descrption
 ***/
public class StormRequest implements Serializable {

    private static final long serialVersionUID = -5196465012408804755L;
    //UUID,唯一标识一次返回值
    private String uniqueKey;
    //服务提供者信息
    private ProviderService providerService;
    //调用的方法名称
    private String invokedMethodName;
    //传递参数
    private Object[] args;
    //消费端应用名
    private String appName;
    //消费请求超时时长
    private long invokeTimeout;
    // getter/setter
}响应:
/**
 * @Descrption
 ***/
public class StormResponse implements Serializable {
    private static final long serialVersionUID = 5785265307118147202L;
    //UUID, 唯一标识一次返回值
    private String uniqueKey;
    //客户端指定的服务超时时间
    private long invokeTimeout;
    //接口调用返回的结果对象
    private Object result;
    //getter/setter
}客户端(消费者)
客户端(消费者)在 RPC 调用中主要是生成服务接口的代理对象,并从注册中心获取对应的服务列表发起网络请求。
客户端和服务端一样采用 Spring 来管理 bean 解析 XML 配置等不再赘述,重点看下以下几点:
1、通过 JDK 动态代理来生成引入服务接口的代理对象
public Object getProxy() {
    return Proxy.newProxyInstance(Thread.currentThread().getContextClassLoader(), new Class<?>[]{targetInterface}, this);
}2、从注册中心获取服务列表并依据某种策略选取其中一个服务节点
//服务接口名称
String serviceKey = targetInterface.getName();
//获取某个接口的服务提供者列表
IRegisterCenter4Invoker registerCenter4Consumer = RegisterCenter.singleton();
List<ProviderService> providerServices = registerCenter4Consumer.getServiceMetaDataMap4Consume().get(serviceKey);
//根据软负载策略,从服务提供者列表选取本次调用的服务提供者
ClusterStrategy clusterStrategyService = ClusterEngine.queryClusterStrategy(clusterStrategy);
ProviderService providerService = clusterStrategyService.select(providerServices);
3、通过 Netty 建立连接,发起网络请求
/**
 * @author 孙浩
 * @Descrption Netty 消费端 bean 代理工厂
 ***/
public class RevokerProxyBeanFactory implements InvocationHandler {
    private ExecutorService fixedThreadPool = null;
    //服务接口
    private Class<?> targetInterface;
    //超时时间
    private int consumeTimeout;
    //调用者线程数
    private static int threadWorkerNumber = 10;
    //负载均衡策略
    private String clusterStrategy;

    @Override
    public Object invoke(Object proxy, Method method, Object[] args) throws Throwable {

        ...

        //复制一份服务提供者信息
        ProviderService newProvider = providerService.copy();
        //设置本次调用服务的方法以及接口
        newProvider.setServiceMethod(method);
        newProvider.setServiceItf(targetInterface);

        //声明调用 AresRequest 对象,AresRequest 表示发起一次调用所包含的信息
        final StormRequest request = new StormRequest();
        //设置本次调用的唯一标识
        request.setUniqueKey(UUID.randomUUID().toString() + "-" + Thread.currentThread().getId());
        //设置本次调用的服务提供者信息
        request.setProviderService(newProvider);
        //设置本次调用的方法名称
        request.setInvokedMethodName(method.getName());
        //设置本次调用的方法参数信息
        request.setArgs(args);

        try {
            //构建用来发起调用的线程池
            if (fixedThreadPool == null) {
                synchronized (RevokerProxyBeanFactory.class) {
                    if (null == fixedThreadPool) {
                        fixedThreadPool = Executors.newFixedThreadPool(threadWorkerNumber);
                    }
                }
            }
            //根据服务提供者的 ip,port, 构建 InetSocketAddress 对象,标识服务提供者地址
            String serverIp = request.getProviderService().getServerIp();
            int serverPort = request.getProviderService().getServerPort();
            InetSocketAddress inetSocketAddress = new InetSocketAddress(serverIp, serverPort);
            //提交本次调用信息到线程池 fixedThreadPool, 发起调用
            Future<StormResponse> responseFuture = fixedThreadPool.submit(RevokerServiceCallable.of(inetSocketAddress, request));
            //获取调用的返回结果
            StormResponse response = responseFuture.get(request.getInvokeTimeout(), TimeUnit.MILLISECONDS);
            if (response != null) {
                return response.getResult();
            }
        } catch (Exception e) {
            throw new RuntimeException(e);
        }
        return null;
    }
    //  ...
}Netty 的响应是异步的,为了在方法调用返回前获取到响应结果,需要将异步的结果同步化。
4、Netty 异步返回的结果存入阻塞队列
@Override
protected void channelRead0(ChannelHandlerContext channelHandlerContext, StormResponse response) throws Exception {
    //将 Netty 异步返回的结果存入阻塞队列,以便调用端同步获取
    RevokerResponseHolder.putResultValue(response);
}5、请求发出后同步获取结果
//提交本次调用信息到线程池 fixedThreadPool, 发起调用
Future<StormResponse> responseFuture = fixedThreadPool.submit(RevokerServiceCallable.of(inetSocketAddress, request));
//获取调用的返回结果
StormResponse response = responseFuture.get(request.getInvokeTimeout(), TimeUnit.MILLISECONDS);
if (response != null) {
    return response.getResult();
}

//===================================================
//从返回结果容器中获取返回结果,同时设置等待超时时间为 invokeTimeout
long invokeTimeout = request.getInvokeTimeout();
StormResponse response = RevokerResponseHolder.getValue(request.getUniqueKey(), invokeTimeout);测试
Server:
/**
 * @Descrption
 ***/
public class MainServer {
    public static void main(String[] args) throws Exception {
        //发布服务
        final ClassPathXmlApplicationContext context = new ClassPathXmlApplicationContext("storm-server.xml");
        System.out.println(" 服务发布完成");
    }
}Client:
public class Client {

    private static final Logger logger = LoggerFactory.getLogger(Client.class);

    public static void main(String[] args) throws Exception {

        final ClassPathXmlApplicationContext context = new ClassPathXmlApplicationContext("storm-client.xml");
        final HelloService helloService = (HelloService) context.getBean("helloService");
        String result = helloService.sayHello("World");
        System.out.println(result);
        for (;;) {

        }
    }
}结果
生产者:

消费者:
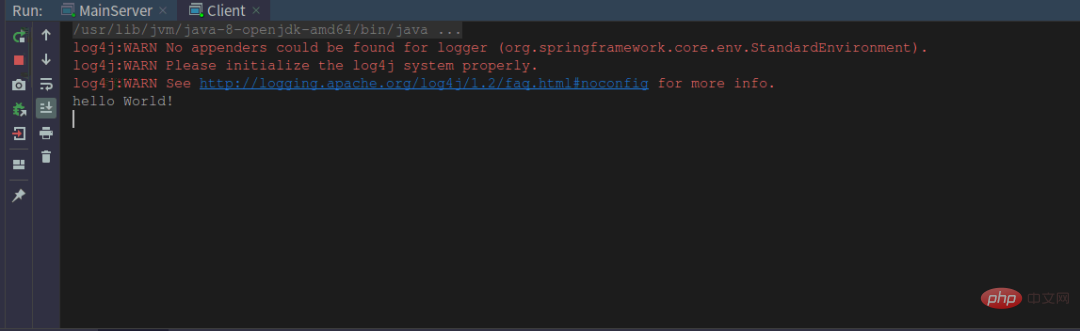
注册中心:

总结
本文简单介绍了 RPC 的整个流程,并实现了一个简单的 RPC 调用。希望阅读完本文之后,能加深你对 RPC 的一些认识。
生产者端流程:
Load the service interface and cache Service registration, write the service interface and service host information to the registration center (this example uses ZooKeeper) Start the network server and listen to Reflection, call locally
Consumer side process:
The proxy service interface generates a proxy object Service discovery (connect to ZooKeeper, get the service address list, and obtain the appropriate service through the client load policy Address) Remote method call (in this example, send a message through Netty and get the response result)
The above is the detailed content of Alibaba interviewer: Please handwrite an RPC framework for me.. For more information, please follow other related articles on the PHP Chinese website!

Hot AI Tools

Undresser.AI Undress
AI-powered app for creating realistic nude photos

AI Clothes Remover
Online AI tool for removing clothes from photos.

Undress AI Tool
Undress images for free

Clothoff.io
AI clothes remover

AI Hentai Generator
Generate AI Hentai for free.

Hot Article
Hot Tools

Notepad++7.3.1
Easy-to-use and free code editor

SublimeText3 Chinese version
Chinese version, very easy to use

Zend Studio 13.0.1
Powerful PHP integrated development environment

Dreamweaver CS6
Visual web development tools

SublimeText3 Mac version
God-level code editing software (SublimeText3)
Hot Topics
 1378
1378
 52
52

 The handwritten RPC framework is really not just for pretending to be 13!
Aug 16, 2023 pm 05:01 PM
The handwritten RPC framework is really not just for pretending to be 13!
Aug 16, 2023 pm 05:01 PM
You may not have been asked, maybe you're lucky, or maybe you're not at this level yet. Usually the monthly salary is more than 20k, and they will basically ask some design questions. From the interviewer's perspective: Asking this type of question is better than writing an eight-part essay, which involves many technical points. For example: knowledge about design patterns, communication protocols, dynamic agents, virtualization, thread pools, etc.
 Alibaba interviewer: Please handwrite an RPC framework for me.
Aug 17, 2023 pm 04:24 PM
Alibaba interviewer: Please handwrite an RPC framework for me.
Aug 17, 2023 pm 04:24 PM
RPC is a computer communication protocol. This protocol allows a program running on one computer to call a subroutine on another computer without the developer having to additionally program this interaction.
 Principles and applications of RPC framework in Go language
Jun 01, 2023 pm 03:01 PM
Principles and applications of RPC framework in Go language
Jun 01, 2023 pm 03:01 PM
1. The concept of RPC framework In distributed systems, data often needs to be transferred between different servers and clients. The RPC (RemoteProcedureCall) framework is a commonly used technical means. The RPC framework allows applications to call functions or methods of another execution environment through remote messaging, thereby enabling the program to run on different computers. There are currently many RPC frameworks on the market, such as Google's gRPC, Thrift, Hessian, etc. This article mainly introduces
 How to develop RPC framework in PHP?
May 13, 2023 pm 03:22 PM
How to develop RPC framework in PHP?
May 13, 2023 pm 03:22 PM
RPC (RemoteProcedureCall) is an inter-process communication protocol that allows different processes to communicate and collaborate over the network on different physical machines. The RPC framework is attracting more and more attention because it can help developers easily implement the development of distributed systems. In this article, we will introduce step by step how to use PHP to develop RPC framework. 1. What is the RPC framework? The RPC framework is a framework used to implement remote procedure calls. In RPC-based
 What rpc frameworks are there?
Aug 03, 2023 am 10:17 AM
What rpc frameworks are there?
Aug 03, 2023 am 10:17 AM
The rpc frameworks include: 1. gRPC, a high-performance, open-source RPC framework developed by Google; 2. Apache Thrift, a cross-language RPC framework developed and open-sourced by Facebook; 3. Apache Dubbo, a high-performance, lightweight RPC framework, suitable for large-scale distributed systems; 4. Apache Axis2, an RPC framework based on Web service standards; 5. Spring Cloud, an open source framework for building distributed systems.
 Go language RPC framework evaluation: performance, ease of use, community support comparison
Feb 27, 2024 pm 09:12 PM
Go language RPC framework evaluation: performance, ease of use, community support comparison
Feb 27, 2024 pm 09:12 PM
As an important modern programming language, Go language is increasingly used in distributed system development. When building a distributed system, the choice of RPC (remote procedure call) framework is often crucial. This article will conduct a horizontal evaluation of the current mainstream Go language RPC frameworks, compare their advantages and disadvantages in terms of performance, ease of use, and community support, and attach specific code examples. 1. Performance comparison In distributed systems, performance is often one of the primary indicators that developers pay attention to. The following are some main
 How to implement a high-concurrency RPC framework in go language
Aug 05, 2023 pm 12:49 PM
How to implement a high-concurrency RPC framework in go language
Aug 05, 2023 pm 12:49 PM
Introduction to how to implement high-concurrency RPC framework in Go language: With the rapid development of the Internet, high-concurrency applications have attracted more and more attention. Using the RPC (RemoteProcedureCall) framework is a common solution. This article will introduce how to implement a high-concurrency RPC framework in the Go language, and will come with code examples. Introduction to the RPC framework: RPC is a communication protocol that allows a computer program to call a subroutine in another address space (usually located on the remote computer) without
 What are the RPC frameworks in PHP7.0?
May 29, 2023 am 11:10 AM
What are the RPC frameworks in PHP7.0?
May 29, 2023 am 11:10 AM
With the continuous development of computer technology, distributed systems have become mainstream, and remote procedure call (RPC) is an important means to implement distributed systems. As a popular Web programming language, PHP also has its own RPC framework, among which some new RPC frameworks were introduced in PHP7.0 version. This article will introduce the common RPC frameworks and their characteristics in PHP7.0. PHPRemoteProcedureCall(phpRPC)phpRPC is a lightweight RP
