

How to change network type to private or public in Windows 11


Setting up a wireless network is common, but choosing or changing the network type can be confusing, especially if you don't know the consequences.
If you're looking for advice on how to change the network type from public to private or vice versa in Windows 11, read on for some helpful information.
What are the different network profiles in Windows 11?
Windows 11 comes with a number of network profiles, which are essentially sets of settings that can be used to configure various network connections.
This is useful if you have multiple connections at home or office so you don't have to set it all up every time you connect to a new network. Private and public network profiles are two common types in Windows 11, but there are usually three.
The three main network profiles include:
1. Public
This profile is used when connecting to an untrusted network, usually when the connected network cannot be verified Use in a public environment on behalf of other computers or devices.
Public networks are accessed through unsecured connections. Examples include public Wi-Fi hotspots, free Wi-Fi at coffee shops, and guest networks at libraries or coffee shops.
If you are concerned about the security of your data on a public profile, you can turn on the strict NAT network type that acts as a firewall.
2. Private
This is the default mode for network profiles. In this mode, the computer is connected to a private home or work network and can only see other devices on that network.
Private network profiles include all the settings your computer needs to join a wireless or wired network without requiring any additional configuration on your part.
Printer sharing and file sharing are also available in this mode because network discovery is turned on by default.
3. Domain name
This is the assigned network configuration file used when the computer joins the domain. It includes settings for authentication, encryption, and caching. Domain configuration files also include settings for user login and resource access.
Businesses often use domain network connections for employees to access company resources, such as email servers and internal websites.
Now that you understand the different scenarios for applying these networks, let’s highlight some of the differences
Network profiles are a powerful tool because they can be used to control the behavior of Windows computers on a network as they move from one environment to another.
Equipped with this information about the different types of network profiles, if you need to change it, here's how to adjust your Windows 11 network settings.
How do users change their network profiles in Windows 11?
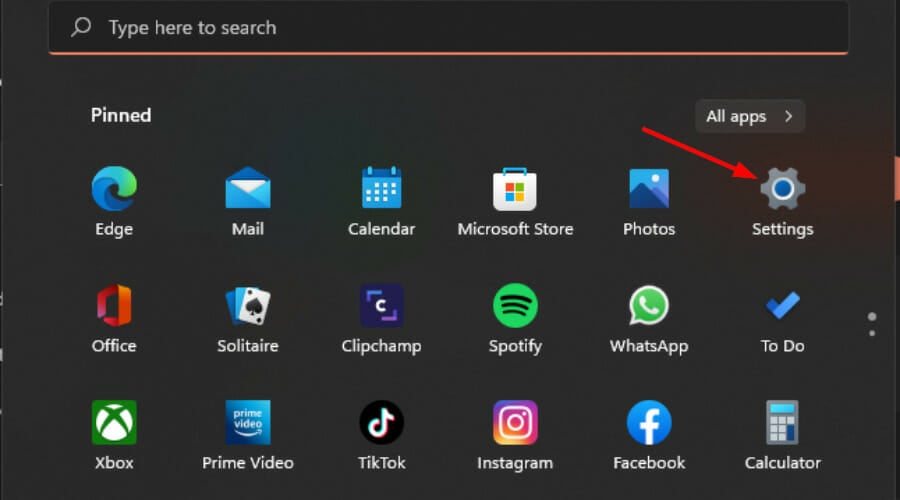
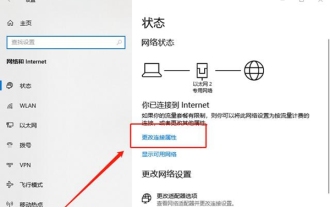
1. Use Settings
- Tap key and click Settings. Windows

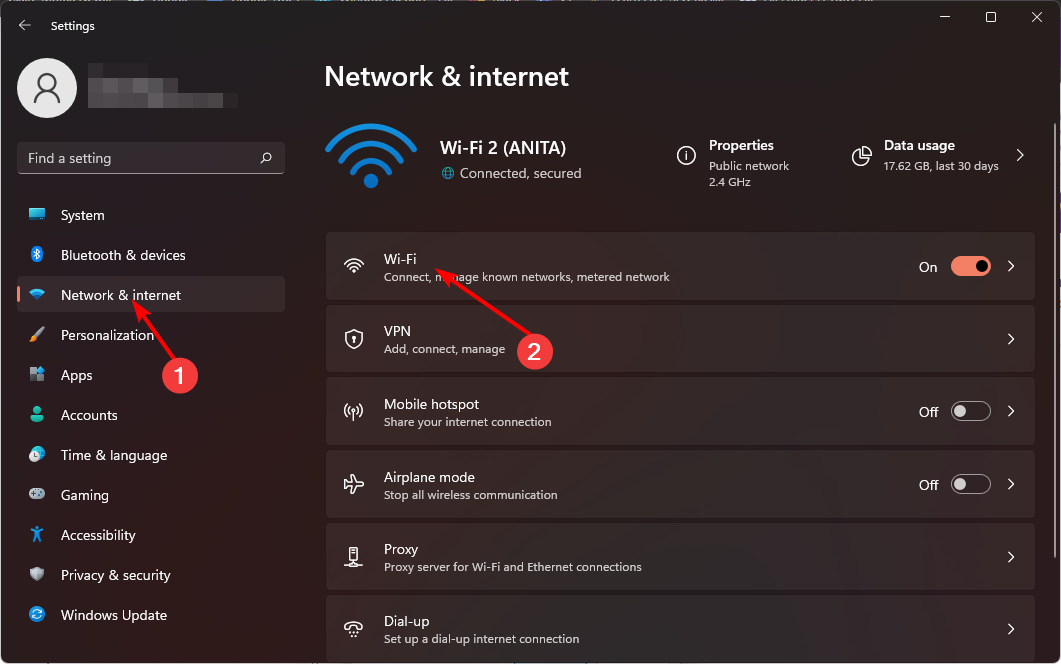
- Select Network & Internet Settings in the left pane and click Wi-Fi (If connected, select the Ethernet connection ).
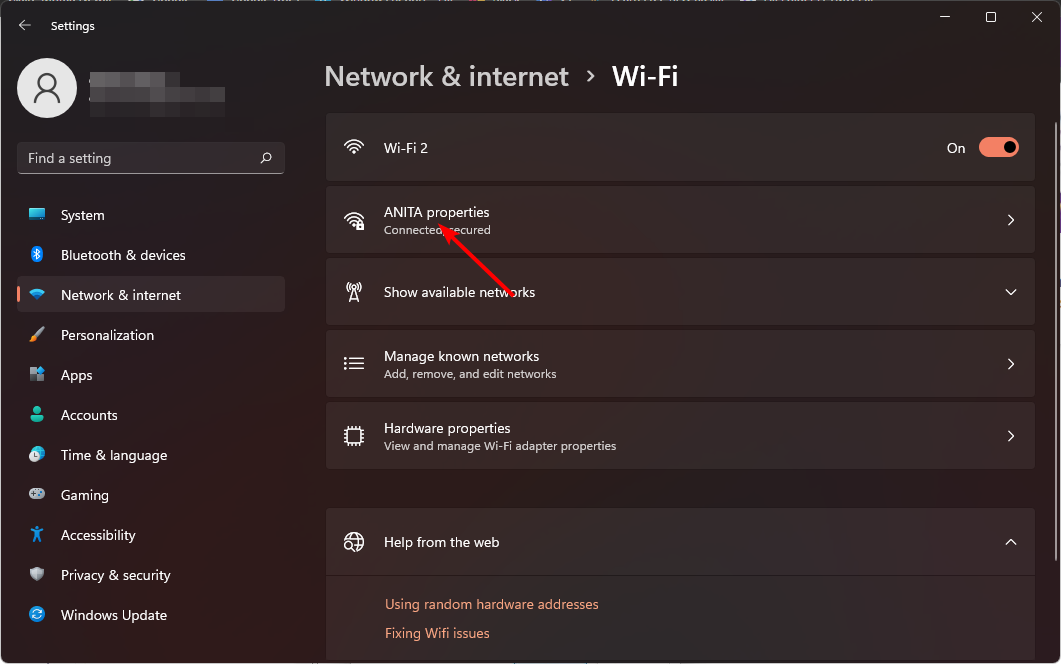
- Select one of your Wi-Fi networks and click on it.
- Under "Network Profile Type", switch to your preferred profile.
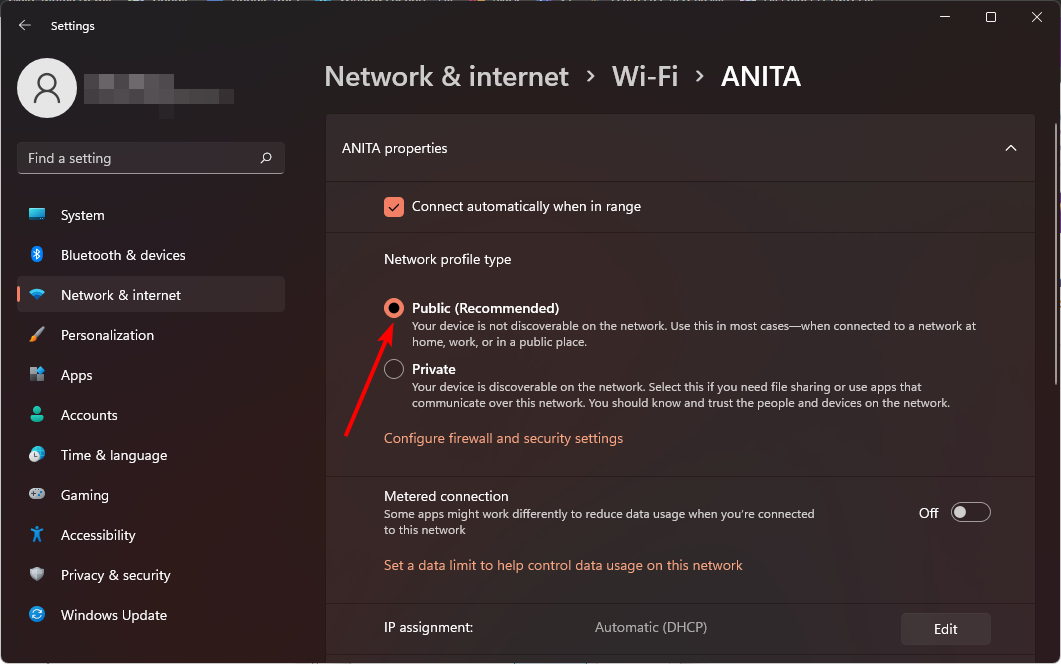
If you find that the network profile type is missing, you may have an outdated driver, so a quick driver update should resolve the issue.
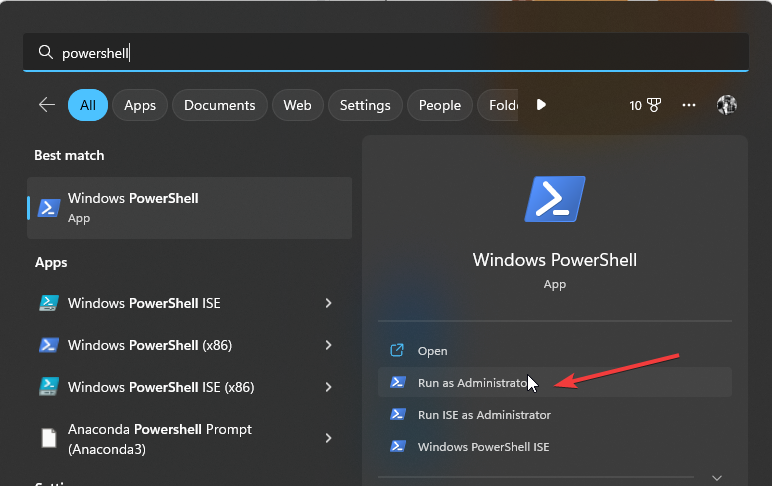
2. Use the PowerShell command line
- click key, type Powershell in the search bar, and then click Run as administrator. Windows
- Enter the following command and click: Enter
<strong>Get-NetConnectionProfile</strong> - Make a note of the name of the network you want to change, and then type the following command. Remember to replace the network name with the network name you noted down and use the Network profile (such as Public, Private or Domain) by typing:
<strong>Set- NetConnectionProfile -Name "network name" -NetworkCategory <Type></strong>
3. Use the registry editor
- to open the run command. WindowsR
- Type Registry Editor in the dialog box and click.Enter
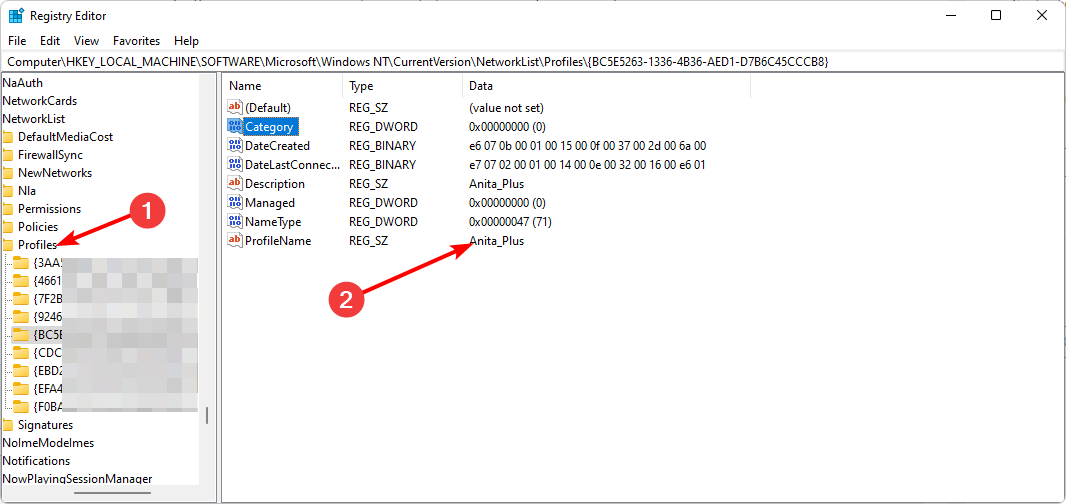
- Navigate to the following location:
<strong>HKEY_LOCAL_MACHINE\SOFTWARE\Microsoft\Windows NT\CurrentVersion\NetworkList\Profiles</strong> - Click "Profiles" to expand the subkeys. Each will have its profile name listed on the right as the last entry.
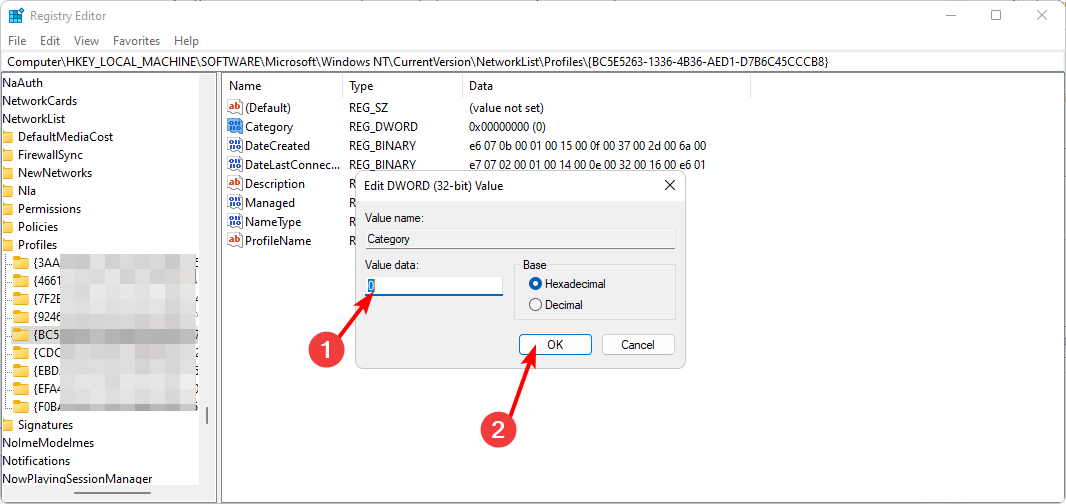
- Double-click the category, and in the Value data, enter 0, 1, or 2 to change to Public, Private, and Domain respectively, and then click Click "OK".
- Close Registry Editor and restart your PC for the changes to take effect.

Keep in mind that editing the registry can be disastrous if anything goes wrong, so be sure to back up or create a restore point before making any changes.
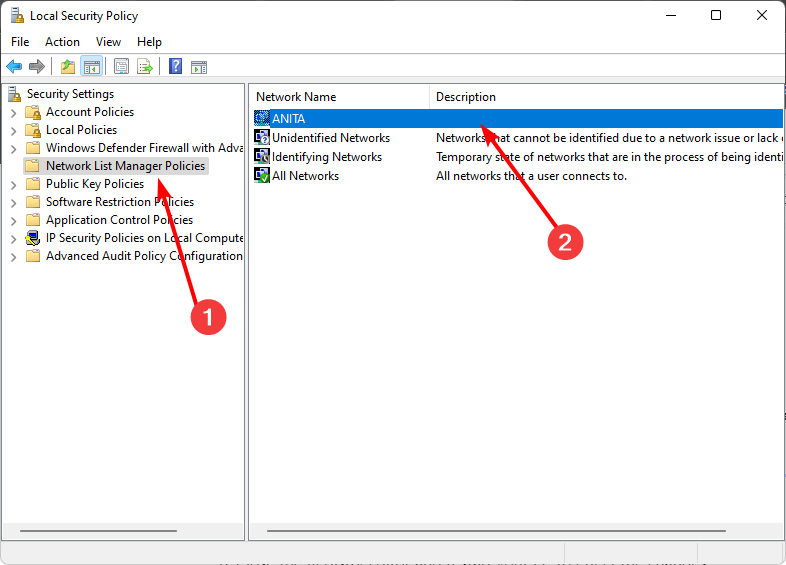
4. Use local security policy
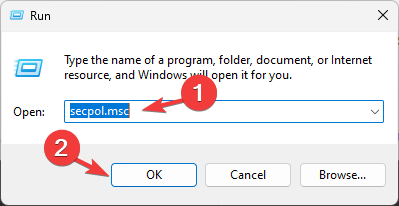
- Press to open the run command. WindowsR
- Type secpol.msc in the dialog box and click .Enter
- Click "Network List Manager Policies" and then double-click the selected network on the right.
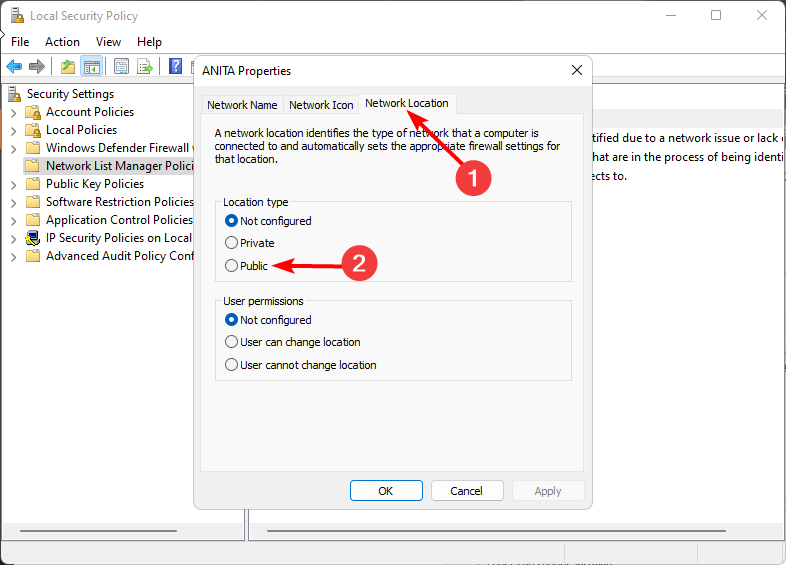
- In the Network Properties dialog box, navigate to the NetworkLocation tab and under the Location Type option, select Private" or "public profile".
- Also, users under Settings User Permissions cannot change the location, then click Apply and OK to save the changes.
It is important to note that this solution may be limited because Local Security Policy is not available in all Windows versions. However, if you are using Windows 11 Pro, Enterprise, and Education editions, you are safe.
Some users complained that they encountered network problems after changing the current network type. Windows cannot connect to this network is the most common, so if you are in the same predicament, check out our expert article on how to fix this problem.
Hopefully now you have a better understanding of how and when to change network profiles in Windows 11 to public or private. What's more, you can easily protect your data.
| Private | Public | Domain | |
| Trusted Network | Trust | Trusted | Trust |
| ##Sharing | |||
| Discoverable | |||
| Safety |
The above is the detailed content of How to change network type to private or public in Windows 11. For more information, please follow other related articles on the PHP Chinese website!
Hot AI Tools

Undresser.AI Undress
AI-powered app for creating realistic nude photos

AI Clothes Remover
Online AI tool for removing clothes from photos.

Undress AI Tool
Undress images for free

Clothoff.io
AI clothes remover

Video Face Swap
Swap faces in any video effortlessly with our completely free AI face swap tool!
Hot Article
Hot Tools

Notepad++7.3.1
Easy-to-use and free code editor

SublimeText3 Chinese version
Chinese version, very easy to use

Zend Studio 13.0.1
Powerful PHP integrated development environment

Dreamweaver CS6
Visual web development tools

SublimeText3 Mac version
God-level code editing software (SublimeText3)
Hot Topics
 1389
1389
 52
52

![WLAN expansion module has stopped [fix]](https://img.php.cn/upload/article/000/465/014/170832352052603.gif?x-oss-process=image/resize,m_fill,h_207,w_330) WLAN expansion module has stopped [fix]
Feb 19, 2024 pm 02:18 PM
WLAN expansion module has stopped [fix]
Feb 19, 2024 pm 02:18 PM
If there is a problem with the WLAN expansion module on your Windows computer, it may cause you to be disconnected from the Internet. This situation is often frustrating, but fortunately, this article provides some simple suggestions that can help you solve this problem and get your wireless connection working properly again. Fix WLAN Extensibility Module Has Stopped If the WLAN Extensibility Module has stopped working on your Windows computer, follow these suggestions to fix it: Run the Network and Internet Troubleshooter to disable and re-enable wireless network connections Restart the WLAN Autoconfiguration Service Modify Power Options Modify Advanced Power Settings Reinstall Network Adapter Driver Run Some Network Commands Now, let’s look at it in detail
 How to solve win11 DNS server error
Jan 10, 2024 pm 09:02 PM
How to solve win11 DNS server error
Jan 10, 2024 pm 09:02 PM
We need to use the correct DNS when connecting to the Internet to access the Internet. In the same way, if we use the wrong dns settings, it will prompt a dns server error. At this time, we can try to solve the problem by selecting to automatically obtain dns in the network settings. Let’s take a look at the specific solutions. How to solve win11 network dns server error. Method 1: Reset DNS 1. First, click Start in the taskbar to enter, find and click the "Settings" icon button. 2. Then click the "Network & Internet" option command in the left column. 3. Then find the "Ethernet" option on the right and click to enter. 4. After that, click "Edit" in the DNS server assignment, and finally set DNS to "Automatic (D
 What should I do if the earth is displayed in the lower right corner of Windows 10 when I cannot access the Internet? Various solutions to the problem that the Earth cannot access the Internet in Win10
Feb 29, 2024 am 09:52 AM
What should I do if the earth is displayed in the lower right corner of Windows 10 when I cannot access the Internet? Various solutions to the problem that the Earth cannot access the Internet in Win10
Feb 29, 2024 am 09:52 AM
This article will introduce the solution to the problem that the globe symbol is displayed on the Win10 system network but cannot access the Internet. The article will provide detailed steps to help readers solve the problem of Win10 network showing that the earth cannot access the Internet. Method 1: Restart directly. First check whether the network cable is not plugged in properly and whether the broadband is in arrears. The router or optical modem may be stuck. In this case, you need to restart the router or optical modem. If there are no important things being done on the computer, you can restart the computer directly. Most minor problems can be quickly solved by restarting the computer. If it is determined that the broadband is not in arrears and the network is normal, that is another matter. Method 2: 1. Press the [Win] key, or click [Start Menu] in the lower left corner. In the menu item that opens, click the gear icon above the power button. This is [Settings].
 Check network connection: lol cannot connect to the server
Feb 19, 2024 pm 12:10 PM
Check network connection: lol cannot connect to the server
Feb 19, 2024 pm 12:10 PM
LOL cannot connect to the server, please check the network. In recent years, online games have become a daily entertainment activity for many people. Among them, League of Legends (LOL) is a very popular multiplayer online game, attracting the participation and interest of hundreds of millions of players. However, sometimes when we play LOL, we will encounter the error message "Unable to connect to the server, please check the network", which undoubtedly brings some trouble to players. Next, we will discuss the causes and solutions of this error. First of all, the problem that LOL cannot connect to the server may be
 ICLR'24 new ideas without pictures! LaneSegNet: map learning based on lane segmentation awareness
Jan 19, 2024 am 11:12 AM
ICLR'24 new ideas without pictures! LaneSegNet: map learning based on lane segmentation awareness
Jan 19, 2024 am 11:12 AM
Written above & The author’s personal understanding of maps as key information for downstream applications of autonomous driving systems is usually represented by lanes or center lines. However, the existing map learning literature mainly focuses on detecting geometry-based topological relationships of lanes or sensing centerlines. Both methods ignore the inherent relationship between lane lines and center lines, that is, lane lines bind center lines. Although simply predicting two types of lanes in one model are mutually exclusive in the learning objective, this paper proposes lanesegment as a new representation that seamlessly combines geometric and topological information, thus proposing LaneSegNet. This is the first end-to-end mapping network that generates lanesegments to obtain a complete representation of road structure. LaneSegNet has two levels
 What's going on when the network can't connect to the wifi?
Apr 03, 2024 pm 12:11 PM
What's going on when the network can't connect to the wifi?
Apr 03, 2024 pm 12:11 PM
1. Check the wifi password: Make sure the wifi password you entered is correct and pay attention to case sensitivity. 2. Confirm whether the wifi is working properly: Check whether the wifi router is running normally. You can connect other devices to the same router to determine whether the problem lies with the device. 3. Restart the device and router: Sometimes, there is a malfunction or network problem with the device or router, and restarting the device and router may solve the problem. 4. Check the device settings: Make sure the wireless function of the device is turned on and the wifi function is not disabled.
 Windows 11 Folder Sharing Guide: Easily Share Your Files and Data
Mar 13, 2024 am 11:49 AM
Windows 11 Folder Sharing Guide: Easily Share Your Files and Data
Mar 13, 2024 am 11:49 AM
In daily life and work, we often need to share files and folders between different devices. Windows 11 system provides convenient built-in folder sharing functions, allowing us to easily and safely share the content we need with others within the same network while protecting the privacy of personal files. This feature makes file sharing simple and efficient without worrying about leaking private information. Through the folder sharing function of Windows 11 system, we can cooperate, communicate and collaborate more conveniently, improving work efficiency and life convenience. In order to successfully configure a shared folder, we first need to meet the following conditions: All devices (participating in sharing) are connected to the same network. Enable Network Discovery and configure sharing. Know the target device
 Windows 10 Home Edition public network changed to private network
Feb 12, 2024 pm 10:27 PM
Windows 10 Home Edition public network changed to private network
Feb 12, 2024 pm 10:27 PM
In order to use our computer, in addition to some hardware, it also needs to be connected to a stable network. Many friends have discovered that the network in the computer is divided into public network and private network. Many people are curious about how to convert the public network into a private network. . Win10 Home Edition public network is changed to a private network 1. Advanced settings of the Advanced Sharing Center 1. First, we directly press the win+R shortcut key combination to summon the run pop-up window, then enter "control panel" here, and click OK to open the control panel . 2. Then we select Network and Internet--Network and Sharing Center--Change advanced sharing settings. 3. Then we click on the dedicated option in the more advanced sharing settings interface and check the "Enable