When building a website these days, it's fairly standard practice to have some kind of build process to help perform development tasks and prepare files for a live environment.
You can do this using Grunt or Gulp, building a series of transformations that allow you to put code on one end and get some minified CSS and JavaScript on the other.
These tools are very popular and very useful. However, there is another way and that is to use Webpack.
Webpack is a so-called "module bundler". It takes JavaScript modules, understands their dependencies, then connects them together in the most efficient way, and finally generates a JS file. Nothing special, right? Things like RequireJS have been doing this for years.
Well, here’s the thing. With Webpack, modules are no longer limited to JavaScript files. By using Loaders, Webpack knows that JavaScript modules may require CSS files, and CSS files may require images. The output assets will contain only what is needed and will not cause too much trouble. Let's start setting it up so we can see it in action.
As with most development tools, you need to install Node.js before you can continue. Assuming you have it set up correctly, all you need to do to install Webpack is type the following into the command line.
npm install webpack -g
This will install Webpack and allow you to run it from anywhere on your system. Next, create a new directory and create a basic HTML file in it like this:
<!doctype html>
<html>
    <head>
        <meta charset="utf-8">
        <title>Webpack fun</title>
    </head>
    <body>
        <h2></h2>
        <script src="bundle.js"></script>
    </body>
</html>
The important part here is the reference to bundle.js, this is what Webpack will make for us. Also note the H2 element - we will use this later.
Next, create two files in the same directory as the HTML file. Naming the first one main.js, you can imagine that it is the main entry point of our script. Then add the second
// say-hello.js

module.exports = function (name, element) {
    element.textContent = 'Hello ' + name + '!';
};
Now that we have a simple module we can import it and call it from main.js. It's as simple as doing the following:
var sayHello = require('./say-hello');

sayHello('Guybrush', document.querySelector('h2'));
Now, if we open the HTML file, then obviously this message will not be displayed because we have not included main.js nor compiled the browser dependencies. What we need to do is have Webpack look at main.js and see if it has any dependencies. If so, it should compile them together and create a bundle.js file that we can use in the browser.
Return to the terminal and run Webpack. Just enter:
webpack main.js bundle.js
The first file specified is the entry file where we want Webpack to start looking for dependencies. It will figure out whether any required files require any other files, and will continue to do this until all necessary dependencies have been calculated. Once complete, it outputs the dependencies as a single concatenated file to bundle.js. If you press Enter, you should see something like this:
Hash: 3d7d7339a68244b03c68
Version: webpack 1.12.12
Time: 55ms
    Asset     Size  Chunks             Chunk Names
bundle.js  1.65 kB       0  [emitted]  main
   [0] ./main.js 90 bytes {0} [built]
   [1] ./say-hello.js 94 bytes {0} [built]
Now open index.html in your browser to see your page and say hello.
Specifying input and output files every time you run Webpack is not very fun. Thankfully, Webpack saves us the trouble by allowing us to use configuration files. Create a file named webpack.config.js in the root directory of your project with the following content:
module.exports = {
    entry: './main.js',
    output: {
        filename: 'bundle.js'
    }
};
Now we can just type webpack and get the same result.
what is that? Do you even bother typing webpack every time you change a file? I don't know, today's generation blah blah blah. Okay, let's set up a small development server to make things more efficient. In the terminal write:
npm install webpack-dev-server -g
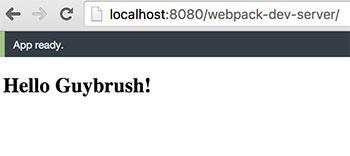
Then run the command webpack-dev-server. This will start a simple web server running, using the current directory as the location to serve files. Open a new browser window and visit http://localhost:8080/webpack-dev-server/. If all goes well, you will see something similar to the following:

Now, not only do we have a nice little web server, but we also have a server that can monitor code changes. If it sees that we have changed a file, it automatically runs webpack commands to bundle our code and refresh the page without us having to do anything. All with zero configuration.
Give it a try, change the name passed to the sayHello function, then switch back to the browser to see the changes applied immediately.
Webpack 最重要的功能之一是加载器。加载器类似于 Grunt 和 Gulp 中的“任务”。它们本质上是获取文件并以某种方式对其进行转换,然后再将其包含在我们的捆绑代码中。
假设我们想在代码中使用 ES2015 的一些优点。 ES2015 是 JavaScript 的新版本,并非所有浏览器都支持,因此我们需要使用加载器将 ES2015 代码转换为支持的普通旧 ES5 代码。为此,我们使用流行的 Babel Loader,根据说明,我们安装如下:
npm install babel-loader babel-core babel-preset-es2015 --save-dev
这不仅会安装加载器本身,还会安装其依赖项和 ES2015 预设,因为 Babel 需要知道它正在转换的 JavaScript 类型。
现在加载器已安装,我们只需要告诉 Babel 使用它即可。更新 webpack.config.js 使其看起来像这样:
module.exports = {
    entry: './main.js',
    output: {
        filename: 'bundle.js'
    },
    module: {
        loaders: [
            {
                test: /\.js$/,
                exclude: /node_modules/,
                loader: 'babel',
                query: {
                    presets: ['es2015']
                }
            }
        ],
    }
};
这里有一些重要的事情需要注意。第一个是 test: /\.js$/ 行,它是一个正则表达式,告诉我们将此加载程序应用于所有具有 .js 扩展名的文件。同样,exclude: /node_modules/ 告诉 Webpack 忽略 node_modules 目录。 loader 和 query 是相当不言自明的——使用带有 ES2015 预设的 Babel 加载器。
按 ctrl+c 并再次运行 webpack-dev-server 重新启动您的 Web 服务器。我们现在需要做的就是使用一些 ES6 代码来测试转换。我们如何将 sayHello 变量更改为常量?
const sayHello = require('./say-hello')
保存后,Webpack 应该会自动重新编译您的代码并刷新您的浏览器。希望您不会看到任何变化。查看 bundle.js 并查看是否可以找到 const 关键字。如果 Webpack 和 Babel 已经完成了它们的工作,您将不会在任何地方看到它——只是普通的旧 JavaScript。
在本教程的第 2 部分中,我们将介绍如何使用 Webpack 将 CSS 和图像添加到您的页面,以及让您的网站做好部署准备。
The above is the detailed content of Getting Started with Webpack: Part 1. For more information, please follow other related articles on the PHP Chinese website!


