Maximize revenue with Google DFP: Introduction
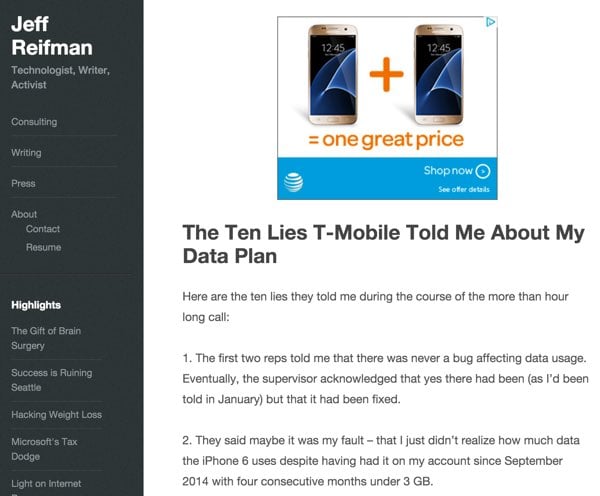
Optimize your Google ad revenue
This is the eighth tutorial in a series about Google DoubleClick for Publishers. For the uninitiated, DFP is a very complex service, so this series aims to simplify it and educate you on some of the most important scenarios.
In Episode 6, "Using House Ads," I detail how to create your own house ads and set a price for them to force AdSense to compete with them. In this tutorial, I’ll take a deeper look at how to configure your website for higher revenue. DFP provides some methods and settings for this, which we'll explore in more detail.
You can see one of the best results in the featured image above. It featured an AT&T ad in a popular story I wrote about T-Mobile's customer service issues.
If you're new to this series, please review a few of our previous episodes before continuing: Introduction to Google DFP Small Business, getting started with ad integration with your site, and placements.
I did try to participate in the discussion below. If you have questions or topic suggestions for future episodes, please leave a comment below or contact me on Twitter @reifman.
Optimization
Today, we’ll explore a few key ways to optimize your revenue:
- Select the best performing ad sizes on Google to get the most money
- Reconfigure updated ad unit inventory on our site
- Place an order for our in-house house ads to improve AdSense placements
In a future episode, we'll cover another way to increase your revenue by integrating alternative ad networks to compete with AdSense.
Let's start by looking at our main method.
Select the best performing ad size on Google
Below are Google's most recommended ad sizes, showing the ad sizes that perform best. As you can see, ad size affects advertiser interest and click-through rates. Both will lead to higher revenue. Larger ads are more disruptive to the user experience, but also have higher inventory because advertisers like them. The size of larger ads gives advertisers the best chance of generating clicks, resulting in more clicks and higher revenue.
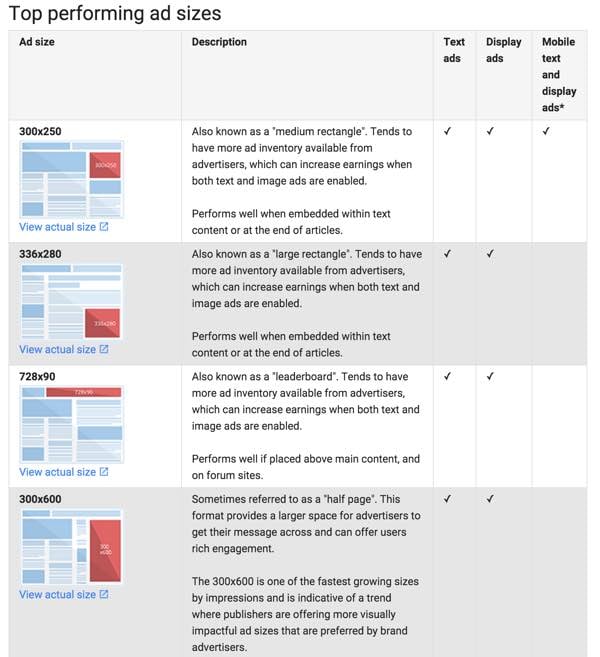
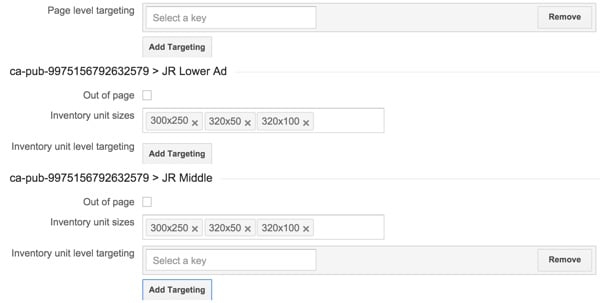
Certain ad sizes perform better on mobile sites, such as 300 x 250 and 320 x 100 below. However, the 320 x 100 size below will not appear on the desktop layout, risking empty, wasted ad impressions.

Initially, I was focusing on the 300 x 250, 320 x 100, and 320 x 50 sizes. However, there are many challenges associated with integrating multiple ad sizes across mobile and desktop platforms. This didn't work in the end:
Integrating dynamic ad size selection based on the responsiveness of your WordPress theme is not an easy task. There are several ways to solve this problem, but for my current topic and method of generating DFP ad tags, it requires more server programming and JavaScript than I can perform in this tutorial.
I found that when using three sizes, Google did not adjust to the reader's viewport size and would often leave the ad empty on the desktop.
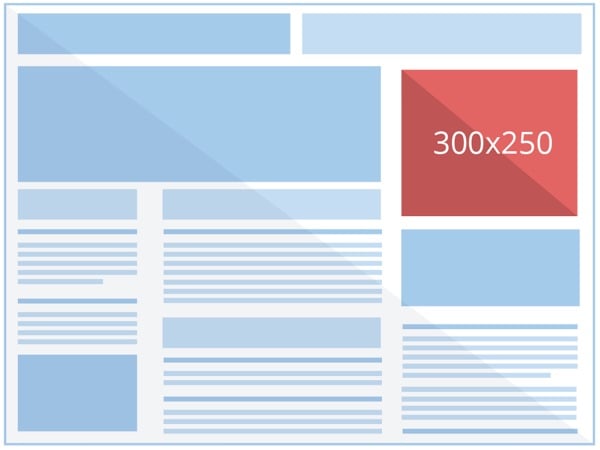
Ultimately, I chose to exclusively use 300 x 250, which works on all platform sizes:
View and configure updated ad units
In the previous episode, “Using House Ads,” we built ad units into the sidebar for publishing with WordPress. Today I wanted to design an ad unit for a new theme on my website jeffreifman.com. I wrote two tutorials on optimizing this website for Google Page Speed here . In the second episode, I switched themes to achieve a page speed of 100. However, in the process, I had to minimize the way I advertised on the site.
In the end, I chose Medium by Array Theme because of its responsiveness and speed. But I want the menu and sidebar to stay lightweight, with very small static house ads. This raises the question of how to place ad units within the main content.
While they're easy to place in code, I'm not a big fan of placing banner ads on top of content. They are a distraction to the reader. I chose to place a lower ad unit above the comments. This will also be provided by the theme on each page.
Here's how I create an ad unit in Google DFP - if you want a step-by-step guide, check out Using House Ads:
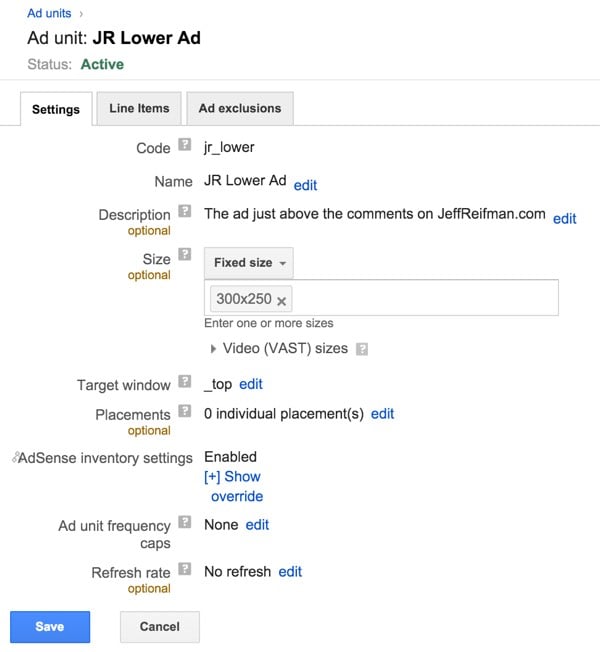
I won't spend time here, but you can reduce the duplication of ad appearance in these spaces by adjusting frequency cappingandrefresh Rate. This may be a better fit for your site, attracting more unique ads and advertisers.
After creating the lower ad units, I chose to create an ad unit for top content and mid-level content, which I needed to manually place on the pages with the most traffic. This may not appeal to publishers with large sites with thousands of pages; larger publishers may want to create ad units and automatically place them in multiple areas of content via themes. (Of course, they can do this by coding it into their theme or CMS.)
This is one of the reasons sidebars are popular - they are easy to code.
My ad unit is now named:
- jr_top
- jr_medium
- jr_bottom
They all render as a 300 x 250 ad unit. This is my new ad inventory and my new theme. Check out the site to see it in action: Jeff Reifman.
Order our in-house house ads
Next, I'll walk you through the process of placing an order for our own house ads. In this case, what I mean by internal advertising is affiliate advertising that generates some revenue or private sales. We'll also examine some order line item settings that can improve performance.
Here is a diagram from the Google DFP Ad Selection white paper outlining how DFP selects which ads to display:
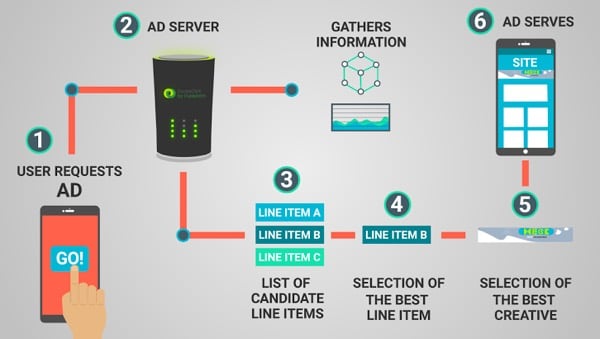
Optimizing order and line item settings is important to optimizing our revenue.
Again, if you want to know how to create an order and add line items, I'll go into detail in my previous post "Using House Ads."
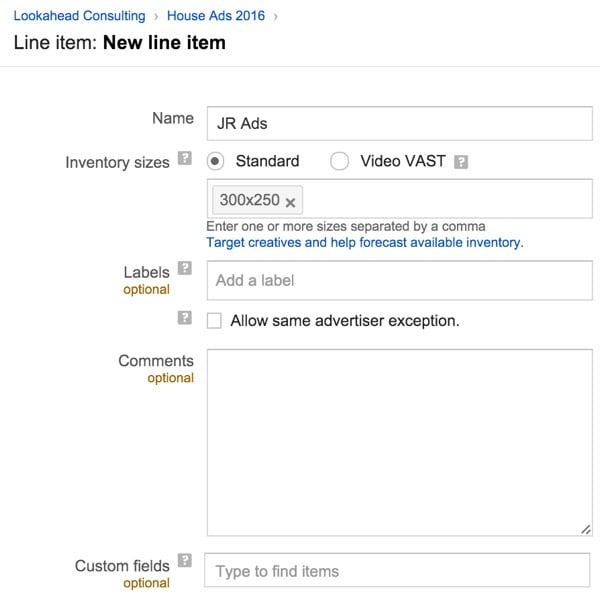
First I added a line item to the order House Ads 2016 I created earlier, I called it JR Ads:
Line item types and their delivery priorities
Let’s take a look at the line item settings:
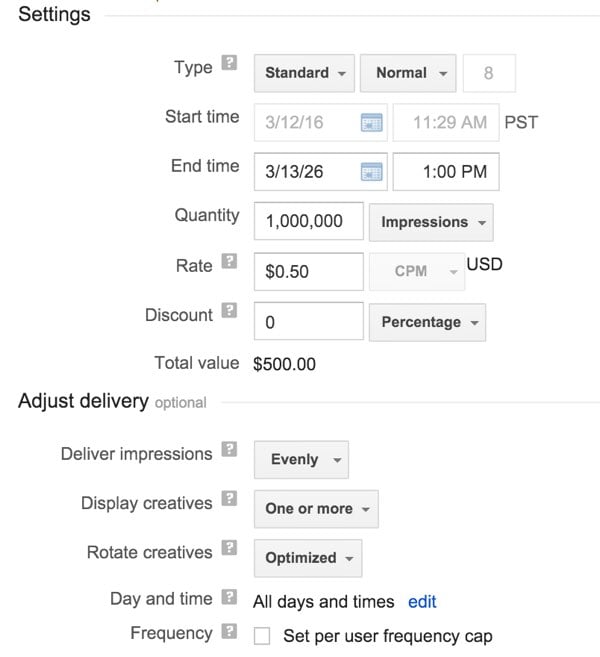
Please note that I set the cost-per-thousand impressions (CPM) rate at 0.50 cents to set a competitive floor against AdSense ads that are too cheap. I would rather show my affiliate ads than underground DFP ads. However, let's discuss Line item types in more detail.
You can apply any of the following delivery priorities to line items (via Google):
- Sponsorships: Sponsorship line items have the highest delivery priority and typically generate revenue. Sponsorship line items are most commonly used in time-based campaigns, such as sponsorships or fixed placements.
- Standard (default): Standard line items are most commonly used in direct-sold campaigns where the number of impressions is negotiated with the advertiser.
- Network: A line item type commonly used to serve ad networks. You can specify the percentage of remaining impressions to be completed.
- Bulk: A line item type used to fill a site's unsold inventory by specifying a fixed number of impressions.
- Price Priority: A line item type used to fill your site's unsold inventory with the highest-paying line items available.
- House line items: House line items are typically used to promote ads for products and services you choose. House ads typically generate no revenue and always have the lowest serving priority.
Depending on how you want to deliver your home inventory, you have a variety of options to do it in different ways. I'm using standard price competitiveness, but you can also do this using price priority. Alternatively, you can do it by priority via sponsorship, or by percentage via network or bulk. Of course, if you don't have house ads coming in, you can use the house plan, which will only appear when there are no paid ads.
Here is a visual representation of the delivery priority for each line item type:
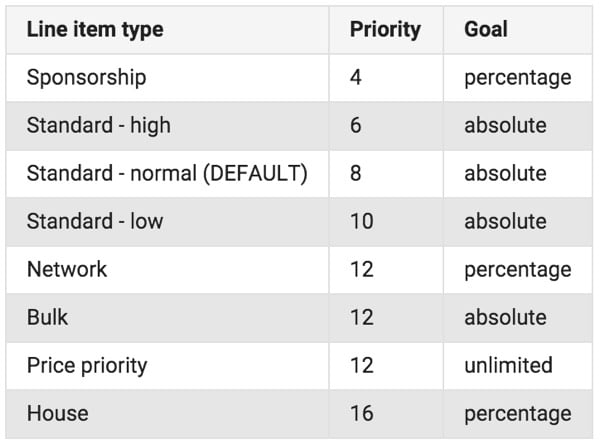
This helps you understand the overall priority of ads placed in orders and specific line item types.
Generate tags for your website
While I went into detail about generating and placing DFP code on your site in "Using House Ads," I wanted to highlight a few more details in this process.
When you generate tags for these line items, you may notice Page-level targeting and Inventory unit-level targeting:
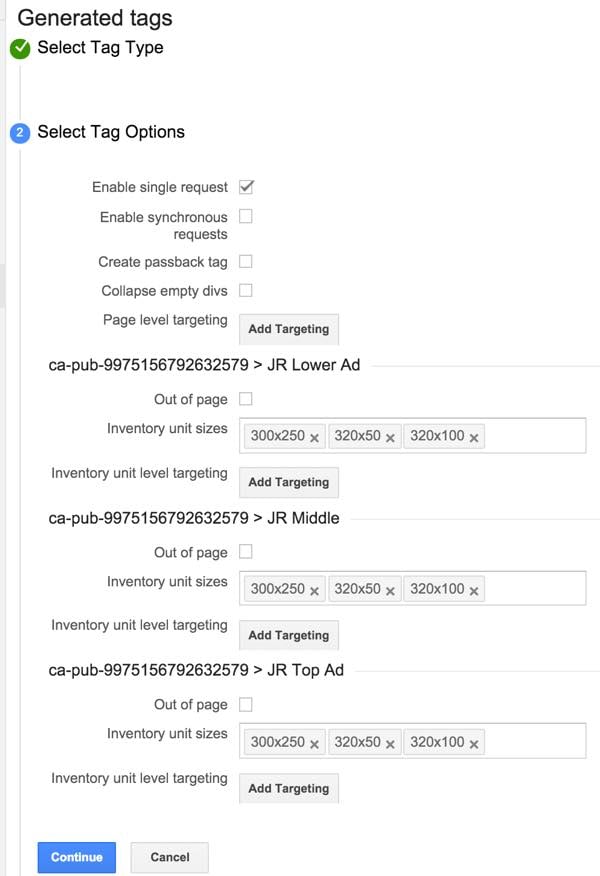
While I won’t go into the details of DFP targeting, you can learn more about it so you can use keywords that better connect your ads to advertisers Serving ads to your content may increase demand and revenue. For example, you could use keywords for pages and advertisers related to "snowboards" or "health care."
Place DFP ad unit code
As with house ads, we add the title tag to my theme title code. For JeffReifman.com, I use GitHub to deploy updates to the theme.
For the jr-lower ad, I placed it in the theme code in the content page area above the comments like this:
</div><!-- post content -->
<?php if( is_page() ) {} else { ?>
  <ul class="meta">
    <li ><span><?php _e( 'Category: ', 'medium' ); ?></span><span><?php the_category( ', ' ); ?></span><br /></li>
  <?php if (!wp_is_mobile()) { ?>
    <!--  not mobile -->
		<?php $posttags = get_the_tags(); if ( $posttags ) { ?>
			<li><span><?php _e( 'Tag: ', 'medium' ); ?></span> <?php the_tags( '', ', ', '' ); ?></li>
		<?php } ?>
	<?php } ?> <!-- end not mobile -->
	<?php if( is_single() ) { ?>
		<li><?php previous_post_link( '%link', __( '<strong>Previous Post: </strong>', 'medium' ) . '%title' ); ?></li>
		<li><?php next_post_link( '%link', __( '<strong>Next Post: </strong>', 'medium' ) . '%title' ); ?></li>
	<?php } ?>
  </ul>
<?php } ?>
<center>
  <!-- /1056613/jr_lower -->
  <div id='div-gpt-ad-1457895390973-0' style='height:250px; width:300px;'>
  <script type='text/javascript'>
  googletag.cmd.push(function() { googletag.display('div-gpt-ad-1457895390973-0'); });
  </script>
  </div>
</center>
</div><!-- box -->
However, for jr-top and jr-middle ads, I would manually repeat these ads through popular content. Since ad tags in DFP can change over time, I use the Shortcoder plugin, which I previously described in the benefits of using the free Shortcoder plugin.
Here, I created shortcodes such as dfp-top and dfp-middle in the shortcode editor. Note that I use a parameter to determine how ads float within my content called %side%%:
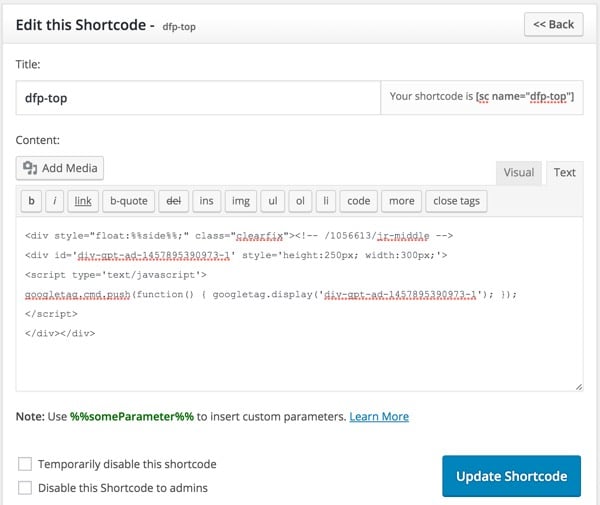
Then when I insert ads into my content I can reuse the shortcode while positioning them left or right or not; if not, I The ad may be centered. Here's an example of placing an ad on the left:
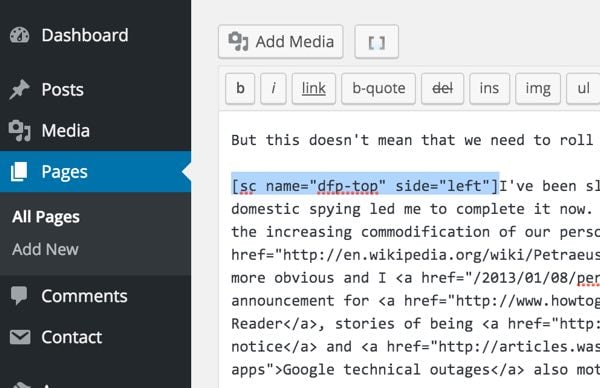
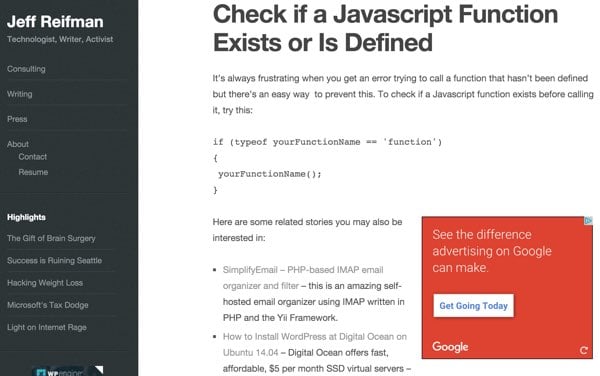
I can place shortcodes within my website content and easily change them as needed from the shortcode editor. Want to see the results? In one of my popular JavaScript posts, there’s this poignant “Look at the difference Google ads can make” ad:
What’s next?
I hope this helps you gain a deeper understanding of how to optimize your revenue through website advertising.
As this series continues, we'd love to hear more feedback from you on the DFP topics you'd like us to explore. Please feel free to post your questions and comments below. You can also contact me on Twitter @reifman. To see other tutorials I've written, check out my Envato Tuts instructor page.
Related Links
- Google DFP Advertising Management System Website
- Google DFP Ad Selection White Paper (pdf)
The above is the detailed content of Maximize revenue with Google DFP: Introduction. For more information, please follow other related articles on the PHP Chinese website!

Hot AI Tools

Undresser.AI Undress
AI-powered app for creating realistic nude photos

AI Clothes Remover
Online AI tool for removing clothes from photos.

Undress AI Tool
Undress images for free

Clothoff.io
AI clothes remover

AI Hentai Generator
Generate AI Hentai for free.

Hot Article

Hot Tools

Notepad++7.3.1
Easy-to-use and free code editor

SublimeText3 Chinese version
Chinese version, very easy to use

Zend Studio 13.0.1
Powerful PHP integrated development environment

Dreamweaver CS6
Visual web development tools

SublimeText3 Mac version
God-level code editing software (SublimeText3)

Hot Topics
 1378
1378
 52
52
 What is the purpose of the <progress> element?
Mar 21, 2025 pm 12:34 PM
The article discusses the HTML <progress> element, its purpose, styling, and differences from the <meter> element. The main focus is on using <progress> for task completion and <meter> for stati
 What is the purpose of the <datalist> element?
Mar 21, 2025 pm 12:33 PM
The article discusses the HTML <datalist> element, which enhances forms by providing autocomplete suggestions, improving user experience and reducing errors.Character count: 159
 What are the best practices for cross-browser compatibility in HTML5?
Mar 17, 2025 pm 12:20 PM
Article discusses best practices for ensuring HTML5 cross-browser compatibility, focusing on feature detection, progressive enhancement, and testing methods.
 What is the purpose of the <meter> element?
Mar 21, 2025 pm 12:35 PM
The article discusses the HTML <meter> element, used for displaying scalar or fractional values within a range, and its common applications in web development. It differentiates <meter> from <progress> and ex
 How do I use HTML5 form validation attributes to validate user input?
Mar 17, 2025 pm 12:27 PM
The article discusses using HTML5 form validation attributes like required, pattern, min, max, and length limits to validate user input directly in the browser.
 What is the viewport meta tag? Why is it important for responsive design?
Mar 20, 2025 pm 05:56 PM
The article discusses the viewport meta tag, essential for responsive web design on mobile devices. It explains how proper use ensures optimal content scaling and user interaction, while misuse can lead to design and accessibility issues.
 What is the purpose of the <iframe> tag? What are the security considerations when using it?
Mar 20, 2025 pm 06:05 PM
The article discusses the <iframe> tag's purpose in embedding external content into webpages, its common uses, security risks, and alternatives like object tags and APIs.
 Gitee Pages static website deployment failed: How to troubleshoot and resolve single file 404 errors?
Apr 04, 2025 pm 11:54 PM
GiteePages static website deployment failed: 404 error troubleshooting and resolution when using Gitee...


