
 Backend Development
PHP Tutorial
Ensuring a maintainable WordPress meta box: completing the front-end part
Backend Development
PHP Tutorial
Ensuring a maintainable WordPress meta box: completing the front-end part
Ensuring a maintainable WordPress meta box: completing the front-end part

In this series of articles, we’ll review some tips and strategies you can use to build a more maintainable WordPress plugin, and we’ll do it all within the context of a plugin that leverages tabbed meta boxes.
In the previous article we implemented functionality specifically for our tabs and also implemented the first textarea which will be used to capture some user input. For those of you who have been following, you know we just did:
- Making tabs functional
- Introduce a single UI element that the user can interact with
We haven't gone through the actual process of cleaning, validating, and saving the data, nor have we bothered to cover the contents of the remaining tabs. In the next two articles, we will do exactly that.
Specifically, in this article we will move on to the rest of the user interface, and then we will move on to actually writing the code responsible for validating user input and associating it with a given post.
These are all before us, let’s get started.
Revisiting tab templates
As mentioned before, in the previous article we introduced textarea in the Draft tab. If you've been following the tutorials and/or using the code from the available repositories, you should see something like this:
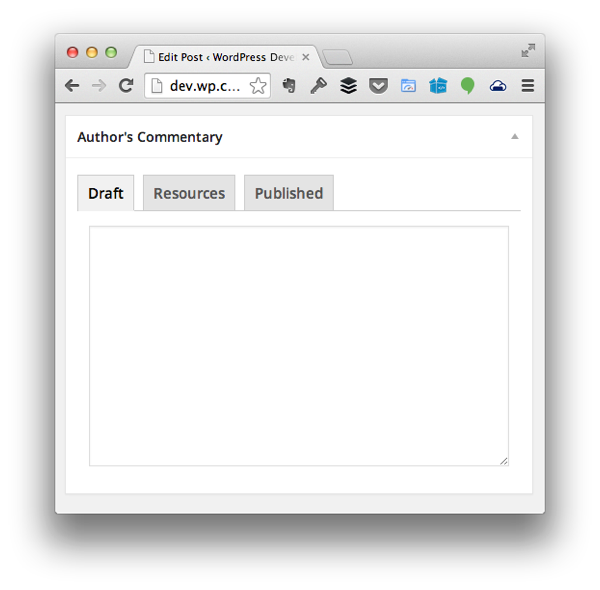

drafts tag is simple: This is where users can jot down notes, collect ideas, and basically have a notepad to help them gather their thoughts before writing a post.
resource
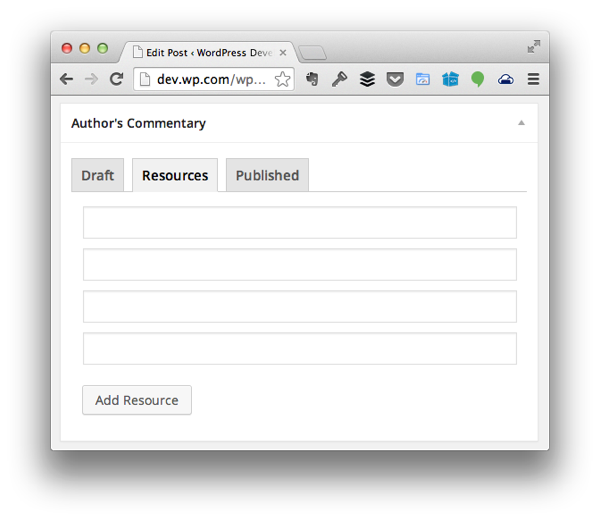
RESOURCESsHow about tags? The idea behind this tab is that users will be able to collect various URLs of pages, tweets, images, and other information relevant to the content they want to write about so that they can embed, link, and/or reference them in posts.
Its working principle is as follows:
- There will be a button that allows the user to add additional fields
- When the button is clicked, an input field will be added above the button to capture the user's input.
- If the user provides information, that information will also be saved when the post is saved.
- If the user does not provide any information, the information will not be saved.
As far as the last two items are concerned, we will address them in the next article. Now, let's add input fields dynamically.
Find admin/views/partials/resources.php and update the code to look like this:
<?php

/**
 * Provides the 'Resources' view for the corresponding tab in the Post Meta Box.
 *
 * @link       https://code.tutsplus.com/tutorials/creating-maintainable-wordpress-meta-boxes-the-front-end--cms-22383
 * @since      0.3.0
 *
 * @package    Authors_Commentary
 * @subpackage Authors_Commentary/admin/partials
 */
?>

<div class="inside hidden">
    <div id="authors-commentary-resources"></div><!-- #authors-commentary-resources -->
	<p><input type="submit" id="authors-commentary-add-resource" value="Add Resource" />
</div>
Next, we create a file in admin/assets/js and name it resources.js. Delete the file so that it looks like this:
(function( $ ) {
    'use strict';

	$(function() {

	});

})( jQuery );
Next, we need to set up an event handler so that when the user clicks the Add Resource button, it does the following:
- Create a new input element.
- Provide the correct ID and name attributes so that the information can be serialized.
- Append it to the existing list of input elements.
Below is fully commented code explaining how to achieve this, with additional information below:
/**
 * Creates a new input element to be appended to the DOM that's used to represent a single
 * resource (be it an address, tweet, image URL, etc.) to be referenced in the post.
 *
 * @since    0.4.0
 * @param    object    $    A reference to the jQuery object
 * @return   object         An input element to be appended to the DOM.
 */
function createInputElement( $ ) {

    var $inputElement, iInputCount;

	/* First, count the number of input fields that already exist. This is how we're going to
	 * implement the name and ID attributes of the element.
	 */
	iInputCount = $( '#authors-commentary-resources' ).children().length;
	iInputCount++;

	// Next, create the actual input element and then return it to the caller
	$inputElement =
		$( '<input />' )
			.attr( 'type', 'text' )
			.attr( 'name', 'authors-commentary-resource-' + iInputCount )
			.attr( 'id', 'authors-commentary-resource-' + iInputCount )
			.attr( 'value', '' );


	return $inputElement;


}

(function( $ ) {
	'use strict';

	$(function() {

		var $inputElement;

		$( '#authors-commentary-add-resource' ).on( 'click', function( evt ) {

			evt.preventDefault();

			/* Create a new input element that will be used to capture the users input
			 * and append it to the container just above this button.
			 */
			$( '#authors-commentary-resources' ).append ( createInputElement( $ ) );


		});

	});

})( jQuery );
In the code above, there is a function specifically used to create the input element and use the number of pre-existing elements to help give it a unique name and ID.
There is also a DOM readiness handler that sets up a function to fire when the user clicks the Add Resource button. When the button is clicked, the above function is called and then the input element is appended to the parent container.
To make sure it looks its best, we need to write some styles. Just like we did with the JavaScript source code, find admin/assets/css/admin.css and add the following code to the bottom of the file:
#authors-commentary-resources input[type="text"] {
    width:         100%;
    margin-bottom: 10px;
}
This will ensure that each input element is 100% wide so that they are each on their own line.
Finally, we need to enqueue the JavaScript written in WordPress so that it properly responds to the elements we display in the section. To do this, find the enqueue_admin_scripts function in admin/class-authors-commentary.php and update it so that it looks like this:
<?php

/**
 * Includes the JavaScript necessary to control the toggling of the tabs in the
 * meta box that's represented by this class.
 *
 * @since    0.2.0
 */
public function enqueue_admin_scripts() {

    if ( 'post' === get_current_screen()->id ) {

		wp_enqueue_script(
			$this->name . '-tabs',
			plugin_dir_url( __FILE__ ) . 'authors-commentary/admin/assets/js/tabs.js',
			array( 'jquery' ),
			$this->version
		);

		wp_enqueue_script(
			$this->name . '-resources',
			plugin_dir_url( __FILE__ ) . 'authors-commentary/admin/assets/js/resources.js',
			array( 'jquery' ),
			$this->version
		);

	}

}
At this point, you should be able to load the post editor in your browser, click on the Resources tag, and start dynamically adding multiple input fields to the page.
请记住,我们实际上还没有在服务器端执行任何操作,因此我们还没有进行清理、验证,或保存此信息。我们将在下一篇文章中执行此操作。
已发布
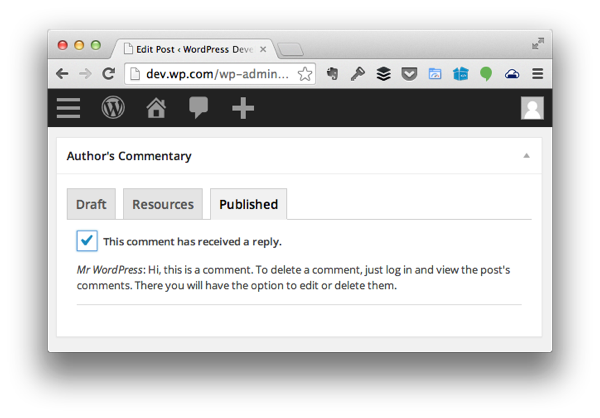
现在我们已经可以收集要在整个帖子中使用的各种注释和资源,那么已发布标签将包含哪些元素?
- 它是否包含一个类似于草稿标签的区域,我们可以在其中留下自己的评论和注释?也许吧。
- 是否包含一个位置来保存评论链接和其他有助于后续跟进的资源?
- 也许它只包含帖子中所有评论的列表,以及指向所述评论的链接以及用于指示该评论是否已收到回复的复选框。
这三个内容都是完全可以接受的,可以引入到已发布标签中;但是,为了不重新发明轮子并继续引入新功能以及使用 WordPress API 的其他方式,我们将采用最终选项。
具体来说,我们将加载帖子中存在的所有评论的列表。每条评论旁边都会有一个复选框。如果评论已收到回复,则会进行查看;否则,它将被取消选中。
我们不会为此添加 pingback,因为作者通常不会回复 pingback。
话虽如此,加载 admin/views/partials/published.php 并添加以下代码:
<?php

/**
 * Provides the 'Published' view for the corresponding tab in the Post Meta Box.
 *
 * @link       http://code.tutsplus.com/tutorials/creating-maintainable-wordpress-meta-boxes-the-front-end--cms-22383
 * @since      0.3.0
 *
 * @package    Authors_Commentary
 * @subpackage Authors_Commentary/admin/partials
 */
?>

<div class="inside hidden">
    <?php $comments = $this->load_post_comments(); ?>
	<ul id="author-commentary-comments">
		<?php foreach ( $comments as $comment ) { ?>
			<li>
				<label for="authors-commentary-comment-<?php echo $comment->comment_ID ?>">
					<input type="checkbox" id="authors-commentary-comment-<?php echo $comment->comment_ID ?>" name="authors-commentary-comment-<?php echo $comment->comment_ID ?>" />
					This comment has received a reply.
				</label>
				<p>
					<em><?php echo $comment->comment_author; ?></em>:
					<?php echo $comment->comment_content; ?>
				</p>
				<hr />
			</li>
		<?php } ?>
	</ul>
</div>
请注意,我们正在调用一个名为 load_post_comments 的函数。由于我们还没有定义它,所以让我们跳到 admin/class-authors-commentary-meta-box.php 并添加以下代码:
<?php

/**
 * Loads all of the comments for the given post along with checkboxes used to
 * indicate whether or not they've received a reply or not.
 *
 * @since    0.4.0
 * @access   private
 */
private function load_post_comments() {

    $args = array(
	    'post_id' => get_the_ID(),
	    'status'  => 'approve'
    );
    $comments = get_comments( $args );

    return $comments;

}
此函数将检索给定帖子的所有已批准评论的集合。上面列出的部分将遍历评论,然后创建一个标签和一个复选框,允许用户选择评论是否收到回复。
在标签下方,您会注意到评论作者和评论。这主要是为了轻松识别留下的评论。
最后,我们需要在样式表中添加一件事:
#author-commentary-comments label {
    font-weight: bold;
}
我们就完成了。
最终,您应该看到一个与上面看到的非常相似的屏幕。
移至服务器端
在下一篇文章中,我们将回到服务器端并开始编写代码,用于验证、清理、序列化和检索与我们刚刚创建的用户界面相关的所有代码。
同时,请记得查看 GitHub 上的代码(可在本文右侧找到),并随时在下面的提要中留下任何及所有问题和评论。
The above is the detailed content of Ensuring a maintainable WordPress meta box: completing the front-end part. For more information, please follow other related articles on the PHP Chinese website!

Hot AI Tools

Undresser.AI Undress
AI-powered app for creating realistic nude photos

AI Clothes Remover
Online AI tool for removing clothes from photos.

Undress AI Tool
Undress images for free

Clothoff.io
AI clothes remover

AI Hentai Generator
Generate AI Hentai for free.

Hot Article
Hot Tools

Notepad++7.3.1
Easy-to-use and free code editor

SublimeText3 Chinese version
Chinese version, very easy to use

Zend Studio 13.0.1
Powerful PHP integrated development environment

Dreamweaver CS6
Visual web development tools

SublimeText3 Mac version
God-level code editing software (SublimeText3)
Hot Topics
 1376
1376
 52
52

 Using middleware to improve error handling in golang functions
Apr 24, 2024 pm 06:57 PM
Using middleware to improve error handling in golang functions
Apr 24, 2024 pm 06:57 PM
Use middleware to improve error handling in Go functions: Introducing the concept of middleware, which can intercept function calls and execute specific logic. Create error handling middleware that wraps error handling logic in a custom function. Use middleware to wrap handler functions so that error handling logic is performed before the function is called. Returns the appropriate error code based on the error type, улучшениеобработкиошибоквфункциях Goспомощьюпромежуточногопрограммногообеспечения.Оно позволяетнамсосредоточитьсянаобработкеошибо
 How to effectively handle error scenarios in C++ through exception handling?
Jun 02, 2024 pm 12:38 PM
How to effectively handle error scenarios in C++ through exception handling?
Jun 02, 2024 pm 12:38 PM
In C++, exception handling handles errors gracefully through try-catch blocks. Common exception types include runtime errors, logic errors, and out-of-bounds errors. Take file opening error handling as an example. When the program fails to open a file, it will throw an exception and print the error message and return the error code through the catch block, thereby handling the error without terminating the program. Exception handling provides advantages such as centralization of error handling, error propagation, and code robustness.
 How to perform error handling and logging in C++ class design?
Jun 02, 2024 am 09:45 AM
How to perform error handling and logging in C++ class design?
Jun 02, 2024 am 09:45 AM
Error handling and logging in C++ class design include: Exception handling: catching and handling exceptions, using custom exception classes to provide specific error information. Error code: Use an integer or enumeration to represent the error condition and return it in the return value. Assertion: Verify pre- and post-conditions, and throw an exception if they are not met. C++ library logging: basic logging using std::cerr and std::clog. External logging libraries: Integrate third-party libraries for advanced features such as level filtering and log file rotation. Custom log class: Create your own log class, abstract the underlying mechanism, and provide a common interface to record different levels of information.
 Best tools and libraries for PHP error handling?
May 09, 2024 pm 09:51 PM
Best tools and libraries for PHP error handling?
May 09, 2024 pm 09:51 PM
The best error handling tools and libraries in PHP include: Built-in methods: set_error_handler() and error_get_last() Third-party toolkits: Whoops (debugging and error formatting) Third-party services: Sentry (error reporting and monitoring) Third-party libraries: PHP-error-handler (custom error logging and stack traces) and Monolog (error logging handler)
 How to use Golang's error wrapper?
Jun 03, 2024 pm 04:08 PM
How to use Golang's error wrapper?
Jun 03, 2024 pm 04:08 PM
In Golang, error wrappers allow you to create new errors by appending contextual information to the original error. This can be used to unify the types of errors thrown by different libraries or components, simplifying debugging and error handling. The steps are as follows: Use the errors.Wrap function to wrap the original errors into new errors. The new error contains contextual information from the original error. Use fmt.Printf to output wrapped errors, providing more context and actionability. When handling different types of errors, use the errors.Wrap function to unify the error types.
 Best practices for error handling in golang functions
Apr 24, 2024 pm 05:24 PM
Best practices for error handling in golang functions
Apr 24, 2024 pm 05:24 PM
Best practices for error handling in Go include: using the error type, always returning an error, checking for errors, using multi-value returns, using sentinel errors, and using error wrappers. Practical example: In the HTTP request handler, if ReadDataFromDatabase returns an error, return a 500 error response.
 Error handling strategies for Go function unit testing
May 02, 2024 am 11:21 AM
Error handling strategies for Go function unit testing
May 02, 2024 am 11:21 AM
In Go function unit testing, there are two main strategies for error handling: 1. Represent the error as a specific value of the error type, which is used to assert the expected value; 2. Use channels to pass errors to the test function, which is suitable for testing concurrent code. In a practical case, the error value strategy is used to ensure that the function returns 0 for negative input.
 Asynchronous processing in golang function error handling
May 03, 2024 pm 03:06 PM
Asynchronous processing in golang function error handling
May 03, 2024 pm 03:06 PM
In Go functions, asynchronous error handling uses error channels to asynchronously pass errors from goroutines. The specific steps are as follows: Create an error channel. Start a goroutine to perform operations and send errors asynchronously. Use a select statement to receive errors from the channel. Handle errors asynchronously, such as printing or logging error messages. This approach improves the performance and scalability of concurrent code because error handling does not block the calling thread and execution can be canceled.
