

Angular is a one-stop framework for creating mobile and web applications using the same reusable code. With Angular, you can divide your entire application into reusable components, making it easier to maintain and reuse your code.
In this tutorial series, you will learn how to start creating web applications using Angular and MongoDB as the backend. You'll use Node.js to run the server.
Throughout this tutorial, you will build a blogging application using Angular, Node.js, and MongoDB.
In this tutorial, you will learn how to start setting up the application and create the Login component.
Let’s start installing Angular CLI.
npm install -g @angular/cli
After installing Angular CLI, create a project folder named AngularBlogApp.
mkdir AngularBlogApp
cd AngularBlogApp
From the project folder, create a new Angular app using the following command:
ng new client
After creating the client application, navigate to the project folder and install the required dependencies using the Node Package Manager (npm).
cd client
npm install
Use npm to start the client server.
npm start
You should have the application running on http://localhost:4200/.
Your Angular web application will have a root component. Create a folder named root in the src/app folder. Create a file called root.component.html and add the following HTML code:
<h3>
    Root Component
</h3>
Add a file named root.component.ts and add the following code:
import { Component } from '@angular/core';

@Component({
  selector: 'app-root',
  templateUrl: './root.component.html'
})
export class RootComponent {

}
Delete files app.component.html, app.component.ts, app.component.scss and app.component.spec. ts. There is only one file named app.module.ts in the src/app folder.
Import RootComponent in the app.module.ts file.
import { RootComponent } from './root/root.component';
Wrap RootComponent in ngModules and bootstrap it.
@NgModule({
  declarations: [
    RootComponent
  ],
  imports: [
    BrowserModule,
    FormsModule
  ],
  providers: [],
  bootstrap: [RootComponent]
})
Save changes and restart the server. When the application loads, you will display RootComponent.
You will use Angular Router for routing in our blog application. Therefore, import routing related dependencies in a new file named app.routing.ts inside the src/app folder.
import { RouterModule, Routes } from '@angular/router';
import { ModuleWithProviders } from '@angular/core/src/metadata/ng_module';
Define routing paths and components as follows:
export const AppRoutes: Routes = [
    { path: '', component: LoginComponent }
];
Export routes to create a module containing all route providers.
export const ROUTING: ModuleWithProviders = RouterModule.forRoot(AppRoutes);
Here is what the app.routing.ts file looks like:
import { RouterModule, Routes } from '@angular/router';
import { ModuleWithProviders } from '@angular/core/src/metadata/ng_module';

import { LoginComponent } from './login/login.component';

export const AppRoutes: Routes = [
    { path: '', component: LoginComponent }
];

export const ROUTING: ModuleWithProviders = RouterModule.forRoot(AppRoutes);
As shown in the code above, you have not created a LoginComponent. It is added for clarity.
Import the ROUTING class in the app.module.ts file.
import { ROUTING } from './app.routing';
Include it in the NgModule import.
imports: [
    BrowserModule,
    ROUTING,
    FormsModule
]
Place RouterOutlet in the root.component.html page. This is where route components are rendered.
<router-outlet></router-outlet>
Create a folder named login inside the src/app folder. In the login folder, create a file named login.component.ts and add the following code:
import { Component } from '@angular/core';

@Component({
  selector: 'app-login',
  templateUrl: './login.component.html'
})
export class LoginComponent {

  constructor() {

  }

}
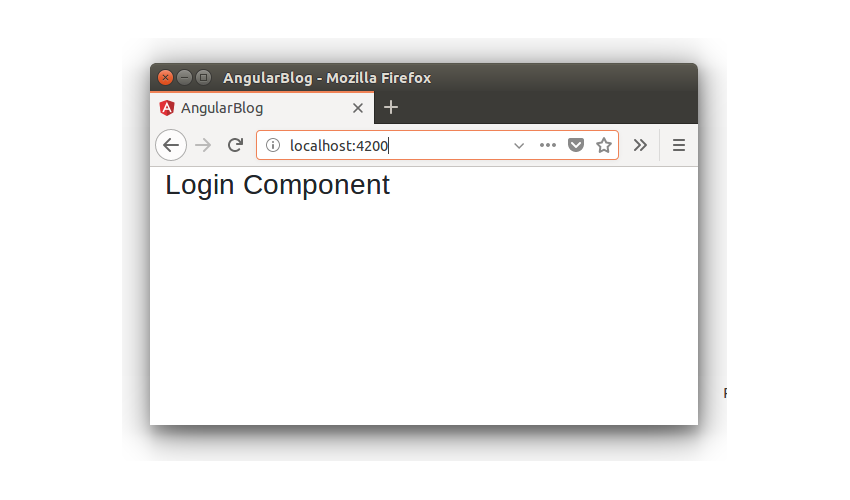
Create a file named login.component.html and add the following code:
<h3>
    Login Component
</h3>
Save the above changes and restart the server. Depending on the route defined when the application loads, LoginComponent will be displayed.
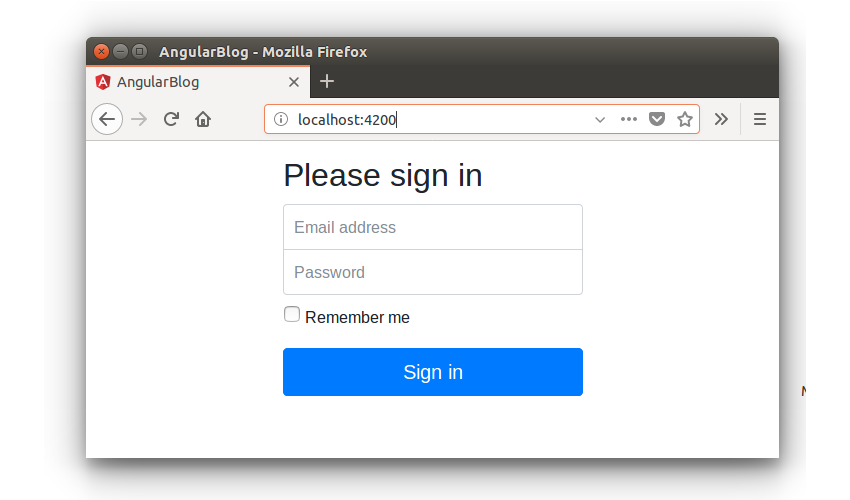
You already laid the foundation for LoginComponent when you set up your application. Let's create a view of LoginComponent using Bootstrap.
Download the bootstrap CSS styles and include them in the assets folder and include the reference in the src/index.html page.
<link rel="stylesheet" type="text/css" href="./assets/bootstrap.min.css">
Place a wrapper around app-root in the index.html page.
<div class="container">
  	<app-root></app-root>
</div>
Add the following HTML to the login.component.html page.
<form class="form-signin">
     <h2 class="form-signin-heading">Please sign in</h2>
     <label for="inputEmail" class="sr-only">Email address</label>
        <input name="email" type="email" id="inputEmail" class="form-control" placeholder="Email address" required autofocus>
        <label for="inputPassword" class="sr-only">Password</label>
        <input name="password"  type="password" id="inputPassword" class="form-control" placeholder="Password" required>
        <div class="checkbox">
          <label>
            <input type="checkbox" value="remember-me"> Remember me
          </label>
        </div>
    <button class="btn btn-lg btn-primary btn-block" type="button">Sign in</button>
</form>
Create a file named login.component.css in the login folder and add the following CSS styles.
.form-signin {
  max-width: 330px;
  padding: 15px;
  margin: 0 auto;
}
.form-signin .form-signin-heading,
.form-signin .checkbox {
  margin-bottom: 10px;
}
.form-signin .checkbox {
  font-weight: 400;
}
.form-signin .form-control {
  position: relative;
  box-sizing: border-box;
  height: auto;
  padding: 10px;
  font-size: 16px;
}
.form-signin .form-control:focus {
  z-index: 2;
}
.form-signin input[type="email"] {
  margin-bottom: -1px;
  border-bottom-right-radius: 0;
  border-bottom-left-radius: 0;
}
.form-signin input[type="password"] {
  margin-bottom: 10px;
  border-top-left-radius: 0;
  border-top-right-radius: 0;
}
修改 @Component 装饰器以包含 CSS 样式。
@Component({
  selector: 'app-login',
  templateUrl: './login.component.html',
  styleUrls: ['./login.component.css']
})
保存上述更改并尝试加载应用程序。您将在登录视图中显示 LoginComponent。
LoginComponent 需要与数据库交互以查看登录用户是否有效。所以它需要进行 API 调用。您将数据库交互部分保存在名为 login.service.ts 的单独文件中。
创建一个名为 login.service.ts 的文件并添加以下代码:
import { Injectable } from '@angular/core';
import { HttpClient } from '@angular/common/http';

@Injectable()
export class LoginService {

    constructor(private http: HttpClient){

	}

	validateLogin(){

	}

}
在 LoginComponent 中导入 LoginService 并将其添加为组件装饰器中的提供程序。
import { LoginService } from './login.service';
@Component({
  selector: 'app-login',
  templateUrl: './login.component.html',
  styleUrls: ['./login.component.css'],
  providers: [ LoginService ]
})
在 login.service.ts 文件中添加一个名为 validateLogin 的方法,该方法将进行 API 调用。其外观如下:
validateLogin(user: User){
	return this.http.post('/api/user/login',{
		username : user.username,
		password : user.password
	})
}
如上面的代码所示,它返回一个将在 login.component.ts 文件中订阅的可观察对象。以下是 login.service.ts 文件的外观:
import { Injectable } from '@angular/core';
import { HttpClient } from '@angular/common/http';
import { User } from '../models/user.model';

@Injectable()
export class LoginService {

    constructor(private http: HttpClient){

	}

	validateLogin(user: User){
		return this.http.post('/api/user/login',{
			username : user.username,
			password : user.password
		})
	}

}
将 ngModel 指令添加到 login.component.html 中的输入元素。
 <input name="email" [(ngModel)] = "user.username" type="email" id="inputEmail" class="form-control" placeholder="Email address" required autofocus>
 <input name="password" [(ngModel)] = "user.password" type="password" id="inputPassword" class="form-control" placeholder="Password" required>
向登录按钮添加点击事件。
<button class="btn btn-lg btn-primary btn-block" (click)="validateLogin();" type="button">Sign in</button>
以下是修改后的 login.component.html 的外观:
在 login.component.ts 文件中定义并初始化用户变量。
public user : User;

constructor(private loginService: LoginService) {
  this.user = new User();
}
User 模型已在 src/app/models 文件夹中定义。其外观如下:
export class User {
    constructor(){
		this.username = '';
		this.password = '';
	}
	public username;
	public password;
}
定义一个名为 validateLogin 的方法,该方法将在单击按钮时调用。该方法如下所示:
validateLogin() {
  if(this.user.username && this.user.password) {
  	this.loginService.validateLogin(this.user).subscribe(result => {
    console.log('result is ', result);
  }, error => {
    console.log('error is ', error);
  });
  } else {
  	alert('enter user name and password');
  }
}
当用户名和密码都输入后,validateLogin 方法会订阅 LoginService 方法来验证用户登录。
以下是 login.component.ts 文件的外观:
import { Component } from '@angular/core';
import { LoginService } from './login.service';
import { User } from '../models/user.model';

@Component({
  selector: 'app-login',
  templateUrl: './login.component.html',
  styleUrls: ['./login.component.css'],
  providers: [ LoginService ]
})
export class LoginComponent {

  public user : User;

  constructor(private loginService: LoginService) {
      this.user = new User();
  }

  validateLogin() {
  	if(this.user.username && this.user.password) {
  		this.loginService.validateLogin(this.user).subscribe(result => {
        console.log('result is ', result);
      }, error => {
        console.log('error is ', error);
      });
  	} else {
  		alert('enter user name and password');
  	}
  }

}
在 Angular 博客应用教程系列的这一部分中,您了解了如何开始使用 Angular 创建 Web 应用。您创建了 Angular 应用程序的基本结构,并创建了 LoginComponent ,这将使用户能够验证用户名和密码。
在本教程系列的下一部分中,您将编写用于用户登录验证的 REST API 并创建主页组件。
本教程的源代码可在 GitHub 上获取。
请在下面的评论中告诉我们您的想法和建议。
The above is the detailed content of Angular and MongoDB: Building a blogging application with login functionality. For more information, please follow other related articles on the PHP Chinese website!


![[Web front-end] Node.js quick start](https://img.php.cn/upload/course/000/000/067/662b5d34ba7c0227.png)


