

Host WordPress website on Google App Engine


何时 WordPress 最初只是一个博客平台,但它不断发展成为一个完整的内容管理系统,为用户提供创建和发布内容的能力。 发布精彩的网站和博客。插件数据库是最大的数据库之一 并且还在不断增长。最大的 WordPress 引擎的简单性对我来说很有吸引力。它需要非常 建立并运行由 WordPress 驱动的博客几乎不需要什么。
说起来简单, 最小并不意味着不能根据自己的喜好进行修改或 要求。您可以将 WordPress 驱动的网站变成照片博客、 专业的在线作品集、新闻网站、在线社区,甚至是 在线电子商务商店。使用时您仅受想象力的限制 WordPress!
开发人员有时是控制狂。好的,大多数 他们是控制狂。他们想要控制每一件小事 这涉及到他们的应用程序或网站的制作。话虽如此,WordPress 提供多种选项,以便您可以在任何方面扩展它 方向取决于你的喜好。您可以使用以下方式为您的网站创建插件 WordPress API。
创建插件后,您可以将其托管在 WordPress 中 插件存储库。除此之外还有主题存储库,您可以在其中提交 您自己创建的主题。您可以创建自定义帖子类型、分类法和 特定于您的应用程序或网站的元数据。说到应用程序,您可以轻松地 管理用户、数据库和 HTTP 请求。这就是我们要研究的内容 本教程。
我们将在 Google App Engine 中为我们的 WordPress 网站设置一个 Cloud SQL 实例。这将允许我们的网站使用 Google 的服务器,这将影响我们的 WordPress 网站或博客的加载时间。总体结果将是快速加载时间和顺利处理访问您的网站或博客的流量。
什么是 Google App Engine?
根据 Google 的说法:
“谷歌 App Engine 是一种平台即服务 (PaaS) 产品,可让您构建 并在 Google 的基础设施上运行应用程序。应用引擎 应用程序易于构建、易于维护并且易于根据您的需要进行扩展 流量和数据存储需要改变。”
由于我们正在与 Google 打交道,因此我们将能够使用 Big G 的基础设施。本质上,我们将使用相同的服务器来托管我们的 WordPress 网站或博客,因此我们可以说我们正在使用 Google托管 Blogger 以外的其他内容。
设置 Google App Engine
要使用 Google App Engine,我们需要一台可以运行本地服务器和 Python 的计算机。您需要首先在您的计算机上设置本地服务器。这将来会有帮助,因为您可以在将网站发布到网上之前测试更新。要设置完整的本地服务器以使用 Google App Engine,我们需要来自互联网的以下软件。
最重要、最明显的是 Google App Engine 软件开发工具包 (SDK) for PHP (SDK),以及使用 MySQL 服务器的本地服务器。您还应该运行安装 Python 的。获取要在本地服务器上使用的 WordPress 的全新副本,或者您也可以下载附件,其中包含准备好为 WordPress 启用 Google App Engine 的所有文件。
步骤 1
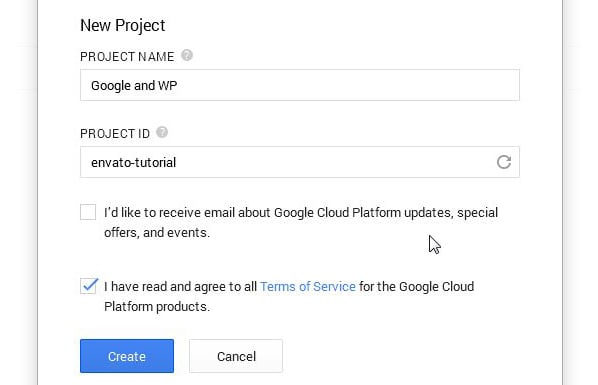
注册 Google Cloud Platform,因为我们需要 Cloud SQL 实例。设置实例很容易。您需要在中创建一个新项目 the Google Developers Console. So we'll set up a test project for 本教程。
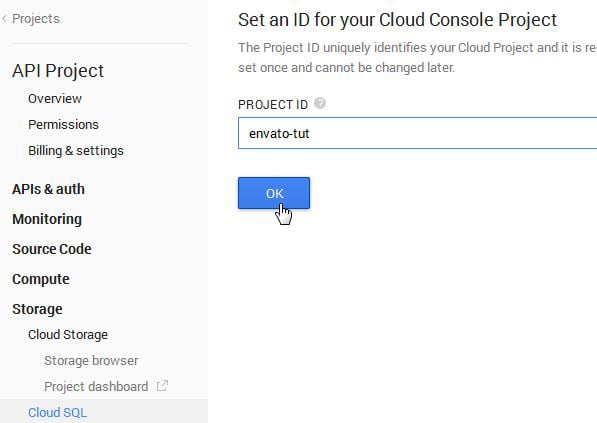
输入必要的详细信息后,转到 存储 > Cloud SQL > 新实例。输入实例名称,然后按住 因为我们将使用相同的名称来连接到 WordPress。您需要启用计费功能,以便您 可以连接到该实例。
步骤 2
下一步
我们将继续设置本地服务器,以便我们可以运行 WordPress
谷歌应用程序引擎。为此,您需要创建三个文件: aap.yaml,
cron.yaml 和 php.ini。在此过程中,下载最新版本的 WordPress 并将其解压到您的硬盘上。将解压出来的文件夹和
将三个文件放在一个新文件夹中,并将其命名为 App Engine。这些文件的代码如下。
应用程序.yaml
1 2 3 4 5 6 7 8 9 10 11 12 13 14 15 16 17 18 19 20 21 22 23 24 25 26 27 28 29 30 31 32 33 34 |
|
Cron.yaml
1 2 3 4 |
|
PHP.this
1 2 3 |
|
在 app.yaml 中
文件,将 your-project-id 更改为我们刚才创建的,然后保存
它。
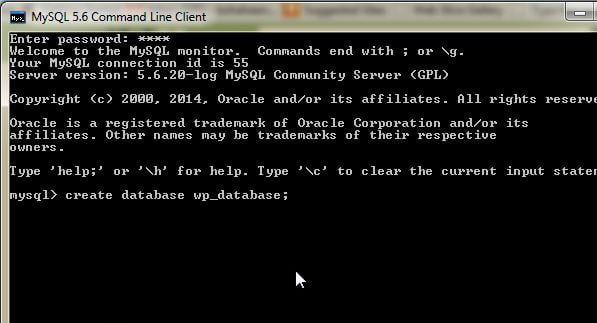
步骤 3
启动
MySQL 命令行客户端。它会要求您输入密码。我将我的设置为
当我安装MySQL服务器时,输入“root”,所以我输入“root”并按Enter。
我们将使用控制台为我们创建一个数据库。输入代码 创建数据库 wp_database;,其中 wp_database 是我们要创建的数据库的名称。
现在我们的
数据库已创建,我们希望 WordPress 使用它。
导航到提取的 WordPress 副本并打开 wp-config.php。输入数据库和用户名的详细信息。此外,您还必须将 define('DB_HOST', 'localhost'); 替换为以下代码段。
1 2 3 4 5 |
|
Replace your_project_id with your Cloud SQL Instance ID name, and save 它。
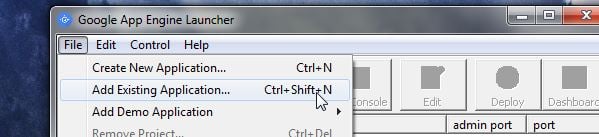
步骤 4
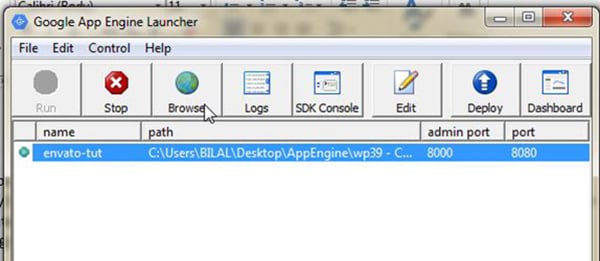
执行 Google App Engine 启动器,启动时按 Control-Shift-N 或转到文件
然后点击添加现有应用程序...浏览到我们命名为“App”的文件夹
Engine”,然后点击确定。Google App Engine 将读取 app.yaml 文件并加载
来自它的数据。
按绿色按钮运行应用程序引擎。等一下 稍等片刻,然后单击浏览按钮。第一次浏览时 您的应用程序,它将向您呈现著名的 WordPress 五分钟安装页面。添加 在用户名和密码等详细信息中。另外你可能不想要 搜索引擎对其进行索引,因此请取消选中该框。
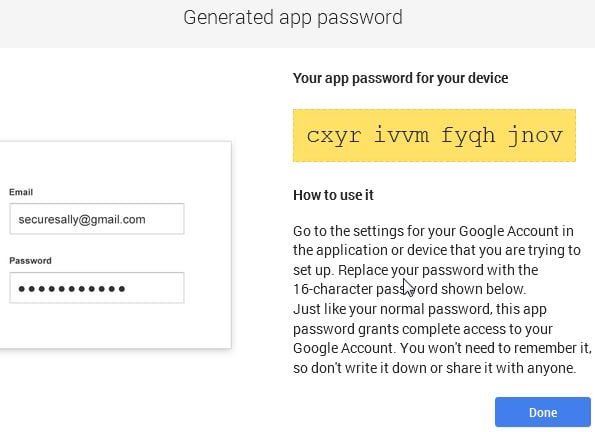
现在您已准备好开始创建您的 应用。创建应用程序后,返回 Google App Engine Launcher,选择您的项目并点击部署按钮。你会 要求输入登录详细信息。输入您的电子邮件 ID,并使用密码作为密码 Google 应用密码生成器。
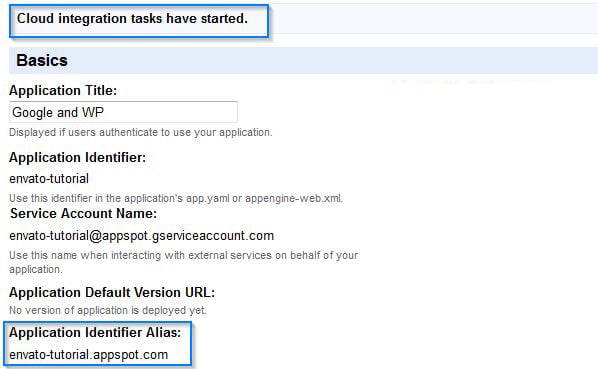
部署应用程序后,现在您可以使用 http:// 访问您的应用程序<project_id>.appspot.com/wp-admin/install.php</project_id>。只需几步,我们就完成了。登录到 App Engine 并单击您最近部署的 WordPress 项目。我们想要为我们的应用程序激活云集成,以便我们可以从 WordPress 中上传媒体。
点击左侧边栏中的应用程序设置,向下滚动到底部,直到看到创建,然后点击将其激活。您将看到一条新消息,表明云集成服务已启动。
步骤 5
最后一个
要做的就是安装适用于 WordPress 的 Google App Engine 插件
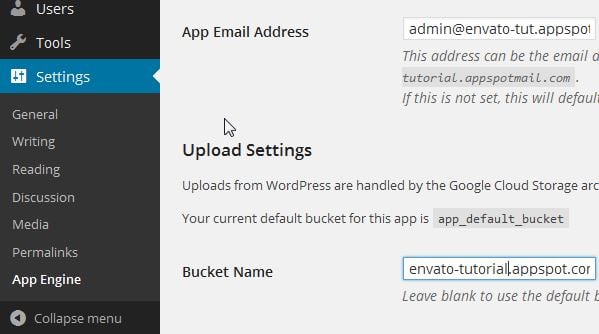
本地。安装插件后,激活它。现在您将看到一个新链接
在 WordPress 的设置选项卡下。导航到 App Engine 并填写
必要的信息。确保您的默认存储桶名称显示
(envato-tutorial.appspot.com)。之后,点击保存按钮,您就可以了
走吧。
结论
您可能想要保留 WordPress 的本地副本 安装。由于安全原因,您的网站是静态的 您无法在 Google App Engine 上更改主题或安装插件 由 WordPress 提供支持的网站。所以你能做的就是安装主题和插件 本地,然后使用 Google App Engine 再次部署 WordPress 启动器。
如果你 按照步骤操作,一切顺利,给自己一个机会 在背面。不,说真的,好好犒劳一下自己吧。我们现在做了什么 将帮助您的博客或网站快速加载并支持上传 图片和其他媒体到博客文章。事实上你已经给你的博客 利用大 G 令人难以置信且强大的基础设施的优势。现在起 打开,您的博客将优雅地处理其传入流量。
The above is the detailed content of Host WordPress website on Google App Engine. For more information, please follow other related articles on the PHP Chinese website!

Hot AI Tools

Undresser.AI Undress
AI-powered app for creating realistic nude photos

AI Clothes Remover
Online AI tool for removing clothes from photos.

Undress AI Tool
Undress images for free

Clothoff.io
AI clothes remover

Video Face Swap
Swap faces in any video effortlessly with our completely free AI face swap tool!
Hot Article
Hot Tools

Notepad++7.3.1
Easy-to-use and free code editor

SublimeText3 Chinese version
Chinese version, very easy to use

Zend Studio 13.0.1
Powerful PHP integrated development environment

Dreamweaver CS6
Visual web development tools

SublimeText3 Mac version
God-level code editing software (SublimeText3)
Hot Topics
 1392
1392
 52
36
110
52
36
110

 Is WordPress easy for beginners?
Apr 03, 2025 am 12:02 AM
Is WordPress easy for beginners?
Apr 03, 2025 am 12:02 AM
WordPress is easy for beginners to get started. 1. After logging into the background, the user interface is intuitive and the simple dashboard provides all the necessary function links. 2. Basic operations include creating and editing content. The WYSIWYG editor simplifies content creation. 3. Beginners can expand website functions through plug-ins and themes, and the learning curve exists but can be mastered through practice.
 How To Begin A WordPress Blog: A Step-By-Step Guide For Beginners
Apr 17, 2025 am 08:25 AM
How To Begin A WordPress Blog: A Step-By-Step Guide For Beginners
Apr 17, 2025 am 08:25 AM
Blogs are the ideal platform for people to express their opinions, opinions and opinions online. Many newbies are eager to build their own website but are hesitant to worry about technical barriers or cost issues. However, as the platform continues to evolve to meet the capabilities and needs of beginners, it is now starting to become easier than ever. This article will guide you step by step how to build a WordPress blog, from theme selection to using plugins to improve security and performance, helping you create your own website easily. Choose a blog topic and direction Before purchasing a domain name or registering a host, it is best to identify the topics you plan to cover. Personal websites can revolve around travel, cooking, product reviews, music or any hobby that sparks your interests. Focusing on areas you are truly interested in can encourage continuous writing
 What is the WordPress good for?
Apr 07, 2025 am 12:06 AM
What is the WordPress good for?
Apr 07, 2025 am 12:06 AM
WordPressisgoodforvirtuallyanywebprojectduetoitsversatilityasaCMS.Itexcelsin:1)user-friendliness,allowingeasywebsitesetup;2)flexibilityandcustomizationwithnumerousthemesandplugins;3)SEOoptimization;and4)strongcommunitysupport,thoughusersmustmanageper
 Can I learn WordPress in 3 days?
Apr 09, 2025 am 12:16 AM
Can I learn WordPress in 3 days?
Apr 09, 2025 am 12:16 AM
Can learn WordPress within three days. 1. Master basic knowledge, such as themes, plug-ins, etc. 2. Understand the core functions, including installation and working principles. 3. Learn basic and advanced usage through examples. 4. Understand debugging techniques and performance optimization suggestions.
 Should I use Wix or WordPress?
Apr 06, 2025 am 12:11 AM
Should I use Wix or WordPress?
Apr 06, 2025 am 12:11 AM
Wix is suitable for users who have no programming experience, and WordPress is suitable for users who want more control and expansion capabilities. 1) Wix provides drag-and-drop editors and rich templates, making it easy to quickly build a website. 2) As an open source CMS, WordPress has a huge community and plug-in ecosystem, supporting in-depth customization and expansion.
 How much does WordPress cost?
Apr 05, 2025 am 12:13 AM
How much does WordPress cost?
Apr 05, 2025 am 12:13 AM
WordPress itself is free, but it costs extra to use: 1. WordPress.com offers a package ranging from free to paid, with prices ranging from a few dollars per month to dozens of dollars; 2. WordPress.org requires purchasing a domain name (10-20 US dollars per year) and hosting services (5-50 US dollars per month); 3. Most plug-ins and themes are free, and the paid price ranges from tens to hundreds of dollars; by choosing the right hosting service, using plug-ins and themes reasonably, and regularly maintaining and optimizing, the cost of WordPress can be effectively controlled and optimized.
 Is WordPress still free?
Apr 04, 2025 am 12:06 AM
Is WordPress still free?
Apr 04, 2025 am 12:06 AM
The core version of WordPress is free, but other fees may be incurred during use. 1. Domain names and hosting services require payment. 2. Advanced themes and plug-ins may be charged. 3. Professional services and advanced features may be charged.
 Why would anyone use WordPress?
Apr 02, 2025 pm 02:57 PM
Why would anyone use WordPress?
Apr 02, 2025 pm 02:57 PM
People choose to use WordPress because of its power and flexibility. 1) WordPress is an open source CMS with strong ease of use and scalability, suitable for various website needs. 2) It has rich themes and plugins, a huge ecosystem and strong community support. 3) The working principle of WordPress is based on themes, plug-ins and core functions, and uses PHP and MySQL to process data, and supports performance optimization.
