

How to save files to USB disk

How to save files to a USB flash drive: 1. Prepare a computer and a USB flash drive; 2. Insert the USB flash drive into the computer’s USB interface; 3. Find the resource manager on the computer’s taskbar Click the icon to open; 4. Select the file to be saved; 5. Right-click the file and select the "Copy" option; 6. Paste the file to the USB flash drive; 7. Wait for the file copy to complete; 8. Confirm that the file has been successfully saved to U disk; 9. Remove the U disk safely.

# A USB flash drive is a portable storage device that can easily transfer files from one computer to another. Saving files to a USB flash drive is an essential skill, whether it is to back up important files or to share files with others. This article will introduce you how to save files to a USB flash drive.
Step One: Preparation
Before saving the file to the USB flash drive, you need to prepare the following items:
1. A computer: Make sure the computer is connected to USB interface for U disk.
2. A USB flash drive: Make sure the capacity of the USB flash drive is enough to store the files you want to save.
Step 2: Insert the U disk
Insert the U disk into the USB interface of the computer. Usually, the USB flash drive will be automatically recognized and displayed in the computer's explorer or file browser.
Step 3: Open the resource manager or file browser
On the computer’s taskbar, find the icon of the resource manager (Windows system) or file browser (Mac system). and click Open.
Step 4: Select the file you want to save
In the resource manager or file browser, find the file you want to save to the USB flash drive. You can use the folder navigator to browse through different directories on your computer until you find the target file.
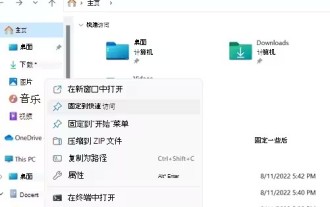
Step 5: Copy the file
Select the file you want to save, right-click the file, and select the "Copy" option. You can also use the keyboard shortcut "Ctrl C" to copy files.
Step 6: Paste the file to the USB flash drive
In the resource manager or file browser, find the icon of the USB flash drive. Right-click on the USB drive icon and select the "Paste" option. You can also use the keyboard shortcut "Ctrl V" to paste the file.
Step 7: Wait for the file copy to complete
The file copy time will vary depending on the size of the file and the performance of the computer. Please wait patiently until the files are copied. During the copying process, please do not move or pull out the USB flash drive.
Step 8: Confirm that the file has been saved to the USB flash drive
After the copy is completed, you can open the USB flash drive and confirm that the file has been successfully saved in the USB flash drive. Double-click the USB flash drive icon to browse the contents of the USB flash drive and verify whether the file exists.
Step 9: Safely remove the USB flash drive
After you finish saving the file, make sure to safely remove the USB flash drive. In Windows systems, right-click the USB flash drive icon, select the "Safely Remove Hardware" option, and select the name of the USB flash drive. In Mac system, you can directly pull out the USB flash drive.
Summary:
Saving files to a USB flash drive is a simple and practical skill. By following the steps above, you can easily save files from your computer to a USB flash drive and carry and share these files anytime and anywhere. Remember to safely remove the USB flash drive from your computer before unplugging it to avoid data loss or damage.
The above is the detailed content of How to save files to USB disk. For more information, please follow other related articles on the PHP Chinese website!

Hot AI Tools

Undresser.AI Undress
AI-powered app for creating realistic nude photos

AI Clothes Remover
Online AI tool for removing clothes from photos.

Undress AI Tool
Undress images for free

Clothoff.io
AI clothes remover

AI Hentai Generator
Generate AI Hentai for free.

Hot Article
Hot Tools

Notepad++7.3.1
Easy-to-use and free code editor

SublimeText3 Chinese version
Chinese version, very easy to use

Zend Studio 13.0.1
Powerful PHP integrated development environment

Dreamweaver CS6
Visual web development tools

SublimeText3 Mac version
God-level code editing software (SublimeText3)
Hot Topics
 1377
1377
 52
52

 Ventoy secure boot settingsSecure Boot
Jun 18, 2024 pm 09:00 PM
Ventoy secure boot settingsSecure Boot
Jun 18, 2024 pm 09:00 PM
Ventoy is a USB boot tool that can directly boot ISO/WIM/IMG/VHD(x)/EFI and other types of files in the USB flash drive. It is very easy to use. Laptops have secure boot turned on by default. If they are not turned off or cannot be turned off, they cannot be booted from a USB device. Ventoy also supports secure boot. The principle is to inject a GRUB installation certificate into the current computer. As long as your computer After being injected once, any USB disk PE booted based on grub can pass. The official description of Ventoy is a GIF image. The playback speed is too fast and you may not be able to remember it. The editor has divided the GIF image to make it easier to understand. Ventoy secure boot has EnrollKey and Enro
 What to do if the 0x80004005 error code appears. The editor will teach you how to solve the 0x80004005 error code.
Mar 21, 2024 pm 09:17 PM
What to do if the 0x80004005 error code appears. The editor will teach you how to solve the 0x80004005 error code.
Mar 21, 2024 pm 09:17 PM
When deleting or decompressing a folder on your computer, sometimes a prompt dialog box "Error 0x80004005: Unspecified Error" will pop up. How should you solve this situation? There are actually many reasons why the error code 0x80004005 is prompted, but most of them are caused by viruses. We can re-register the dll to solve the problem. Below, the editor will explain to you the experience of handling the 0x80004005 error code. Some users are prompted with error code 0X80004005 when using their computers. The 0x80004005 error is mainly caused by the computer not correctly registering certain dynamic link library files, or by a firewall that does not allow HTTPS connections between the computer and the Internet. So how about
 How to transfer files from Quark Cloud Disk to Baidu Cloud Disk?
Mar 14, 2024 pm 02:07 PM
How to transfer files from Quark Cloud Disk to Baidu Cloud Disk?
Mar 14, 2024 pm 02:07 PM
Quark Netdisk and Baidu Netdisk are currently the most commonly used Netdisk software for storing files. If you want to save the files in Quark Netdisk to Baidu Netdisk, how do you do it? In this issue, the editor has compiled the tutorial steps for transferring files from Quark Network Disk computer to Baidu Network Disk. Let’s take a look at how to operate it. How to save Quark network disk files to Baidu network disk? To transfer files from Quark Network Disk to Baidu Network Disk, you first need to download the required files from Quark Network Disk, then select the target folder in the Baidu Network Disk client and open it. Then, drag and drop the files downloaded from Quark Cloud Disk into the folder opened by the Baidu Cloud Disk client, or use the upload function to add the files to Baidu Cloud Disk. Make sure to check whether the file was successfully transferred in Baidu Cloud Disk after the upload is completed. That's it
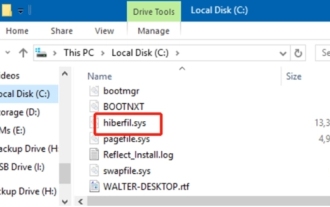 What is hiberfil.sys file? Can hiberfil.sys be deleted?
Mar 15, 2024 am 09:49 AM
What is hiberfil.sys file? Can hiberfil.sys be deleted?
Mar 15, 2024 am 09:49 AM
Recently, many netizens have asked the editor, what is the file hiberfil.sys? Can hiberfil.sys take up a lot of C drive space and be deleted? The editor can tell you that the hiberfil.sys file can be deleted. Let’s take a look at the details below. hiberfil.sys is a hidden file in the Windows system and also a system hibernation file. It is usually stored in the root directory of the C drive, and its size is equivalent to the size of the system's installed memory. This file is used when the computer is hibernated and contains the memory data of the current system so that it can be quickly restored to the previous state during recovery. Since its size is equal to the memory capacity, it may take up a larger amount of hard drive space. hiber
 Different uses of slashes and backslashes in file paths
Feb 26, 2024 pm 04:36 PM
Different uses of slashes and backslashes in file paths
Feb 26, 2024 pm 04:36 PM
A file path is a string used by the operating system to identify and locate a file or folder. In file paths, there are two common symbols separating paths, namely forward slash (/) and backslash (). These two symbols have different uses and meanings in different operating systems. The forward slash (/) is a commonly used path separator in Unix and Linux systems. On these systems, file paths start from the root directory (/) and are separated by forward slashes between each directory. For example, the path /home/user/Docume
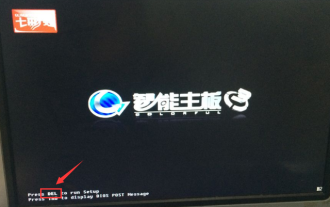 Colorful motherboard boot USB flash drive shortcut key
Mar 19, 2024 pm 12:55 PM
Colorful motherboard boot USB flash drive shortcut key
Mar 19, 2024 pm 12:55 PM
Hello everyone, today I will share a graphic tutorial from Xiaobai System official website (xiaobaixitong.com). Colorful motherboard is a computer motherboard brand with very good performance, and it has certain advantages in all aspects, and its price-performance ratio is also very high. So here comes the question, how to set the USB boot option for Colorful motherboard? Don’t worry, the editor will show you how to set up the USB disk boot option in Colorful. Teach you step by step how to set the U disk boot option for Colorful motherboard: First, insert the U disk into the computer, then turn on the computer and quickly and intermittently press the startup shortcut key to enter the BIOS setting interface (please note: usually it will be displayed below the computer brand logo Start hotkey hints). 2. Enter BIOS settings
 What should I do if the system installation is too slow when reinstalling the system from USB disk in System Home?
Mar 01, 2024 pm 11:30 PM
What should I do if the system installation is too slow when reinstalling the system from USB disk in System Home?
Mar 01, 2024 pm 11:30 PM
When reinstalling the system, many users use the USB flash drive reinstallation system of System Home. However, when they reinstall the USB flash drive, they find that the loading speed is too slow. So how should we deal with it? What should I do if the system installation is too slow when reinstalling the system via USB flash drive in System Home? Reason introduction: 1. The transmission speed of the USB flash drive itself is slow, especially when processing large files, and the operation time is very long. 2. The USB interface of the computer and the extension cord will cause The signal is attenuated, making the USB disk reinstallation system installation too slow. Solution: 1. The U disk can only be used as a PE system disk. Just put the system GHO file into the U disk. 2. When the user starts the U disk and enters the PE system, he directly copies GHO to the D disk. 3. When restoring the system, you can directly quote the GHO file of the D drive
 How to delete USB disk files? What should I do if the USB disk files cannot be deleted?
Mar 14, 2024 pm 08:49 PM
How to delete USB disk files? What should I do if the USB disk files cannot be deleted?
Mar 14, 2024 pm 08:49 PM
There are many important files stored in the USB flash drive, and there are also some useless files. Cleaning the USB flash drive regularly can better manage the USB flash drive resources. However, some users found that some files in the USB disk cannot be deleted. What is going on? This tutorial will bring you the solution, come and take a look. 1. Check whether the file is occupied 1. Open the file explorer and find the path of the U disk. 2. Right-click the file you want to delete and select "Properties". 3. In the "Properties" window, switch to the "Security" tab. 4. Click the "Advanced" button to view the file permissions. 5. Ensure that the current user has