
 Web Front-end
JS Tutorial
Create collaboration-boosting web applications using PubNub, React.js, and ES6
Web Front-end
JS Tutorial
Create collaboration-boosting web applications using PubNub, React.js, and ES6
Create collaboration-boosting web applications using PubNub, React.js, and ES6

In previous tutorials, I demonstrated how to prototype an IoT device and create data visualizations from hardware sensors using PubNub's dataflow network. In this tutorial, I'll show you how to build a real-time collaborative web application using PubNub with React.js, which lets you manipulate the DOM very efficiently, and the next generation of JavaScript, ES6.
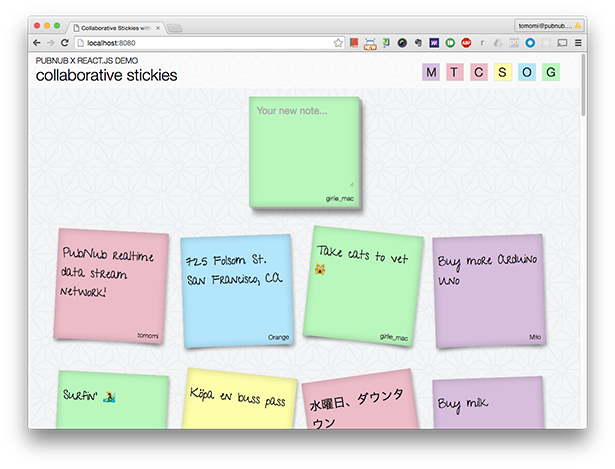
Live Demonstration: Collaboration Sticky Notes
I created two versions of the same Stickie Note app: the version I hosted on CodePen using a CDN-hosted React version, and the other version hosted on GitHub using a package manager. In this tutorial, I'm using the "lite" version of the latter. I'll walk you through how to build your app using all the goodies: npm, webpack, Babel for JSX, and ES6!
<p></p>prerequisites
To continue, you need:
-
<li>Basic understanding of React
<li>Understand the npm package manager for downloading, installing, and managing dependencies
<li>Get a working knowledge of the webpack module builder, which bundles JavaScript and other resources for the browser (it works similar to grunt or gulp)
<li> Node.js and npm installed on your computer
This tutorial does not cover how to start using React. However, you can learn more from many other excellent Envato Tuts tutorials.
<p></p>what are you up to
You will now build a simple web application using PubNub. PubNub is a Data Streaming Network (DSN) that provides a global infrastructure that allows you to easily build and scale real-time applications and IoT devices. Here you'll create a shareable "sticky note." Here is the user flow of the application:
<p></p>-
<li>User login.
<li>After the user enters a name, the application retrieves the last 50 notes (if any).
<li>The user enters content on the note board and then presses the Enter key to submit.
<li>The new sticky note will appear with other sticky notes on your browser and all other browsers currently online.
Now, let’s get started!
Install software package
In your app's directory, run npm init to set up your package.json file and then install the modules.
Install the webpack module builder, which compiles, concatenates, minifies and compresses static resources for the front end:
$ npm install webpack --save-dev
Install webpack web server to run a local server:
$ npm install webpack-dev-server --save-dev
Install React, React DOM and CSS animation add-ons:
$ npm install React React-dom React-addons-css-transition-group --save
Install Babel to use JSX and ES6. We will be writing in ES6 (ES 2015) with the help of the compiler Babel, which is the next generation of JavaScript:
$ sudo npm install babel-loader babel-core babel-preset-es2015 babel- preset-react --save
Install PubNub for real-time communication:
$ npm install pubnub --save
Configuring the application structure and web server<p></p>
Create an application structure similar to this:
├── /app
│   ├── app.jsx
│   ├── stickie.jsx
│   ├── stickieList.jsx
├── /dist
├── /css
├── /images
├── /node_modules
├── index.html
├── package.json
└── webpack.config.js
And configure webpack.config.js:
var webpack = require('webpack');
module.exports = {
  entry: './app/app.jsx',
  output: {path: './dist', filename: 'bundle.js'},
  watch: true,
  module: {...}
}
View the entire configuration file on this GitHub repository.
Basically, you are setting up an entry point file (top-level file) and output destination, and after running the webpack command, all js (and .jsx) files will be built into a single file. Additionally, by setting watch: true, you can ensure that webpack will watch your file changes and automatically rebuild your output files.
Create index.html file
Include the script bundle.js in your index.html file:
<p></p><!DOCTYPE html>
<html>
<head>
<meta charset="utf-8">
<title>Collaborative Stickies</title>
<link rel="stylesheet" href="css/style.css" />
</head>
<body>
<section id="container"></section>
<script src="dist/bundle.js"></script>
</body>
</html>
Also, please note the elements with id="container" in the body. This is where your React application will be inserted.
Run Webpack development server
You can run the development server using the following command:
$ ./node_modules/.bin/webpack-dev-server
Or you can set it in package.json by adding the following line:
<p></p>"scripts": {
"start": "webpack-dev-server"
},
So you can use the npm start command to run the server.
In your browser, go to http://localhost:8080/webpack-dev-server/ and you should see your application (so far a blank HTML page) running.
Create React components using ES6
Open a new app.jsx file in the application directory based on the entry point you configured in webpack.config.js. As you can tell from the file extension, we will be using the JSX JavaScript syntax extension.
首先,导入 app.jsx 所需的模块和文件:
<p></p>import React from 'react'; import ReactDOM from 'react-dom'; import StickieList from './stickieList'; import 'pubnub';
ES6 中新引入的 import 语句用于导入从外部模块或脚本导出的函数、对象或基元。
然后使用此 ES6 类声明定义一个类 CollabStickies,它扩展了 React.Component 类。这相当于 ES5 中的 React.createClass 方法:
class CollabStickies extends React.Component {
  constructor(props) {
    super(props);
    this.state = {
      stickieList: []
    }
  }

  componentWillMount() {
    … // will explain later
  }
...
  render() {
    return (
      <div>
        <StickieWritable username={this.props.username} color={this.props.color} />
        <StickieList stickieList={this.state.stickieList} />
      </div>
    );
  }
}
在构造函数中,您将设置此可变数据(stickieList 数组)的初始状态。每次收到新的便笺时,我们都会使用 this.setState() 更新数组。
在渲染函数中,使用 JSX 定义类似 HTML 模板的虚拟 DOM 元素。在本例中,包含自定义组件 StickieWritable 和 StickieList。您可以将可变的 props 和 states 传递给要使用的组件。我们稍后将定义它们。
当你构建应用程序时,Babel 会将所有这些 ES6 和 JSX 语法转换为浏览器可以正常渲染的 ES5。
使用数据绑定渲染 DOM 节点
使用 ReactDOM.render()(react-dom 包自带的),在 DOM 节点上渲染 CollabStickies 组件您的 HTML。
ReactDOM.render(
  <CollabStickies username={username} color={color} />,
  document.getElementById('container')
);
在这里,您会注意到用户名和颜色 props。此数据用于 CollabStickies 组件并传递给其子组件。
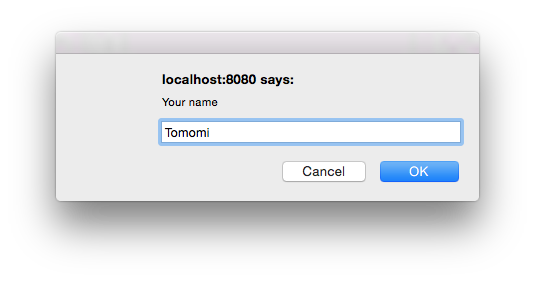
这些值应该从用户登录中获取;但是,为了简化本练习的应用程序,我们只需使用一个简单的 window.prompt() 来获取用户名,然后在加载应用程序时提供随机颜色的便笺。
var username = window.prompt('Your name');

const colors = ['yellow', 'pink', 'green', 'blue', 'purple'];
var color = colors[~~(Math.random() * colors.length)];
虽然我在这里使用的是浏览器原生的提示对话框,但实际上,我建议您创建另一个具有登录功能的 UI 组件,或者使用第三方对话框组件。您可以找到许多可重用的组件,例如 Elemental UI 的 Modal 和 Material UI 的 Dialog。
使用 PubNub 进行协作
现在,您将使用 PubNub 使应用程序具有协作性。
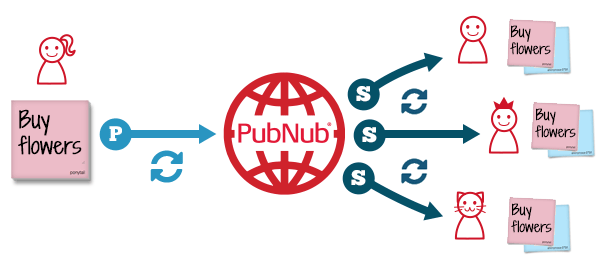
PubNub 是一个全球分布式数据流网络,可让您轻松构建实时应用程序。其核心功能是发布/订阅,可同时在多个用户之间发送和接收数据。
在此应用程序中,任何“登录”的人都可以在便签上发布消息并与其他用户共享。
要在您的应用中使用 PubNub,请确保 pubnub 模块已安装并导入到您的文件顶部。
正在初始化 PubNub
首先,您需要对其进行初始化以创建 Pubnub 对象的实例。您在实例化过程中需要 API 密钥,因此请注册 PubNub 以获取您自己的密钥。
const publish_key =  'pub-c-1d17120...'; // your pub key
const subscribe_key  = 'sub-c-85bdc...'; // your sub key

const pubnub = require('pubnub').init({
  publish_key   : publish_key,
  subscribe_key : subscribe_key,
  ssl: true,
  uuid: username
});

const channel = 'stickie-notes';
在这里,您将从“登录”过程中获得的用户名分配为 uuid,唯一标识符。 (在本练习中,我们将用户输入的任何字符串作为 uuid,但实际上,您需要一个真正的登录系统,以便每个 uuid 实际上是唯一的,没有重复!)
另外,请注意,对于这些全局常量值,我使用 ES6 const 声明,而不是 var 。在 ES6 中, const 充当只读变量,表示对值的常量引用。在后面的示例中,您还将看到新引入的 let,它是一个块作用域局部变量。
订阅消息
要创建可共享笔记应用程序,您将使用 PubNub 的 publish() 方法将您的笔记发送给每个人,而 subscribe() 让其他用户接收所有笔记。每次有人发布新笔记时,都会自动调用 subscribe() 方法。
在您的 React 应用程序中,让我们在 componentWillMount() 中调用 subscribe(),该函数在应用程序生命周期中发生初始渲染之前立即调用。< /p>
componentWillMount() {
  pubnub.subscribe({
    channel: channel,
    restore: true,
    connect: () => this.connect(),
    message: (m) => this.success(m)
  });
}
订阅方法是异步的,当每个操作成功完成时,会调用 message 回调。在回调中,我们通过设置 stickieList 数组的状态来更新便签列表,该数组在开头的构造函数中定义。
在 React 中,使用 setState 修改数据会自动更新视图。
success(m) {
  let newList = [m].concat(this.state.stickieList);
  this.setState({stickieList: newList});
}
我们稍后将创建视图(UI 组件)。
在订阅回调中,您可能已经注意到带有箭头的有趣语法,=>。这称为箭头函数,其语法比 ES5 函数表达式更短。此外,此表达式按词法绑定 this 值。再次强调,通过 Babel,我们可以利用所有 ES6 的强大功能!
此外,我们还使用可选的 connect 回调到订阅方法来检索“历史记录”。当第一次建立与 PubNub 的连接时,这将获取过去的数据。
connect() {
  pubnub.history({
    channel: channel,
    count: 50,
    callback: (m) => {
      m[0].reverse();
      for (var v of m[0]) {
        let newList = this.state.stickieList.concat(v);
        this.setState({stickieList: newList});
      }
    }
  });
}
history() 是 PubNub 存储和回放功能的一部分,在本例中,它从 PubNub 获取最后 50 条消息。在 success 回调中,也通过在此处设置 stickieList 数组的状态来更新视图。
发布消息
让我们创建一个类,StickieWritable。它是一个需要用户输入的便签组件。
它的渲染效果如下:
render() {
  return (
    <div className={'stickie-note writable ' + this.props.color}>
      <textarea type='text' placeholder='Your new note...' onKeyUp={this.handleTextChange.bind(this)} />
    </div>
  );
}
在textarea中,监听onKeyUp事件,每次触发该事件时,调用handleTextChange函数检查是否键是返回/输入键。请注意,我在调用函数时绑定了 this 。与 React.createClass()(React 的 ES5 方法创建类)不同,ES6 类不会自动将方法绑定到对象的实例,因此您需要自己绑定它。 (有几种不同的方法可以实现同一目标。)
在handleTextChange函数中,将文本和用户数据发布到PubNub:
var data = {
  username: this.props.username,
  color: this.props.color,
  text: e.target.value,
  timestamp: Date.now()
};

pubnub.publish({
  channel: channel,
  message: data,
  callback: e.target.value = '' // resetting the text field
});
现在,当用户在记事本中键入一些文本并按回车键时,该消息将发送到 PubNub,并且所有其他用户同时接收该消息(在 1/4 秒内!)。
创建 UI 组件
应用程序 UI 由一些 UI 组件组成,如下所示:

1. CollabStickies
2. StickieWritable
3.贴纸
4。粘性列表
组件 1 和 2 已经处理完毕,所以让我们创建组件 3,一个单独的便签组件。
<p></p>创建一个新文件stickie.jsx以使用 JSX 呈现 UI。与 StickieWritable 组件不同,这是一个只读 UI 组件,没有 UX 功能。它只有一个 render() 函数,可以使用 prop 数据绘制带有文本的便签。
基本上,每次用户从另一个用户收到新消息时,该消息都会在新的粘性组件中呈现。
import React from 'react';
import ReactDOM from 'react-dom';

export default class Stickie extends React.Component {
  render() {
    return (
      <div className={'stickie-note ' + this.props.color} >
        <p className='note'>{this.props.text}</p>
        <p className='username'>{this.props.username}</p>
      </div>
    );
  }
}
接下来,我们将创建另一个 UI 组件 stickieList.jsx,它是该组件的容器,并包含一堆便签纸。
动画组件
将 Stickie.jsx 和所有其他依赖项导入到 StickieList.jsx 中。在这里,我使用 ReactCSSTransitionGroup 插件和自定义 Web 字体。
import React from 'react';
import ReactDOM from 'react-dom';
import ReactCSSTransitionGroup from 'react/lib/ReactCSSTransitionGroup';
import Stickie from './stickie';
import webfontloader from 'webfontloader'
您可以使用 npm 安装 Web 字体加载器:
$ npm install webfontloader
然后您可以加载您选择的任何自定义字体。您可以查看源代码,了解如何导入自定义 Google 字体。
在 render() 中,使用 ES6 箭头函数和 map() 迭代数组,并使用 stickieList 进行渲染您刚刚创建的每个 Stickie 组件:
export default class StickieList extends React.Component {
  render() {
    let items = (this.props.stickieList || []).map((item) =>
      <li key={item.username + '-' + item.timestamp} >
        <div className="stickieWrapper">
          <Stickie text={item.text} color={item.color} username={item.username}/>
        </div>
      </li>);

    return (
      <ReactCSSTransitionGroup transitionName='animation' transitionEnterTimeout={500} transitionLeaveTimeout={500} component='ul' id="stickiesList">
        {items}
      </ReactCSSTransitionGroup>
    )
  }
}
定义的组件可以使用 <ReactCSSTransitionGroup> 进行动画处理。设置 transitionName,您需要在 CSS 中使用它来定义动画样式。另外,请注意 <li> 中的关键属性。当您使用 <ReactCSSTransitionGroup> 时,您需要为每个列表使用唯一的键来为每个组件设置动画。
React 添加了额外的类名。例如,当你的 transitionName 是 'animation' 时,你还会有 'animation-enter', ' Animation-enter-active'、'animation-leave' 和 'animation-leave-active'。
以下是 /css/style.css 中的代码:
<p></p>.animation-enter {
opacity: 0.1;
transform: scale(1.3);
transition: all 1s ease-out;
}
.animation-enter.animation-enter-active {
opacity: 1;
transform: scale(1);
}
...
现在,您刚刚使用 React 和 PubNub 构建了一个实时协作应用程序!我希望您喜欢本教程!
You can view the full code, including CSS, in this GitHub repository. Although in this tutorial I'm using the "lite" version app-lite.jsx, you can check out app.jsx for more features. p>
If you are interested in building more real-time applications, such as chat applications, multiplayer games, trading applications, and more, head over to PubNub and find more resources!
Want more reactions?
We have a course specifically aimed at maximizing your React skills. In this course, you'll start building modern web applications using React and Redux. Starting from scratch, you'll use these two libraries to build a complete web application.
You will start with the simplest architecture and slowly build the application feature by feature. You'll learn about basic concepts like tools, reducers, and routing. You'll also learn about some more advanced techniques, such as smart and dumb components, pure components, and asynchronous operations. Finally, you'll create a complete flashcards app for learning with spaced repetition.
<p></p>Are you interested? Let's see!
references
-
<li>
PubNub: A global real-time data streaming network for IoT, mobile and web applications
<li>
PubNub JavaScript SDK Tutorial
<li> React: JavaScript library for creating user interfaces
<li> ES6: ECMAScript 2015 Language Specification
<li> webpack: module generator
The above is the detailed content of Create collaboration-boosting web applications using PubNub, React.js, and ES6. For more information, please follow other related articles on the PHP Chinese website!

Hot AI Tools

Undresser.AI Undress
AI-powered app for creating realistic nude photos

AI Clothes Remover
Online AI tool for removing clothes from photos.

Undress AI Tool
Undress images for free

Clothoff.io
AI clothes remover

AI Hentai Generator
Generate AI Hentai for free.

Hot Article
Hot Tools

Notepad++7.3.1
Easy-to-use and free code editor

SublimeText3 Chinese version
Chinese version, very easy to use

Zend Studio 13.0.1
Powerful PHP integrated development environment

Dreamweaver CS6
Visual web development tools

SublimeText3 Mac version
God-level code editing software (SublimeText3)
Hot Topics
 1377
1377
 52
52

 How do I create and publish my own JavaScript libraries?
Mar 18, 2025 pm 03:12 PM
How do I create and publish my own JavaScript libraries?
Mar 18, 2025 pm 03:12 PM
Article discusses creating, publishing, and maintaining JavaScript libraries, focusing on planning, development, testing, documentation, and promotion strategies.
 How do I optimize JavaScript code for performance in the browser?
Mar 18, 2025 pm 03:14 PM
How do I optimize JavaScript code for performance in the browser?
Mar 18, 2025 pm 03:14 PM
The article discusses strategies for optimizing JavaScript performance in browsers, focusing on reducing execution time and minimizing impact on page load speed.
 What should I do if I encounter garbled code printing for front-end thermal paper receipts?
Apr 04, 2025 pm 02:42 PM
What should I do if I encounter garbled code printing for front-end thermal paper receipts?
Apr 04, 2025 pm 02:42 PM
Frequently Asked Questions and Solutions for Front-end Thermal Paper Ticket Printing In Front-end Development, Ticket Printing is a common requirement. However, many developers are implementing...
 How do I debug JavaScript code effectively using browser developer tools?
Mar 18, 2025 pm 03:16 PM
How do I debug JavaScript code effectively using browser developer tools?
Mar 18, 2025 pm 03:16 PM
The article discusses effective JavaScript debugging using browser developer tools, focusing on setting breakpoints, using the console, and analyzing performance.
 How do I use source maps to debug minified JavaScript code?
Mar 18, 2025 pm 03:17 PM
How do I use source maps to debug minified JavaScript code?
Mar 18, 2025 pm 03:17 PM
The article explains how to use source maps to debug minified JavaScript by mapping it back to the original code. It discusses enabling source maps, setting breakpoints, and using tools like Chrome DevTools and Webpack.
 Who gets paid more Python or JavaScript?
Apr 04, 2025 am 12:09 AM
Who gets paid more Python or JavaScript?
Apr 04, 2025 am 12:09 AM
There is no absolute salary for Python and JavaScript developers, depending on skills and industry needs. 1. Python may be paid more in data science and machine learning. 2. JavaScript has great demand in front-end and full-stack development, and its salary is also considerable. 3. Influencing factors include experience, geographical location, company size and specific skills.
 Getting Started With Chart.js: Pie, Doughnut, and Bubble Charts
Mar 15, 2025 am 09:19 AM
Getting Started With Chart.js: Pie, Doughnut, and Bubble Charts
Mar 15, 2025 am 09:19 AM
This tutorial will explain how to create pie, ring, and bubble charts using Chart.js. Previously, we have learned four chart types of Chart.js: line chart and bar chart (tutorial 2), as well as radar chart and polar region chart (tutorial 3). Create pie and ring charts Pie charts and ring charts are ideal for showing the proportions of a whole that is divided into different parts. For example, a pie chart can be used to show the percentage of male lions, female lions and young lions in a safari, or the percentage of votes that different candidates receive in the election. Pie charts are only suitable for comparing single parameters or datasets. It should be noted that the pie chart cannot draw entities with zero value because the angle of the fan in the pie chart depends on the numerical size of the data point. This means any entity with zero proportion
 TypeScript for Beginners, Part 2: Basic Data Types
Mar 19, 2025 am 09:10 AM
TypeScript for Beginners, Part 2: Basic Data Types
Mar 19, 2025 am 09:10 AM
Once you have mastered the entry-level TypeScript tutorial, you should be able to write your own code in an IDE that supports TypeScript and compile it into JavaScript. This tutorial will dive into various data types in TypeScript. JavaScript has seven data types: Null, Undefined, Boolean, Number, String, Symbol (introduced by ES6) and Object. TypeScript defines more types on this basis, and this tutorial will cover all of them in detail. Null data type Like JavaScript, null in TypeScript
