

Basic introduction: WebGL development with Three.js

3D graphics in browsers have been a hot topic since they were first introduced. But if you want to create an application using pure WebGL, it takes a long time. That's why some really useful libraries have emerged recently. Three.js is one of the most popular, and in this series, I'll show you how to best use it to create stunning 3D experiences for your users.
Before we begin, I do expect you to have a basic understanding of 3D space before starting this tutorial, as I will not be explaining coordinates, vectors, etc.
Step 1: Preparation
First, create three files: index.html, main.js, and style.css. Now, download Three.js (the entire zip file with examples and source code, or a separate JavaScript file, your choice). Now, open index.html and insert the following code:
<!DOCTYPE html>
<html>
<head>
	<link rel="stylesheet" href="./style.css">
	<script src="./three.js"></script>
</head>
<body>
	<script src="./main.js"></script>
</body>
</html>
That's all you need in this file. Just declarations of scripts and stylesheets. All the magic will happen in main.js, but before we can do that, we need one more trick to make the application look better. Open style.css and insert the following code:
canvas {
	position: fixed;
	top: 0;
	left: 0;
}
This will position the canvas in the top left corner because body will have 8px margins by default. Now we can move on to the JavaScript code.
Step 2: Scene and Renderer
Three.js uses the concept of display lists. This means that all objects are stored in a list and then drawn to the screen.
Three.js uses the concept of display lists. This means that all objects are stored in a list and then drawn to the screen. In this case, it's a THREE.Scene object. You need to add any objects you want to draw on the screen to the scene. You can have as many scenes as you like, but a renderer can only draw one scene at a time (of course you can switch the displayed scenes).
The renderer simply draws everything in the scene onto the WebGL canvas. Three.js also supports drawing on SVG or 2D Canvas, but we will focus on WebGL.
First, let's store the width and height of the window in variables, we will use it later:
var width = window.innerWidth;
var height = window.innerHeight;
Now define the renderer and scene:
var renderer = new THREE.WebGLRenderer({ antialias: true });
renderer.setSize(width, height);
document.body.appendChild(renderer.domElement);

var scene = new THREE.Scene;
The first line defines the WebGL renderer. You can pass the renderer options in the first parameter as a map. Here, we set antialias to true since we want the edges of the object to be smooth, not jagged.
The second line sets the renderer size to the size of the window, and in the third line we add the canvas element of the renderer to the document (you can also use a library to do this, e.g. jQuery: $( 'body').append(renderer.domElement)).
The last definition scene does not require parameters.
Step 3: Cube
Now let's add what we want to draw. Let it be a cube, as it is the simplest 3D object. In Three.js, the objects drawn on the screen are called grids. Each mesh must have its own geometry and materials. Geometry is a set of points that need to be connected to create an object. A material is just paint (or painting, but that's not the topic of this tutorial) that covers an object. So, let's create our cube. Fortunately, there are some helper functions in Three.js for creating primitives (simple shapes):
var cubeGeometry = new THREE.CubeGeometry(100, 100, 100);
var cubeMaterial = new THREE.MeshLambertMaterial({ color: 0x1ec876 });
var cube = new THREE.Mesh(cubeGeometry, cubeMaterial);

cube.rotation.y = Math.PI * 45 / 180;

scene.add(cube);
As you can see, first we create the geometry. Parameters define the size of the cube: width, height and depth.
Next, we define the material of the cube. There are some material types in Three.js, but this time we will use THREE.MeshLambertMaterial because we want some lighting later (this material uses Lambert's algorithm for lighting calculations). You can pass the options in the first argument as a map, the same as for renderers - this is pretty much the rule for more complex objects in Three.js. Here we only use color, which is passed as a hexadecimal number.
In the third line, we create a mesh using the previously created geometry and material. Next, we rotate the cube 45 degrees on the Y axis to make it look better. We have to change degrees to radians, which is handled via an equation you might remember from high school physics class: Math.PI * 45 / 180. Finally, the cube is added to the scene.
Now you can open index.html in your browser to see the results, but you won't see anything because the scene hasn't been rendered yet.
Step 4: Camera!
To render something, first we need to add a camera to the scene so that the renderer knows from which angle the content should be rendered. There are several types of cameras in Three.js, but you'll probably only use THREE.PerspectiveCamera. This type of camera presents a scene of the world as we see it. Let's create one:
var camera = new THREE.PerspectiveCamera(45, width / height, 0.1, 10000);
“要渲染某些内容,首先我们需要将相机添加到场景中,以便渲染器知道应该从哪个角度渲染内容。”
创建相机比我们迄今为止所做的其他事情要复杂一些。第一个参数定义 FOV(视野),即从相机所在位置可以看到的角度。 45 度的 FOV 看起来很自然。接下来,我们定义相机的比率。这始终是渲染器的宽度除以高度,除非您想实现一些特殊效果。最后两个数字定义了对象与要绘制的相机的距离。
现在我们必须稍微向后和向上移动相机,因为在 Three.js 中创建的所有对象都将其位置设置在场景中间(x: 0, y: 0, z: 0)默认:
camera.position.y = 160;
camera.position.z = 400;
z 坐标在观看者的方向上为正,因此具有较高 z 位置的对象会显得离您更近(在这种情况下,由于我们移动了相机,所有对象都会显得更远)来自您)。
现在,让我们将相机添加到场景并渲染它:
scene.add(camera);

renderer.render(scene, camera);
添加相机就像添加立方体一样。下一行使用该相机渲染场景。现在您可以打开浏览器,您应该看到以下内容:
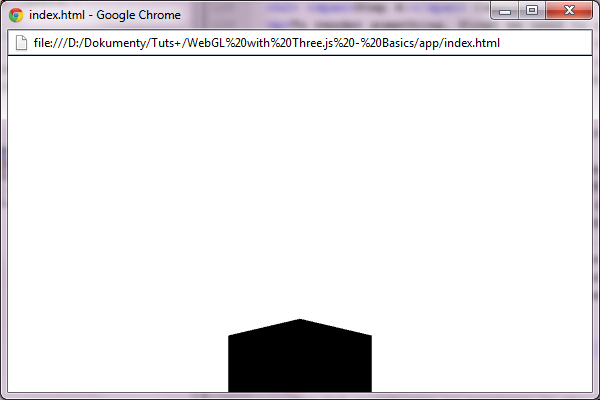
您应该只能看到立方体的顶部。这是因为我们将相机向上移动,但它仍然看起来在它的正前方。这个问题可以通过让相机知道它应该看什么位置来解决。在设置相机位置的行之后添加此行:
camera.lookAt(cube.position);
传入的唯一参数是相机将看到的位置。现在,场景看起来更好了,但立方体仍然是黑色,无论您在创建立方体时设置了什么颜色:
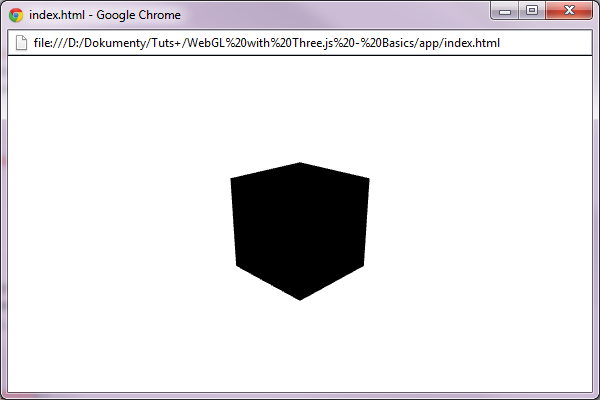
第 5 步: 灯!
立方体是黑色的,因为场景中没有灯光,所以它就像一个完全黑的房间。您会看到白色背景,因为除了立方体之外没有任何东西可以绘制。为了避免这种情况,我们将使用一种称为天空盒的技术。基本上,我们将添加一个大立方体来显示场景的背景(如果是开放空间,通常是一些远处的地形)。那么,让我们创建这个盒子。此代码应位于 renderer.render 调用之前:
var skyboxGeometry = new THREE.CubeGeometry(10000, 10000, 10000);
var skyboxMaterial = new THREE.MeshBasicMaterial({ color: 0x000000, side: THREE.BackSide });
var skybox = new THREE.Mesh(skyboxGeometry, skyboxMaterial);

scene.add(skybox);
此代码与创建多维数据集的代码类似。但这一次的几何形状要大得多。我们还使用了 THREE.MeshBasicMaterial 因为我们不需要照亮天空盒。另外,请注意传递给材料的附加参数:side: THREE.BackSide。由于立方体将从内部显示,因此我们必须更改绘制的侧面(通常,Three.js 只绘制外墙)。
现在渲染的场景是全黑的。为了解决这个问题,我们必须向场景添加灯光。我们将使用 THREE.PointLight,它像灯泡一样发出光。在天空盒后添加这些行:
var pointLight = new THREE.PointLight(0xffffff);
pointLight.position.set(0, 300, 200);

scene.add(pointLight);
如您所见,我们创建了白色的点光源,然后将其位置设置为向上和向后一点,以照亮立方体的正面和顶部。最后,灯光像任何其他对象一样添加到场景中。打开浏览器,您应该会看到一个彩色阴影立方体:
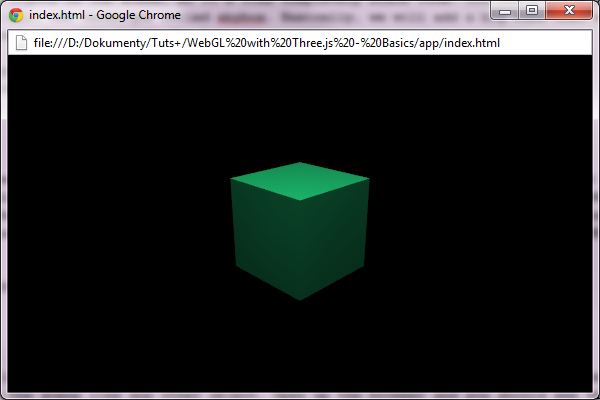
但是立方体仍然很无聊。让我们为其添加一些动作。
第 6 步: 行动!
现在我们将为场景添加一些运动。让我们让立方体绕 Y 轴旋转。但首先,我们必须改变渲染场景的方式。一次 renderer.render 调用,渲染场景的当前状态一次。因此,即使我们以某种方式为立方体设置动画,我们也不会看到它移动。要改变这一点,我们必须将渲染循环添加到我们的应用程序中。这可以使用专门为此目的创建的 renderAnimationFrame 函数来实现。大多数主要浏览器都支持它,对于那些不支持它的浏览器,Three.js 附带了自己的 polyfill。那么,让我们改变一下:
renderer.render(scene, camera);
对此:
function render() {
	renderer.render(scene, camera);

	requestAnimationFrame(render);
}

render();
实际上,那里没有循环,因为它会冻结浏览器。 requestAnimationFrame 函数的行为有点像 setTimeout,但它会在浏览器准备就绪时调用该函数。因此,显示的场景没有任何变化,立方体仍然没有移动。让我们解决这个问题。 Three.js自带了THREE.Clock,可以用来实现对象的平滑动画。首先在render函数定义之前进行初始化:
var clock = new THREE.Clock;
现在,每次调用 clock.getDelta 时,它都会返回自上次调用以来的时间(以毫秒为单位)。这可以用来旋转立方体,如下所示:
cube.rotation.y -= clock.getDelta();
在 render 函数中的 renderer.render 和 requestAnimationFrame 调用之间添加此行。它只是减去立方体在 Y 轴上旋转所花费的时间(记住它以弧度为单位)来顺时针旋转立方体。现在打开浏览器,您应该看到立方体顺时针平稳旋转。
结论
在本系列的这一部分中,您学习了如何准备场景、添加对象和灯光以及如何为事物设置动画。您可以尝试该应用程序,添加更多或不同的对象、灯光。由你决定。下次我将向您展示如何使用纹理以及如何使用粒子创建一些漂亮的效果。如果遇到任何问题,请不要忘记查看文档。
The above is the detailed content of Basic introduction: WebGL development with Three.js. For more information, please follow other related articles on the PHP Chinese website!

Hot AI Tools

Undresser.AI Undress
AI-powered app for creating realistic nude photos

AI Clothes Remover
Online AI tool for removing clothes from photos.

Undress AI Tool
Undress images for free

Clothoff.io
AI clothes remover

AI Hentai Generator
Generate AI Hentai for free.

Hot Article
Hot Tools

Notepad++7.3.1
Easy-to-use and free code editor

SublimeText3 Chinese version
Chinese version, very easy to use

Zend Studio 13.0.1
Powerful PHP integrated development environment

Dreamweaver CS6
Visual web development tools

SublimeText3 Mac version
God-level code editing software (SublimeText3)
Hot Topics
 1382
1382
 52
52

 Four recommended AI-assisted programming tools
Apr 22, 2024 pm 05:34 PM
Four recommended AI-assisted programming tools
Apr 22, 2024 pm 05:34 PM
This AI-assisted programming tool has unearthed a large number of useful AI-assisted programming tools in this stage of rapid AI development. AI-assisted programming tools can improve development efficiency, improve code quality, and reduce bug rates. They are important assistants in the modern software development process. Today Dayao will share with you 4 AI-assisted programming tools (and all support C# language). I hope it will be helpful to everyone. https://github.com/YSGStudyHards/DotNetGuide1.GitHubCopilotGitHubCopilot is an AI coding assistant that helps you write code faster and with less effort, so you can focus more on problem solving and collaboration. Git
 Which AI programmer is the best? Explore the potential of Devin, Tongyi Lingma and SWE-agent
Apr 07, 2024 am 09:10 AM
Which AI programmer is the best? Explore the potential of Devin, Tongyi Lingma and SWE-agent
Apr 07, 2024 am 09:10 AM
On March 3, 2022, less than a month after the birth of the world's first AI programmer Devin, the NLP team of Princeton University developed an open source AI programmer SWE-agent. It leverages the GPT-4 model to automatically resolve issues in GitHub repositories. SWE-agent's performance on the SWE-bench test set is similar to Devin, taking an average of 93 seconds and solving 12.29% of the problems. By interacting with a dedicated terminal, SWE-agent can open and search file contents, use automatic syntax checking, edit specific lines, and write and execute tests. (Note: The above content is a slight adjustment of the original content, but the key information in the original text is retained and does not exceed the specified word limit.) SWE-A
 Learn how to develop mobile applications using Go language
Mar 28, 2024 pm 10:00 PM
Learn how to develop mobile applications using Go language
Mar 28, 2024 pm 10:00 PM
Go language development mobile application tutorial As the mobile application market continues to boom, more and more developers are beginning to explore how to use Go language to develop mobile applications. As a simple and efficient programming language, Go language has also shown strong potential in mobile application development. This article will introduce in detail how to use Go language to develop mobile applications, and attach specific code examples to help readers get started quickly and start developing their own mobile applications. 1. Preparation Before starting, we need to prepare the development environment and tools. head
 Summary of the five most popular Go language libraries: essential tools for development
Feb 22, 2024 pm 02:33 PM
Summary of the five most popular Go language libraries: essential tools for development
Feb 22, 2024 pm 02:33 PM
Summary of the five most popular Go language libraries: essential tools for development, requiring specific code examples. Since its birth, the Go language has received widespread attention and application. As an emerging efficient and concise programming language, Go's rapid development is inseparable from the support of rich open source libraries. This article will introduce the five most popular Go language libraries. These libraries play a vital role in Go development and provide developers with powerful functions and a convenient development experience. At the same time, in order to better understand the uses and functions of these libraries, we will explain them with specific code examples.
 Which Linux distribution is best for Android development?
Mar 14, 2024 pm 12:30 PM
Which Linux distribution is best for Android development?
Mar 14, 2024 pm 12:30 PM
Android development is a busy and exciting job, and choosing a suitable Linux distribution for development is particularly important. Among the many Linux distributions, which one is most suitable for Android development? This article will explore this issue from several aspects and give specific code examples. First, let’s take a look at several currently popular Linux distributions: Ubuntu, Fedora, Debian, CentOS, etc. They all have their own advantages and characteristics.
 Understanding VSCode: What is this tool used for?
Mar 25, 2024 pm 03:06 PM
Understanding VSCode: What is this tool used for?
Mar 25, 2024 pm 03:06 PM
"Understanding VSCode: What is this tool used for?" 》As a programmer, whether you are a beginner or an experienced developer, you cannot do without the use of code editing tools. Among many editing tools, Visual Studio Code (VSCode for short) is very popular among developers as an open source, lightweight, and powerful code editor. So, what exactly is VSCode used for? This article will delve into the functions and uses of VSCode and provide specific code examples to help readers
 Exploring Go language front-end technology: a new vision for front-end development
Mar 28, 2024 pm 01:06 PM
Exploring Go language front-end technology: a new vision for front-end development
Mar 28, 2024 pm 01:06 PM
As a fast and efficient programming language, Go language is widely popular in the field of back-end development. However, few people associate Go language with front-end development. In fact, using Go language for front-end development can not only improve efficiency, but also bring new horizons to developers. This article will explore the possibility of using the Go language for front-end development and provide specific code examples to help readers better understand this area. In traditional front-end development, JavaScript, HTML, and CSS are often used to build user interfaces
 Is PHP front-end or back-end in web development?
Mar 24, 2024 pm 02:18 PM
Is PHP front-end or back-end in web development?
Mar 24, 2024 pm 02:18 PM
PHP belongs to the backend in web development. PHP is a server-side scripting language, mainly used to process server-side logic and generate dynamic web content. Compared with front-end technology, PHP is more used for back-end operations such as interacting with databases, processing user requests, and generating page content. Next, specific code examples will be used to illustrate the application of PHP in back-end development. First, let's look at a simple PHP code example for connecting to a database and querying data:
