

Today I will show you how to create an appointment system using the Easy Appointments plugin for WordPress. We will first explore the basic settings provided by the plugin, and then, we will work through a real-life example to build a complete booking system.
No matter the profession, an online appointment system is a must-have today, providing comfort and flexibility to clients. Not only that, it also improves the overall resource utilization of the service provider. Therefore, the benefits of setting up an effective online booking system are twofold: customers can choose to book a time slot that suits them, and service providers can help them plan their time.
Today, we’ll look at how to set up a reservation system using WordPress. If you’re using a WordPress website and are curious about how to build a booking system for your website, you’ve come to the right place!
As a WordPress developer, you can choose the plugin you want from a variety of free plugins available in the WordPress plugin library. Likewise, you will also find many plugins for booking calendar systems. In this article I have chosen one of the best free plugins in this category called Easy Dating and I will show you how to use it.
In this article, I am using WordPress 5.1 and the Easy Appointments plugin version is 2.3.12. If you want to follow this article, I recommend you install it. To install the Easy Appointments plugin, simply follow the standard installation process.
Next, we’ll explore the basics of the Easy Appointments plugin and the setup process. We will then build a real-life example to demonstrate the use of the plugin. At the same time, we will also cover several important aspects of the plugin that allow you to customize your booking system.
Easy Appointments plugin is one of the best free plugins in this category. It allows you to easily set up a time management system. It can be used in almost any profession such as doctors, personal trainers, personal tutors or anyone who wants to book an appointment.
Let’s take a quick look at the features it offers:
As you can see, this plugin can be used for a variety of services, and if you use it wisely, it can potentially turn into an effective booking system.
In the next section, we will discuss several core elements of the plugin that are important to understand first if you hope to use the plugin effectively.
Easy Appointments plugin is different from other booking plugins in that it allows you to create time slots by associating them with a specific combination of location, service and staff.
Simply put, it works like this:
Now, let’s take a quick look at each element.
First, you need to add the locations you intend to serve in the system. For example, if you want to limit your service to certain cities, you need to add the cities in the backend.
After adding the location, the next step is to add the services according to your requirements. Of course, you can create different services for different locations.
Finally, after creating the location and services, it's time to add the staff who will actually serve customers based on the bookings assigned to them.
Connections allow you to create time slots by combining locations, services, and workers. When creating a new connection, you'll also need to select the day of the week and time for which the connection is applicable. If this sounds a little confusing, don't worry - it will make sense when we build a real-world example in the next section.
In this section, we will build a real-life example to demonstrate how to use the Easy Appointments plugin.
Before we continue, if you want to proceed, make sure you have the Easy Appointments plugin installed in your WordPress site. After you install the Easy Appointments plugin, it will add plugin related links in the left sidebar.
Suppose we want to build an appointment system for a dental clinic in New York City. In this example, New York City is considered the location entity. Next, we’ll add routine dental exams as a service. Finally, we will add some doctors who can make appointments on weekdays.
First, we need to add all the locations; in our case, we will add New York City as our service location. Click the Easy Dating > Settings > Locations link and you will be taken to the location list page.
Click the Add New Location button and enter the details related to New York City as shown in the screenshot below.
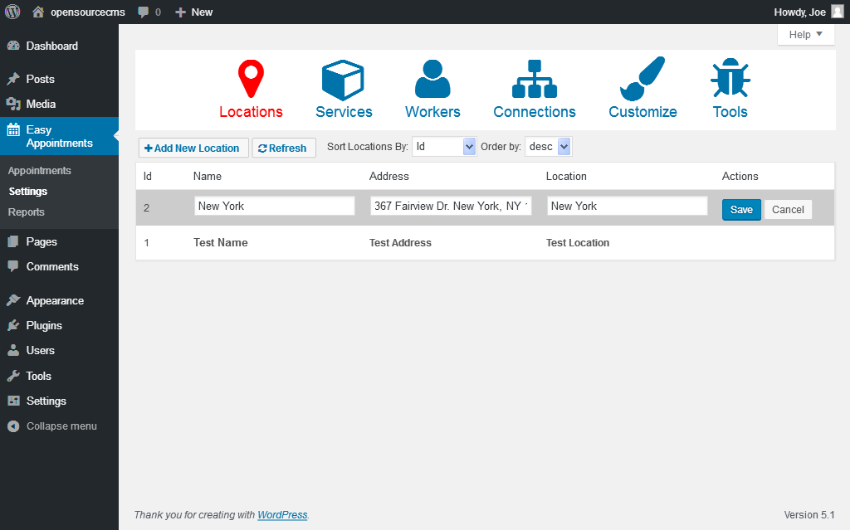
In our example we only considered New York City, but of course you can go ahead and add as many locations as you wish.
Next, we need to add the services we want to provide on the booking website. In our example, we will be providing routine dental check-ups.
Click the Easy Booking > Settings > Service link, and you will enter the service list page. Click on the Add New Service button and enter the details related to our service as shown in the following screenshot.

Fill in 60 in the Duration and Time Slot Step text boxes and save them temporarily. The Duration field indicates the reservation duration for this service, and the Slot Step indicates the start of the next available service. We'll discuss this later.
Finally, we need to add doctors who can perform the examination. Click the Easy Appointment > Settings > Staff link and you will enter the staff list page. Click on the Add New Employee button and enter the doctor’s details as shown in the following screenshot.
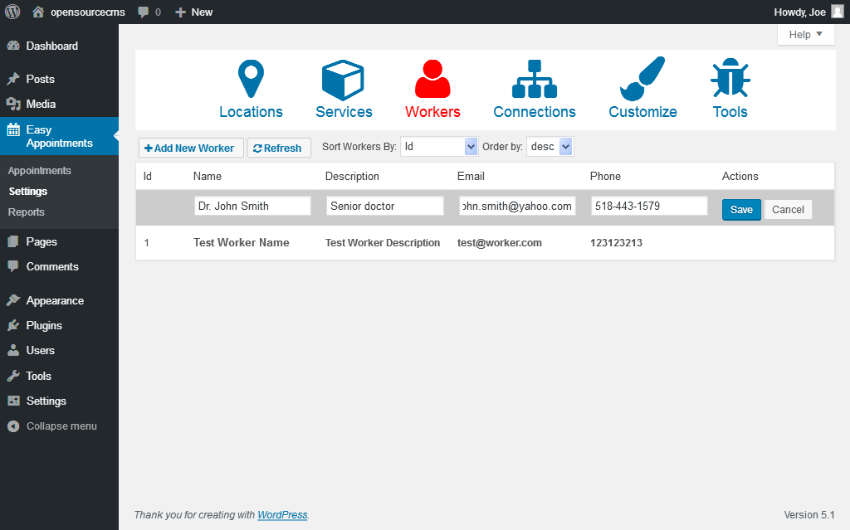
I will add more and you can repeat this process to add more doctors.
So far we have added locations, services and doctors. Now, it's time to connect them together and create a connection that can be used for booking.
Go ahead and click the Easy Dating > Settings > Connections link and it should take you to the connections list page. Click the Add New Connection button to create a new connection as shown in the screenshot below.
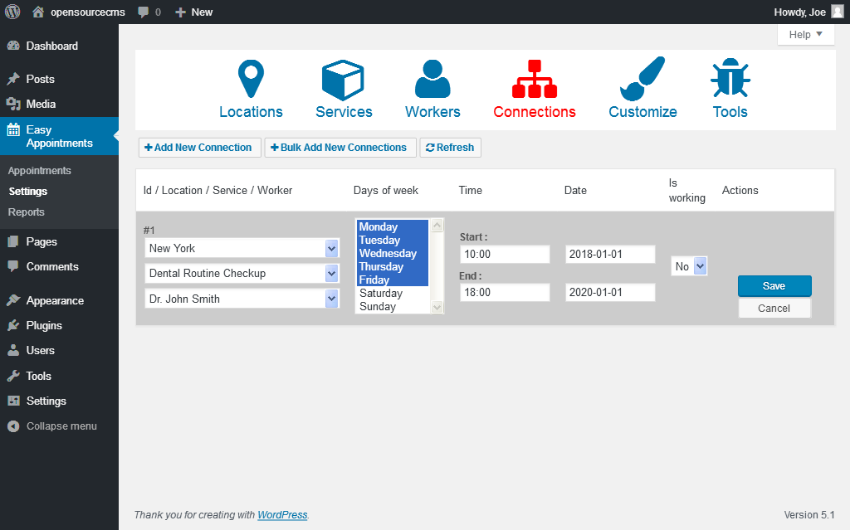
Select locations, services, and workers from the appropriate drop-down lists that you want to associate together. I selected New York City in the Location drop-down list, selected Routine Dental Examination Services in the Services drop-down list, and selected Dr. John in the Staff Smith staff strong> drop down box.
Next, select the days of the week when this service is available. In addition to this, you can also select the start and end time of service availability. Be sure to set the Working field to is to make this connection active, otherwise it will not show up in the frontend. Once everything is filled in, go ahead and save the connection.
In the next section we will see how to display the booking calendar for the connection we just created.
After creating the connection, you need to use the shortcode to display the booking form. You can insert the following code in your post or page to display the booking form.
[ea_bootstrap]
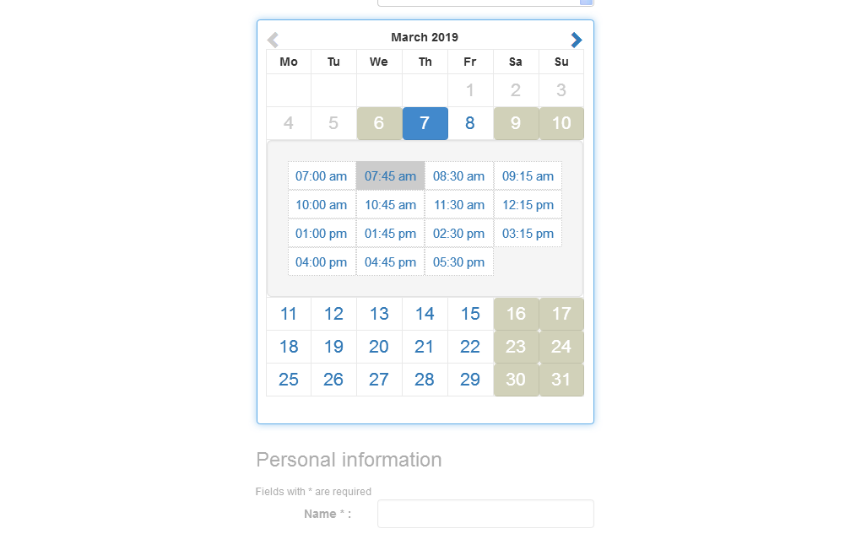
Once completed, you should see the booking form as shown in the screenshot below.
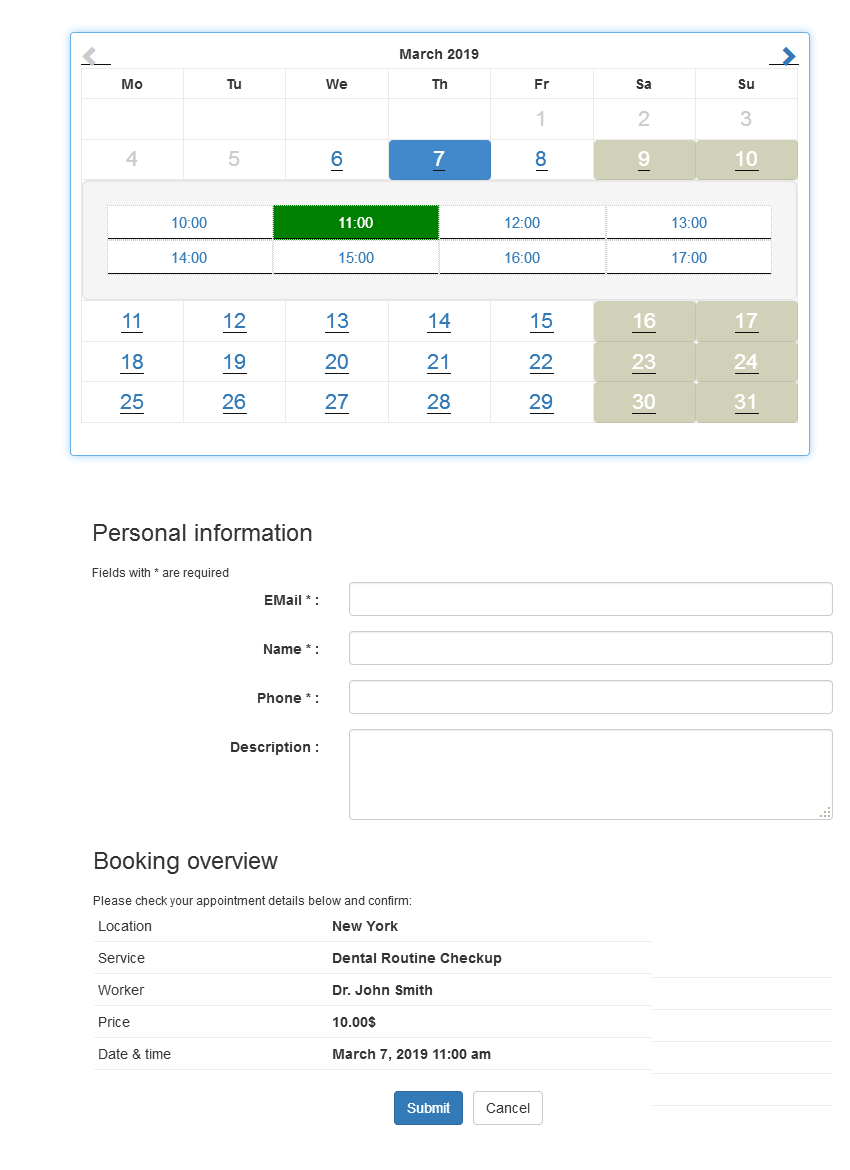
As you can see, there is a calendar showing all the available slots for the connection we created earlier. If you recall, we chose a one-hour time slot for the service, so users could choose from eight different time slots each weekday. You won't be able to book on weekends and these days will be greyed out.
Once the user selects a time slot, they will be taken to the Booking Overview section. They can enter their details to confirm the booking.
In the backend you will be able to view all bookings for all transfers. Additionally, email notifications will be sent once the booking is completed. If booking is not available for any time slot, it will appear as shown in the screenshot below.
As you can see, the booked time slot is grayed out and not clickable.
This is how you set up a reservation system using this plugin. Additional plugins are available to extend the default functionality and integrate with services such as PayPal, Twilio, iCalendar, and Google Calendar.
If you use this extension wisely, it will allow you to build an amazing booking system.
Today, we discussed the Easy Appointments plugin, which allows you to easily build an appointment system. In the first part I explained the basic concepts of the plugin and later we created a real example for demonstration purposes.
If you come across other good calendar or booking plugins, I'd love to hear from you! Please feel free to share your thoughts and feedback using the feed below.
The above is the detailed content of Get started with the free booking calendar plugin in WordPress. For more information, please follow other related articles on the PHP Chinese website!
 vcruntime140.dll cannot be found and code execution cannot continue
 pr shortcut key
 How to dress up Douyin Xiaohuoren
 What does data intelligence mean?
 parentnode usage
 How to read data from excel file in python
 What to do if the computer fakes death
 What to do if css cannot be loaded
 What is the difference between JD International self-operated and JD self-operated


![[Web front-end] Node.js quick start](https://img.php.cn/upload/course/000/000/067/662b5d34ba7c0227.png)


