

Personalize your WordPress admin experience - Dashboard

In the first part of this series, I showed you how to customize your WordPress login screen by adding a custom logo and some content. Custom styles.
The next thing a user will see after logging in is the dashboard, so in this tutorial you will learn how to customize it by removing some existing meta boxes, moving some meta boxes, and adding some new meta boxes.
The steps I will demonstrate in this tutorial are:
- Remove some meta boxes that may confuse users
- Move the meta box to a different location on the screen
- Add your own custom meta box to help users
I will create a plugin to do this - if you have already created a plugin after completing Part 1 of this series, you may prefer to add the code from this tutorial to the plugin, giving you a A plugin that contains all the features you need to manage your customizations.
What you need to complete this tutorial
To complete this tutorial you will need:
- WordPress Installation
- Visit your website’s plugins folder to add plugins
- Text editor for creating plugins
Setting plugin
At the beginning of the plugin, I add the following lines:
/*
Plugin Name: WPTutsPlus Customize the Admin Part 2 - The Dashboard
Plugin URI: https://rachelmccollin.co.uk
Description: This plugin supports the tutorial in WPTutsPlus. It customizes the WordPress dashboard.
Version: 1.0
Author: Rachel McCollin
Author URI: http://rachelmccollin.com
License: GPLv2
*/
1. Remove unnecessary meta boxes
The first step is to delete any meta boxes we don't need. This only works for users with roles lower than "Admin" as I still want to have access to all WordPress dashboards as an admin.
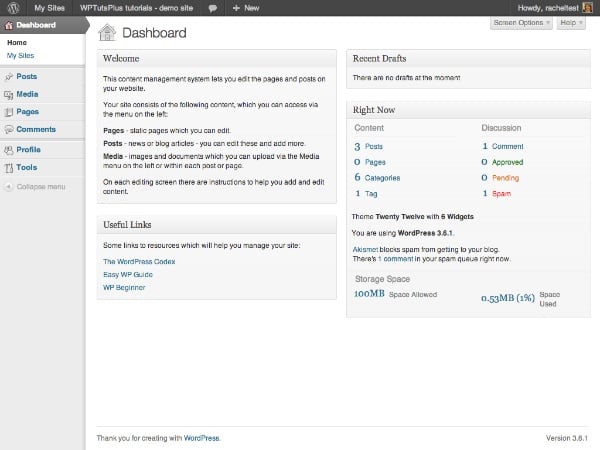
I would first look at what users with the "Editor" role see when accessing the dashboard:
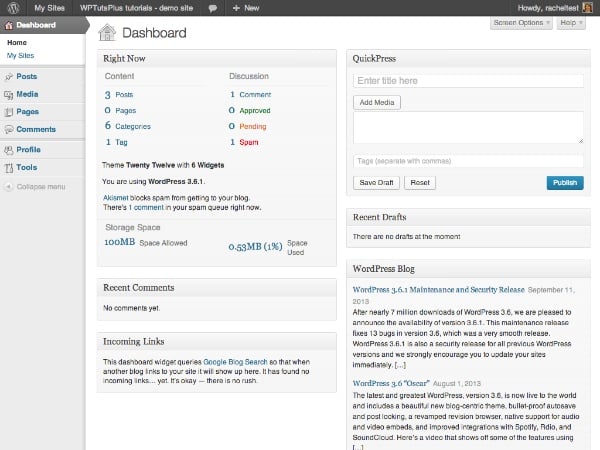
There is so much content that users have to scroll down to see it, and a lot of it is useless to users who are not familiar with WordPress. Additionally, if your site doesn’t use comments or pingbacks, these meta boxes won’t be of much help.
So I want to move the following:
- Latest comments
- Incoming link
- Quick News
- WordPress Blog
- Other WordPress News
To remove these meta boxes for users other than admins, add the following to your plugin:
// remove unwanted dashboard widgets for relevant users
function wptutsplus_remove_dashboard_widgets() {
	$user = wp_get_current_user();
	if ( ! $user->has_cap( 'manage_options' ) ) {
		remove_meta_box( 'dashboard_recent_comments', 'dashboard', 'normal' );
		remove_meta_box( 'dashboard_incoming_links', 'dashboard', 'normal' );
		remove_meta_box( 'dashboard_quick_press', 'dashboard', 'side' );
		remove_meta_box( 'dashboard_primary', 'dashboard', 'side' );
		remove_meta_box( 'dashboard_secondary', 'dashboard', 'side' );
	}
}
add_action( 'wp_dashboard_setup', 'wptutsplus_remove_dashboard_widgets' );
By checking whether the user has the manage_options capability (this capability is only owned by administrators), for user roles below the administrator. Then it removes the meta box and finally attaches the function to the wp_dashboard_setup hook.
The dashboard looks much cleaner now:
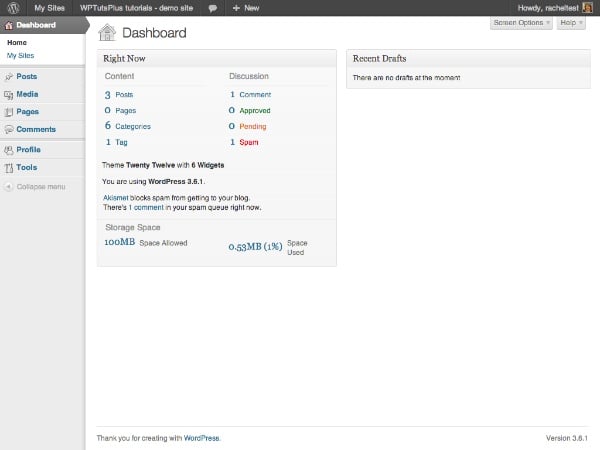
Maybe a little too sparse! Don't worry, I'll show you how to add some new meta boxes soon.
But first I'm going to move the "immediate" meta box because I want to add another meta box at the top left position.
2. Mobile Dashboard Meta Box
Mobile dashboard meta boxes can help you make your dashboard more relevant to your website by prioritizing the meta boxes that you or your users need to use most. I'll move the "Right Now" meta box to the right.
In your plugin, add the following code:
// Move the 'Right Now' dashboard widget to the right hand side
function wptutsplus_move_dashboard_widget() {
	$user = wp_get_current_user();
	if ( ! $user->has_cap( 'manage_options' ) ) {
		global $wp_meta_boxes;
		$widget = $wp_meta_boxes['dashboard']['normal']['core']['dashboard_right_now'];
		unset( $wp_meta_boxes['dashboard']['normal']['core']['dashboard_right_now'] );
		$wp_meta_boxes['dashboard']['side']['core']['dashboard_right_now'] = $widget;
	}
}
add_action( 'wp_dashboard_setup', 'wptutsplus_move_dashboard_widget' );
This will move the "Now" meta box from its "normal" position on the left to its "right" position, as shown in the screenshot:
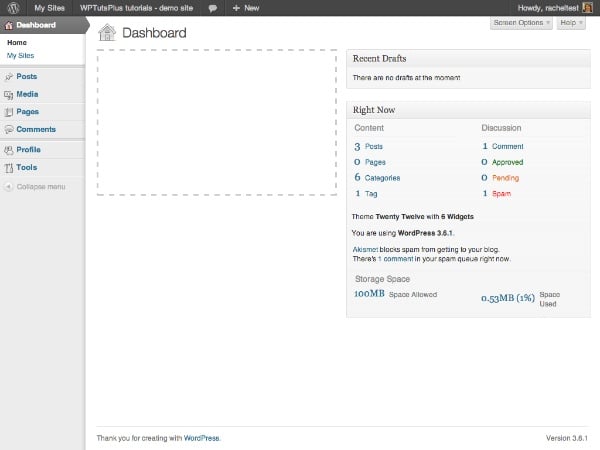
The next step is to fill in the gap on the left with a few custom meta boxes.
3. Add new dashboard meta box
Adding a meta box to a dashboard consists of two steps:
- Use the
wp_add_dashboard_widget()function to define the parameters of the widget - its ID, title and a callback function that defines its content. Activate this feature via thewp_dashboard_setuphook. - Write a callback function to define the content of the meta box.
In this case, I'm going to add new meta boxes for all users, so I won't be checking the user functionality - if you prefer, just copy the code you used in the previous section (or replace all of this tutorial Original test section for manage_options functionality).
In your plugin, add the following:
// add new dashboard widgets
function wptutsplus_add_dashboard_widgets() {
	wp_add_dashboard_widget( 'wptutsplus_dashboard_welcome', 'Welcome', 'wptutsplus_add_welcome_widget' );
	wp_add_dashboard_widget( 'wptutsplus_dashboard_links', 'Useful Links', 'wptutsplus_add_links_widget' );
}
function wptutsplus_add_welcome_widget(){ ?>

	This content management system lets you edit the pages and posts on your website.

	Your site consists of the following content, which you can access via the menu on the left:

	<ul>
		<li><strong>Pages</strong> - static pages which you can edit.</li>
		<li><strong>Posts</strong> - news or blog articles - you can edit these and add more.</li>
		<li><strong>Media</strong> - images and documents which you can upload via the Media menu on the left or within each post or page.</li>
	</ul>

	On each editing screen there are instructions to help you add and edit content.

<?php }

function wptutsplus_add_links_widget() { ?>

	Some links to resources which will help you manage your site:

	<ul>
		<li><a href="http://wordpress.org">The WordPress Codex</a></li>
		<li><a href="http://easywpguide.com">Easy WP Guide</a></li>
		<li><a href="http://www.wpbeginner.com">WP Beginner</a></li>
	</ul>
<?php }
add_action( 'wp_dashboard_setup', 'wptutsplus_add_dashboard_widgets' );
This will add two new meta boxes to the left side of the dashboard screen. You now have a customized dashboard!
Summary
In this tutorial, you learned how to do three things:
- Remove Meta Box from Dashboard
- Moving meta boxes from one part of the dashboard to another
- Add new dashboard meta box
What you choose to add to the meta box is up to you. You can include links to training videos, help users edit their websites, or add links to your own blog or website. Or you could put your thoughts for the day in there - whatever works for you!
The above is the detailed content of Personalize your WordPress admin experience - Dashboard. For more information, please follow other related articles on the PHP Chinese website!

Hot AI Tools

Undresser.AI Undress
AI-powered app for creating realistic nude photos

AI Clothes Remover
Online AI tool for removing clothes from photos.

Undress AI Tool
Undress images for free

Clothoff.io
AI clothes remover

AI Hentai Generator
Generate AI Hentai for free.

Hot Article
Hot Tools

Notepad++7.3.1
Easy-to-use and free code editor

SublimeText3 Chinese version
Chinese version, very easy to use

Zend Studio 13.0.1
Powerful PHP integrated development environment

Dreamweaver CS6
Visual web development tools

SublimeText3 Mac version
God-level code editing software (SublimeText3)
Hot Topics


 Create WordPress Plugins With OOP Techniques
Mar 06, 2025 am 10:30 AM
Create WordPress Plugins With OOP Techniques
Mar 06, 2025 am 10:30 AM
This tutorial demonstrates building a WordPress plugin using object-oriented programming (OOP) principles, leveraging the Dribbble API. Let's refine the text for clarity and conciseness while preserving the original meaning and structure. Object-Ori
 How to Pass PHP Data and Strings to JavaScript in WordPress
Mar 07, 2025 am 09:28 AM
How to Pass PHP Data and Strings to JavaScript in WordPress
Mar 07, 2025 am 09:28 AM
Best Practices for Passing PHP Data to JavaScript: A Comparison of wp_localize_script and wp_add_inline_script Storing data within static strings in your PHP files is a recommended practice. If this data is needed in your JavaScript code, incorporat
 How to Embed and Protect PDF Files With a WordPress Plugin
Mar 09, 2025 am 11:08 AM
How to Embed and Protect PDF Files With a WordPress Plugin
Mar 09, 2025 am 11:08 AM
This guide demonstrates how to embed and protect PDF files within WordPress posts and pages using a WordPress PDF plugin. PDFs offer a user-friendly, universally accessible format for various content, from catalogs to presentations. This method ens
 Is WordPress easy for beginners?
Apr 03, 2025 am 12:02 AM
Is WordPress easy for beginners?
Apr 03, 2025 am 12:02 AM
WordPress is easy for beginners to get started. 1. After logging into the background, the user interface is intuitive and the simple dashboard provides all the necessary function links. 2. Basic operations include creating and editing content. The WYSIWYG editor simplifies content creation. 3. Beginners can expand website functions through plug-ins and themes, and the learning curve exists but can be mastered through practice.
 Why would anyone use WordPress?
Apr 02, 2025 pm 02:57 PM
Why would anyone use WordPress?
Apr 02, 2025 pm 02:57 PM
People choose to use WordPress because of its power and flexibility. 1) WordPress is an open source CMS with strong ease of use and scalability, suitable for various website needs. 2) It has rich themes and plugins, a huge ecosystem and strong community support. 3) The working principle of WordPress is based on themes, plug-ins and core functions, and uses PHP and MySQL to process data, and supports performance optimization.
 Is WordPress still free?
Apr 04, 2025 am 12:06 AM
Is WordPress still free?
Apr 04, 2025 am 12:06 AM
The core version of WordPress is free, but other fees may be incurred during use. 1. Domain names and hosting services require payment. 2. Advanced themes and plug-ins may be charged. 3. Professional services and advanced features may be charged.
