

In the previous part of this tutorial series, we populated the application's dashboard page with wishes created by different users. We also attached a "Like" button to each wish so that users can like a specific wish.
In this part of the series, we'll look at how to toggle the like/dislike display and display the total number of likes a specific wish has received.
We start by cloning the previous part of this tutorial from GitHub.
git clone https://github.com/jay3dec/PythonFlaskMySQLApp_Part7.git
After cloning the source code, navigate to the project directory and start the web server.
cd PythonFlaskMySQLApp_Part7
python app.py
Point your browser to http://localhost:5002/ and the application should be running.
We will first implement a feature to display the total count that a specific wish has been granted. When a new wish is added, we will add an entry in the tbl_likes table. Therefore, modify the MySQL stored procedure sp_addWish to add entries to the tbl_likes table.
DELIMITER $$
CREATE DEFINER=`root`@`localhost` PROCEDURE `sp_addWish`(
    IN p_title varchar(45),
	IN p_description varchar(1000),
	IN p_user_id bigint,
	IN p_file_path varchar(200),
	IN p_is_private int,
	IN p_is_done int
)
BEGIN
	insert into tbl_wish(
		wish_title,
		wish_description,
		wish_user_id,
		wish_date,
		wish_file_path,
		wish_private,
		wish_accomplished
	)
	values
	(
		p_title,
		p_description,
		p_user_id,
		NOW(),
		p_file_path,
		p_is_private,
		p_is_done
	);

	SET @last_id = LAST_INSERT_ID();
	insert into tbl_likes(
		wish_id,
		user_id,
		wish_like
	)
	values(
		@last_id,
		p_user_id,
		0
	);


END$$
DELIMITER ;
As shown in the stored procedure code above, after inserting the wish into the tbl_wish table, we obtain the last inserted ID and insert the data into tbl_likes surface.
Next, we need to modify the sp_GetAllWishes stored procedure to include the number of likes each wish received. We will use a MySQL function to get the total number of wishes. So create a function called getSum that will get the wish ID and return the total number of likes.
DELIMITER $$
CREATE DEFINER=`root`@`localhost` FUNCTION `getSum`(
    p_wish_id int
) RETURNS int(11)
BEGIN
	select sum(wish_like) into @sm from tbl_likes where wish_id = p_wish_id;
RETURN @sm;
END$$
DELIMITER ;
Now, call the above MySQL function named getSum in the stored procedure sp_GetAllWishes to get the total number of likes for each wish.
DELIMITER $$
CREATE DEFINER=`root`@`localhost` PROCEDURE `sp_GetAllWishes`()
BEGIN
    select wish_id,wish_title,wish_description,wish_file_path,getSum(wish_id)
	from tbl_wish where wish_private = 0;
END$$
DELIMITER ;
Modify getAllWishes Python method to include like count. When iterating over results returned from a MySQL stored procedure, include a like field like this:
for wish in result:
    wish_dict = {
        'Id': wish[0],
        'Title': wish[1],
        'Description': wish[2],
        'FilePath': wish[3],
        'Like':wish[4]}
    wishes_dict.append(wish_dict)
Modify the CreateThumb JavaScript method to create an additional scope that we will use to display the like count.
var likeSpan = $('<span>').attr('aria-hidden','true').html(' '+like+' like(s)');
and append likeSpan to the parent paragraph p. This is the modified CreateThumb JavaScript function.
function CreateThumb(id, title, desc, filepath, like) {
    var mainDiv = $('<div>').attr('class', 'col-sm-4 col-md-4');
    var thumbNail = $('<div>').attr('class', 'thumbnail');
    var img = $('<img>').attr({
        'src': filepath,
        'data-holder-rendered': true,
        'style': 'height: 150px; width: 150px; display: block'
    });
    var caption = $('<div>').attr('class', 'caption');
    var title = $('<h3>').text(title);
    var desc = $('<p>').text(desc);


    var p = $('<p>');
    var btn = $('<button>').attr({
        'id': 'btn_' + id,
        'type': 'button',
        'class': 'btn btn-danger btn-sm'
    });
    var span = $('<span>').attr({
        'class': 'glyphicon glyphicon-thumbs-up',
        'aria-hidden': 'true'
    });

    var likeSpan = $('<span>').attr('aria-hidden', 'true').html(' ' + like + ' like(s)');

    p.append(btn.append(span));
    p.append(likeSpan);


    caption.append(title);
    caption.append(desc);
    caption.append(p);

    thumbNail.append(img);
    thumbNail.append(caption);
    mainDiv.append(thumbNail);
    return mainDiv;


}
Include like parameters when calling the CreateThumb JavaScript function in the success callback of a jQuery AJAX call /getAllWishes.
CreateThumb(data[i].Id,data[i].Title,data[i].Description,data[i].FilePath,data[i].Like)
Save changes and restart the server. Once logged into the app, you should be able to see the number of likes corresponding to each wish.
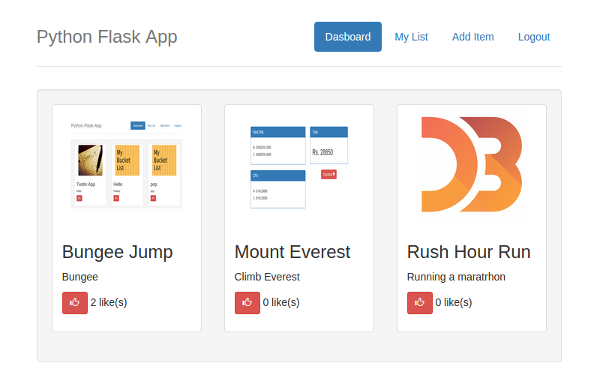
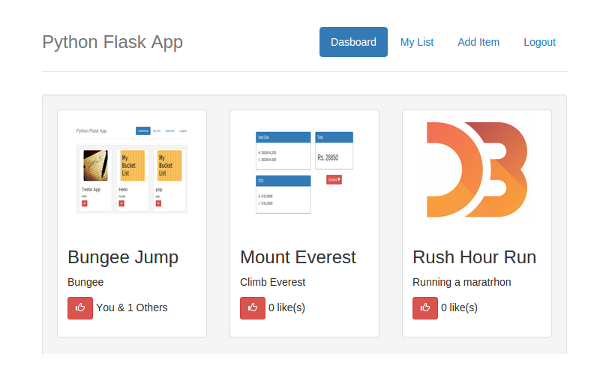
Check the number of likes under each wish. It is not clear whether the logged in user has liked the wish. So we will display a correct message like You & 20 Others. To achieve this, we need to modify sp_GetAllWishes to include some code that indicates whether the logged in user likes a particular wish. To check if a wish is liked, we make a function call. Create a function named hasLiked that accepts user ID and wish ID as parameters and returns whether the wish is liked by the user.
DELIMITER $$
CREATE DEFINER=`root`@`localhost` FUNCTION `hasLiked`(
    p_wish int,
	p_user int
) RETURNS int(11)
BEGIN

	select wish_like into @myval from tbl_likes where wish_id =  p_wish and user_id = p_user;
RETURN @myval;
END$$
DELIMITER ;
Now call the above MySQL function hasLiked in sp_GetAllWishes to return an extra field in the returned dataset indicating the user's like status.
DELIMITER $$

CREATE DEFINER=`root`@`localhost` PROCEDURE `sp_GetAllWishes`(
    p_user int
)
BEGIN
	select wish_id,wish_title,wish_description,wish_file_path,getSum(wish_id),hasLiked(wish_id,p_user)
	from tbl_wish where wish_private = 0;
END
Open app.py and modify the call to the MySQL stored procedure sp_GetAllWishes to include the user ID as a parameter.
_user = session.get('user')
conn = mysql.connect()
cursor = conn.cursor()
cursor.callproc('sp_GetAllWishes',(_user,))
Now modify the getAllWishes method to include the user's similar status for a specific wish. Modify the code to include HasLiked in the dictionary created.
for wish in result:
    wish_dict = {
       'Id': wish[0],
       'Title': wish[1],
       'Description': wish[2],
       'FilePath': wish[3],
       'Like':wish[4],
       'HasLiked':wish[5]}
    wishes_dict.append(wish_dict)
In the CreateThumb JavaScript function we will check for HasLiked and add the HTML accordingly.
if (hasLiked == "1") {
    likeSpan.html(' You & ' + (Number(like) - 1) + ' Others');
} else {
    likeSpan.html(' ' + like + ' like(s)');
}
As shown in the code above, if the user dislikes a particular wish, we display the like count. If the user likes this wish, we will display a more descriptive message.
When we click the "Like" button, the "Like" status is updated in the database but does not change in the dashboard. So let's update this in the success callback of the AJAX call when the like button is clicked.
我们首先对 MySQL 存储过程 sp_AddUpdateLikes 进行更改。早些时候,我们传递了喜欢的状态,1 表示喜欢,0 表示不喜欢。我们将对其进行修改并在存储过程中切换类似/不同。打开 sp_AddUpdateLikes 并将赞状态选择到变量中并检查变量状态。如果变量状态为“相似”,我们会将状态更新为“相似”,反之亦然。以下是修改后的 sp_AddUpdateLikes 存储过程。
-- --------------------------------------------------------------------------------
-- Routine DDL
-- Note: comments before and after the routine body will not be stored by the server
-- --------------------------------------------------------------------------------
DELIMITER $$

CREATE DEFINER=`root`@`localhost` PROCEDURE `sp_AddUpdateLikes`(
    p_wish_id int,
	p_user_id int,
	p_like int
)
BEGIN

	if (select exists (select 1 from tbl_likes where wish_id = p_wish_id and user_id = p_user_id)) then


		select wish_like into @currentVal from tbl_likes where wish_id = p_wish_id and user_id = p_user_id;

		if @currentVal = 0 then
			update tbl_likes set wish_like = 1 where wish_id = p_wish_id and user_id = p_user_id;
		else
			update tbl_likes set wish_like = 0 where wish_id = p_wish_id and user_id = p_user_id;
		end if;

	else

		insert into tbl_likes(
			wish_id,
			user_id,
			wish_like
		)
		values(
			p_wish_id,
			p_user_id,
			p_like
		);


	end if;
END
在CreateThumb JavaScript函数中,为我们之前创建的likeSpan分配一个ID,这样我们就可以根据需要更新状态.
var likeSpan = $('<span>').attr({'aria-hidden':'true','id':'span_'+id});
打开 app.py。在 addUpdateLike 方法中,一旦数据更新成功,我们将使用另一个存储过程调用来获取愿望之类的计数和状态。因此,创建一个名为 sp_getLikeStatus 的 MySQL 存储过程。在 sp_getLikeStatus 中,我们将调用已创建的 MySQL 函数 getSum 和 hasLiked 来获取状态。
DELIMITER $$
CREATE DEFINER=`root`@`localhost` PROCEDURE `sp_getLikeStatus`(
    IN p_wish_id int,
	IN p_user_id int
)
BEGIN
	select getSum(p_wish_id),hasLiked(p_wish_id,p_user_id);
END$$
DELIMITER ;
从 Python 方法 addUpdateLike 调用 sp_AddUpdateLikes 后,关闭光标和连接。
if len(data) is 0:
    conn.commit()
    cursor.close()
    conn.close()
现在调用存储过程 sp_getLikeStatus。
conn = mysql.connect()
cursor = conn.cursor()
cursor.callproc('sp_getLikeStatus',(_wishId,_user))
result = cursor.fetchall()
随响应一起返回点赞计数和点赞状态。
return json.dumps({'status':'OK','total':result[0][0],'likeStatus':result[0][1]})
在dashboard.html中,在对addUpdateLike方法进行AJAX调用的成功回调中,解析返回的响应并根据点赞状态显示点赞计数.
success: function(response) {

    var obj = JSON.parse(response);

    if (obj.likeStatus == "1") {
        $('#span_' + spId).html(' You & ' + (Number(obj.total) - 1) + ' Others');
    } else {
        $('#span_' + spId).html(' ' + obj.total + ' like(s)');
    }

}
保存更改,重新启动服务器,然后使用有效凭据登录。进入仪表板页面后,尝试点赞某个特定愿望,然后查看点赞状态如何相应更新。
在本系列的这一部分中,我们为仪表板页面中显示的愿望实现了类似/不同的功能。在本系列的后续部分中,我们将在应用程序中实现更多新功能并完善一些现有功能。
请在下面的评论中告诉我们您的想法和建议或任何更正。本教程的源代码可在 GitHub 上获取。
The above is the detailed content of Part 8: Developing a Python Flask and MySQL web application from scratch. For more information, please follow other related articles on the PHP Chinese website!
 How to turn off win10 upgrade prompt
 The difference between lightweight application servers and cloud servers
 CMD close port command
 The difference between external screen and internal screen broken
 How to jump with parameters in vue.js
 Cell sum
 How to intercept harassing calls
 virtual digital currency


![[Web front-end] Node.js quick start](https://img.php.cn/upload/course/000/000/067/662b5d34ba7c0227.png)


