

In this tutorial, I will demonstrate custom module configuration for Magento backend. It is always useful to provide a set of configurable options for a module on the backend, allowing administrators to easily configure module-specific settings. We will walk through the process of setting up a module configuration by creating a custom module in Magento.
As a developer, in the process of creating a custom module, you may feel that it would be nice if you could transfer control of some module-specific settings to the backend. Magento allows you to achieve this using a configuration system based on XML files. You just set up your files according to Magento's conventions and they'll be picked up automatically and magically! Most of the time, when setting up basic front-end storage, you need to deal with a large number of configurable settings provided by the core module.
I assume you are familiar with the basic module creation process in Magento. If you want to learn more about custom modules in Magento, this is a great article. Having said that, Magento follows the convention over configuration paradigm, which should make things easier to understand if you are new to the custom module development process.
In this tutorial, I will create a basic custom module called "CustomConfig" which provides backend configuration under the System > Configuration menu. Here is a list of files required for the required setup:
app/etc/modules/Envato_All.xml: This is a file used to enable our custom modules. app/code/local/Envato/CustomConfig/etc/config.xml: This is a module configuration file. app/code/local/Envato/CustomConfig/etc/system.xml: This is a file that declares the configuration options for our module. app/code/local/Envato/CustomConfig/Model/Options.php: This is a model file that provides options for certain form elements configured. app/code/local/Envato/CustomConfig/Helper/Data.php: This is the file used by the Magento translation system. First, we will create a module enabler file. Create the file "app/etc/modules/Envato_All.xml" and paste the following content into the file. We use "Envato" as the module namespace and "CustomConfig" as the module name. By default it will enable our "CustomConfig" module.
<?xml version="1.0"?>
<config>
  <modules>
    <Envato_CustomConfig>
      <active>true</active>
      <codePool>local</codePool>
    </Envato_CustomConfig>
  </modules>
</config>
Next, we need to create a module configuration file. Create "app/code/local/Envato/CustomConfig/etc/config.xml" and paste the following content into the file.
<?xml version="1.0"?>
<config>
    <modules>
        <Envato_CustomConfig>
            <version>0.0.1</version>
        </Envato_CustomConfig>
    </modules>
    <global>
        <helpers>
            <customconfig>
                <class>Envato_CustomConfig_Helper</class>
            </customconfig>
        </helpers>
        <models>
             <customconfig>
                <class>Envato_CustomConfig_Model</class>
             </customconfig>
        </models>
    </global>
    <adminhtml>
        <acl>
            <resources>
                <admin>
                    <children>
                        <system>
                            <children>
                                <config>
                                    <children>
                                        <customconfig_options>
                                            <title>Custom Configuration Section</title>
                                        </customconfig_options>
                                    </children>
                                </config>
                            </children>
                        </system>
                    </children>
                </admin>
            </resources>
        </acl>
    </adminhtml>
</config>
You should be familiar with Magento's convention for model and helper class declarations. Of course, the <adminhtml> tag will be new to you, which is what we care about in this tutorial. Let’s take a closer look at each label to understand what it represents.
<adminhtml> tag is used to define resources on the admin side. In our example, the module's configuration page is a resource. Additionally, we wrap the <acl> tag with the <resources> tag, which means only authenticated users can access it.
The next few tags are used to define the path to the backend configuration page. So the path to our configuration page looks like "admin/system/config/customconfig_options". Of course, the last tag <customconfig_options> should be unique so it doesn't conflict with other extensions.
Next, let us define the most important file "system.xml". Create "app/code/local/Envato/CustomConfig/etc/system.xml" and paste the following content into the file.
<?xml version="1.0"?>
<config>
    <tabs>
        <customconfig translate="label" module="customconfig">
            <label>Custom Configuration Tab</label>
            <sort_order>1</sort_order>
        </customconfig>
    </tabs>

    <sections>
        <customconfig_options translate="label" module="customconfig">
            <label>Custom Configuration Settings</label>
            <tab>customconfig</tab>
            <frontend_type>text</frontend_type>
            <sort_order>1</sort_order>
            <show_in_default>1</show_in_default>
            <show_in_website>1</show_in_website>
            <show_in_store>1</show_in_store>
            <groups>
                <section_one translate="label">
                    <label>Section One</label>
                    <frontend_type>text</frontend_type>
                    <sort_order>1</sort_order>
                    <show_in_default>1</show_in_default>
                    <show_in_website>1</show_in_website>
                    <show_in_store>1</show_in_store>
                    <fields>
                        <custom_field_one>
                            <label>Custom Text Field</label>
                            <frontend_type>text</frontend_type>
                            <sort_order>1</sort_order>
                            <show_in_default>1</show_in_default>
                            <show_in_website>1</show_in_website>
                            <show_in_store>1</show_in_store>
                            <comment>Example of text field.</comment>
                        </custom_field_one>
                    </fields>
                </section_one>
                <section_two translate="label">
                    <label>Section Two</label>
                    <frontend_type>text</frontend_type>
                    <sort_order>2</sort_order>
                    <show_in_default>1</show_in_default>
                    <show_in_website>1</show_in_website>
                    <show_in_store>1</show_in_store>
                    <fields>
                        <custom_field_two>
                            <label>Custom Select Field</label>
                            <frontend_type>select</frontend_type>
                            <source_model>customconfig/options</source_model>
                            <sort_order>1</sort_order>
                            <show_in_default>1</show_in_default>
                            <show_in_website>1</show_in_website>
                            <show_in_store>1</show_in_store>
                            <comment>Example of select field.</comment>
                        </custom_field_two>
                        <custom_field_three>
                            <label>Custom Radio Field</label>
                            <frontend_type>radios</frontend_type>
                            <source_model>customconfig/options</source_model>
                            <sort_order>2</sort_order>
                            <show_in_default>1</show_in_default>
                            <show_in_website>1</show_in_website>
                            <show_in_store>1</show_in_store>
                            <comment>Example of radios field.</comment>
                        </custom_field_three>
                        <custom_field_four>
                            <label>Custom Multiselect Field</label>
                            <frontend_type>multiselect</frontend_type>
                            <source_model>customconfig/options</source_model>
                            <sort_order>3</sort_order>
                            <show_in_default>1</show_in_default>
                            <show_in_website>1</show_in_website>
                            <show_in_store>1</show_in_store>
                            <comment>Example of multiselect field.</comment>
                        </custom_field_four>
                    </fields>
                </section_two>
            </groups>
        </customconfig_options>
    </sections>
</config>
As you may have guessed, this file is responsible for displaying our module’s configuration page on the backend. Let's take a closer look at some important tags in this file.
<tabs> tag is used to define the tabs that will appear on the left side of the configuration page. <sections> Tags are used to define the sections under each tab.
Let's try to understand it through an example. Go to System > Configuration of your Magento backend. You will notice that there are different tags such as General, Catalog, Customer, etc.
Under each tab, you will also see different sections. For example, under the Advanced tag there are Admin, System, Advanced and Developer sections. In our case, we will have a Custom Configuration Settings section under the Custom Configuration tab.
Next, we use <groups> tags to group similar configuration fields together. For example, you want to display image related fields and email related fields under different sections. To do this, we define the <section_one> and <section_two> tags.
最后,我们使用 <fields> 标签包裹每个部分的字段。在我们的示例中,我们在“第一部分”字段集下提供了一个文本字段,而选择框、单选按钮和多项选择等其他字段则在“第二部分”字段集下可用。这就是“system.xml”文件。
接下来,让我们创建一个模型文件“app/code/local/Envato/CustomConfig/Model/Options.php”。
<?php
class Envato_CustomConfig_Model_Options
{
  /**
   * Provide available options as a value/label array
   *
   * @return array
   */
  public function toOptionArray()
  {
    return array(
      array('value'=>1, 'label'=>'One'),
      array('value'=>2, 'label'=>'Two'),
      array('value'=>3, 'label'=>'Three'),
      array('value'=>4, 'label'=>'Four')
    );
  }
}
这里没有什么特别的 - 它只是用于将选项提供给单选表单字段并在配置表单中选择表单字段。
最后,我们需要创建“app/code/local/Envato/CustomConfig/Helper/Data.php”文件,以确保 Magento 的翻译系统正常工作。它几乎是一个空文件,但按照约定应该存在!
<?php
/**
 * Sample Widget Helper
 */
class Envato_CustomConfig_Helper_Data extends Mage_Core_Helper_Abstract
{
}
我们已经完成了文件设置。在下一节中,我们将检查它在 Magento 后端的外观。
前往 Magento 后端并清除所有缓存。可以通过转至系统 > 缓存管理来访问它。
现在,转到系统 > 配置打开配置页面。您应该会注意到页面左侧的自定义配置选项卡。在其下方,可以使用自定义配置设置链接,单击该链接将打开我们模块的配置页面。如果您看不到它,请尝试退出管理部分并重新登录。
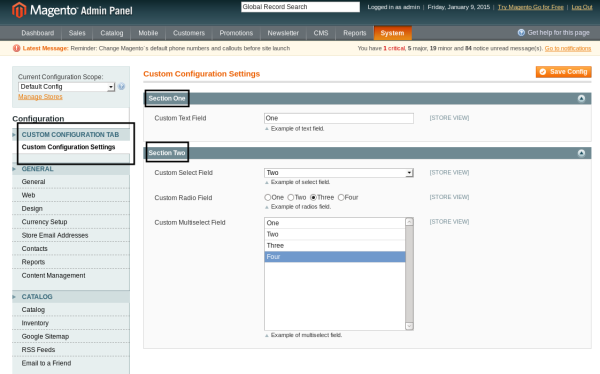
这是一个开箱即用的漂亮界面,不是吗?您可以尝试一下,填写表单并点击保存配置按钮来提交更改,Magento 将处理剩下的事情。
要访问代码中配置参数的值,可以使用 getStoreConfig 静态方法。例如,您可以使用以下语法检索 custom_field_one 参数的值:
Mage::getStoreConfig('customconfig_options/section_one/custom_field_one');
语法相当简单 - 您需要使用 system.XML 文件中定义的“section_name/group_name/field_name”模式。
管理系统配置是 Magento 最强大、最有用的部分之一。 Magento 允许您非常轻松地插入自定义配置参数,这要归功于最强大的电子商务系统之一的可扩展性!使用下面的提要分享您的想法!
The above is the detailed content of Personalized backend configuration in Magento. For more information, please follow other related articles on the PHP Chinese website!


![[Web front-end] Node.js quick start](https://img.php.cn/upload/course/000/000/067/662b5d34ba7c0227.png)


