

A closer look at CanJS: Part 2

This is the second in a three-part series that will teach you how to build a contact manager application in JavaScript using CanJS and jQuery. After completing this tutorial, you'll have everything you need to build your own JavaScript applications using CanJS!
In the first part, you created the models, views, and controls needed to display contacts and used fixtures that simulated a REST service.
In this section you will:
- Create controls and views to display categories.
- Use controls to listen to events.
- Use routing to filter contacts.
You will be adding source files in Part One, so if you haven't done so yet, please catch up first. I'll be here when you're ready.
Set routing
Routing helps manage browser history and client state in single-page JavaScript applications.
Routing helps manage browser history and client state in single-page JavaScript applications. The hash in the URL contains properties that the application reads and writes. Various parts of the application can listen for these changes and react accordingly, often updating parts of the current page without loading a new page.
can.route is a special observable that updates and responds to changes in window.location.hash. Use can.route to map URLs to properties, resulting in beautiful URLs such as #!filter/all. If no route is defined, the hash value is simply serialized into a URL-encoded representation, such as #!category=all.
In this application, routing will be used to filter contacts by category. Add the following code to your contacts.js file:
1 2 |
|
The first line creates a route with a category attribute that your application will be able to read and write. The second line creates a default route, setting the category attribute to all.
Use model instance list
A Model.List is an observable array of model instances. When you define a Model (such as Contact), a Model.List for that type of model is automatically created. We can extend this created Model.List to add helper functions that operate on a list of model instances.
Contact.List Two helper functions will be needed to filter the contact list and report how many contacts are in each category. Add this to contacts.js immediately after the Contact model:
1 2 3 4 5 6 7 8 9 10 11 12 13 14 15 |
|
The two auxiliary functions here are:
-
filter()Loops through each contact in the list and returns a newContact.Listof the contacts within the category.this.attr('length')is included here so EJS will set up the live binding when we use this helper in the view. -
count()Use thefilter()helper function to return the number of contacts in a category. Sincethis.attr('length')infilter(), EJS will set the live binding when we use this helper in the view.
If you are using helpers in EJS, use
attr()on a list or instance attribute to set live binding.
Filter Contacts
Next, you will modify the contactsList.ejs view to filter contacts based on the category attribute in the hash. In the contactsList.ejs view, change the parameters passed to the list() helper to contacts.filter(can.route.attr('category')). When finished, your EJS file should look like this:
1 2 3 4 5 6 7 8 9 |
|
On the second line, filter() is called with the current category in can.route. Since you are using attr() in both filter() and can.route, EJS will set the live binding when either of them changes to re-render your UI.
Now you should be aware of the power of live binding. With a slight adjustment to the view, the app's UI is now fully synchronized not only with the contact list, but also with the category properties defined in the route.
Display categories
Contacts will be filtered when the category attribute in the hash changes. Now you need a way to list all available categories and change the hash.
First, create a new view to display the list of categories. Save this code as filterView.ejs in the views folder:
1 2 3 4 5 6 7 8 9 10 11 |
|
Let’s look at a few lines of this code and see what they do:
1 |
|
$.each Loops through the categories and executes a callback for each category.
1 |
|
每个链接都有一个 data-category 属性,该属性将被拉入 jQuery 的数据对象中。稍后,可以使用 <a> 标记上的 .data('category') 来访问该值。类别的名称和联系人数量将用作链接测试。实时绑定是根据联系人数量设置的,因为 count() 调用 filter() 其中包含 this.attr('length')。
使用 can.Control 监听事件
创建实例时,控件会自动绑定看起来像事件处理程序的方法。事件处理程序的第一部分是选择器,第二部分是您要侦听的事件。选择器可以是任何有效的 CSS 选择器,事件可以是任何 DOM 事件或自定义事件。因此,像 'a click' 这样的函数将监听控件元素内任何 <a> 标记的点击。
Control 使用事件委托,因此您不必担心在 DOM 更改时重新绑定事件处理程序。
显示类别
通过将此代码添加到 contacts.js 紧随 Contacts 控件之后来创建管理类别的控件:
1 2 3 4 5 6 7 8 9 10 11 12 13 14 15 |
|
让我们检查一下您刚刚创建的“Filter”控件中的代码:
1 2 3 4 |
|
就像在 Contacts 控件中一样,init() 使用 can.view() 来呈现类别,并使用 html() 将其插入到控件的元素中。
1 |
|
查找与当前类别相对应的链接,并将“active”类添加到其父元素。
1 |
|
监听与选择器 [data-category] 匹配的任何元素上的 click 事件。
1 2 |
|
从所有链接中删除“活动”类,然后向单击的链接添加“活动”类。
1 |
|
使用 jQuery 数据对象中所单击的 <a> 的值更新 can.route 中的类别属性。
初始化过滤器控件
就像第一部分中的 Contacts 控件一样,您需要创建 Filter 控件的新实例。更新您的文档就绪函数,如下所示:
1 2 3 4 5 6 7 8 9 10 11 12 13 14 15 |
|
通过此更改,将在 #filter 元素上创建 Filter 控件的实例。它将传递联系人和类别列表。
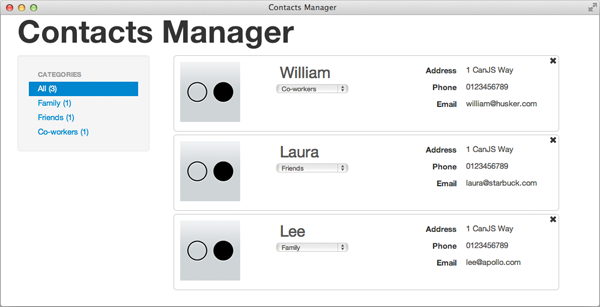
现在,当您在浏览器中运行应用程序时,您将能够通过单击右侧的类别来过滤联系人:
总结
这就是第二部分的全部内容!以下是我们所取得的成就:
- 创建了一个用于侦听事件并管理类别的控件
- 设置路由以按类别过滤联系人
- 调整了您的视图,以便实时绑定使您的整个 UI 与数据层保持同步
在第三部分中,您将更新现有控件以允许编辑和删除联系人。您还将创建一个新的控件和视图,以便您添加新的联系人。
迫不及待想了解更多信息?该系列的第三部分已发布在这里!
The above is the detailed content of A closer look at CanJS: Part 2. For more information, please follow other related articles on the PHP Chinese website!

Hot AI Tools

Undresser.AI Undress
AI-powered app for creating realistic nude photos

AI Clothes Remover
Online AI tool for removing clothes from photos.

Undress AI Tool
Undress images for free

Clothoff.io
AI clothes remover

Video Face Swap
Swap faces in any video effortlessly with our completely free AI face swap tool!
Hot Article
Hot Tools

Notepad++7.3.1
Easy-to-use and free code editor

SublimeText3 Chinese version
Chinese version, very easy to use

Zend Studio 13.0.1
Powerful PHP integrated development environment

Dreamweaver CS6
Visual web development tools

SublimeText3 Mac version
God-level code editing software (SublimeText3)
Hot Topics


 Explore a deep understanding of the syntactic structure of the id selector
Jan 03, 2024 am 09:26 AM
Explore a deep understanding of the syntactic structure of the id selector
Jan 03, 2024 am 09:26 AM
To understand the syntax structure of the id selector in depth, you need specific code examples. In CSS, the id selector is a common selector that selects the corresponding element based on the id attribute of the HTML element. A deep understanding of the syntactic structure of the id selector can help us better use CSS to select and style specific elements. The syntactic structure of the id selector is very simple. It uses the pound sign (#) plus the value of the id attribute to specify the selected element. For example, if we have an HTML element with an id attribute value of "myElemen
 Exploring Cookies in Java: Uncovering Their Reality
Jan 03, 2024 am 09:35 AM
Exploring Cookies in Java: Uncovering Their Reality
Jan 03, 2024 am 09:35 AM
A closer look at cookies in Java: What exactly are they? In computer networks, a cookie is a small text file stored on the user's computer. It is sent by the web server to the web browser and then saved on the user's local hard drive. Whenever the user visits the same website again, the web browser will send the cookie to the server to provide personalized services. The Cookie class is also provided in Java to handle and manage Cookies. A common example is a shopping website,
 Uncovering localstorage: exploring its true nature
Jan 03, 2024 pm 02:47 PM
Uncovering localstorage: exploring its true nature
Jan 03, 2024 pm 02:47 PM
A closer look at localstorage: what exactly is it? , if you need specific code examples, this article will delve into what file localstorage is and provide specific code examples to help readers better understand and apply localstorage. Localstorage is a mechanism for storing data in web browsers. It creates a local file in the user's browser that stores key-value data. This file is persistent even after the browser is closed.
 Understand the five caching mechanism implementation methods of JavaScript
Jan 23, 2024 am 09:24 AM
Understand the five caching mechanism implementation methods of JavaScript
Jan 23, 2024 am 09:24 AM
In-depth understanding: Five implementation methods of JS caching mechanism, specific code examples are required Introduction: In front-end development, caching mechanism is one of the important means to optimize web page performance. Through reasonable caching strategies, requests to the server can be reduced and user experience improved. This article will introduce the implementation of five common JS caching mechanisms, with specific code examples so that readers can better understand and apply them. 1. Variable caching Variable caching is the most basic and simplest caching method. Avoid duplication by storing the results of one-time calculations in variables
 Understanding Canvas: What programming languages are supported?
Jan 17, 2024 am 10:16 AM
Understanding Canvas: What programming languages are supported?
Jan 17, 2024 am 10:16 AM
Learn more about Canvas: What languages are supported? Canvas is a powerful HTML5 element that provides a way to draw graphics using JavaScript. As a cross-platform drawing API, Canvas not only supports drawing static images, but can also be used in animation effects, game development, data visualization and other fields. Before using Canvas, it is very important to understand which languages Canvas supports. This article will take an in-depth look at the languages supported by Canvas. JavaScript
 Discover the secrets of PHP writing standards: a deep dive into best practices
Aug 13, 2023 am 08:37 AM
Discover the secrets of PHP writing standards: a deep dive into best practices
Aug 13, 2023 am 08:37 AM
Explore the secrets of PHP writing specifications: In-depth understanding of best practices Introduction: PHP is a programming language widely used in web development. Its flexibility and convenience allow developers to use it widely in projects. However, due to the characteristics of the PHP language and the diversity of programming styles, the readability and maintainability of the code are inconsistent. In order to solve this problem, it is crucial to develop PHP writing standards. This article will delve into the mysteries of PHP writing disciplines and provide some best practice code examples. 1. Naming conventions compiled in PHP
 Deeply master the application of Canvas technology
Jan 17, 2024 am 09:14 AM
Deeply master the application of Canvas technology
Jan 17, 2024 am 09:14 AM
Canvas technology is a very important part of web development. Canvas can be used to draw graphics and animations on web pages. If you want to add graphics, animation and other elements to your web application, you must not miss Canvas technology. In this article, we'll take a deeper look at Canvas technology and provide some concrete code examples. Introduction to Canvas Canvas is one of the elements of HTML5, which provides a way to dynamically draw graphics and animations on web pages. Canvas provides
 Learn more about Canvas: Uncover its unique features
Jan 06, 2024 pm 11:48 PM
Learn more about Canvas: Uncover its unique features
Jan 06, 2024 pm 11:48 PM
Learn more about Canvas: Reveal its unique features and require specific code examples. With the rapid development of Internet technology, the interface design of applications has become more and more diverse and creative. The emergence of HTML5 technology provides developers with more rich tools and functions, of which Canvas is a very important component. Canvas is a new tag in HTML5, which can be used to draw graphics on web pages, create highly interactive animations and games, etc. This article will delve into the unique features of Canvas,
