
 CMS Tutorial
WordPress
Exploring WooCommerce Checkout Options: A Comprehensive Guide for Beginners, Part 2
CMS Tutorial
WordPress
Exploring WooCommerce Checkout Options: A Comprehensive Guide for Beginners, Part 2
Exploring WooCommerce Checkout Options: A Comprehensive Guide for Beginners, Part 2

In the previous article, we started discussing the checkout process using coupons and SSL security layer. We also configured the checkout page. In this article, I will explain the rest of the checkout options, which include checkout endpoints and payment gateways.
Checkout Endpoint
To make the checkout process even simpler, WooCommerce provides various checkout endpoints that users can add to the end of the different page URLs involved in the checkout process. Online store owners can set these endpoints according to their choice; however, some default settings are already in place.
- Payment:You can add endpoints for the Payment page from here.
- Order Received: The checkout endpoint can be configured from here.
- Add payment method: This is the endpoint of page Checkout > Add payment method.
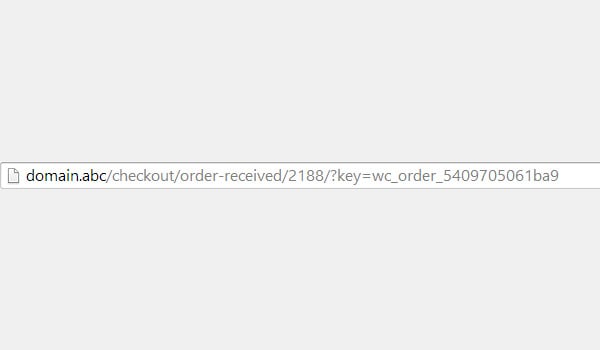
For starters, I will explain how and where these endpoints will appear in your online store. Let’s take received order as an example.
- Use the default value for the "Order Received" endpoint, which is
order-received. - Click the Save Changes button.
- Add any product to Cart.
- Now go to the Checkout page.
- Click the Place Order button.
page will open in your browser, and its URL will contain the endpoint order-received.
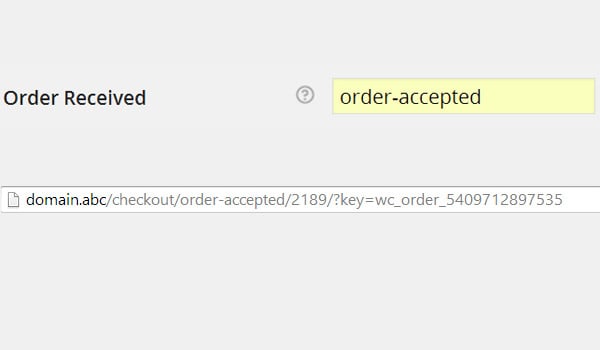
Now we set a custom value for the Received order endpoint instead of the default value e.g. Accepted order. Repeating the same process above will show that the URL now contains order-accepted as the new endpoint.
So, you can use default or custom endpoints for checkout process in WooCommerce. But I recommend you not to change or replace these default names for standard store features.
Payment Gateway
The success of any e-commerce website largely depends on the payment gateway it provides. Customers always want and look for the payment method that works best for them so that they can pay with ease. Here is Wikipedia’s definition of payment gateway:
A payment gateway is an e-commerce application service provider service that authorizes credit card payments for e-commerce, online retailers, brick-and-mortar stores, or traditional brick-and-mortar stores. It is the equivalent of a physical point-of-sale terminal found in most retail stores. 块引用>Any e-commerce website should provide all payment gateways to make the payment process as wide-ranging as possible. WooCommerce solves this problem as it allows you to offer multiple payment gateways to your customers immediately after installing the plugin. This is the last set of configurations in the checkout options section.
Gateway display
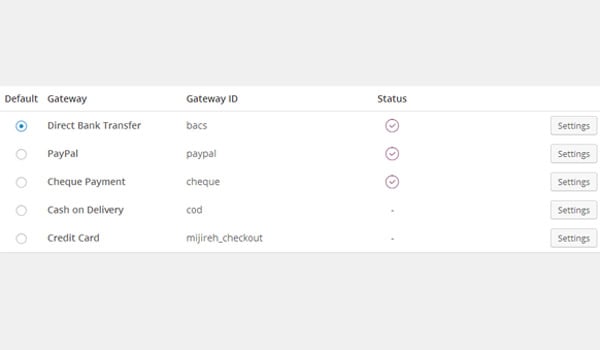
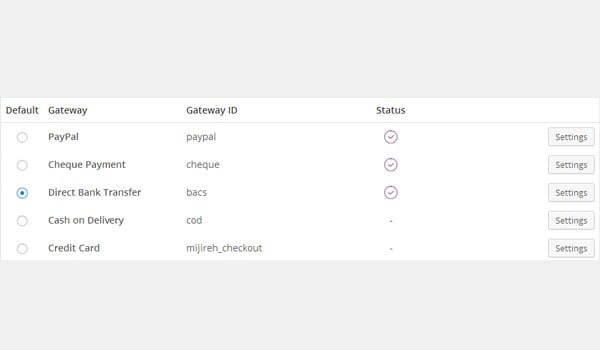
In this part of the configuration, you can see a table listing all automatically installed payment gateways. You'll see various rows and columns, each representing a unique payment gateway.
These columns include:
- Default: If the customer does not make an individual selection, the payment gateway provided by default is controlled by the radio button in this column. All you need to do is select your default gateway here.
- Gateways: This column lists the names of all available payment gateways.
- Gateway ID: This will uniquely identify the account for a specific payment gateway.
- Status: Users can see small icons in this column indicating whether the gateway is enabled and will be available to customers.
- Settings: The last column is where you can configure, manage, and control the settings for each payment gateway individually.
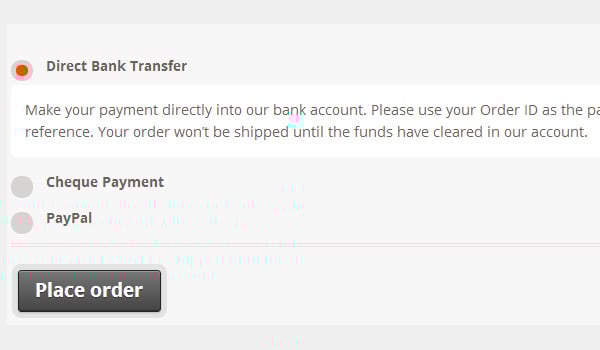
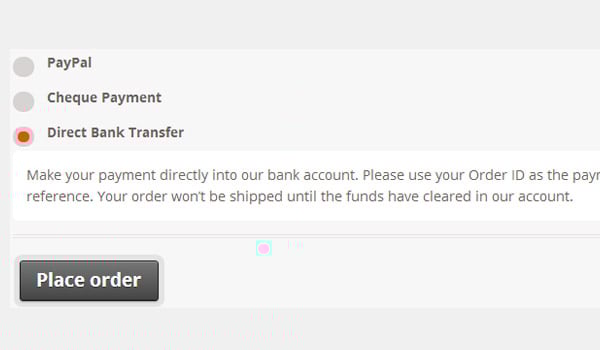
It is up to you which payment gateways are displayed and the order in which they are displayed on the frontend. You can control this sequence by simply dragging and dropping these gateways into a location of your choice. Let us consider the following payment gateway sequence:
On the frontend you will see the gateways displayed in the same order:
Now suppose you change the order as follows:
Now the result of the front end will be:
When you have made all changes, don't forget to click Save Changes.
in conclusion
This completes the setting of checkout options. In the following tutorials, we will edit and configure various sub-pages related to the settings of different payment gateways. There, you’ll learn how to manage the settings for each payment gateway offered by WooCommerce.
Until then, if you have any questions about checkout options, please ask in the comments section below.
The above is the detailed content of Exploring WooCommerce Checkout Options: A Comprehensive Guide for Beginners, Part 2. For more information, please follow other related articles on the PHP Chinese website!

Hot AI Tools

Undresser.AI Undress
AI-powered app for creating realistic nude photos

AI Clothes Remover
Online AI tool for removing clothes from photos.

Undress AI Tool
Undress images for free

Clothoff.io
AI clothes remover

Video Face Swap
Swap faces in any video effortlessly with our completely free AI face swap tool!

Hot Article
Hot Tools

Notepad++7.3.1
Easy-to-use and free code editor

SublimeText3 Chinese version
Chinese version, very easy to use

Zend Studio 13.0.1
Powerful PHP integrated development environment

Dreamweaver CS6
Visual web development tools

SublimeText3 Mac version
God-level code editing software (SublimeText3)
Hot Topics


 Is WordPress easy for beginners?
Apr 03, 2025 am 12:02 AM
Is WordPress easy for beginners?
Apr 03, 2025 am 12:02 AM
WordPress is easy for beginners to get started. 1. After logging into the background, the user interface is intuitive and the simple dashboard provides all the necessary function links. 2. Basic operations include creating and editing content. The WYSIWYG editor simplifies content creation. 3. Beginners can expand website functions through plug-ins and themes, and the learning curve exists but can be mastered through practice.
 How To Begin A WordPress Blog: A Step-By-Step Guide For Beginners
Apr 17, 2025 am 08:25 AM
How To Begin A WordPress Blog: A Step-By-Step Guide For Beginners
Apr 17, 2025 am 08:25 AM
Blogs are the ideal platform for people to express their opinions, opinions and opinions online. Many newbies are eager to build their own website but are hesitant to worry about technical barriers or cost issues. However, as the platform continues to evolve to meet the capabilities and needs of beginners, it is now starting to become easier than ever. This article will guide you step by step how to build a WordPress blog, from theme selection to using plugins to improve security and performance, helping you create your own website easily. Choose a blog topic and direction Before purchasing a domain name or registering a host, it is best to identify the topics you plan to cover. Personal websites can revolve around travel, cooking, product reviews, music or any hobby that sparks your interests. Focusing on areas you are truly interested in can encourage continuous writing
 What is the WordPress good for?
Apr 07, 2025 am 12:06 AM
What is the WordPress good for?
Apr 07, 2025 am 12:06 AM
WordPressisgoodforvirtuallyanywebprojectduetoitsversatilityasaCMS.Itexcelsin:1)user-friendliness,allowingeasywebsitesetup;2)flexibilityandcustomizationwithnumerousthemesandplugins;3)SEOoptimization;and4)strongcommunitysupport,thoughusersmustmanageper
 Can I learn WordPress in 3 days?
Apr 09, 2025 am 12:16 AM
Can I learn WordPress in 3 days?
Apr 09, 2025 am 12:16 AM
Can learn WordPress within three days. 1. Master basic knowledge, such as themes, plug-ins, etc. 2. Understand the core functions, including installation and working principles. 3. Learn basic and advanced usage through examples. 4. Understand debugging techniques and performance optimization suggestions.
 How to get logged in user information in WordPress for personalized results
Apr 19, 2025 pm 11:57 PM
How to get logged in user information in WordPress for personalized results
Apr 19, 2025 pm 11:57 PM
Recently, we showed you how to create a personalized experience for users by allowing users to save their favorite posts in a personalized library. You can take personalized results to another level by using their names in some places (i.e., welcome screens). Fortunately, WordPress makes it very easy to get information about logged in users. In this article, we will show you how to retrieve information related to the currently logged in user. We will use the get_currentuserinfo(); function. This can be used anywhere in the theme (header, footer, sidebar, page template, etc.). In order for it to work, the user must be logged in. So we need to use
 Should I use Wix or WordPress?
Apr 06, 2025 am 12:11 AM
Should I use Wix or WordPress?
Apr 06, 2025 am 12:11 AM
Wix is suitable for users who have no programming experience, and WordPress is suitable for users who want more control and expansion capabilities. 1) Wix provides drag-and-drop editors and rich templates, making it easy to quickly build a website. 2) As an open source CMS, WordPress has a huge community and plug-in ecosystem, supporting in-depth customization and expansion.
 How to display child categories on archive page of parent categories
Apr 19, 2025 pm 11:54 PM
How to display child categories on archive page of parent categories
Apr 19, 2025 pm 11:54 PM
Do you want to know how to display child categories on the parent category archive page? When you customize a classification archive page, you may need to do this to make it more useful to your visitors. In this article, we will show you how to easily display child categories on the parent category archive page. Why do subcategories appear on parent category archive page? By displaying all child categories on the parent category archive page, you can make them less generic and more useful to visitors. For example, if you run a WordPress blog about books and have a taxonomy called "Theme", you can add sub-taxonomy such as "novel", "non-fiction" so that your readers can
 How much does WordPress cost?
Apr 05, 2025 am 12:13 AM
How much does WordPress cost?
Apr 05, 2025 am 12:13 AM
WordPress itself is free, but it costs extra to use: 1. WordPress.com offers a package ranging from free to paid, with prices ranging from a few dollars per month to dozens of dollars; 2. WordPress.org requires purchasing a domain name (10-20 US dollars per year) and hosting services (5-50 US dollars per month); 3. Most plug-ins and themes are free, and the paid price ranges from tens to hundreds of dollars; by choosing the right hosting service, using plug-ins and themes reasonably, and regularly maintaining and optimizing, the cost of WordPress can be effectively controlled and optimized.
