

Real-time chat using Readline and Socket.io for Node.js

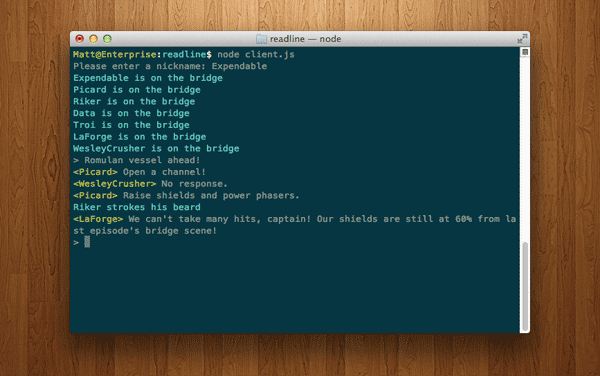
Node.js has an underappreciated, but very useful module in its standard library. The Readline module does what it says on the box: reads a line of input from the terminal. This can be used to ask the user a question or two, or create a prompt at the bottom of the screen. In this tutorial, I'm going to demonstrate the capabilities of Readline and make a live CLI chat room powered by Socket.io. Not only can clients send simple messages, they can also send emoticon commands using /me, send private messages using /msg, and allow the use of /nick.
A little about Readline
This is probably the simplest usage of Readline:
var readline = require('readline');

var rl = readline.createInterface(process.stdin, process.stdout);

rl.question("What is your name? ", function(answer) {
	console.log("Hello, " + answer );
	rl.close();
});
We include this module to create a Readline interface using standard input and output streams and then ask the user a one-time question. This is the first use of Readline: asking questions. If you need to confirm something with the user, this might be in the popular form, "Would you like to do this? (y/n)", which is ubiquitous in CLI tools, readline.question () Here's how to do it.
Readline is a prompt, which can be customized based on its default ">" characters and temporarily paused to prevent typing. For our Readline chat client, this will be our primary interface. There will be one readline.question() asking for the user's nickname, but everything else will be readline.prompt().
Manage your dependencies
Let’s start with the boring part: dependencies. This project will use the socket.io, socket.io-client packages, and ansi-color. Your packages.json file should look like this:
{
    "name": "ReadlineChatExample",
	"version": "1.0.0",
	"description": "CLI chat with readline and socket.io",
	"author": "Matt Harzewski",
	"dependencies": {
		"socket.io": "latest",
		"socket.io-client": "latest",
		"ansi-color": "latest"
	},
	"private": true
}
Run npm install and that’s it.
server
In this tutorial, we will use a very simple Socket.io server. It doesn’t get more basic than this:
var socketio = require('socket.io');

// Listen on port 3636
var io = socketio.listen(3636);

io.sockets.on('connection', function (socket) {

    // Broadcast a user's message to everyone else in the room
	socket.on('send', function (data) {
		io.sockets.emit('message', data);
    });

});
All it does is receive incoming messages from one client and pass them on to everyone else. For larger scale applications the server may be more robust, but for this simple example it should be enough.
This should be saved in the project directory with the name server.js.
Client: Includes and Settings
Before we get to the fun part, we need to include our dependencies, define some variables, and start the Readline interface and socket connection.
var readline = require('readline'),
socketio = require('socket.io-client'),
util = require('util'),
color = require("ansi-color").set;


var nick;
var socket = socketio.connect('localhost', { port: 3636 });
var rl = readline.createInterface(process.stdin, process.stdout);
At this point, the code is almost self-explanatory. We already have the nickname variable, the socket connection (via the socket.io-client package) and the Readline interface.
In this example Socket.io will connect to localhost via port 3636, of course if you are making a production chat application this will change to your own server's domain and port. (There’s not much point in chatting with yourself!)
Client: Ask for username
Now we are using Readline for the first time! We want to ask the user for a nickname of their choice, which will identify them in the chat room. To do this, we will use Readline's question() method.
// Set the username
rl.question("Please enter a nickname: ", function(name) {
    nick = name;
	var msg = nick + " has joined the chat";
	socket.emit('send', { type: 'notice', message: msg });
	rl.prompt(true);
});
We set the previous nick variable to the value collected from the user, send a message to the server (which will be forwarded to other clients) that our user has joined the chat, and then switch the Readline interface back to prompt mode. The true value passed to prompt() ensures that the prompt is displayed correctly. (Otherwise the cursor may move to position zero on the line and ">" will not be displayed.)
Unfortunately, Readline has frustrating problems with the prompt() method. It doesn't play well with console.log(), which outputs the text to the same line as the prompt character, leaving stray ">" everywhere Characters and other weird characters. To solve this problem, we will not use console.log anywhere in this application except one location. Instead, the output should be passed to this function:
function console_out(msg) {
    process.stdout.clearLine();
	process.stdout.cursorTo(0);
	console.log(msg);
	rl.prompt(true);
}
This slightly hacky solution ensures that the current line in the console is empty and the cursor is at position zero before printing the output. Then it explicitly asks to output the prompt again.
Therefore, in the rest of this tutorial, you will see console_out() instead of console.log().
Client: processing input
Users can enter two types of input: chat and commands. We know the command is preceded by a slash, so it's easy to differentiate between the two.
Readline 有几个事件处理程序,但最重要的无疑是 line。每当在输入流中检测到换行符(通过 return 或 Enter 键)时,就会触发此事件。因此,我们需要为我们的输入处理程序挂钩 line。
rl.on('line', function (line) {
    if (line[0] == "/" && line.length > 1) {
		var cmd = line.match(/[a-z]+\b/)[0];
		var arg = line.substr(cmd.length+2, line.length);
		chat_command(cmd, arg);

	} else {
		// send chat message
		socket.emit('send', { type: 'chat', message: line, nick: nick });
		rl.prompt(true);
	}
});
如果输入行的第一个字符是斜杠,我们就知道这是一个命令,这将需要更多的处理。否则,我们只是发送常规聊天消息并重置提示。请注意此处通过套接字发送的数据与上一步中的加入消息之间的差异。它使用不同的 type,因此接收客户端知道如何格式化消息,并且我们还传递 nick 变量。
命令名称(cmd)和后面的文本(arg)用一些正则表达式和子字符串魔术隔离,然后我们将它们传递给处理函数命令。
function chat_command(cmd, arg) {
    switch (cmd) {

		case 'nick':
			var notice = nick + " changed their name to " + arg;
			nick = arg;
			socket.emit('send', { type: 'notice', message: notice });
			break;

		case 'msg':
			var to = arg.match(/[a-z]+\b/)[0];
			var message = arg.substr(to.length, arg.length);
			socket.emit('send', { type: 'tell', message: message, to: to, from: nick });
			break;

		case 'me':
			var emote = nick + " " + arg;
			socket.emit('send', { type: 'emote', message: emote });
			break;

		default:
			console_out("That is not a valid command.");

	}
}
如果用户输入 /nick gollum,则 nick 变量将重置为 gollum,它可能是 smeagol 之前,并将通知推送到服务器。
如果用户输入 /msg bilbo 珍贵在哪里?,使用相同的正则表达式来分隔接收者和消息,然后是一个类型为 tell 被推送到服务器。这将与普通消息的显示方式略有不同,并且其他用户不应该看到。诚然,我们过于简单的服务器会盲目地将消息推送给每个人,但客户端会忽略未发送到正确昵称的通知。更强大的服务器可以更加离散。
表情命令的使用形式为/我正在吃第二顿早餐。昵称以任何使用过 IRC 或玩过多人角色扮演游戏的人都应该熟悉的方式添加到表情符号中,然后将其推送到服务器。
客户端:处理传入消息
现在客户端需要一种接收消息的方法。我们需要做的就是挂钩 Socket.io 客户端的 message 事件并适当地格式化数据以进行输出。
socket.on('message', function (data) {
    var leader;
	if (data.type == 'chat' && data.nick != nick) {
		leader = color("<"+data.nick+"> ", "green");
		console_out(leader + data.message);
	}
	else if (data.type == "notice") {
		console_out(color(data.message, 'cyan'));
	}
	else if (data.type == "tell" && data.to == nick) {
		leader = color("["+data.from+"->"+data.to+"]", "red");
		console_out(leader + data.message);
	}
	else if (data.type == "emote") {
		console_out(color(data.message, "cyan"));
	}
});
客户端使用我们的昵称发送的类型为 chat 的消息将与昵称和聊天文本一起显示。用户已经可以看到他们在 Readline 中输入的内容,因此没有必要再次输出它。在这里,我使用 ansi-color 包对输出进行一点着色。这并不是绝对必要的,但它使聊天更容易理解。
类型为 notice 或 emote 的消息按原样打印,但颜色为青色。
如果消息是 tell,且昵称等于此客户端的当前名称,则输出采用 [Somebody->You] Hi! 的形式。当然,这并不是非常私密的事情。如果您想查看每个人的消息,您只需取出 && data.to == nick 部分即可。理想情况下,服务器应该知道将消息推送到哪个客户端,而不是将其发送给不需要它的客户端。但这增加了不必要的复杂性,超出了本教程的范围。
点燃它!
现在让我们看看是否一切正常。要对其进行测试,请通过运行 node server.js 启动服务器,然后打开几个新的终端窗口。在新窗口中,运行 node client.js 并输入昵称。假设一切顺利,那么您应该能够在他们之间聊天。
希望本教程向您展示了 Readline 模块的入门是多么容易。您可能想尝试向聊天应用程序添加更多功能,以进行更多练习。最后,查看 Readline 文档以获取完整的 API。
The above is the detailed content of Real-time chat using Readline and Socket.io for Node.js. For more information, please follow other related articles on the PHP Chinese website!

Hot AI Tools

Undresser.AI Undress
AI-powered app for creating realistic nude photos

AI Clothes Remover
Online AI tool for removing clothes from photos.

Undress AI Tool
Undress images for free

Clothoff.io
AI clothes remover

AI Hentai Generator
Generate AI Hentai for free.

Hot Article
Hot Tools

Notepad++7.3.1
Easy-to-use and free code editor

SublimeText3 Chinese version
Chinese version, very easy to use

Zend Studio 13.0.1
Powerful PHP integrated development environment

Dreamweaver CS6
Visual web development tools

SublimeText3 Mac version
God-level code editing software (SublimeText3)
Hot Topics


 The difference between nodejs and tomcat
Apr 21, 2024 am 04:16 AM
The difference between nodejs and tomcat
Apr 21, 2024 am 04:16 AM
The main differences between Node.js and Tomcat are: Runtime: Node.js is based on JavaScript runtime, while Tomcat is a Java Servlet container. I/O model: Node.js uses an asynchronous non-blocking model, while Tomcat is synchronous blocking. Concurrency handling: Node.js handles concurrency through an event loop, while Tomcat uses a thread pool. Application scenarios: Node.js is suitable for real-time, data-intensive and high-concurrency applications, and Tomcat is suitable for traditional Java web applications.
 The difference between nodejs and vuejs
Apr 21, 2024 am 04:17 AM
The difference between nodejs and vuejs
Apr 21, 2024 am 04:17 AM
Node.js is a server-side JavaScript runtime, while Vue.js is a client-side JavaScript framework for creating interactive user interfaces. Node.js is used for server-side development, such as back-end service API development and data processing, while Vue.js is used for client-side development, such as single-page applications and responsive user interfaces.
 Is nodejs a backend framework?
Apr 21, 2024 am 05:09 AM
Is nodejs a backend framework?
Apr 21, 2024 am 05:09 AM
Node.js can be used as a backend framework as it offers features such as high performance, scalability, cross-platform support, rich ecosystem, and ease of development.
 What is the difference between npm and npm.cmd files in the nodejs installation directory?
Apr 21, 2024 am 05:18 AM
What is the difference between npm and npm.cmd files in the nodejs installation directory?
Apr 21, 2024 am 05:18 AM
There are two npm-related files in the Node.js installation directory: npm and npm.cmd. The differences are as follows: different extensions: npm is an executable file, and npm.cmd is a command window shortcut. Windows users: npm.cmd can be used from the command prompt, npm can only be run from the command line. Compatibility: npm.cmd is specific to Windows systems, npm is available cross-platform. Usage recommendations: Windows users use npm.cmd, other operating systems use npm.
 Is nodejs a back-end development language?
Apr 21, 2024 am 05:09 AM
Is nodejs a back-end development language?
Apr 21, 2024 am 05:09 AM
Yes, Node.js is a backend development language. It is used for back-end development, including handling server-side business logic, managing database connections, and providing APIs.
 What are the global variables in nodejs
Apr 21, 2024 am 04:54 AM
What are the global variables in nodejs
Apr 21, 2024 am 04:54 AM
The following global variables exist in Node.js: Global object: global Core module: process, console, require Runtime environment variables: __dirname, __filename, __line, __column Constants: undefined, null, NaN, Infinity, -Infinity
 How to connect nodejs to mysql database
Apr 21, 2024 am 06:13 AM
How to connect nodejs to mysql database
Apr 21, 2024 am 06:13 AM
To connect to a MySQL database, you need to follow these steps: Install the mysql2 driver. Use mysql2.createConnection() to create a connection object that contains the host address, port, username, password, and database name. Use connection.query() to perform queries. Finally use connection.end() to end the connection.
 Is there a big difference between nodejs and java?
Apr 21, 2024 am 06:12 AM
Is there a big difference between nodejs and java?
Apr 21, 2024 am 06:12 AM
The main differences between Node.js and Java are design and features: Event-driven vs. thread-driven: Node.js is event-driven and Java is thread-driven. Single-threaded vs. multi-threaded: Node.js uses a single-threaded event loop, and Java uses a multi-threaded architecture. Runtime environment: Node.js runs on the V8 JavaScript engine, while Java runs on the JVM. Syntax: Node.js uses JavaScript syntax, while Java uses Java syntax. Purpose: Node.js is suitable for I/O-intensive tasks, while Java is suitable for large enterprise applications.
