

Jump-start WordPress development with Twig: Blocks and Nesting

In my previous article, I covered integrating the Twig template engine with WordPress via Timber and how developers can send data from PHP files to Twig files. Let’s discuss how to create a basic template using Twig, the advantages of this DRY technique, and the Timber-Twig WordPress Cheatsheet.
Creating a basic template in Twig
Twig follows the DRY (Don’t Repeat Yourself) principle. One of the most important features of Twig is basic templates with nesting and multiple inheritance. While most people use PHP includes in a linear fashion, you can create unlimited levels of nested blocks to specifically control your page templates.
Think of your base template as a parent template with multiple blocks within it. A child template can extend the parent template and modify any block or blocks within it without rewriting the code, which is similar in both templates.
Let's look at an example parent or base template, the base.twig file. You can place it in the views folder along with other Twig templates. You can call this file in any Twig template and use it as the parent template for that specific Twig file. Type the following lines of code to create the views folder. This basic template will provide the basic structure for your WordPress theme. This is the code for a simple base.twig file.
{# Base Template: base.twig #}

{% block html_head_container %}

    {% include 'header.twig' %}

{% endblock %}

	<body class="{{body_class}}">

		<div class="wrapper">

			{% block content %}

			    <!-- Add your main content here. -->
			    <p>SORRY! No content found!</p>

			{% endblock %}

		</div>
		<!-- /.wrapper -->

	{% include "footer.twig" %}

	</body>

</html>
Comments in Twig: {# Base template: base.twig #}
You can write comments in Twig using the {# comment here #} syntax. To comment out some lines in a template, use the comment syntax {# ... #}. This is useful for debugging or adding information to other template designers or yourself. You can find the comment on line 1.
Block: {% block html_head_container %} {% endblock %}
The whole idea of Twig and Timber revolves around the modular coding approach in WordPress. I've been writing back and forth about the idea of handling data in Twig in the form of components or blocks.
blocks are used for inheritance and act as both placeholders and replacements. They are documented in detail in the documentation for extension tags.
{% block add_block_name_here %} Block content here { % endblock % }
In the code written above, you can find a block named html_head_container, which spans lines 3 to 7. Any template that extends this base.twig base template can inherit the same block of content or modify it to add additional content. There is another block called content {% block content %} that spans lines 13 to 18.
Similarly, the concept of creating blocks has been further extended and you can also create unlimited levels of nested blocks. This is the true DRY principle.
Include statements: {% include "header.twig" %}
Twig templates can contain other Twig templates, just like we do in PHP. This base.twig file will be a universal wrapper that is incomplete without its Header and Footer files. Therefore, the syntax {% include "file.twig" %} will help us include two different Twig templates:
- Header template
{ % include "header.twig" %}Line 5. - Footer template (
{% include "footer.twig" %}Line 23.
Extended basic template
We created a base.twig file as the parent template and left the content block empty. This block can be used in any custom Twig file that modifies it, and the rest of the base template will be inherited as-is. For example, let's create a single.twig file that will extend the base.twig template and modify the content block.
{# Single Template: `single.twig` #}

{% extends "base.twig" %}

{% block content %}

    <div class="single_content">
        <h1 id="post-title">{{ post.title }}</h1>
        <p>{{ post.get_content }}</p>
    </div>

{% endblock %}
This code displays a custom single.twig file. On line 3, the template expands to base.twig as its parent or base template. The extends tag can be used to extend a template from another template.
Here, all details related to header and footer are inherited from the base.twig file, which is the parent template, and The content block will be replaced with the post title and content. How fun is this?
Wood’s WordPress Cheat Sheet
The developers of Timber have ensured that it complements WordPress in every possible way, from core to end-user. Although the conversion syntax for WordPress functions in Timber is somewhat different, it is well documented. At the end of this article, I will share a list of some transformations of WordPress functions and their Timber equivalents. Let's review.
简要回顾!
在我的上一篇文章中,我创建了一条欢迎消息,该消息仅通过演示网站主页上的 PHP 字符串填充。其代码可以在 GitHub 上的分支中找到。让我们再次重复此过程,但使用不同且更具技术性的方法。
现在,我将显示相同的欢迎消息,但这次是通过创建一个填充在主页上的新页面。
检索 Twig 中的 WordPress 函数
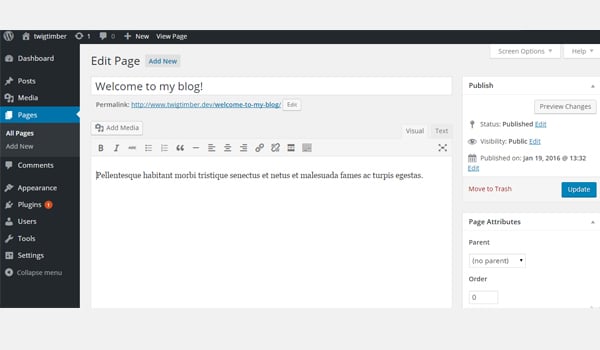
创建一个标题为“欢迎来到我的博客!”的新页面。并在点击发布按钮之前在其中添加一些内容。
现在让我们在主页上显示这个欢迎页面的内容。为此,请再次转到 index.php 文件并添加以下代码行。
<?php
/**
 * Homepage
 */

// Context array.
$context = array();

// Add the page ID which is 4 in my case.
$context[ 'welcome_page' ] = Timber::get_post( 4 );

// Timber render().
Timber::render( 'welcome.twig', $context );
在这里,我添加了一个 $context 数组,在其中添加了一个元素 welcome_page 然后使用 get_post() 函数来获取我刚刚创建的页面。为此,我提交了页面 ID,在本例中为 4。
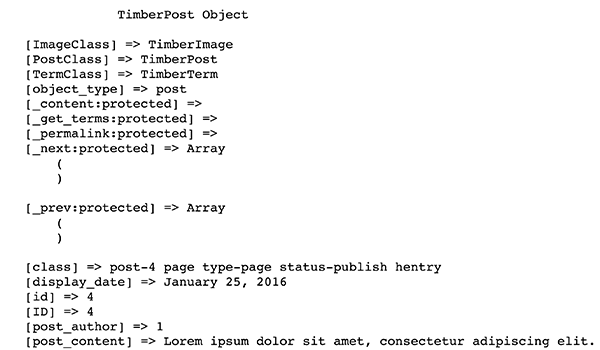
在 welcome.twig 文件中,让我们查看 print_r 元素 welcome_page 并看看我们得到了什么数据。我的welcome.twig 文件目前看起来像这样。
{# Message Template: `welcome.twig` #}
<section class="message">
        <pre class="brush:php;toolbar:false">
            <code>{{ welcome_page | print_r }}</code>
我可以确认 $context 数组中的这个元素现在有一个 ID 为 4 的特定页面的 TimberPost 对象。
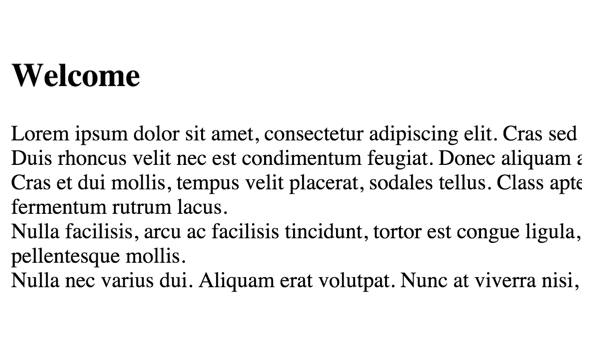
从这里我们可以获得所有可以在前端显示的属性。例如,我只想显示页面标题和内容。所以现在我的 welcome.twig 文件如下所示:
{# Message Template: `welcome.twig` #}
<section class="message">
        <h2 id="welcome-page-title">{{ welcome_page.title }}</h2>
        <p>{{ welcome_page.content }}</p>
</section>
主页上有我们需要的信息。
WordPress 备忘单
正如我之前所说,Timber 为您提供了一些 WordPress 函数的便捷转换。这些功能可以帮助您获取与以下内容相关的信息:
- 博客
- 身体课程
- 页眉/页脚
get_context() 函数
有一个 Timber::get_context() 函数,用于检索开发人员希望在整个网站的前端显示的网站信息负载。文档是这样解释的:
这将返回一个对象,其中包含我们在整个站点中需要的许多常见内容。像你的 nav、wp_head 和 wp_footer 这样的东西你每次都会想要开始(即使你稍后覆盖它们)。您可以执行$context = Timber::get_context(); print_r( $context );查看内部内容或打开 timber.php 自行检查。
<?php $context = Timber::get_context(); ?>
不仅如此,您还可以通过方便的过滤器将您自己的自定义数据添加到此函数中。
<?php

/**
 * Custom Context
 *
 * Context data for Timber::get_context() function.
 *
 * @since 1.0.0
 */
function add_to_context( $data ) {
    $data['foo'] = 'bar';
	$data['stuff'] = 'I am a value set in your functions.php file';
	$data['notes'] = 'These values are available everytime you call Timber::get_context();';
	$data['menu'] = new TimberMenu();
	return $data;
}
add_filter( 'timber_context', 'add_to_context' );
您可以在下面找到更多与此类似的转换,这些转换可以与 Timber 一起使用。
博客信息
-
blog_info('charset')=>{{ site.charset }} -
blog_info('描述')=>{{ site.description }} -
blog_info('站点名称')=>{{ site.name }} -
blog_info('url')=>{{ site.url }}
身体等级
-
implode(' ', get_body_class())=><body class="{{ body_class }}">
主题
-
get_template_directory_uri()=>{{ theme.link }}(用于父主题) -
get_template_directory_uri()=>{{ theme.parent.link }}(用于子主题) -
get_stylesheet_directory_uri()=>{{ theme.link }} -
get_template_directory()=>{{ theme.parent.path }} -
get_stylesheet_directory()=>{{ theme.path }}
wp_函数
-
wp_head()=>{{ wp_head }} -
wp_footer()=>{{ wp_footer }}
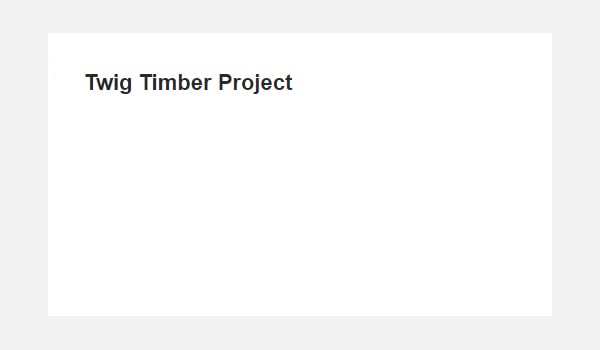
让我们从博客信息开始尝试一些功能。将 foo 写入 {{ site.name }}。
前端将显示这样的站点标题:
Timber 还具有一些函数转换,可以通过 TimberPost( )。在解释这个函数的用法之前,我们先列出与其相关的函数转换。
发布
-
the_content()=>{{ post.content }} -
the_permalink()=>{{ post.permalink }} -
the_title()=>{{ post.title }} -
get_the_tags()=>{{ post.tags }}
用法
在 single.php 文件中使用此代码。
<?php
$context = Timber::get_context();
$context[ 'post' ] = new TimberPost();
Timber::render( 'welcome.twig', $context );
?>
现在让我们测试 Twig 文件中的 {{ post.title }} 函数。
<section class="single_post">
        <h2 id="post-title">{{ post.title }}</h2>
</section>
保存,前端会显示这样的帖子标题:
轮到你了!
今天,您在构建 WordPress 主题时见证了 Timber 和 Twig 的 DRY 原则的实际实施。阅读本教程并尝试实现它,如果您有任何问题,请告诉我。您可以在此 GitHub 存储库的 WP Cheatsheet 分支中找到完整的代码。
在下一篇也是上一篇文章中,我将讨论如何在基于 Twig 的 WordPress 模板中处理图像和菜单。在此之前,请在 Twitter 上与我联系以获取您问题的答案,或在此处发布问题。
The above is the detailed content of Jump-start WordPress development with Twig: Blocks and Nesting. For more information, please follow other related articles on the PHP Chinese website!

Hot AI Tools

Undresser.AI Undress
AI-powered app for creating realistic nude photos

AI Clothes Remover
Online AI tool for removing clothes from photos.

Undress AI Tool
Undress images for free

Clothoff.io
AI clothes remover

AI Hentai Generator
Generate AI Hentai for free.

Hot Article
Hot Tools

Notepad++7.3.1
Easy-to-use and free code editor

SublimeText3 Chinese version
Chinese version, very easy to use

Zend Studio 13.0.1
Powerful PHP integrated development environment

Dreamweaver CS6
Visual web development tools

SublimeText3 Mac version
God-level code editing software (SublimeText3)
Hot Topics
 1378
1378
 52
52

 Can generic functions in Go be nested within each other?
Apr 16, 2024 pm 12:09 PM
Can generic functions in Go be nested within each other?
Apr 16, 2024 pm 12:09 PM
Nested Generic Functions Generic functions in Go 1.18 allow the creation of functions that apply to multiple types, and nested generic functions can create reusable code hierarchies: Generic functions can be nested within each other, creating a nested code reuse structure. By composing filters and mapping functions into a pipeline, you can create reusable type-safe pipelines. Nested generic functions provide a powerful tool for creating reusable, type-safe code, making your code more efficient and maintainable.
 How to use Twig with CakePHP?
Jun 05, 2023 pm 07:51 PM
How to use Twig with CakePHP?
Jun 05, 2023 pm 07:51 PM
Using Twig in CakePHP is a way to separate templates and views, making the code more modular and maintainable. This article will introduce how to use Twig in CakePHP. 1. Install Twig. First install the Twig library in the project. You can use Composer to complete this task. Run the following command in the console: composerrequire "twig/twig:^2.0" This command will be displayed in the project's vendor
 How to use Vue form processing to implement recursive nesting of forms
Aug 11, 2023 pm 04:57 PM
How to use Vue form processing to implement recursive nesting of forms
Aug 11, 2023 pm 04:57 PM
How to use Vue form processing to implement recursive nesting of forms Introduction: As the complexity of front-end data processing and form processing continues to increase, we need a flexible way to handle complex forms. As a popular JavaScript framework, Vue provides us with many powerful tools and features to handle recursive nesting of forms. This article will introduce how to use Vue to handle such complex forms, and attach code examples. 1. Recursive nesting of forms In some scenarios, we may need to deal with recursive nesting.
 How to use the Twig template engine in PHP for web development
Jun 25, 2023 pm 04:03 PM
How to use the Twig template engine in PHP for web development
Jun 25, 2023 pm 04:03 PM
With the continuous development of Web development technology, more and more developers are beginning to look for more flexible and efficient template engines to develop Web applications. Among them, Twig is a very excellent and popular PHP template engine. It is developed based on the Symfony framework and supports unlimited expansion. It is very suitable for building complex web applications. This article will introduce how to use the Twig template engine for web development in PHP. 1. Introduction to Twig template engine Twig is developed by FabienPoten
 Template library in PHP8.0: Twig
May 14, 2023 am 08:40 AM
Template library in PHP8.0: Twig
May 14, 2023 am 08:40 AM
Template library in PHP8.0: TwigTwig is a template library currently widely used in PHP Web applications. It has the characteristics of high readability, easy use and strong scalability. Twig uses simple and easy-to-understand syntax, which can help web developers organize and output HTML, XML, JSON and other text formats in a clear and orderly manner. This article will introduce you to the basic syntax and features of Twig and its use in PHP8.0. The basic syntax of Twig is similar to P
 Jump-start WordPress development with Twig and Timber images, menus, and users
Sep 04, 2023 pm 03:37 PM
Jump-start WordPress development with Twig and Timber images, menus, and users
Sep 04, 2023 pm 03:37 PM
So far, you have learned the basic concepts of using Twig with Timber while building a modular WordPress theme. We also studied block nesting and multiple inheritance using Twig based on the DRY principle. Today we will explore how to use Twig with the Timber plugin to display attachment images, WordPress menus, and users in your theme. Images in wood Images are one of the important elements of any WordPress theme. In normal WordPress coding practice, images are integrated with PHP within normal HTML image tags. However, Timber provides a fairly comprehensive approach to handling img (image) tags that is modular and clean.
 How to create nested tables in HTML?
Sep 09, 2023 pm 10:05 PM
How to create nested tables in HTML?
Sep 09, 2023 pm 10:05 PM
Tables are a fundamental and crucial aspect of web development and are used to present information in an orderly and clear format. However, there may be situations where more complex data needs to be presented, requiring the use of nested tables. Nested tables are tables located within other table cells. In this article, we'll walk you through the process of building nested tables in HTML, with meticulously detailed explanations complete with illustrations to help you understand the concepts more effectively. Whether you are a newbie or an experienced web designer, this article will provide you with the knowledge and expertise you need to become proficient in creating nested tables using HTML. Before we start exploring making nested tables, it's necessary to understand the basic makeup of HTML tables. HTML tables are implemented through the <table> element.
 How to implement nested exception handling in C++?
Jun 05, 2024 pm 09:15 PM
How to implement nested exception handling in C++?
Jun 05, 2024 pm 09:15 PM
Nested exception handling is implemented in C++ through nested try-catch blocks, allowing new exceptions to be raised within the exception handler. The nested try-catch steps are as follows: 1. The outer try-catch block handles all exceptions, including those thrown by the inner exception handler. 2. The inner try-catch block handles specific types of exceptions, and if an out-of-scope exception occurs, control is given to the external exception handler.
