Token-based authentication with Angular and Node
Authentication is one of the most important parts of any web application. This tutorial discusses token-based authentication systems and how they differ from traditional login systems. By the end of this tutorial, you will see a fully working demo written in Angular and Node.js.
Traditional Authentication System
Before moving on to token-based authentication systems, let’s take a look at traditional authentication systems.
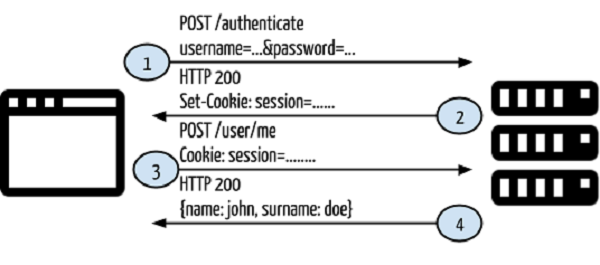
- The user provides username and password in the login form, and then clicks Login.
- After making the request, authenticate the user on the backend by querying the database. If the request is valid, a session is created using the user information obtained from the database, and the session information is returned in the response header so that the session ID is stored in the browser.
- Provides session information for accessing restricted endpoints in the application.
- If the session information is valid, have the user access the specified endpoint and respond with rendered HTML content.
So far, so good. The web application works fine and is able to authenticate users so they can access restricted endpoints. But what happens when you want to develop another client for your application (such as an Android client)? Are you able to authenticate mobile clients and serve restricted content using your current application? As it stands, no. There are two main reasons for this:
- Sessions and cookies have no meaning for mobile applications. You cannot share sessions or cookies created on the server side with mobile clients.
- In the current application, return the rendered HTML. In mobile clients, you need to include something like JSON or XML as the response.
In this case you need a client independent application.
Token-based authentication
In token-based authentication, cookies and sessions are not used. The token will be used to authenticate the user for every request made to the server. Let's redesign the first scenario using token-based authentication.
It will use the following control flow:
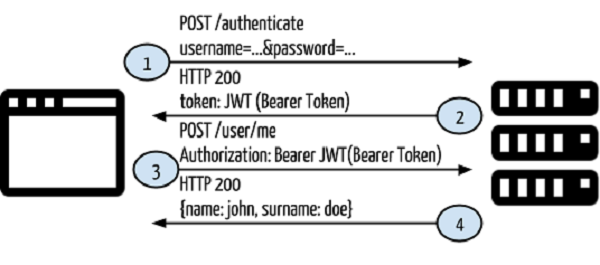
- The user provides username and password in the login form, and then clicks Login.
- After making the request, authenticate the user on the backend by querying the database. If the request is valid, a token is created using the user information obtained from the database and then returned in the response header so that we can store the token browser in local storage.
- Provide token information in each request header to access restricted endpoints in your application.
- If the token obtained from the request header information is valid, let the user access the specified endpoint and respond with JSON or XML.
In this case, we are not returning a session or cookie, nor are we returning any HTML content. This means we can use this architecture for any client-specific application. You can see the schema below:
So what is this JWT?
JWT
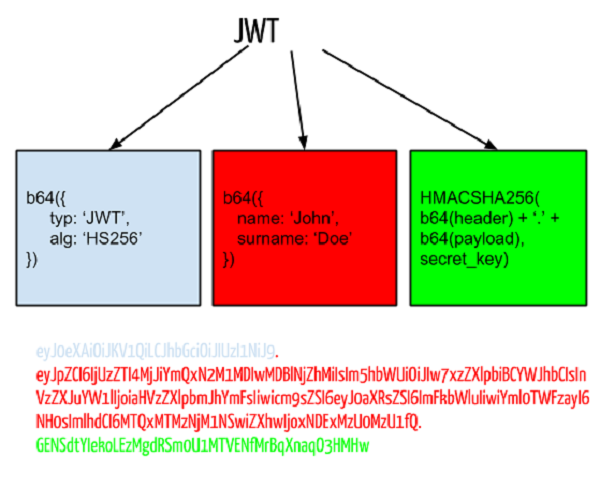
JWT stands for JSON Web Token and is the token format used in the authorization header. This token helps you design communication between the two systems in a secure manner. For the purposes of this tutorial, we will reformulate JWT as "Bearer Token". A bearer token consists of three parts: header, payload, and signature.
- Header is the part of the token that holds the token type and encryption method, and is also encrypted using Base-64.
- Payload Contains information. You can enter any type of data such as user information, product information, etc., all of which are stored using Base-64 encryption.
- Signature consists of a combination of header, payload, and key. The key must be kept securely on the server side.
You can see the JWT schema and sample token below:
You don't need to implement a bearer token generator, as you can find established packages for many languages. You can see some of them below:
| Node.js | https://github.com/auth0/node-jsonwebtoken |
| PHP | http://github.com/firebase/php-jwt |
| Java | http://github.com/auth0/java-jwt |
| 红宝石 | https://github.com/jwt/ruby-jwt |
| .NET | https://github.com/auth0/java-jwt |
| Python | http://github.com/progrium/pyjwt/ |
A practical example
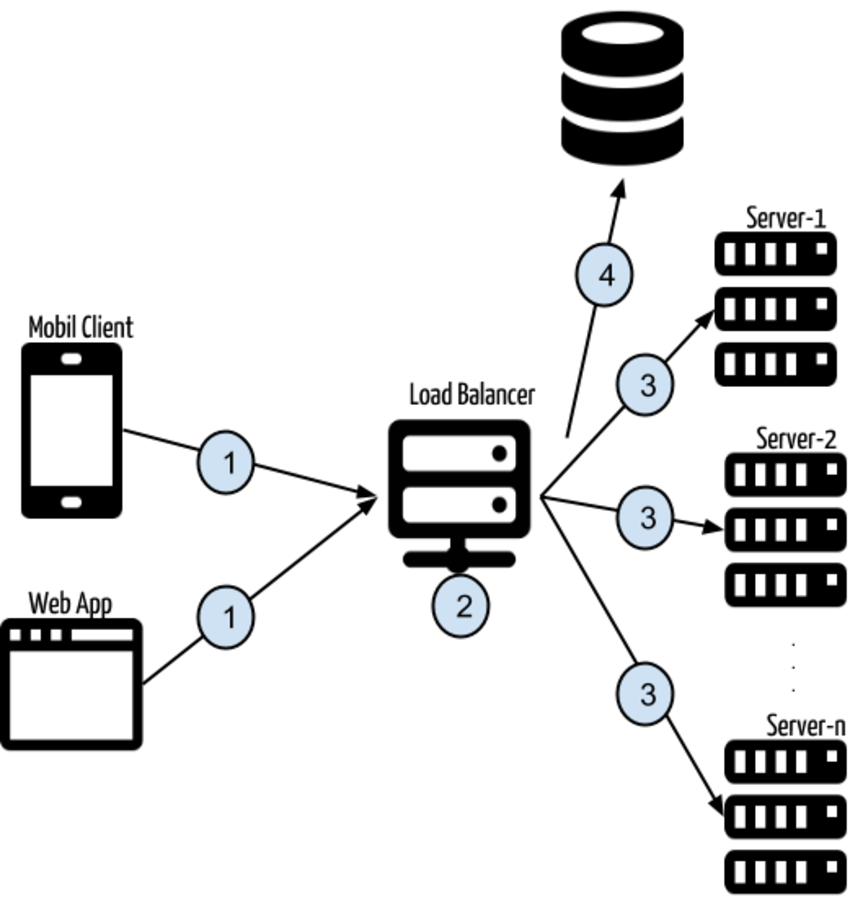
Having covered some basic information about token-based authentication, we can now move on to a practical example. Take a look at the architecture below, then we'll analyze it in more detail:
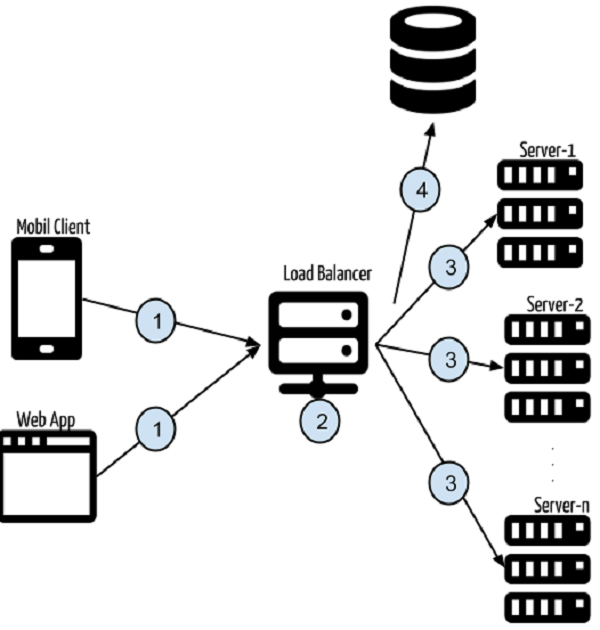
- Multiple clients (such as web applications or mobile clients) make requests to the API for a specific purpose.
- Requests are made to services such as
https://api.yourexampleapp.com. If many people use the application, multiple servers may be needed to serve the requested operations. - Here, the load balancer is used to balance the requests to best suit the backend application servers. When you make a request to
https://api.yourexampleapp.com, the load balancer first handles the request and then redirects the client to a specific server. - There is an application, and the application is deployed to multiple servers (server-1, server-2, ..., server-n). Whenever a request is made to
https://api.yourexampleapp.com, the backend application intercepts the request headers and extracts the token information from the Authorization header. This token will be used for database queries. If this token is valid and has the required permissions to access the requested endpoint, it will continue. If not, it will return a 403 response code (indicating forbidden status).
advantage
Token-based authentication has several advantages that solve serious problems. Here are some of them:
Client-independent service
In token-based authentication, the token is transmitted through the request header, rather than persisting the authentication information in the session or cookie. This means there is no state. You can send requests to the server from any type of client that can make HTTP requests.
Content Delivery Network (CDN)
In most current web applications, the view is rendered on the backend and the HTML content is returned to the browser. Front-end logic depends on back-end code.
There is no need to establish such a dependency. This raises several questions. For example, if you're working with a design agency that implements front-end HTML, CSS, and JavaScript, you'll need to migrate that front-end code into back-end code so that some rendering or filling operations can occur. After a while, the HTML content you render will be very different from what the code agency implemented.
In token-based authentication, you can develop your front-end project separately from your back-end code. Your backend code will return a JSON response instead of rendered HTML, and you can put a minified, gzipped version of your frontend code into a CDN. When you visit a web page, the HTML content will be served from the CDN and the page content will be populated by the API service using the token in the Authorization header.
Cookieless session (or no CSRF)
CSRF is a major problem in modern network security because it does not check whether the source of the request is trustworthy. To solve this problem, use a token pool to send this token on every form post. In token-based authentication, the token is used in the authorization header, and CSRF does not contain this information.
Persistent Token Storage
When a session read, write, or delete operation occurs in an application, it performs file operations in the operating system's temp folder, at least for the first time. Let's say you have multiple servers and you create a session on the first server. When you make another request and your request falls to another server, the session information will not be there and you will get an "Unauthorized" response. I know, you can solve this problem with sticky sessions. However, in token-based authentication, this situation is solved naturally. There is no sticky session issue as the request token is intercepted on every request on any server.
These are the most common advantages of token-based authentication and communication. This concludes the theoretical and architectural discussion of token-based authentication. It's time to look at a practical example.
Sample Application
You will see two applications that demonstrate token-based authentication:
- Token-based authentication backend
- Token-based authentication frontend
In the back-end project, there will be service implementation, and the service result will be in JSON format. There is no view returned from the service. In the front-end project, there will be an Angular project for the front-end HTML and then the front-end application will be populated by the Angular service to make requests to the back-end service.
Token-based authentication backend
In the back-end project, there are three main files:
- package.json is used for dependency management.
- models/User.js Contains a user model for database operations on users.
- server.js Used for project guidance and request processing.
That's it! This project is very simple so you can easily understand the main concepts without having to delve too deep into it.
{
    "name": "angular-restful-auth",
    "version": "0.0.1",
    "dependencies": {
        "body-parser": "^1.20.2",
        "express": "4.x",
        "express-jwt": "8.4.1",
        "jsonwebtoken": "9.0.0",
        "mongoose": "7.3.1",
        "morgan": "latest"
    },
    "engines": {
        "node": ">=0.10.0"
    }
}
package.json Contains the project's dependencies: express for MVC, body-parser for mocking the post Node. Request handling in js, morgan for request logging, mongoose for our ORM framework to connect to MongoDB, and jsonwebtoken is used to create a JWT token using our user model. There is also a property called engines which indicates that the project was made using Node.js version >= 0.10.0. This is useful for PaaS services like Heroku. We will also discuss this topic in another section.
const mongoose = require('mongoose');
const Schema = mongoose.Schema;

const UserSchema = new Schema({
  email: String,
  password: String,
  token: String
});

module.exports = mongoose.model('User', UserSchema);
We said we would use the user model payload to generate the token. This model helps us perform user operations on MongoDB. In User.js, the user pattern is defined and the user model is created using the mongoose model. The model is ready for database operations.
Our dependencies have been defined, our user model has been defined, so now let's put it all together to build a service that handles specific requests.
// Required Modules
const express    = require("express");
const morgan     = require("morgan");
const bodyParser = require("body-parser");
const jwt        = require("jsonwebtoken");
const mongoose   = require("mongoose");
const app        = express();
In Node.js, you can use require to include modules in your project. First, we need to import the necessary modules into the project:
const port = process.env.PORT || 3001;
const User     = require('./models/User');

// Connect to DB
mongoose.connect(process.env.MONGO_URL);
Our service will be provided through a specific port. You can use it if any port variable is defined in the system environment variables or we have port 3001 defined. After that, the User model is included and a database connection is established for some user operations. Don’t forget to define an environment variable MONGO_URL for the database connection URL.
app.use(bodyParser.urlencoded({ extended: true }));
app.use(bodyParser.json());
app.use(morgan("dev"));
app.use(function(req, res, next) {
    res.setHeader('Access-Control-Allow-Origin', '*');
    res.setHeader('Access-Control-Allow-Methods', 'GET, POST');
    res.setHeader('Access-Control-Allow-Headers', 'X-Requested-With,content-type, Authorization');
    next();
});
In the above section, we used Express to make some configurations to simulate HTTP request processing in Node. We allow requests from different domains in order to develop a client-independent system. If you don't allow this, you will trigger CORS (Cross-Origin Request Sharing) errors in your web browser.
-
Access-Control-Allow-Origin允许所有域。 - 您可以向此服务发送
POST和GET请求。 -
X-Requested-With和content-type标头是允许的。
app.post('/authenticate', async function(req, res) {
    try {
      const user = await User.findOne({ email: req.body.email, password: req.body.password }).exec();
      if (user) {
        res.json({
          type: true,
          data: user,
          token: user.token
        });
      } else {
        res.json({
          type: false,
          data: "Incorrect email/password"
        });
      }
    } catch (err) {
      res.json({
        type: false,
        data: "Error occurred: " + err
      });
    }
  });
我们已经导入了所有必需的模块并定义了我们的配置,所以现在是时候定义请求处理程序了。在上面的代码中,每当你使用用户名和密码向 /authenticate 发出 POST 请求时,你都会得到一个 JWT 令牌。首先,使用用户名和密码处理数据库查询。如果用户存在,则用户数据将与其令牌一起返回。但是如果没有与用户名和/或密码匹配的用户怎么办?
 app.post('/signin', async function(req, res) {
    try {
      const existingUser = await User.findOne({ email: req.body.email }).exec();
      if (existingUser) {
        res.json({
          type: false,
          data: "User already exists!"
        });
      } else {
        const userModel = new User();
        userModel.email = req.body.email;
        userModel.password = req.body.password;
        const savedUser = await userModel.save();
        savedUser.token = jwt.sign(savedUser.toObject(), process.env.JWT_SECRET);
        const updatedUser = await savedUser.save();
        res.json({
          type: true,
          data: updatedUser,
          token: updatedUser.token
        });
      }
    } catch (err) {
      res.json({
        type: false,
        data: "Error occurred: " + err
      });
    }
  });
当您使用用户名和密码向 /signin 发出 POST 请求时,将使用发布的用户信息创建一个新用户。在 14th 行,您可以看到使用 jsonwebtoken 模块生成了一个新的 JSON 令牌,该令牌已分配给 jwt 变量。认证部分没问题。如果我们尝试访问受限端点怎么办?我们如何设法访问该端点?
app.get('/me', ensureAuthorized, async function(req, res) {
    try {
      const user = await User.findOne({ token: req.token }).exec();
      res.json({
        type: true,
        data: user
      });
    } catch (err) {
      res.json({
        type: false,
        data: "Error occurred: " + err
      });
    }
  });
当您向 /me 发出 GET 请求时,您将获得当前用户信息,但为了继续请求的端点,确保Authorized函数将被执行。
function ensureAuthorized(req, res, next) {
    var bearerToken;
    var bearerHeader = req.headers["authorization"];
    if (typeof bearerHeader !== 'undefined') {
        var bearer = bearerHeader.split(" ");
        bearerToken = bearer[1];
        req.token = bearerToken;
        next();
    } else {
        res.send(403);
    }
}
在该函数中,拦截请求头,并提取authorization头。如果此标头中存在承载令牌,则该令牌将分配给 req.token 以便在整个请求中使用,并且可以使用 next( )。如果令牌不存在,您将收到 403(禁止)响应。让我们回到处理程序 /me,并使用 req.token 使用此令牌获取用户数据。每当您创建新用户时,都会生成一个令牌并将其保存在数据库的用户模型中。这些令牌是独一无二的。
对于这个简单的项目,我们只有三个处理程序。之后,您将看到:
process.on('uncaughtException', function(err) {
    console.log(err);
});
如果发生错误,Node.js 应用程序可能会崩溃。使用上面的代码,可以防止崩溃,并在控制台中打印错误日志。最后,我们可以使用以下代码片段启动服务器。
// Start Server
app.listen(port, function () {
    console.log( "Express server listening on port " + port);
});
总结一下:
- 模块已导入。
- 配置已完成。
- 已定义请求处理程序。
- 定义中间件是为了拦截受限端点。
- 服务器已启动。
我们已经完成了后端服务。为了让多个客户端可以使用它,您可以将这个简单的服务器应用程序部署到您的服务器上,或者也可以部署在 Heroku 中。项目根文件夹中有一个名为 Procfile 的文件。让我们在 Heroku 中部署我们的服务。
Heroku 部署
您可以从此 GitHub 存储库克隆后端项目。
我不会讨论如何在 Heroku 中创建应用程序;如果您之前没有创建过 Heroku 应用程序,可以参考这篇文章来创建 Heroku 应用程序。创建 Heroku 应用程序后,您可以使用以下命令将目标添加到当前项目:
git remote add heroku <your_heroku_git_url>
现在您已经克隆了一个项目并添加了一个目标。在 git add 和 git commit 之后,您可以通过执行 git push heroku master 将代码推送到 Heroku。当您成功推送项目时,Heroku 将执行 npm install 命令将依赖项下载到 Heroku 上的 temp 文件夹中。之后,它将启动您的应用程序,您可以使用 HTTP 协议访问您的服务。
基于令牌的-auth-frontend
在前端项目中,您将看到一个 Angular 项目。在这里,我只提及前端项目中的主要部分,因为 Angular 不是一个教程可以涵盖的内容。
您可以从此 GitHub 存储库克隆该项目。在此项目中,您将看到以下文件夹结构:
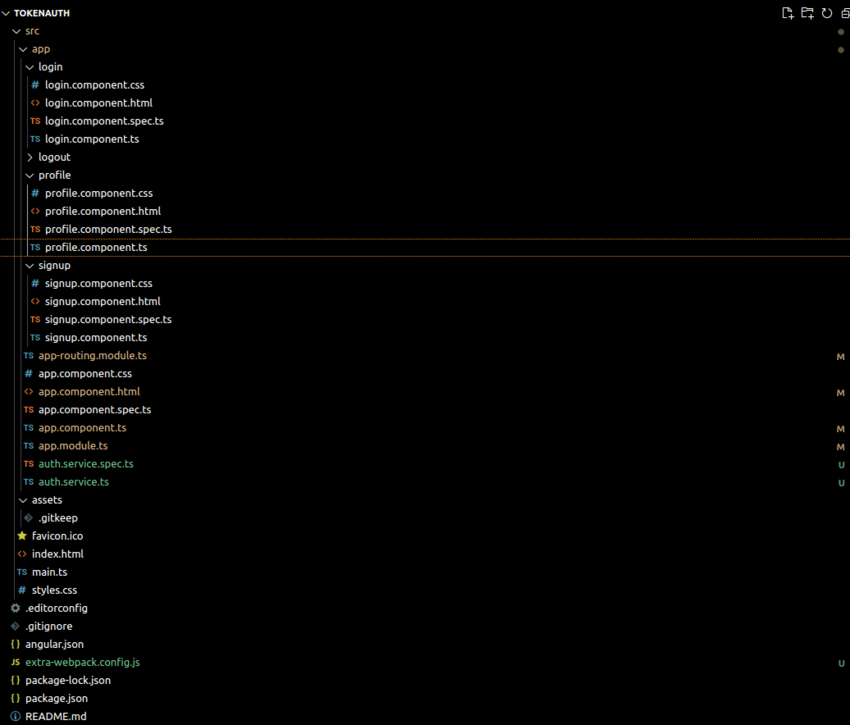
我们拥有三个组件——注册、配置文件和登录——以及一个身份验证服务。
您的app.component.html 如下所示:
<!doctype html>
<html lang="en">
  <head>
    <meta charset="utf-8">
    <meta name="viewport" content="width=device-width, initial-scale=1">
    <title>Bootstrap demo</title>
    <link href="https://cdn.jsdelivr.net/npm/bootstrap@5.3.0/dist/css/bootstrap.min.css" rel="stylesheet" integrity="sha384-9ndCyUaIbzAi2FUVXJi0CjmCapSmO7SnpJef0486qhLnuZ2cdeRhO02iuK6FUUVM" crossorigin="anonymous">
  </head>
  <body>
    <nav class="navbar navbar-expand-lg bg-body-tertiary">
        <div class="container-fluid">
          <a class="navbar-brand" href="#">Home</a>
          <button class="navbar-toggler" type="button" data-bs-toggle="collapse" data-bs-target="#navbarNav" aria-controls="navbarNav" aria-expanded="false" aria-label="Toggle navigation">
            <span class="navbar-toggler-icon"></span>
          </button>
          <div class="collapse navbar-collapse" id="navbarNav">
            <ul class="navbar-nav">

              <li class="nav-item"><a class="nav-link" routerLink="/profile">Me</a></li>
              <li class="nav-item"><a class="nav-link" routerLink="/login">Signin</a></li>
              <li class="nav-item"><a class="nav-link" routerLink="/signup">Signup</a></li>
              <li class="nav-item"><a class="nav-link" (click)="logout()">Logout</a></li>
            </ul>
          </div>
        </div>
      </nav>

    <div class="container">
        <router-outlet></router-outlet>
    </div>

  </body>
</html>
在主组件文件中,<router-outlet></router-outlet> 定义各个组件的路由。
在 auth.service.ts 文件中,我们定义 AuthService 类,该类通过 API 调用来处理身份验证,以登录、验证 Node.js 应用程序的 API 端点。
import { Injectable } from '@angular/core';
import { HttpClient,HttpHeaders } from '@angular/common/http';
import { Observable } from 'rxjs';
import { tap } from 'rxjs/operators';

@Injectable({
  providedIn: 'root'
})
export class AuthService {
  private apiUrl = 'your_node_app_url';
  public token: string ='';


  constructor(private http: HttpClient) {

  }


  signin(username: string, password: string): Observable<any> {
    const data = { username, password };
    return this.http.post(`${this.apiUrl}/signin`, data);
  }


  authenticate(email: string, password: string): Observable<any> {
    const data = { email, password };
    console.log(data)

    return this.http.post(`${this.apiUrl}/authenticate`, data)
      .pipe(
        tap((response:any) => {
          this.token = response.data.token; // Store the received token
          localStorage.setItem('token',this.token)
          console.log(this.token)
        })
      );
  }

  profile(): Observable<any> {
    const headers = this.createHeaders();
    return this.http.get(`${this.apiUrl}/me`,{ headers });
  }


  private createHeaders(): HttpHeaders {
    let headers = new HttpHeaders({
      'Content-Type': 'application/json',
    });

    if (this.token) {
      headers = headers.append('Authorization', `Bearer ${this.token}`);
    }

    return headers;
  }

  logout(): void {

    localStorage.removeItem('token');
  }


}
在 authenticate() 方法中,我们向 API 发送 POST 请求并对用户进行身份验证。从响应中,我们提取令牌并将其存储在服务的 this.token 属性和浏览器的 localStorage 中,然后将响应作为 Observable 返回。
在 profile() 方法中,我们通过在 Authorization 标头中包含令牌来发出 GET 请求以获取用户详细信息。
createHeaders() 方法在发出经过身份验证的 API 请求时创建包含身份验证令牌的 HTTP 标头。当用户拥有有效令牌时,它会添加一个授权标头。该令牌允许后端 API 对用户进行身份验证。
如果身份验证成功,用户令牌将存储在本地存储中以供后续请求使用。该令牌也可供所有组件使用。如果身份验证失败,我们会显示一条错误消息。
不要忘记将服务 URL 放入上面代码中的 baseUrl 中。当您将服务部署到 Heroku 时,您将获得类似 appname.herokuapp.com 的服务 URL。在上面的代码中,您将设置 var baseUrl = "appname.herokuapp.com"。
注销功能从本地存储中删除令牌。
在 signup.component.ts 文件中,我们实现了 signup () 方法,该方法获取用户提交的电子邮件和密码并创建一个新用户。
import { Component } from '@angular/core';
import { AuthService } from '../auth.service';


@Component({
  selector: 'app-signup',
  templateUrl: './signup.component.html',
  styleUrls: ['./signup.component.css']
})
export class SignupComponent {
  password: string = '';
  email: string = '';


  constructor(private authService:AuthService){}

  signup(): void {
    this.authService.signin(this.email, this.password).subscribe(
      (response) => {
        // success response
        console.log('Authentication successful', response);

      },
      (error) => {
        // error response
        console.error('Authentication error', error);
      }
    );
  }
}
import { Component } from '@angular/core';
import { AuthService } from '../auth.service';


@Component({
  selector: 'app-login',
  templateUrl: './login.component.html',
  styleUrls: ['./login.component.css']
})
export class LoginComponent {

  email: string = '';
  password: string = '';

  constructor(private authService: AuthService) {}

  login(): void {
    this.authService.authenticate(this.email, this.password).subscribe(
      (response) => {
        // success response
        console.log('Signin successful', response);

      },
      (error) => {
        // error response
        console.error('Signin error', error);
      }
    );
  }
}
配置文件组件使用用户令牌来获取用户的详细信息。每当您向后端的服务发出请求时,都需要将此令牌放入标头中。 profile.component.ts 如下所示:
import { Component } from '@angular/core';
import { AuthService } from '../auth.service';
@Component({
  selector: 'app-profile',
  templateUrl: './profile.component.html',
  styleUrls: ['./profile.component.css']
})

export class ProfileComponent {
  myDetails: any;

  constructor(private authService: AuthService) { }

  ngOnInit(): void {
    this.getProfileData();
  }
  getProfileData(): void {
    this.authService.me().subscribe(
      (response: any) => {
        this.myDetails = response;
        console.log('User Data:', this.myDetails);
      },
      (error: any) => {
        console.error('Error retrieving profile data');
      }
    );
  }
在上面的代码中,每个请求都会被拦截,并在标头中放入授权标头和值。然后,我们将用户详细信息传递到 profile.component.html 模板。
<h2 id="User-profile">User profile </h2>

<div class="row">
    <div class="col-lg-12">
        <p>{{myDetails.data.id}}</p>
        <p>{{myDetails.data.email}}</p>
    </div>
</div>
最后,我们在 app.routing.module.ts 中定义路由。
import { NgModule } from '@angular/core';
import { RouterModule, Routes } from '@angular/router';
import { LoginComponent } from './login/login.component';
import { ProfileComponent } from './profile/profile.component';
import { SignupComponent } from './signup/signup.component';

const routes: Routes = [
  {path:'signup' , component:SignupComponent},
  {path:'login' , component:LoginComponent},
  { path: 'profile', component: ProfileComponent },
];

@NgModule({
  imports: [RouterModule.forRoot(routes)],
  exports: [RouterModule]
})
export class AppRoutingModule { }
从上面的代码中您可以很容易地理解,当您转到/时,将呈现app.component.html页面。另一个例子:如果您转到/signup,则会呈现signup.component.html。这个渲染操作将在浏览器中完成,而不是在服务器端。
结论
基于令牌的身份验证系统可帮助您在开发独立于客户端的服务时构建身份验证/授权系统。通过使用这项技术,您将只需专注于您的服务(或 API)。
身份验证/授权部分将由基于令牌的身份验证系统作为服务前面的一层进行处理。您可以从任何客户端(例如网络浏览器、Android、iOS 或桌面客户端)访问和使用服务。
The above is the detailed content of Token-based authentication with Angular and Node. For more information, please follow other related articles on the PHP Chinese website!

Hot AI Tools

Undresser.AI Undress
AI-powered app for creating realistic nude photos

AI Clothes Remover
Online AI tool for removing clothes from photos.

Undress AI Tool
Undress images for free

Clothoff.io
AI clothes remover

AI Hentai Generator
Generate AI Hentai for free.

Hot Article

Hot Tools

Notepad++7.3.1
Easy-to-use and free code editor

SublimeText3 Chinese version
Chinese version, very easy to use

Zend Studio 13.0.1
Powerful PHP integrated development environment

Dreamweaver CS6
Visual web development tools

SublimeText3 Mac version
God-level code editing software (SublimeText3)

Hot Topics
 How to implement single sign-on in PHP
Jun 11, 2023 pm 07:01 PM
Single sign-on (SSO) is an authentication mechanism that allows users to authenticate across multiple applications and sites using a single set of credentials, such as a username and password. This mechanism can improve user experience and efficiency while also enhancing security. In PHP, implementing single sign-on requires some specific methods. Below we will introduce how to implement single sign-on in PHP. We will divide it into the following steps: Create a user authentication center (AuthenticationCenter) using OAuth2
 How to install Angular on Ubuntu 24.04
Mar 23, 2024 pm 12:20 PM
Angular.js is a freely accessible JavaScript platform for creating dynamic applications. It allows you to express various aspects of your application quickly and clearly by extending the syntax of HTML as a template language. Angular.js provides a range of tools to help you write, update and test your code. Additionally, it provides many features such as routing and form management. This guide will discuss how to install Angular on Ubuntu24. First, you need to install Node.js. Node.js is a JavaScript running environment based on the ChromeV8 engine that allows you to run JavaScript code on the server side. To be in Ub
 How to disable private browsing authentication in Safari: How-to guide for iOS 17
Sep 11, 2023 pm 06:37 PM
In iOS 17, Apple introduced several new privacy and security features to its mobile operating system, one of which is the ability to require two-step authentication for private browsing tabs in Safari. Here's how it works and how to turn it off. On an iPhone or iPad running iOS 17 or iPadOS 17, if you have any Private Browsing tab open in Safari and then exit the session or app, Apple's browser now requires Face ID/TouchID authentication or a passcode to access again they. In other words, if someone gets their hands on your iPhone or iPad while it's unlocked, they still won't be able to view it without knowing your passcode
 How to use express to handle file upload in node project
Mar 28, 2023 pm 07:28 PM
How to handle file upload? The following article will introduce to you how to use express to handle file uploads in the node project. I hope it will be helpful to you!
 An in-depth analysis of Node's process management tool 'pm2”
Apr 03, 2023 pm 06:02 PM
This article will share with you Node's process management tool "pm2", and talk about why pm2 is needed, how to install and use pm2, I hope it will be helpful to everyone!
 Pi Node Teaching: What is a Pi Node? How to install and set up Pi Node?
Mar 05, 2025 pm 05:57 PM
Detailed explanation and installation guide for PiNetwork nodes This article will introduce the PiNetwork ecosystem in detail - Pi nodes, a key role in the PiNetwork ecosystem, and provide complete steps for installation and configuration. After the launch of the PiNetwork blockchain test network, Pi nodes have become an important part of many pioneers actively participating in the testing, preparing for the upcoming main network release. If you don’t know PiNetwork yet, please refer to what is Picoin? What is the price for listing? Pi usage, mining and security analysis. What is PiNetwork? The PiNetwork project started in 2019 and owns its exclusive cryptocurrency Pi Coin. The project aims to create a one that everyone can participate
 How to reset Apple ID password?
May 21, 2023 pm 05:01 PM
How to reset Apple ID password? If you forgot your AppleID password, don't worry. You can easily reset it using one of the following methods. Using your iPhone or other trusted Apple device is the fastest and easiest way to reset your password, as long as you have the device signed in with your Apple ID. Go to Settings and tap your name. Click Password & Security, then click Change Password. Follow the on-screen instructions to create a new password. Apple You can also use this method on a trusted iPad, iPod touch, or Apple Watch. Use the Apple Support App If you don't have an Apple device but have access to a trusted phone number, you can get a call from a friend or
 Angular components and their display properties: understanding non-block default values
Mar 15, 2024 pm 04:51 PM
The default display behavior for components in the Angular framework is not for block-level elements. This design choice promotes encapsulation of component styles and encourages developers to consciously define how each component is displayed. By explicitly setting the CSS property display, the display of Angular components can be fully controlled to achieve the desired layout and responsiveness.


