

Explore MVC, Forms, and Layout: Yii2 Programming Guide

In Yii2 Programming: Getting Started, we set up Yii2 locally, built a Hello World application, set up a remote server, and deployed our code using Github. This tutorial will cover some of the more basic concepts of Yii related to the implementation of the MVC framework: Models, Views, and Controllers. We'll also explore the layout and customization of navigation menus and Bootstrap elements.
For these examples, we're assuming we're building a framework for posting simple status updates, like our own mini-Twitter. However, we do not store the data in the database. I'll save that for the next tutorial, which will explore Yii's scaffolding feature, called Gii.
Gii automates and simplifies everything we will do in this tutorial, but it is important to understand the basic concepts and perform these tasks manually at least once.
Model
What is a model? Wikipedia says: "A Model notifies its associated views and controllers when its state changes. This notification allows views to generate updated output and allows controllers to change the set of available commands."
To me, a model usually represents the concept of whatever I'm building in the "outside" world. So if we consider state updates, the state model will contain all properties of state updates and all functions or methods related to querying or changing the state.
Best practice is to build as much functionality and intelligence into the model as possible. In MVC practice, you build "heavy" models and lightweight controllers and views. Yii provides some excellent features that are specific to what you are doing in web and application development and can simplify model building, especially when it comes to forms and databases; most of which we will explore in later tutorials .
Let's create our state model. For our coding examples, you can use a Git repository. I'm building on what we created in the getting started tutorial - I've marked it here for reference. The Github repository for the completed tutorial is here.
We will create Status.php in /hello/models/Status.php. To post a status message, we need to collect the message text from the user. We will also create a permissions field for publishing publicly or privately.
<?php

namespace app\models;

use yii\base\Model;

class Status extends Model
{
    const PERMISSIONS_PRIVATE = 10;
    const PERMISSIONS_PUBLIC = 20;

    public $text;
    public $permissions;

    public function rules()
    {
        return [
            [['text','permissions'], 'required'],
        ];
    }

    public function getPermissions() {
      return array (self::PERMISSIONS_PRIVATE=>'Private',self::PERMISSIONS_PUBLIC=>'Public');
    }

    public function getPermissionsLabel($permissions) {
      if ($permissions==self::PERMISSIONS_PUBLIC) {
        return 'Public';
      } else {
        return 'Private';
      }
    }
}
?>
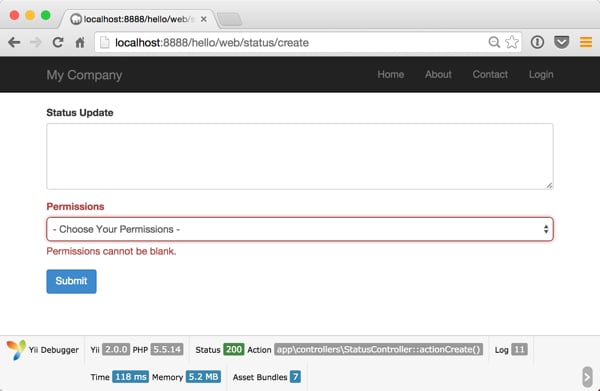
Note the rule function - Yii's form validation uses this to ensure that the user enters the appropriate information in each field. Yii uses JavaScript to validate forms as the user enters them.
The getPermissions() function I created will be used for the dropdown list element of the form.
Now, let's go ahead and create a controller to allow the user to create and view text updates.
Controller
What is a controller? Wikipedia says, "A controller can send commands to the model to update the model's state (e.g., edit a document). It can also send commands to its associated views to change the model's view presentation." In a typical Yii web application , the URL path of the page calls the controller to load the page data using the model and render the page using the view.
It is best to logically group related functions in a single controller. Different methods of the controller (called actions) implement each function. These usually correspond to specific pages. For example, http://localhost:8888/hello/web/status/create will call the create action of the StatusController we are building.
When you develop Status-related functionality, you can group these functionality into a StatusController.php. For now, we just build a create function.
In /hello/controllers/, create StatusController.php:
<?php

namespace app\controllers;

use Yii;
use yii\web\Controller;
use app\models\Status;

class StatusController extends Controller
{
    public function actionCreate()
    {
        $model = new Status;

        if ($model->load(Yii::$app->request->post()) && $model->validate()) {
            // valid data received in $model
            return $this->render('view', ['model' => $model]);
        } else {
            // either the page is initially displayed or there is some validation error
            return $this->render('create', ['model' => $model]);
        }
    }
}
?>
Form creation operations typically call model data, which are then derived based on whether they are part of a POST operation. If not, an empty form is displayed. If they receive the published data, it is verified and processed. In our case this means continuing to render the view file.
Times watched
What is a view? Wikipedia says: "View Requests information from the model and is used to generate a representation of the output for the user." In Yii, views use a PHP-like templating language to render page output to HTML, leveraging the data loaded by the model and the data passed from the controller.
Views are usually located in a single folder related to the associated controller, for example the StatusController view is located in the views/status folder.
In Yii, form code is usually contained in so-called partial views. These files are usually named with an underscore prefix. They should be included in other views. This allows creating and updating pages to reuse the actual form code.
First, we will create the "Create" view that renders the form. We will then also create a view view to display the status updates we post. This will change in the following tutorials when we use an actual database, storing and retrieving data.
这是我们的 /hello/views/status.view.php 视图文件的一个简单示例,用于呈现发布的数据:
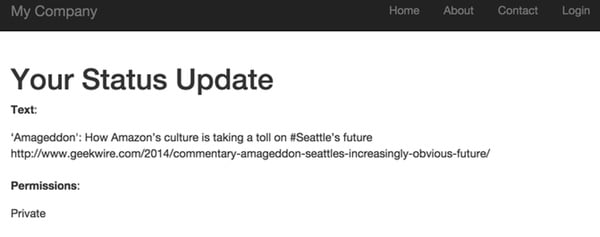
<?php
  use yii\helpers\Html;
?>

<h1>Your Status Update</strong></h1>
<p><label>Text</label>:</p>
  <?= Html::encode($model->text) ?>
<br /><br />
<p><label>Permissions</label>:</p>
<?php
echo $model->getPermissionsLabel($model->permissions);
?>
请注意视图文件是 HTML 和 PHP 的混合体。当控制器接收到发布的数据时,它会渲染上面的视图,显示用户提交的数据。
但是,现在我们来谈谈表单并构建创建表单视图文件。
表格
表单是我们在网络开发中每天用来收集用户数据的工具,通常用于将用户输入提交到数据库。 Yii 提供了大量的帮助程序代码来简化构建、验证、保护和发布表单数据的过程。在 Yii 中,表单是一种视图。
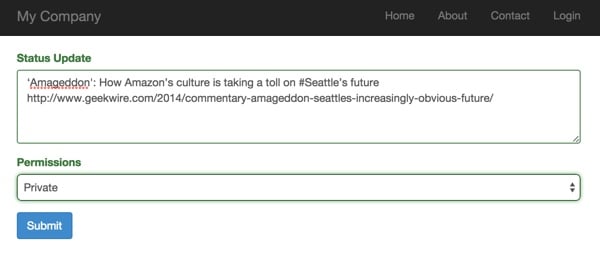
以下是用于创建状态更新的示例表单:
<?php
  use yii\helpers\Html;
  use yii\widgets\ActiveForm;
  use app\models\Status;
?>
<?php $form = ActiveForm::begin();?>
    <?= $form->field($model, 'text')->textArea(['rows' => '4'])->label('Status Update'); ?>

    <?=
    $form->field($model, 'permissions')->dropDownList($model->getPermissions(),
             ['prompt'=>'- Choose Your Permissions -']) ?>

    <div class="form-group">
        <?= Html::submitButton('Submit', ['class' => 'btn btn-primary']) ?>
    </div>

<?php ActiveForm::end(); ?>
Yii2 ActiveForm 小部件用于为我们的输入字段生成 HTML。请注意下拉列表如何调用 Status 模型 getPermissions 方法。

单击“提交”按钮将返回到 StatusController 的创建操作。当接收到发布的数据时,它会呈现 view.php 文件而不是 create.php 表单文件。
以下是使用 view.php 呈现时视图文件的显示方式:
接下来,让我们更新全局导航栏以包含状态创建表单的链接。
布局
布局是网站大多数外部重复元素的模板,例如 HTML 文档包装器、页眉、导航栏和页脚。由于这些对于网站的大多数页面来说都是通用的,因此它们在布局中构建一次,并且不会在代码中的任何地方重复。
如果你查看\hello\views\layouts\main.php,你可以看到外部布局的结构:
<?php
use yii\helpers\Html;
use yii\bootstrap\Nav;
use yii\bootstrap\NavBar;
use yii\widgets\Breadcrumbs;
use app\assets\AppAsset;
/* @var $this \yii\web\View */
/* @var $content string */
AppAsset::register($this);
?>
<?php $this->beginPage() ?>
<!DOCTYPE html>
<html lang="<?= Yii::$app->language ?>">
<head>
<meta charset="<?= Yii::$app->charset ?>"/>
<meta name="viewport" content="width=device-width, initial-scale=1">
<?= Html::csrfMetaTags() ?>
<title><?= Html::encode($this->title) ?></title>
<?php $this->head() ?>
</head>
<body>
<?php $this->beginBody() ?>
<div class="wrap">
<?php
NavBar::begin([
'brandLabel' => 'My Company',
'brandUrl' => Yii::$app->homeUrl,
'options' => [
'class' => 'navbar-inverse navbar-fixed-top',
],
]);
echo Nav::widget([
'options' => ['class' => 'navbar-nav navbar-right'],
'items' => [
['label' => 'Home', 'url' => ['/site/index']],
['label' => 'About', 'url' => ['/site/about']],
['label' => 'Contact', 'url' => ['/site/contact']],
Yii::$app->user->isGuest ?
['label' => 'Login', 'url' => ['/site/login']] :
['label' => 'Logout (' . Yii::$app->user->identity->username . ')',
'url' => ['/site/logout'],
'linkOptions' => ['data-method' => 'post']],
],
]);
NavBar::end();
?>
        <div class="container">
            <?= Breadcrumbs::widget([
                'links' => isset($this->params['breadcrumbs']) ? $this->params['breadcrumbs'] : [],
            ]) ?>
            <?= $content ?>
        </div>
</div>
<footer class="footer">
<div class="container">
<p class="pull-left">© My Company <?= date('Y') ?></p>
<p class="pull-right"><?= Yii::powered() ?></p>
</div>
</footer>
<?php $this->endBody() ?>
</body>
</html>
<?php $this->endPage() ?>
视图主要代表网站的内部页面主体,即页眉和导航栏以及页脚开头之间的内容。当布局回显 $content:
<div class="container">
<?= Breadcrumbs::widget([
'links' => isset($this->params['breadcrumbs']) ? $this->params['breadcrumbs'] : [],
]) ?>
<?= $content ?>
</div>
Yii 允许您为每个应用程序构建多个布局,尽管这并不总是必要的。这取决于您的应用程序。控制器提供默认布局,您可以针对任何给定操作覆盖此布局。如果您的控制器对相关活动进行逻辑分组,则用户界面很可能会对控制器内的所有操作使用相同的布局。
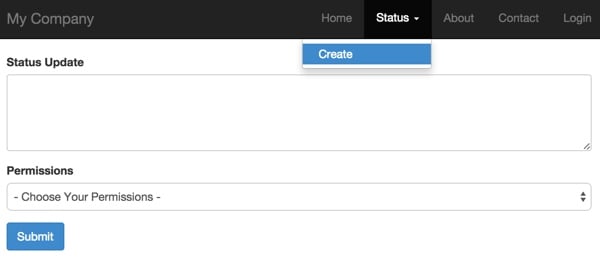
现在,让我们更新导航栏以包含带有“创建”操作的状态菜单。由于 Yii2 使用 Bootstrap 进行布局和样式,我们只需要告诉它创建一个 Bootstrap 下拉列表。
更新 Nav::widget 以拥有嵌套数组:
            echo Nav::widget([
                'options' => ['class' => 'navbar-nav navbar-right'],
                'items' => [
                    ['label' => 'Home', 'url' => ['/site/index']],
                    [
                       'label' => 'Status',
                       'items' => [
                            ['label' => 'Create', 'url' => ['/status/create']],
                        ],
                    ],
                    ['label' => 'About', 'url' => ['/site/about']],
                    ['label' => 'Contact', 'url' => ['/site/contact']],
                    Yii::$app->user->isGuest ?
                        ['label' => 'Login', 'url' => ['/site/login']] :
                        ['label' => 'Logout (' . Yii::$app->user->identity->username . ')',
                            'url' => ['/site/logout'],
                            'linkOptions' => ['data-method' => 'post']],
                ],
            ]);
这是您应该看到的内容:
下一步是什么?
现在您已经了解了 Yii 的 MVC 架构在实践中如何工作,包括模型、视图、控制器、表单和布局,我们将为状态创建一个数据库模式,并使用 Yii 的脚手架生成器 Gii 来构建所有这对我们来说是自动的。事情会开始进展得更快一些。
如果您想知道下一个 Yii2 教程何时发布,请在 Twitter 上关注我 @reifman 或查看我的 Tuts+ 讲师页面。我的讲师页面将立即包含本系列的所有文章。
相关链接
- Yii 框架网站
- Yii 框架简介 (Tuts+)
-
使用 Yii2 编程:入门(Tuts+)
- 作者提供的其他免费开源 Yii 开发人员示例
The above is the detailed content of Explore MVC, Forms, and Layout: Yii2 Programming Guide. For more information, please follow other related articles on the PHP Chinese website!

Hot AI Tools

Undresser.AI Undress
AI-powered app for creating realistic nude photos

AI Clothes Remover
Online AI tool for removing clothes from photos.

Undress AI Tool
Undress images for free

Clothoff.io
AI clothes remover

Video Face Swap
Swap faces in any video effortlessly with our completely free AI face swap tool!

Hot Article
Hot Tools

Notepad++7.3.1
Easy-to-use and free code editor

SublimeText3 Chinese version
Chinese version, very easy to use

Zend Studio 13.0.1
Powerful PHP integrated development environment

Dreamweaver CS6
Visual web development tools

SublimeText3 Mac version
God-level code editing software (SublimeText3)
Hot Topics
 1387
1387
 52
52

 Alipay PHP SDK transfer error: How to solve the problem of 'Cannot declare class SignData'?
Apr 01, 2025 am 07:21 AM
Alipay PHP SDK transfer error: How to solve the problem of 'Cannot declare class SignData'?
Apr 01, 2025 am 07:21 AM
Alipay PHP...
 Explain JSON Web Tokens (JWT) and their use case in PHP APIs.
Apr 05, 2025 am 12:04 AM
Explain JSON Web Tokens (JWT) and their use case in PHP APIs.
Apr 05, 2025 am 12:04 AM
JWT is an open standard based on JSON, used to securely transmit information between parties, mainly for identity authentication and information exchange. 1. JWT consists of three parts: Header, Payload and Signature. 2. The working principle of JWT includes three steps: generating JWT, verifying JWT and parsing Payload. 3. When using JWT for authentication in PHP, JWT can be generated and verified, and user role and permission information can be included in advanced usage. 4. Common errors include signature verification failure, token expiration, and payload oversized. Debugging skills include using debugging tools and logging. 5. Performance optimization and best practices include using appropriate signature algorithms, setting validity periods reasonably,
 Explain the concept of late static binding in PHP.
Mar 21, 2025 pm 01:33 PM
Explain the concept of late static binding in PHP.
Mar 21, 2025 pm 01:33 PM
Article discusses late static binding (LSB) in PHP, introduced in PHP 5.3, allowing runtime resolution of static method calls for more flexible inheritance.Main issue: LSB vs. traditional polymorphism; LSB's practical applications and potential perfo
 How does session hijacking work and how can you mitigate it in PHP?
Apr 06, 2025 am 12:02 AM
How does session hijacking work and how can you mitigate it in PHP?
Apr 06, 2025 am 12:02 AM
Session hijacking can be achieved through the following steps: 1. Obtain the session ID, 2. Use the session ID, 3. Keep the session active. The methods to prevent session hijacking in PHP include: 1. Use the session_regenerate_id() function to regenerate the session ID, 2. Store session data through the database, 3. Ensure that all session data is transmitted through HTTPS.
 Describe the SOLID principles and how they apply to PHP development.
Apr 03, 2025 am 12:04 AM
Describe the SOLID principles and how they apply to PHP development.
Apr 03, 2025 am 12:04 AM
The application of SOLID principle in PHP development includes: 1. Single responsibility principle (SRP): Each class is responsible for only one function. 2. Open and close principle (OCP): Changes are achieved through extension rather than modification. 3. Lisch's Substitution Principle (LSP): Subclasses can replace base classes without affecting program accuracy. 4. Interface isolation principle (ISP): Use fine-grained interfaces to avoid dependencies and unused methods. 5. Dependency inversion principle (DIP): High and low-level modules rely on abstraction and are implemented through dependency injection.
 How to automatically set permissions of unixsocket after system restart?
Mar 31, 2025 pm 11:54 PM
How to automatically set permissions of unixsocket after system restart?
Mar 31, 2025 pm 11:54 PM
How to automatically set the permissions of unixsocket after the system restarts. Every time the system restarts, we need to execute the following command to modify the permissions of unixsocket: sudo...
 How to debug CLI mode in PHPStorm?
Apr 01, 2025 pm 02:57 PM
How to debug CLI mode in PHPStorm?
Apr 01, 2025 pm 02:57 PM
How to debug CLI mode in PHPStorm? When developing with PHPStorm, sometimes we need to debug PHP in command line interface (CLI) mode...
 Explain late static binding in PHP (static::).
Apr 03, 2025 am 12:04 AM
Explain late static binding in PHP (static::).
Apr 03, 2025 am 12:04 AM
Static binding (static::) implements late static binding (LSB) in PHP, allowing calling classes to be referenced in static contexts rather than defining classes. 1) The parsing process is performed at runtime, 2) Look up the call class in the inheritance relationship, 3) It may bring performance overhead.
