

Documenting JavaScript documentation using YUIDoc

Documenting code is a bit like testing; we all know we should do it, but we're not quite sure how, and most people, if we're honest, don't do it at all, but those who do are the ones who do it Big supporter. This tutorial will help you quickly understand one of the best ways to solve this problem: YUIDoc.
What is YUIDoc?
YUIDoc will generate API documentation based on the comments you write.
YUIDoc is a NodeJS application that will generate API documentation (in the form of HTML) based on comments you write in JavaScript source code. In fact, it doesn't just work with JavaScript: any programming language that supports block comments separated by /* */ will work with YUIDoc. As you might have guessed, YUIDoc is one of Yahoo!'s tools. Released with their YUI library.
To install YUIDoc, you need to first install NodeJS and the Node Package Manager (npm). You can then install YUIDoc via npm -g install yuidocjs. You'll use this by running yuidoc <js></js>;; more on that later.
It’s all about the tags
So, you know that YUIDoc gets its documentation from multiline comments in the source file. Of course, you may have comments that don't belong in the document. In order for YUIDoc to recognize the comment as important, it must start with a double: /**. so:
/**
YUIDoc will process this
*/

/*
But not this
*/
Of course, the important thing is the content inside (that is, the content inside the comment block). Each label must contain one and only one primary label; it can also contain zero or more secondary labels. Indeed, YUIDoc is just that simple: add a comment with the right tags to your code, and there you have it: documentation! So let's learn some tags. We'll do this: we'll examine the tags and where they are used, and provide simple usage examples; then, we'll write and document some code so you can better understand how the tags work together.
Main Tags
Before entering the main tag, please remember that there can only be one main tag per comment block. These describe what a given block of code is.
@module
@module Tags describe a group of related classes. (Yes, yes, JavaScript doesn't have classes: YUIDoc refers to constructors.) If you use YUIDoc to document BackboneJS, the Backbone object will be a module because it contains the Model, Collection, View and other categories. After the label, place the name of the module.
/**
@module Backbone
 */
 var Backbone = Backbone || {};
@class
The @class tag properly describes a single class. In YUI libraries this usually means constructors, but if you prefer to use a different pattern and call it your class, you can do that too. Each comment tagged with @class should also have a @static or @constructor tag (we'll discuss auxiliary tags shortly).
/**
@class Model
 */
 function Model () {}
If your class is part of a module, you don't need to do anything to specify it in the @class comment: just make sure there is a @module comment block at the top of the file i.e. Can.
@method
Of course, every class has at least some methods, and you will use the @method tag to describe them. The method name will come after the label, and you will use the auxiliary labels @return and @params to describe the method.
/**
@method render
*/
View.prototype.render = function (data) {}
@property
@property Tags are used to mark properties of classes. Of course, you will need to use the @type and @default auxiliary tags.
/**
@property templateString
*/
this.templateString = "div";
@event
If you have special custom events that your class can trigger, you will need to use the @event tag to describe them. The contents of the YUIDoc document are as follows:
The
@eventblock is somewhat similar to the@methodblock, except that@returnis irrelevant and@paramis used to describe hang Property received on the event object that the callback listens for.
Auxiliary tag
Comment blocks can have multiple secondary tags; they will usually have a handful, and sometimes more than one, of the same type. Let’s look at some you’ll use regularly.
@submodule
If you divide your module into submodules (maybe one submodule per file, maybe not), the @submodule tag will serve you well.
/**
@module Util
@submodule array
*/
Util.array = {};
@extends
The @extends tag is useful when you have a superclass/subclass relationship. You can declare which class is the parent class of the currently recorded class:
/**
@class AppView
@extends Backbone.View
*/
var AppView = Backbone.View.extend({});
@constructor
If a class can be instantiated, it means it needs a constructor. If you use the standard prototype pattern in JavaScript, the class declaration is also a constructor. This means you'll often see something like this:
/**
@class Recipe
@constructor
*/
function Recipe () {}
事实上,您可能还记得我说过每个 @class 标记都应该有 @constructor 或 @static 辅助标记。
@static
说到@static,就在这里。当您无法创建类的实例时,该类被视为静态。一个很好的例子是内置的 Math 对象:您永远不会创建它的实例 (new Math()),您从类本身调用它的方法。
/**
@class MathHelpers
@static
*/
var MathHelpers = {};
方法也可以是静态的:如果一个类可以实例化,但也有一些类级方法,则这些方法被认为是静态的(它们在类上调用,而不是在实例上调用)。
/**
@class Person
@constructor
*/
function Person () {}

/**
@method all
@static
*/
Person.all = function () {};
在此示例中,您可以创建一个 Person 实例,但 all 方法是静态的。
@final
此标签用于属性或特性,并将所述属性标记为常量:不应更改。虽然 JavaScript 在当前状态下没有真正的常量,但原则上您的编码模式或样式指南可能会使用它们,因此这对此很有用。
/**
@property DATE_FORMAT
@final
*/
var DATE_FORMAT = "%B %d, %Y";
@param
这里有一个重要的:@param标签用于定义@method(包括@constructor)或@event的参数。 @param 标记后面有三部分信息:参数名称、类型(可选)和描述。这些可以按顺序 名称类型描述 或 类型名称描述;但无论哪种情况,类型都必须用花括号括起来。
/**
@method greet
@param person {string} The name of the person to greet
*/
function greet (person) {}
还有几种方法可以自定义 name 部分。将其放在方括号中将其标记为可选,而将 =someVal 放在它后面显示默认值是什么(显然,只有可选参数才有默认值)。然后,如果它是多个参数的占位符,请附加 * 来显示这一点。 (显然,name* 是 1 个或多个参数的占位符,而 [name]* 是 0 个或多个参数的占位符)。
/**
@class Template
@constructor
@param template {String} The template string
@param [data={}] {Object} The object whose properties will be rendered in the template
*/
function Template (template, data) {}
@return
大多数方法都希望返回一个值,因此这是描述该值的标签。不要忘记告诉它该值是什么类型,并给出描述。
/**
@method toHTML
@param [template=Recipe.defaultTemplate] {Template} A template object
@return {String} The recipe contents formatted in HTML with the default or passed-in template.
*/
Recipe.prototype.toHTML = function (template) {
    return "whatever";
};
@type
还记得 @property 主标记吗?您需要定义这些属性的类型,对吧?好吧, @type 标签正是您所需要的。标记后指定类型;您还可以通过用竖线分隔来提供多种类型:
/**
@property URL
@type String
*/
URL: "https://code.tutsplus.com",

/**
@property person
@type String|Person|Object
*/
this.person = new Person();
@private / @protected
传统编程语言提供私有属性或方法:无法从实例外部访问这些属性或方法。就像常量一样,JavaScript 仅在实践中拥有它们,但如果您使用它们,则可以使用 @private 来标记它们。请注意,YUIDoc 不会在它生成的文档中显示私有属性(这是有道理的),因此这允许您为了自己的利益而记录功能,而不是让它显示在文档中。
/**
@method _toString
@private
*/
var _toString = Object.prototype.toString.call;
受保护的属性和方法介于公共和私有之间:它们只能从实例和子类的实例中访问。如果您在 JavaScript 中执行此操作,请使用以下标签:@protected。
@requires
如果某个模块依赖于一个或多个其他模块,可以使用 @requires 来标记:
/**
@module MyFramework.localstorage
@requires MyFramework
*/
请注意,@requires 还可以获取依赖项列表,以逗号分隔。
@default
声明 @property 时,您可能会发现给它一个 @default 值很有用。 @default 应始终与 @type 一起使用。
/**
@property element
@type String
@default "div"
*/
element: "div",
@uses
就像我们所说的,JavaScript 并没有真正的类,但它足够灵活,可以创建类甚至子类的假象。更酷的是,它足够灵活,可以拥有 mixins 或模块:这是一个类从另一个类“借用”属性或方法的地方。而且它也不是继承,因为您可以混合多个类的各个部分(当然,YUI 有能力做到这一点,但 Dojo 和其他库也能做到这一点)。如果您这样做,您会发现 @uses 非常有用:它可以让您声明给定类混合了哪些类。
/**
@class ModalWindow
@uses Window
@uses DragDroppable
*/
var ModalWindow = new Class({
    mixes: [Window, DragDroppable],
    ...
});
注意:我刚刚编写了 mixin 语法,但我很确定我在某处看到过类似的东西。
@example
想要包含如何使用特定代码段的示例吗?使用 @example 标签,然后编写下面的示例,并将其缩进一级。您可以添加任意数量的示例。
/**
@method greet
@example
    person.greet("Jane");
*/
Person.prototype.greet = function (name) {};
@chainable
您可能熟悉 jQuery 中的可链接方法。您知道,您可以在哪里从方法调用中调用方法,因为方法返回对象?使用 @chainable 标记您的方法。
/**
@method addClass
@chainable
*/
jQuery.prototype.addClass = function (class) {
    // stuff;
    return this;
}
@已弃用的 / @since / @beta
这三个标签都是关于对代码的支持(可以是任何代码:模块、类、方法或其他代码)。使用 @deprecated 将某些功能标记为不再是最佳方法(已弃用的功能可能会在未来版本的代码中删除)。或者,您可以添加一条消息来解释当前的执行方式。
/**
@method toJSON
@deprecated Pass the object to `JSON.parse` instead
*/
Something.toJSON = function () {};
@since 标签只是告诉读者给定代码添加了什么版本。 @beta 标记 beta 代码:YUI 建议 @beta 代码可能“在不久的将来经历向后不兼容的更改。 ”
/**
@class Tooltip
@since 1.2.3
@constructor
*/
function Tooltip () {}
@extension / @extensionfor / extension_for
@extension 标签(及其别名)与 @uses 几乎相反。用它来标记扩展类可以混合到哪些类中。当然,要意识到这并不意味着它总是混合在一起,只是它可以混合在一起。
/**
@class Draggable
@extensionfor ModalWindow
*/
评论和 Markdown
在我们查看实际示例之前,让我再指出有关文档注释块的两件事。
首先,您通常需要添加比标签提供的更多有关代码的信息。也许您想描述方法的用途,或者类如何适应更大的情况。将这些评论添加到评论块顶部的任意标签上方。 YUIDoc 会注意到它们并将它们包含在文档中。
/**
The `Router` class is used for . . .
@class Router
@static
*/
var Router = {};
其次,您会很高兴地知道这些注释以及标记后编写的任何描述或消息都可以用 Markdown 编写,并且 YUIDoc 会将其转换为正确的 HTML。您甚至可以在注释中缩进示例代码块并获得语法突出显示!
示例
现在您已经了解了标签,让我们实际编写一些代码并记录下来。让我们创建一个 Store 模块,它包含两个类:Item 和 Cart。每个 Item 实例都将是商店库存中的一种商品:它将具有名称、价格和数量。 Cart 实例可以将商品添加到购物车并计算购物车中商品的总价(含税)。它相当简单,但为我们提供了足够多的功能来使用我们讨论过的许多标签。我已将以下所有代码放入 store.js 中。
我们首先创建模块:
/**
* This module contains classes for running a store.
* @module Store
*/

var Store = Store || {};
现在,让我们创建一个“常量”:税率。
/**
* `TAX_RATE` is stored as a percentage. Value is 13.
    * @property TAX_RATE
    * @static
    * @final
    * @type Number
*/

Store.TAX_RATE = 13;
这是 @type 的常量 (@final) @property 数。请注意,我已经包含了 @static:这是因为,出于某种原因,当我们生成此文件的文档时,YUIDoc 会将其显示为我们的 Item 类的属性:似乎 YUIDoc 不支持具有模块上的属性。我想我可以创建一个静态类来保存这个常量(以及如果我们进一步开发这个常量可能会出现的其他常量),但我这样保留它是为了提醒您:要充分利用像 YUIDoc 这样的工具,您可能必须改变您的编码方式。您必须决定这是否是您想要做的。
现在,对于 Item 类:
/**
 * @class Item
 * @constructor
 * @param name {String} Item name
 * @param price {Number} Item price
 * @param quantity {Number} Item quantity (the number available to buy)
 */

Store.Item = function (name, price, quantity) {
    /**
     * @property name
     * @type String
     */
    this.name = name;
    /**
     * @property price
     * @type String
     */
    this.price = price * 100;
    /**
     * @property quantity
     * @type Number
     */
    this.quantity = quantity;
    /**
     * @property id
     * @type Number
     */
    this.id = Store.Item._id++;
    Store.Item.list[this.id] = this;
};
正如您所看到的,这个构造函数有三个参数。然后,我们还在描述构造函数内的三个属性。由于我们想要为每个 Item 提供一个唯一的 ID,因此我们需要存储一个静态(类级)属性来递增 ID,以及另一个静态属性,即通过 ID 跟踪 Item 的对象。
/**
 * `_id` is incremented when a new item is created, so every item has a unique ID
 * @property id
 * @type Number
 * @static
 * @private
 */
Store.Item._id = 1;

/**
 * @property list
 * @static
 * @type Object
 */
Store.Item.list = {};
Cart 类怎么样?
/**
 * @class Cart
 * @constructor
 * @param name {String} Customer name
 */

Store.Cart = function (name) {
    /**
     * @property name
     * @type String
     */
    this.name = name;
    /**
     * @property items
     * @type Object
     * @default {}
     */
    this.items = {};
};
这里并没有什么新东西:请注意,我们声明 items 属性的默认(或初始)状态是一个空对象。
现在,方法。对于 addItem,其中一个参数是可选的,因此我们将其声明为默认值 1。另外,请注意,我们创建了方法 @chainable。
/**
 * Adds 1 or more of a given item to the cart, if the chosen quantity
 * is available. If not, none are added.
 *
 * @method addItem
 * @param item {Object} An `Item` Object
 * @param [quantity=1] {Number} The number of items to add to the cart
 * @chainable
 */

Store.Cart.prototype.addItem = function (item, quantity) {
    quantity = quantity || 1;
    if (item.quantity >= quantity) {
        this.items[item.id] = this.items[item.id] || 0;
        this.items[item.id] += quantity;
        item.quantity -= quantity;
    }
    return this;
};
最后,我们希望能够返回总价,包括税费。请注意,我们以美分为单位进行价格计算,然后转换为美元并四舍五入到小数点后两位。
/**
 * @method total
 * @return {Number} tax-included total value of cart contents
 */

Store.Cart.prototype.total = function () {
    var subtotal, id;
    subtotal = 0;
    for (id in this.items) {
        if(this.items.hasOwnProperty(id)) {
            subtotal += Store.Item.list[id].price * this.items[id];
        }
    }
    return parseFloat(((subtotal * (1 + Store.TAX_RATE / 100)) / 100).toFixed(2));
};
如果您想测试此代码,这里有一个简单的测试:
var apple, pear, book, desk, assertEquals;

assertEquals = function (one, two, msg) {
    console.log(((one === two) ? "PASS : " : "FAIL : ") + msg);
};

apple = new Store.Item('Granny Smith Apple', 1.00, 5);
pear  = new Store.Item('Barlett Pear', 2.00, 3);
book  = new Store.Item('On Writing Well', 15.99, 2);
desk  = new Store.Item('IKEA Gallant', 123.45, 1);
cart  = new Store.Cart('Andrew');

cart.addItem(apple, 1).addItem(book, 3).addItem(desk, 1);

assertEquals(apple.quantity, 4, "adding 1 apple removes 1 from the item quantity");
assertEquals(book.quantity, 2, "trying to add more books than there are means none are added");
assertEquals(cart.total(), 140.63, "total price for 1 apple and 1 desk is 140.63");
生成文档
现在我们已经编写了代码和注释块,是时候生成文档了。
如果您通过 npm 全局安装了它,您将能够简单地运行 yuidoc {path to js}。就我而言,就是这样
yuidoc .
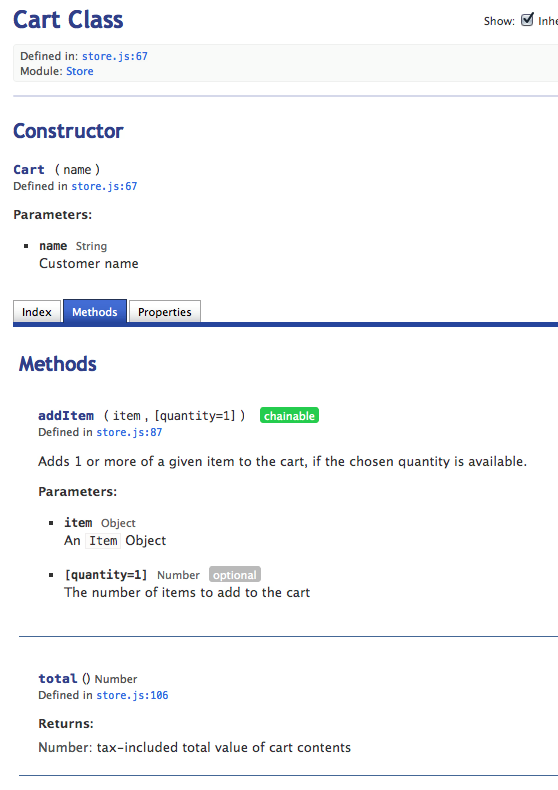
现在,您将看到该文件夹中有一个 out 目录;打开out/index.html,你会看到文档。以下是 Cart 类文档的部分内容:
配置输出
使用 YUIDoc 时可以设置多个配置选项。当然,您可以将它们设置为命令行标志,但我宁愿将它们设置在 JSON 配置文件中。在项目目录中,创建一个名为 yuidoc.json 的文件。首先,您可以设置一堆常规项目信息;这实际上并没有对输出产生太大影响,但最好记录一下它们:
{
    "name": "Documenting JavaScript with YUIDoc",
    "description": "A tutorial about YUIDoc, for Nettuts+",
    "version": "1.0.0",
    "url": "https://code.tutsplus.com"
}
然后,您可以设置许多实际选项。这里有一些有趣的;
-
linkNatives:将其设置为“true”以将 String 或 Number 等原生类型链接到 MDN 文档。 -
outdir:用这个重命名out目录 -
paths:使用此设置YUIDoc搜索JavaScript文件的路径。 -
exclude:将其设置为您希望 YUIDoc 忽略的以逗号分隔的文件列表。
只要设置了 paths 选项,就可以运行 yuidoc -c yuidoc.json 并运行 YUIDoc。即使您没有设置 paths 并仅运行 yuidoc .,YUIDoc 也会看到该配置文件并应用它。
这是我这个项目的总配置文件:
{
    "name": "Documenting JavaScript with YUIDoc",
    "description": "A tutorial about YUIDoc, for Nettuts+",
    "version": "1.0.0",
    "url": "https://code.tutsplus.com",
    "options": {
        "linkNatives": "true",
        "outdir": "./docs",
        "paths": "."
    }
}
评估
根据 YUIDoc 提供的标签,您可以看到它是为以传统 OOP 风格编写的 JavaScript 编写的,并且专门为 YUI 小部件等而设计(事实上,我遗漏了几个特定于 YUI 的标签) )。正因为如此,您可能会发现有几个标签对您来说没有多大用处。然后,你必须问自己是否愿意改变你的编码风格以更好地符合 YUIDoc“思考”的方式。但即使您不打算进行更改,我想您也会发现大多数 YUIDoc 标签都可以很好地适应。
对我来说,更大的问题是您是否喜欢将文档与代码内联。
我们上面写的示例代码有 120 行带注释,40 行不带注释。显然,这是超级简单的代码,几乎任何现实世界的例子都会更加平衡;然而,阅读这种散布的代码可能会很困难。就我个人而言,我认为我会给 YUIDoc 一个公平的试用:在接下来的几周内,我将在编写 JavaScript 时记录它(或者至少在它旁边)。我有兴趣看看它是否或如何影响我的编码风格和工作流程。
你知道这个惯例:喜欢或讨厌它,请在评论中告诉我!
了解更多
- YUIDoc 0.3.0 发布博文
- YUIDoc 主页
- 使用 YUIDoc
- YUIDoc 语法参考
- YUIDoc 主题
The above is the detailed content of Documenting JavaScript documentation using YUIDoc. For more information, please follow other related articles on the PHP Chinese website!

Hot AI Tools

Undresser.AI Undress
AI-powered app for creating realistic nude photos

AI Clothes Remover
Online AI tool for removing clothes from photos.

Undress AI Tool
Undress images for free

Clothoff.io
AI clothes remover

AI Hentai Generator
Generate AI Hentai for free.

Hot Article
Hot Tools

Notepad++7.3.1
Easy-to-use and free code editor

SublimeText3 Chinese version
Chinese version, very easy to use

Zend Studio 13.0.1
Powerful PHP integrated development environment

Dreamweaver CS6
Visual web development tools

SublimeText3 Mac version
God-level code editing software (SublimeText3)
Hot Topics


 Insufficient memory or disk space to repagin or print this document Word error
Feb 19, 2024 pm 07:15 PM
Insufficient memory or disk space to repagin or print this document Word error
Feb 19, 2024 pm 07:15 PM
This article will introduce how to solve the problem of insufficient memory or disk space to repage or print the document in Microsoft Word. This error usually occurs when users try to print a Word document. If you encounter a similar error, please refer to the suggestions provided in this article to resolve it. Insufficient memory or disk space to repage or print this document Word error How to resolve the Microsoft Word printing error "There is not enough memory or disk space to repage or print the document." Update Microsoft Office Close memory-hogging applications Change your default printer Start Word in safe mode Rename the NorMal.dotm file Save the Word file as another
 How to add redline to Word document
Mar 01, 2024 am 09:40 AM
How to add redline to Word document
Mar 01, 2024 am 09:40 AM
It is 395 words, which is 495. This article will show you how to add red lines in Word documents. Redlining a document refers to making modifications to the document so that users can clearly see the changes. This feature is very important when multiple people are editing a document together. What redline means Marking a document Redlining means using red lines or callouts to indicate changes, edits, or revisions to a document. The term was inspired by the practice of using a red pen to mark printed documents. Redline comments are widely used in different scenarios, such as clearly showing recommended changes to authors, editors, and reviewers when editing a document. Propose changes and modifications in legal agreements or contracts Provide constructive criticism and suggestions on papers, presentations, etc. How to give W
 Can't open hyperlink in word document
Feb 18, 2024 pm 06:10 PM
Can't open hyperlink in word document
Feb 18, 2024 pm 06:10 PM
In recent years, with the continuous development of network technology, our lives are inseparable from various digital tools and the Internet. When processing documents, especially in writing, we often use word documents. However, sometimes we may encounter a difficult problem, that is, the hyperlink in the word document cannot be opened. This issue will be discussed below. First of all, we need to make it clear that hyperlinks refer to links added in word documents to other documents, web pages, directories, bookmarks, etc. When we click on these links, I
 How to implement an online speech recognition system using WebSocket and JavaScript
Dec 17, 2023 pm 02:54 PM
How to implement an online speech recognition system using WebSocket and JavaScript
Dec 17, 2023 pm 02:54 PM
How to use WebSocket and JavaScript to implement an online speech recognition system Introduction: With the continuous development of technology, speech recognition technology has become an important part of the field of artificial intelligence. The online speech recognition system based on WebSocket and JavaScript has the characteristics of low latency, real-time and cross-platform, and has become a widely used solution. This article will introduce how to use WebSocket and JavaScript to implement an online speech recognition system.
 Word document is blank when opening on Windows 11/10
Mar 11, 2024 am 09:34 AM
Word document is blank when opening on Windows 11/10
Mar 11, 2024 am 09:34 AM
When you encounter a blank page issue when opening a Word document on a Windows 11/10 computer, you may need to perform repairs to resolve the situation. There are various sources of this problem, one of the most common being a corrupted document itself. Furthermore, corruption of Office files may also lead to similar situations. Therefore, the fixes provided in this article may be helpful to you. You can try to use some tools to repair the damaged Word document, or try to convert the document to another format and reopen it. In addition, checking whether the Office software in the system needs to be updated is also a way to solve this problem. By following these simple steps, you may be able to fix Word document blank when opening Word document on Win
 WebSocket and JavaScript: key technologies for implementing real-time monitoring systems
Dec 17, 2023 pm 05:30 PM
WebSocket and JavaScript: key technologies for implementing real-time monitoring systems
Dec 17, 2023 pm 05:30 PM
WebSocket and JavaScript: Key technologies for realizing real-time monitoring systems Introduction: With the rapid development of Internet technology, real-time monitoring systems have been widely used in various fields. One of the key technologies to achieve real-time monitoring is the combination of WebSocket and JavaScript. This article will introduce the application of WebSocket and JavaScript in real-time monitoring systems, give code examples, and explain their implementation principles in detail. 1. WebSocket technology
 How to use JavaScript and WebSocket to implement a real-time online ordering system
Dec 17, 2023 pm 12:09 PM
How to use JavaScript and WebSocket to implement a real-time online ordering system
Dec 17, 2023 pm 12:09 PM
Introduction to how to use JavaScript and WebSocket to implement a real-time online ordering system: With the popularity of the Internet and the advancement of technology, more and more restaurants have begun to provide online ordering services. In order to implement a real-time online ordering system, we can use JavaScript and WebSocket technology. WebSocket is a full-duplex communication protocol based on the TCP protocol, which can realize real-time two-way communication between the client and the server. In the real-time online ordering system, when the user selects dishes and places an order
 JavaScript and WebSocket: Building an efficient real-time weather forecasting system
Dec 17, 2023 pm 05:13 PM
JavaScript and WebSocket: Building an efficient real-time weather forecasting system
Dec 17, 2023 pm 05:13 PM
JavaScript and WebSocket: Building an efficient real-time weather forecast system Introduction: Today, the accuracy of weather forecasts is of great significance to daily life and decision-making. As technology develops, we can provide more accurate and reliable weather forecasts by obtaining weather data in real time. In this article, we will learn how to use JavaScript and WebSocket technology to build an efficient real-time weather forecast system. This article will demonstrate the implementation process through specific code examples. We
