
People love pictures. They love looking at them, they love clicking on them. Therefore, it makes sense to use them in your website’s navigation.
You may already use featured images in your archive pages to give users a deeper understanding of the content of your posts and to make your archive pages look better. Beautiful, large clickable images also make the process of browsing a page or publishing a post more intuitive.
But elsewhere, you can use featured images to help navigate to certain parts of your WordPress site. In this two-part tutorial, we'll show you how to create a grid of images that links to a subpage of a given page in your website, or a subpage of the current page.
In this first part, I will demonstrate how to write PHP to take a page and output its title and featured image, internal links. In part two, Ian Yates shows you how to add CSS to turn your list into a beautiful grid.
To follow this tutorial, you need the following:
The first thing to do is decide which pages to output. In this tutorial I will demonstrate two options:
The starting point of the two methods is the same.
First create a plugin in the wp-content/plugins folder. You need to create a folder for the plugin because in the second part of this tutorial you will add the stylesheet as well as the main plugin file.
Once you have the folder, create a PHP file for your code. I'm calling my tutsplus-child-pages.php.
Now set up your plugin file and add the commented out text at the top:
/**
 * Plugin Name:  Tutsplus List Child Pages
 * Plugin URI:   https://github.com/rachelmccollin/tutsplus-list-child-pages
 * Description:  Output a list of children of the current page or a specific page with featured images.
 * Author:       Rachel McCollin
 * Author URI:   https://rachelmccollin.com
 * Version:      1.0
 * Text Domain:  tutsplus
 * License:      GPLv2.0+
 */
This tells WordPress what your plugin is and what it is used for.
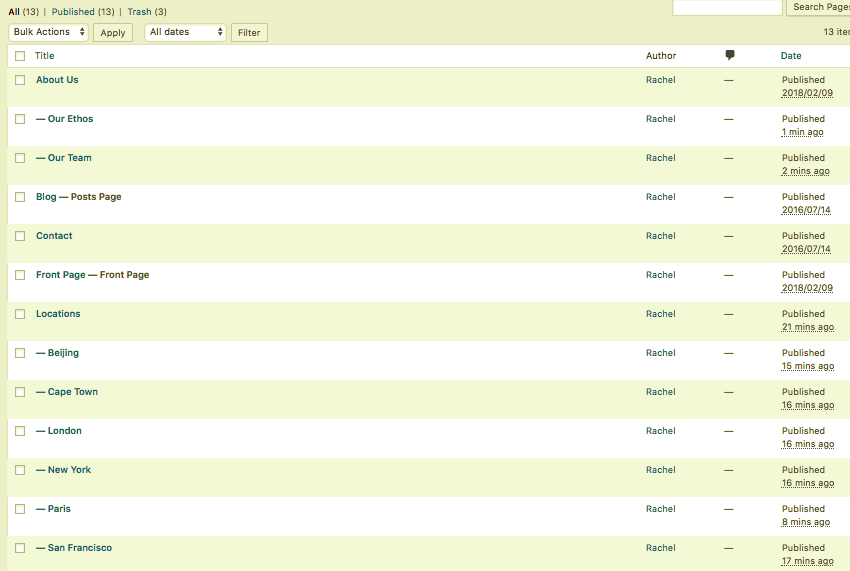
Now, go ahead and create some pages if you haven't already. I'm going to create some pages with subpages, including a location page as the parent page for my specific list of pages.
This is my page in management:

Now it’s time to write the function that outputs the list.
Let's start with this option. This will output a list of all subpages of the current page, including images, links, and titles.
This is a useful approach if your site has a hierarchical page structure and you want to encourage people visiting the top-level pages (or mid-level pages, if any) to visit the pages below them in the structure .
First create a function in the plug-in file:
function tutpslus_list_current_child_pages() {

}
Now, inside the function, check if we are on the page. Everything else will be placed inside this conditional tag:
if ( is_page() ) {

}
Next, set the $post global variable and define the parent page:
global $post;

// define the page they need to be children of
$parentpage = get_the_ID();
After that, define the parameters of get_pages() function:
// define args
$args = array(
    'parent' => $parentpage,
	'sort_order' => 'ASC',
	'sort_column' => 'menu_order',
);

$children = get_pages( $args );
You may want to change some of these parameters. I'm using menu_order for sorting so I can adjust it manually, but you can use date, title, or any other sortable parameter.
The next task is to set the result using the get_pages() function foreach Loop:
if ( $children ) { ?>

    <div class="child-page-listing">

		<h2><?php _e( 'Learn More', 'tutsplus' ); ?></h2>

		<?php //foreach loop to output
		foreach ( $children as $post ) {

			setup_postdata( $post ); ?>

			<article id="<?php the_ID(); ?>" class="child-listing" <?php post_class(); ?>>

				<?php if ( has_post_thumbnail() ) { ?>

					<a class="child-post-title" href="<?php the_permalink(); ?>">
						<?php the_title(); ?>
					</a>

					<div class="child-post-image">
						<a href="<?php the_permalink(); ?>">
							<?php the_post_thumbnail( 'medium' ); ?>
						</a>
					</div>

				<?php }	?>

			</article>

		<?php } ?>

	</div>

<?php }
Let’s run this code:
get_pages() function returns any results, i.e. if $children is populated. foreach loop for each subpage as the $post variable. article element. I've added CSS classes to each element so that we can style them in the second part of this tutorial.
Now you have your function. The next step is to add this to your theme so it can be output in the correct location.
如果您的主题有动作挂钩,您可以将您的函数挂钩到其中之一。因此,如果我的有一个 after_content 挂钩,我可以在我的插件中的函数外部添加此代码:
add_action( 'after_content', 'tutpslus_list_current_child_pages' );
但是,我在这个演示中使用了“二十十六”主题,它没有这样的动作挂钩。因此,我需要直接在模板文件中添加函数。
如果您使用自己的主题,则可以将其添加到 page.php 文件中您希望显示列表的位置。
但如果您使用的是第三方主题,则不得对其进行编辑,因为下次更新主题时所有更改都将丢失。相反,创建一个子主题。在新的子主题中创建父主题的 page.php 文件的副本(或 page.php 的循环文件的副本),然后对其进行编辑。
确定您希望在页面中输出列表的位置,并将其添加到主题模板文件中:
tutpslus_list_current_child_pages();
我已将其添加到子主题的 page.php 文件中的循环之后。
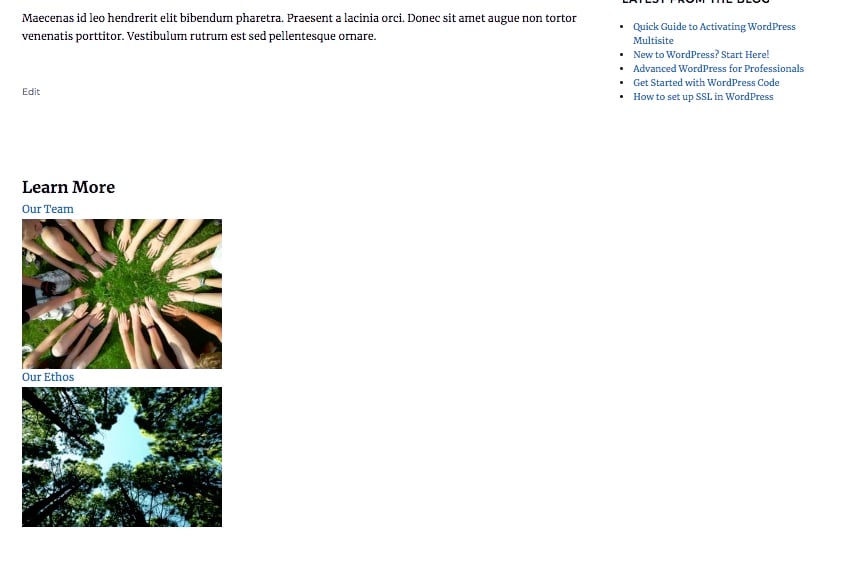
现在让我们看一下该网站。这是我的关于我们页面及其子页面:

这就是添加指向当前页面子页面的链接的方法。但是,如果您想添加指向某一特定页面的子页面的链接该怎么办?接下来让我们解决这个问题。
此代码与当前页面子页面的代码几乎相同。区别在于定义运行 get_pages() 时将使用的父页面。
复制插件文件中的第一个函数并编辑函数名称,使它们不同。
找到页面上的条件检查并将其删除。不要忘记也删除该检查的右大括号。
现在找到如下行:
$parentpage = get_the_ID();
将其替换为:
$page = get_page_by_path( 'locations', OBJECT, 'page' );

$parentpage = $page->ID;
您会看到它使用 get_page_by_path() 函数,其第一个参数是目标页面的 slug。编辑此内容,使其使用您想要在网站中定位的页面的 slug。
在此函数中编辑 CSS 类也是一种很好的做法,以便它们与第一个函数中的 CSS 类不同。这样,如果您同时使用两者,则可以为每个使用不同的样式。
这是进行这些编辑后的完整功能:
function tutpslus_list_locations_child_pages() {

	global $post;

	// define the page they need to be children of
	$page = get_page_by_path( 'locations', OBJECT, 'page' );

    $parentpage = $page->ID;

    // define args
	$args = array(
		'parent' => $parentpage,
		'sort_order' => 'ASC',
		'sort_column' => 'menu_order',
	);

	//run get_posts
	$children = get_pages( $args );

	if ( $children ) { ?>

		<div class="child-page-listing">

			<h2><?php _e( 'Our Locations', 'tutsplus' ); ?></h2>

			<?php //foreach loop to output
			foreach ( $children as $post ) {

				setup_postdata( $post ); ?>

				<article id="<?php the_ID(); ?>" class="location-listing" <?php post_class(); ?>>

					<?php if ( has_post_thumbnail() ) { ?>

						<a class="location-title" href="<?php the_permalink(); ?>">
							<?php the_title(); ?>
						</a>

						<div class="location-image">
							<a href="<?php the_permalink(); ?>">
								<?php the_post_thumbnail( 'medium' ); ?>
							</a>
						</div>

					<?php }	?>

				</article>

			<?php } ?>

		</div>

	<?php }

}
您需要再次将代码添加到主题中。在这种情况下,您不仅希望列表在静态页面中输出,而且可能希望将其放在不同的位置。
如果您的主题有操作挂钩,您可以在插件文件中使用其中之一,方式与之前类似:
add_action( 'before_footer', 'tutpslus_list_locations_child_pages' );
我将把它添加到我的主题的页脚中,再次在我的子主题中创建 footer.php 的副本并对其进行编辑。
这是我的 footer.php 文件中的代码,位于 footer 元素的开头:
<?php tutpslus_list_locations_child_pages(); // list locations pages ?>
这是我的页脚中的列表输出。这是在单个帖子的底部:

提示:如果出现以下情况,您可能希望避免在位置页面中输出此列表:您同时运行这两个函数,以避免重复。尝试使用页面 ID 添加条件标记来实现此目的。
您现在有两个页面列表:一个是当前页面的子页面,另一个是特定页面的子页面。
现在,图像都被推到页面的一侧,标题看起来不太好。在这个由两部分组成的教程的下一部分(链接如下)中,您将学习如何设置图像样式以创建具有 CSS 网格布局的网格,以及如何将标题文本集成到该网格中。
The above is the detailed content of Create a WordPress Image Gallery: Develop a Plugin. For more information, please follow other related articles on the PHP Chinese website!
 vcruntime140.dll cannot be found and code execution cannot continue
 pr shortcut key
 How to dress up Douyin Xiaohuoren
 What does data intelligence mean?
 parentnode usage
 How to read data from excel file in python
 What to do if the computer fakes death
 What to do if css cannot be loaded
 What is the difference between JD International self-operated and JD self-operated


