

In this tutorial, I will show you how to implement a real-time chat application using Laravel 5, PostgreSQL, and Pusher. We then deploy this application together to Modulus.
We will use Laravel 5 as the backend service, HTML5 and jQuery as the simple front-end application, PostgreSQL as the database, and Pusher for real-time communication between server and client. The overall architecture will be like this:
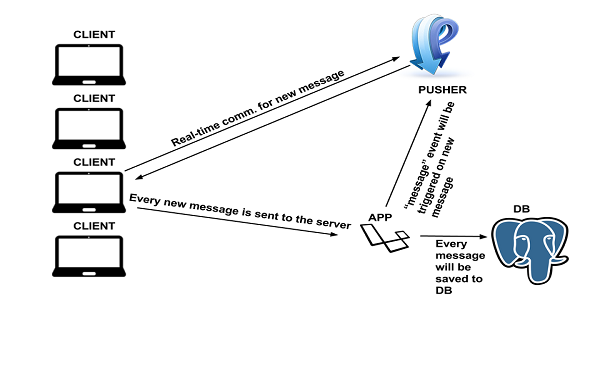
We will cover very useful topics in this scenario, even though this is a very simple application.
Let's first install Laravel so that we can write a chat service for our application. We'll use Composer to easily install Laravel and related packages. Please visit the Composer website to learn more about Composer installation. After installing Composer, open a command line prompt and run the following commands to install Laravel 5:
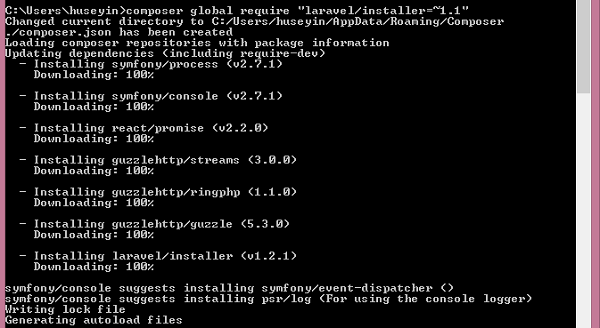
composer globally requires "laravel/installer=~1.1"
You will see the following output:
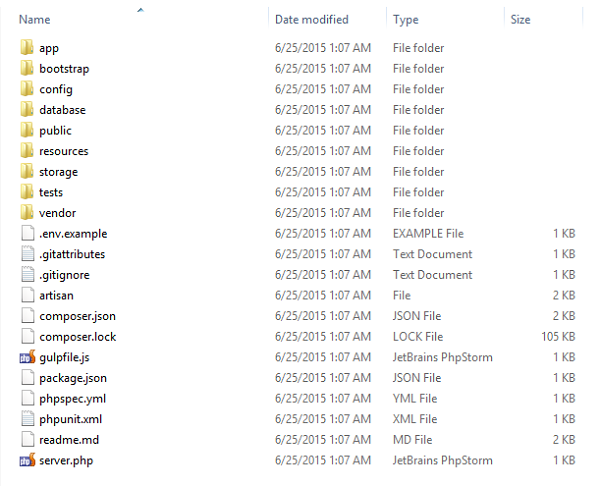
We are ready to generate the Laravel project. Run the following code to generate the chat application's project structure.
laravel New RealtimeChatLaravel
This will generate a boilerplate Laravel project and you will see the following folder structure:
Our application will interact with the database, which will be PostgreSQL. In this project, we will use ElephantSQL, a company that provides PostgreSQL as a service. You can use several types of databases with Laravel, such as SQLite, MySQL, PostgreSQL, and SQL Server. I chose PostgreSQL because when we deploy the project to Modulus, you won't be able to use an internal database like the above database types. I prefer to use a database that provides it as a service. ElephantSQL allows you to try out some of PostgreSQL’s great features with a free plan.
You can get a free plan from ElephantSQL to suit your needs. After completing the account and database creation, you will know the database information such as hostname, database name, username, and password. Please note this information for use in database configuration in Laravel.
The company provides services that trigger events for real-time communication. You can get one by visiting the Pusher website. After successfully creating your account and application, you will be able to obtain some credentials such as Application ID, Application Key, and Application Key. We will discuss their usage in the following sections.
In order to run PHP applications in Modulus, you need to configure a web server to serve your application. We will use the following Nginx configuration:
server {

  listen 8080;


  server_name modulus_app_url;


  root /mnt/app/public;

  index index.html index.php;


  location / {

    try_files $uri $uri/ /index.php?$query_string;

  }


  location ~ \.php$ {


    fastcgi_split_path_info ^(.+\.php)(/.+)$;

    fastcgi_pass unix:/mnt/home/php-fpm.sock;

    fastcgi_param SCRIPT_FILENAME $document_root$fastcgi_script_name;

    fastcgi_index index.php;


    include fastcgi_params;


  }

}
We have completed the environment settings required to continue development. Let's get into the design part.
If you have used an ORM framework before, you will be very familiar with this topic. In Laravel projects, domain models are placed in the app/ folder by default. In this application we will perform CRUD operations on messages, which means we need to create a Message model.
If you want to create a model, just create a class that extends the Model class, which is an abstract class in the Laravel core package Illuminate\Database\Eloquent . Create a file named Message.php under the app/ folder and put the following content into the file:
<?php


namespace App;


use Illuminate\Database\Eloquent\Model;


class Message extends Model

{

    protected $table = 'messages';


}
This model will allow us to easily perform some database related operations. For example, when you execute the following query:
<?php

.....

Message::all();

...

?>
它将为您提供数据库中的所有消息。但是,它如何决定将在结果中获取的表名称?它使用模型类中的 $table 值。当您创建新消息时,它会直接将您的消息模型保存到 messages 表中。我们将在控制器部分详细介绍模型。
控制器是定义应用程序行为的地方。如果我们的应用程序中存在 ChatController ,我们将执行一些与消息相关的操作。我们的应用程序将有四个端点:
GET /login:用于渲染登录页面GET /chat:用于渲染聊天页面GET /messages:用于列出用户首次打开聊天页面时显示的最后五条消息POST /messages:用于保存新消息为了创建控制器,只需在 App\Http\Controllers 下创建一个类,并让该类扩展 Laravel 特定类 Controller ,该类存在于 App\Http\Controllers。当您请求 /login 或 /chat 端点时,它们将在 resources/views 下呈现自己的模板。您可以通过以下操作来做到这一点。
class ChatController extends Controller

{

    public function getLogin()

    {

        return view("login");

    }


    public function getChat()

    {

        return view("chat");

    }


    public function saveMessage()

    {

        if(Request::ajax()) {

            $data = Input::all();

            $message = new Message;

            $message->author = $data["author"];

            $message->message = $data["message"];

            $message->save();


            Pusher::trigger('chat', 'message', ['message' => $message]);

        }


    }


    public function listMessages(Message $message) {

        return response()->json($message->orderBy("created_at", "DESC")->take(5)->get());

    }

}
第一个和第二个操作将呈现特定页面。第三个操作是保存消息。在此操作中,将检查第一个请求类型。如果是 AJAX 请求,它将获取所有请求正文作为关联数组。该数组用于填充新创建的模型消息。
然后直接对模型执行save()方法保存数据库。每当有新消息保存到数据库时,都会通过触发 message 事件将相同的消息发送到 Pusher。当您触发事件时,所有连接的客户端都会收到通知。为了在 Laravel 项目中使用 Pusher 类,您可以执行以下操作:
composer 需要 vinkla/pusher 提供与 Pusher 相关的软件包。config/app.php 中,即 Vinkla\Pusher\PusherServiceProvider::class。
Vinkla\Pusher\Facades\Pusher;。您对这些软件包没问题,但是 Pusher 配置怎么样?您需要使用以下命令来发布项目中的供应商:
php artisan vendor:publish
此命令将创建一个配置文件 config/pusher.php,您需要提供可在 Pusher 仪表板中找到的所需凭据。配置文件如下所示:
'connections' => [


        'main' => [

            'auth_key' => 'auth_key',

            'secret' => 'secret',

            'app_id' => 'app_id',

            'options' => [],

            'host' => null,

            'port' => null,

            'timeout' => null,

        ],


        'alternative' => [

            'auth_key' => 'your-auth-key',

            'secret' => 'your-secret',

            'app_id' => 'your-app-id',

            'options' => [],

            'host' => null,

            'port' => null,

            'timeout' => null,

        ],


    ]
第四个端点用于列出新加入用户的聊天页面上显示的最后五条消息。神奇的代码是:
public function listMessages(Message $message) {

        return response()->json($message->orderBy("created_at", "DESC")->take(5)->get());

    }
在此代码中,Message 模型被注入到操作中,或使用 $message 执行数据库相关操作。首先按 created_at 按降序排列消息,然后取最后 5 个。使用 response()->json(...) 以 JSON 格式返回结果。
我们已经提到了控制器和操作,但是当用户访问特定 URL 时这些操作是如何执行的呢?您可以将路由配置添加到文件 app/Http/routes.php。您可以看到下面的示例:
<?php


Route::get('/chat', '\App\Http\Controllers\Chat\ChatController@getChat');


Route::get('/login', '\App\Http\Controllers\Chat\ChatController@getLogin');


Route::get('/messages', '\App\Http\Controllers\Chat\ChatController@listMessages');


Route::post('/messages', '\App\Http\Controllers\Chat\ChatController@saveMessage');
在此用法中,请求 URI 和请求方法映射到控制器名称和操作名称。
这就是控制器的全部内容。让我们切换到 View 部分。
在本节中,我们使用了 Laravel 提供的 Blade 模板引擎。实际上,我们的项目中没有模板引擎的东西,但是如果你想从控制器发送值到视图,你可以直接使用这个项目。
我们有两个视图页面:login.blade.php 和 chat.blade.php。正如您所看到的,视图文件名中有一个 Blade 关键字,表明这将用于 Blade 模板引擎。
第一个只是简单的登录操作,所以我们先来说说chat页面。在此视图文件中,有一些从 CDN 提供的第三方 JavaScript 库,例如 jQuery、jQuery Cookie、Bootstrap 和 Pusher。我们有一个聊天表单来发送消息,Laravel 在页面中放置了元描述:
<meta name="_token" value="token">
但是,我们通过 AJAX 发送聊天消息,并且 AJAX 请求标头中没有令牌。我们通过使用以下代码片段提供了解决方案:
$.ajaxSetup({

            headers: { 'X-CSRF-Token' : $('meta[name=_token]').attr('content') }

        });
每当您发送 AJAX 请求时,此令牌都会被放入标头内。
为了实时监听消息通道,我们使用了以下内容:
var pusher = new Pusher('app_id');

var channel = pusher.subscribe('chat');

channel.bind('message', function(data) {

    var message = data.message;

    $(".media-list li").first().remove();

    $(".media-list").append('<li class="media"><div class="media-body"><div class="media"><div class="media-body">'

    + message.message + '<br/><small class="text-muted">' + message.author + ' | ' + message.created_at + '</small><hr/></div></div></div></li>');

});
首先,我们有一个 Pusher 对象,其中包含 app_id 构造函数。然后,客户端订阅该频道。每当名为 message 的新事件到达时,就会在 bind() 函数内执行回调函数。消息列表区域将刷新为新消息。
最后,每当新用户打开聊天页面时,消息列表区域都会显示最后五条消息,代码如下:
$.get("/messages", function (messages) {

    refreshMessages(messages)

});
您可以参考源码来分析视图页面的完整源码。
我们将使用 Modulus 来托管我们的应用程序。
Modulus 是用您选择的语言部署、扩展和监控应用程序的最佳 PaaS 之一。在继续部署之前,请转到 Modulus 并创建一个帐户。
Modulus 中的部署非常容易。您唯一需要做的就是安装 Node.js 模块并运行命令。您还可以压缩项目并将其上传到 Modulus。我们更喜欢本教程中的第一个选项。
我假设您已经在计算机上安装了 Node.js 和 npm。只需打开命令行工具并执行 npm install -g modulus 即可。成功安装后,使用 Modulus CLI 登录您的 Modulus 帐户:modulus login。如果想使用GitHub登录,可以使用模数登录--github。
登录后,使用以下命令创建一个项目:modulus project create "RealtimeChatLaravel"。您已在 Modulus 端创建了一个应用程序。
您需要做的最后一件事是在项目根文件夹中创建一个名为 sites-enabled 的文件夹,并将我们在上面 Nginx 部分中提到的 Nginx 配置放入此 sites-enabled 文件夹。
让我们将您的项目部署到此应用程序下的 Modulus。执行 modulus deploy 开始部署,就完成了!此命令会将您的项目文件上传到 Modulus,并且还会使用您放入 sites-enabled 文件夹中的 Nginx 配置来配置 Web 服务器。
成功部署后,您将收到一条消息 RealtimeChatLaravel running at http://realtimechatlaravel-51055.onmodulus.net/cha。转至此 URL 查看工作演示。
Modulus CLI 有非常有用的命令可在部署和运行时部分使用。例如,您可以使用 modulus 项目日志 tail 跟踪正在运行的项目的日志,使用 modulus env set <key> <value></value></key> 设置环境变量,等等。可以使用 modulus help 查看完整的命令列表。
如果你正在构建一个PHP Web应用程序,你不可避免地需要处理Web服务器,例如Apache或NGINX;但是,如果您使用 Modulus,则可以只专注于您的 PHP 项目。 Modulus 允许您将 Web 服务器配置放入项目中,以便在部署代码时它会生效。
在本教程中,我们重点关注实时聊天应用程序,并发现由于 Modulus,该应用程序的其他方面都非常容易处理。
The above is the detailed content of Building a real-time chat application using Modulus and Laravel 5. For more information, please follow other related articles on the PHP Chinese website!


![[Web front-end] Node.js quick start](https://img.php.cn/upload/course/000/000/067/662b5d34ba7c0227.png)


