
 Web Front-end
JS Tutorial
Enhancing Project Management in Angular-Based Grocery List Manager: Part 2
Web Front-end
JS Tutorial
Enhancing Project Management in Angular-Based Grocery List Manager: Part 2
Enhancing Project Management in Angular-Based Grocery List Manager: Part 2

In the first part of this Angular tutorial series, you learned how to get started creating a grocery list manager using Angular. You learned how to create a view of the Grocery component, add items to a grocery list, and display the added items.
In this section, you will implement the functionality of marking completed projects, editing existing projects, and deleting added projects.
start using
Let's start by cloning the source code for the first part of this tutorial. In your terminal, write the following code to clone the source code:
git clone https://github.com/royagasthyan/AngularGrocery
After cloning the source code, navigate to the project folder and install the required dependencies.
cd AngularGrocery
npm install
After installing the dependencies, you will be able to start the server. From the project folder, enter the following command:
ng serve
Point your browser to http://localhost:4200/ and the application should be running.
Update grocery items
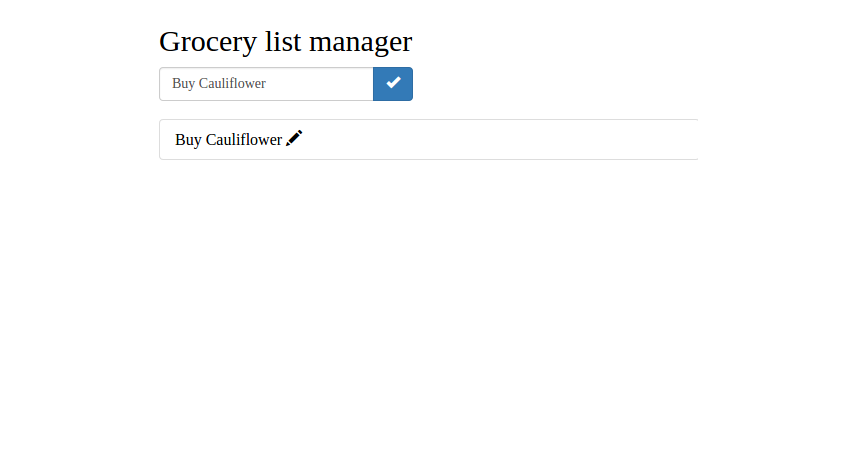
After you add grocery items to your list, you should be able to edit and update them. Let's provide an edit button in the list grid, which when clicked will enable editing of existing items.
Modify app.grocery.html code to include edit buttons within the grid.
<span class="glyphicon glyphicon-pencil floatright"></span>
Save the above changes and restart the server. Load the page and enter some items, you will see edit buttons for each item.

You need to add an on click method to handle item editing when the user clicks the edit button. Modify app.grocery.html to add a click event for editing items.
<span (click)="onEdit(task)" class="glyphicon glyphicon-pencil floatright"></span>
Pass task to the onEdit method (as shown in the code above) to identify the item to be edited.
Initialize the task scope variable in the GroceryComponent class as follows:
task = {
    name: '',
	id: 0
  };
In the onClick method you will check the id to see if it is an existing item or a new item. Modify the onClick method as follows:
if(this.task.id == 0){
    this.tasks.push({id: (new Date()).getTime(),name: this.task.name});
}
As shown in the picture, you have assigned each task a unique timestamp, which is id. Now let's define the onEdit method to edit an existing item. In the onEdit method, assign the incoming item to the task variable.
onEdit(item){
    this.task = item;
}
Save changes and restart the server. Enter new items in your shopping list and click the corresponding edit button. You can edit and update this entry by clicking the OK button.
Delete Grocery Items
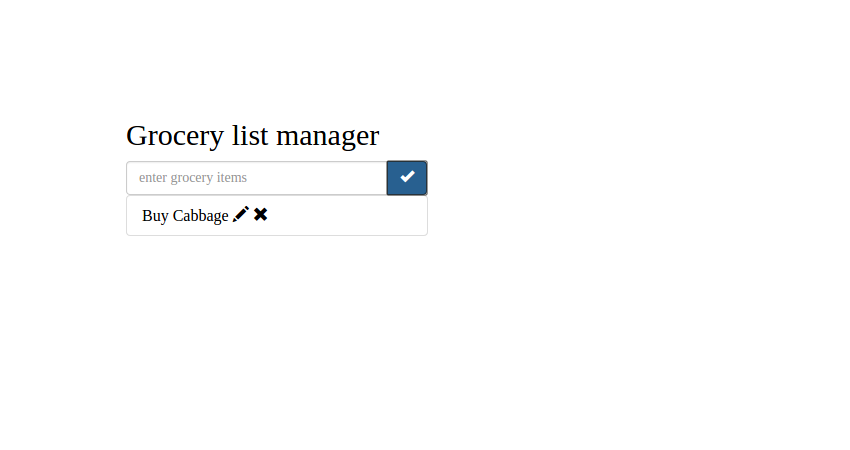
Let's add a delete icon to delete existing items. Update the app.grocery.html file and modify the HTML code as follows:
<span class="glyphicon glyphicon-remove floatright paddingLeft"></span>
Here is what the complete app.grocery.html file looks like:
Grocery list manager
- {{ task.name }} <span class="glyphicon glyphicon-remove floatright paddingLeft"></span> <span (click)="onEdit(task)" class="glyphicon glyphicon-pencil floatright"></span>
Add click event to delete icon to delete groceries.
<span (click)="onDelete(task)" class="glyphicon glyphicon-remove floatright paddingLeft"></span>
Save changes and restart the server. Try adding new items to the grocery management app and you will see these items along with delete and edit icons.
To implement the delete function, you need to add onDelete method = "inline">app.grocery.ts in
<div class="code" style="position:relative; padding:0px; margin:0px;"><pre class='brush:php;toolbar:false;'>onDelete(item){
    // Delete functionality will be here
}
</pre><div class="contentsignin">Copy after login</div></div>
<p> After the user clicks the delete icon, you need to check the item <code class="inline">id
against the list of grocery items and delete the entry from the tasks list. Here's what the onDelete method looks like:
onDelete(item){
    for(var i = 0;i < this.tasks.length; i++){
    	if(item.id == this.tasks[i].id){
    		this.tasks.splice(i,1);
    		break;
    	}
    }
}
As shown in the code above, you have iterated over the tasks list and checked it based on the clicked item id. If it matches an item in the tasks list, use the splice method to remove it.
Save the above changes and restart the server. Add some items to the grocery list manager. It will be added to the task list grid along with the delete and edit icons. Try clicking the delete icon and the item will be removed from the items list.
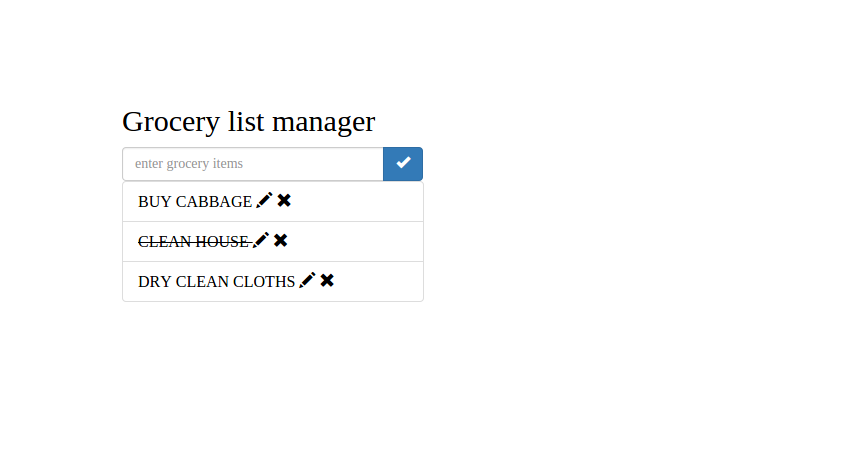
Mark groceries as complete
Let's add the ability to remove items added to the list. Once the user completes a task in the shopping list manager, it should be possible to delete the completed task. To track new and completed tasks, add a new variable strike to the task information.
Modify the onClick method to include the new strike variable as follows:
  onClick(){
    if(this.task.id == 0){
		this.tasks.push({id: (new Date()).getTime(),name: this.task.name, strike: false});
	}

  	this.task = {
		name: '',
		id: 0
	};
  }
在 src/style.css 文件中添加一个名为 strike 的新类,该类将删除该项目。
.strike{
    text-decoration:line-through;
}
在项目上包含单击事件,以切换 items 变量中的 strike 变量。您将根据 strike 变量的布尔值将 strike 类应用于项目。默认情况下,它将为 false。以下是用于切换罢工变量值的 onStrike 方法:
onStrike(item){
  for(var i = 0;i < this.tasks.length; i++){
    if(item.id == this.tasks[i].id){
      if(this.tasks[i].strike){
        this.tasks[i].strike = false;
      }
      else{
        this.tasks[i].strike = true;
      }
      break;
    }
  }
}
如上面的方法所示,您将迭代项目列表。找到该项目后,您可以切换罢工值。
基于 strike 变量,您需要将类 strike 应用到任务名称范围。其外观如下:
<span (click)="onStrike(task)" [ngClass]="{'strike': task.strike}"> {{ task.name }} </span>
如图所示,如果 task.strike 值为 ngClass 指令将类 strike 应用于 span 元素class="inline">true。
保存以上更改并重新启动服务器。将项目添加到列表中,然后单击添加的项目。单击后,该项目将按预期被删除。
总结
在本教程中,您了解了如何使用 Angular 在杂货店管理应用中更新、删除任务并将任务标记为完成。我希望您喜欢本教程。请在下面的评论中告诉我您的想法。
JavaScript 已成为事实上的网络工作语言之一。它并非没有学习曲线,而且还有大量的框架和库可以让您忙碌起来。如果您正在寻找其他资源来学习或在工作中使用,请查看我们在 Envato 市场中提供的资源。
哦,不要忘记本教程的源代码可以在 GitHub 上找到。
The above is the detailed content of Enhancing Project Management in Angular-Based Grocery List Manager: Part 2. For more information, please follow other related articles on the PHP Chinese website!

Hot AI Tools

Undresser.AI Undress
AI-powered app for creating realistic nude photos

AI Clothes Remover
Online AI tool for removing clothes from photos.

Undress AI Tool
Undress images for free

Clothoff.io
AI clothes remover

AI Hentai Generator
Generate AI Hentai for free.

Hot Article
Hot Tools

Notepad++7.3.1
Easy-to-use and free code editor

SublimeText3 Chinese version
Chinese version, very easy to use

Zend Studio 13.0.1
Powerful PHP integrated development environment

Dreamweaver CS6
Visual web development tools

SublimeText3 Mac version
God-level code editing software (SublimeText3)
Hot Topics
 1378
1378
 52
52

 How do I create and publish my own JavaScript libraries?
Mar 18, 2025 pm 03:12 PM
How do I create and publish my own JavaScript libraries?
Mar 18, 2025 pm 03:12 PM
Article discusses creating, publishing, and maintaining JavaScript libraries, focusing on planning, development, testing, documentation, and promotion strategies.
 How do I optimize JavaScript code for performance in the browser?
Mar 18, 2025 pm 03:14 PM
How do I optimize JavaScript code for performance in the browser?
Mar 18, 2025 pm 03:14 PM
The article discusses strategies for optimizing JavaScript performance in browsers, focusing on reducing execution time and minimizing impact on page load speed.
 What should I do if I encounter garbled code printing for front-end thermal paper receipts?
Apr 04, 2025 pm 02:42 PM
What should I do if I encounter garbled code printing for front-end thermal paper receipts?
Apr 04, 2025 pm 02:42 PM
Frequently Asked Questions and Solutions for Front-end Thermal Paper Ticket Printing In Front-end Development, Ticket Printing is a common requirement. However, many developers are implementing...
 How do I debug JavaScript code effectively using browser developer tools?
Mar 18, 2025 pm 03:16 PM
How do I debug JavaScript code effectively using browser developer tools?
Mar 18, 2025 pm 03:16 PM
The article discusses effective JavaScript debugging using browser developer tools, focusing on setting breakpoints, using the console, and analyzing performance.
 Who gets paid more Python or JavaScript?
Apr 04, 2025 am 12:09 AM
Who gets paid more Python or JavaScript?
Apr 04, 2025 am 12:09 AM
There is no absolute salary for Python and JavaScript developers, depending on skills and industry needs. 1. Python may be paid more in data science and machine learning. 2. JavaScript has great demand in front-end and full-stack development, and its salary is also considerable. 3. Influencing factors include experience, geographical location, company size and specific skills.
 How do I use source maps to debug minified JavaScript code?
Mar 18, 2025 pm 03:17 PM
How do I use source maps to debug minified JavaScript code?
Mar 18, 2025 pm 03:17 PM
The article explains how to use source maps to debug minified JavaScript by mapping it back to the original code. It discusses enabling source maps, setting breakpoints, and using tools like Chrome DevTools and Webpack.
 Getting Started With Chart.js: Pie, Doughnut, and Bubble Charts
Mar 15, 2025 am 09:19 AM
Getting Started With Chart.js: Pie, Doughnut, and Bubble Charts
Mar 15, 2025 am 09:19 AM
This tutorial will explain how to create pie, ring, and bubble charts using Chart.js. Previously, we have learned four chart types of Chart.js: line chart and bar chart (tutorial 2), as well as radar chart and polar region chart (tutorial 3). Create pie and ring charts Pie charts and ring charts are ideal for showing the proportions of a whole that is divided into different parts. For example, a pie chart can be used to show the percentage of male lions, female lions and young lions in a safari, or the percentage of votes that different candidates receive in the election. Pie charts are only suitable for comparing single parameters or datasets. It should be noted that the pie chart cannot draw entities with zero value because the angle of the fan in the pie chart depends on the numerical size of the data point. This means any entity with zero proportion
 The difference in console.log output result: Why are the two calls different?
Apr 04, 2025 pm 05:12 PM
The difference in console.log output result: Why are the two calls different?
Apr 04, 2025 pm 05:12 PM
In-depth discussion of the root causes of the difference in console.log output. This article will analyze the differences in the output results of console.log function in a piece of code and explain the reasons behind it. �...
