

Advanced: Reusable Custom Meta Box: Advanced Fields

In Part 1 of our custom meta box template tutorial series, we covered how to set up a custom meta box that loops through a series of fields and outputs each field as well as the various types of form fields required html. Now we're ready to start adding some advanced items to the array and switch box.
Broadcast Group
Radio buttons are actually never used on their own, as they are used to force the user to select at least one of two options, not as an on/off switch like a checkbox. The first thing we need to do is add the single option to our $custom_meta_fields array.
array (
	'label' => 'Radio Group',
	'desc'	=> 'A description for the field.',
	'id'	=> $prefix.'radio',
	'type'	=> 'radio',
	'options' => array (
		'one' => array (
			'label' => 'Option One',
			'value'	=> 'one'
		),
		'two' => array (
			'label' => 'Option Two',
			'value'	=> 'two'
		),
		'three' => array (
			'label' => 'Option Three',
			'value'	=> 'three'
		)
	)
)
Be sure to add this to the other array items in the original $custom_meta_fields array we started in Part 1.
This array is almost identical to our select box item. It has a main tag, a description, and a unique ID. Define the type and then add the options array. It is important that the option key is the same as the option value because we will later check the saved array to get the saved value.
// radio
case 'radio':
	foreach ( $field['options'] as $option ) {
		echo '<input type="radio" name="'.$field['id'].'" id="'.$option['value'].'" value="'.$option['value'].'" ',$meta == $option['value'] ? ' checked="checked"' : '',' />
				<label for="'.$option['value'].'">'.$option['label'].'</label><br />';
	}
break;
This code will be added after the last "break;" in our meta box switch.
- Loop through each option in the field nested "options" array
- Use inline conditions to determine whether the saved value matches the currently opened value, and if true, output the "checked" attribute
- Use the value of the option as the unique ID of the tag
- Add a newline character at the end so that the next option is on a new line
- End with description field. The preceding "
" is not needed because we left a when looping through the options
CheckboxGroup
We've covered how to use checkboxes as switches and how to select an option from multiple options, but we want to be able to save multiple values for the same field? This is where checkbox groups come in handy.
array (
	'label'	=> 'Checkbox Group',
	'desc'	=> 'A description for the field.',
	'id'	=> $prefix.'checkbox_group',
	'type'	=> 'checkbox_group',
	'options' => array (
		'one' => array (
			'label' => 'Option One',
			'value'	=> 'one'
		),
		'two' => array (
			'label' => 'Option Two',
			'value'	=> 'two'
		),
		'three' => array (
			'label' => 'Option Three',
			'value'	=> 'three'
		)
	)
)
Again we add it to the $custom_meta_fields array and the settings are almost the same as similar fields with a unique id and defined type.
// checkbox_group
case 'checkbox_group':
	foreach ($field['options'] as $option) {
		echo '<input type="checkbox" value="'.$option['value'].'" name="'.$field['id'].'[]" id="'.$option['value'].'"',$meta && in_array($option['value'], $meta) ? ' checked="checked"' : '',' />
				<label for="'.$option['value'].'">'.$option['label'].'</label><br />';
	}
	echo '<span class="description">'.$field['desc'].'</span>';
break;
The biggest difference here is that we save this data as an array.
- Loop through each option defined in the array
- Store data in an array by adding square brackets at the end of the name: []
- In the inline condition that outputs the "checked" attribute, use "in_array()" to check whether the value is within the array
- As before, add a value to each input, close the loop, and output the description
Category selection
It's great to be able to provide custom taxonomies for a variety of purposes, but sometimes you want to limit users to selecting only one term per post. A simple solution is to remove the default select box that WordPress adds to the Compose Post page and add it as a select box to a custom meta box.
array(
	'label' => 'Category',
	'id'	=> 'category',
	'type'	=> 'tax_select'
)
For this example, I will use the built-in taxonomy "Categories". Add this to your $custom_meta_fields array. Make sure the "id" is the same as the category name.
// tax_select
case 'tax_select':
	echo '<select name="'.$field['id'].'" id="'.$field['id'].'">
			<option value="">Select One</option>'; // Select One
	$terms = get_terms($field['id'], 'get=all');
	$selected = wp_get_object_terms($post->ID, $field['id']);
	foreach ($terms as $term) {
		if (!empty($selected) && !strcmp($term->slug, $selected[0]->slug))
			echo '<option value="'.$term->slug.'" selected="selected">'.$term->name.'</option>';
		else
			echo '<option value="'.$term->slug.'">'.$term->name.'</option>';
	}
	$taxonomy = get_taxonomy($field['id']);
	echo '</select><br /><span class="description"><a href="'.get_bloginfo('home').'/wp-admin/edit-tags.php?taxonomy='.$field['id'].'">Manage '.$taxonomy->label.'</a></span>';
break;
We need more information to make this field fully functional than the other fields we have set up.
- Open the select box and add a blank value as "Select One"
- Get all terms of the set classification
- Get the terms saved for the current category
- Start looping through each term.
- To keep things simple and readable, we use full-sized conditional statements that output an option if it matches the saved term and a regular option otherwise.
- When you close the loop and select box, we want to get some information about the classification and store it in a variable.
- Use description areas as a simple way to link users to areas where taxonomy terms can be managed. Make sure the plurals are correct (there is no such thing as a category) using the tags from the $taxonomy information we collected.
Delete the default category box
Since we want to override the default box with a custom select box without any conflicts in user experience or saving data, it is necessary to remove the taxonomy's edit box from the screen.
function remove_taxonomy_boxes() {
	remove_meta_box('categorydiv', 'post', 'side');
}
add_action( 'admin_menu' , 'remove_taxonomy_boxes' );
You could use the $custom_meta_fields array here to loop through each "tax_select" field and add it to this delete function, but it's probably much simpler to name them individually. You need to know the ID of the category box's div in order to delete it correctly. Learn more about remove_meta_box() in the WordPress Codex.
Save Terms
The final step for this field is to ensure that the taxonomy is saved as-is and not as a custom field. To do this, we'll go back and modify the save_custom_meta() function we created in Part 1 of this series.
First, skip it in the field loop. Find this line:
foreach ($custom_meta_fields as $field) {
Then add this line:
if($field['type'] == 'tax_select') continue;
Then add the following after the foreach loop:
// save taxonomies
$post = get_post($post_id);
$category = $_POST['category'];
wp_set_object_terms( $post_id, $category, 'category' );
This just takes the value from our category select field and sets it as the category term for the post.
发布选择
另一个不太可能但有用的字段是通过将 ID 保存在自定义字段中来将另一个帖子与某个帖子关联起来。这非常类似于 CMS,我发现它对于诸如链接幻灯片帖子类型以转到网站上的另一个帖子或页面之类的事情非常有用,只需从下拉菜单中选择它即可。您可以稍后在另一个函数中使用该 ID 查询该帖子,以从该帖子中获取您需要的任何信息。
array(
	'label' => 'Post List',
	'desc' => 'A description for the field.',
	'id' 	=>  $prefix.'post_id',
	'type' => 'post_list',
	'post_type' => array('post','page')
)
我们这里有所有常见的嫌疑人,但最后我们添加了一个额外的变量来保存您想要在列表中的帖子类型。您可以在此数组中包含帖子、页面和任何其他自定义帖子类型。
// post_list
case 'post_list':
$items = get_posts( array (
	'post_type'	=> $field['post_type'],
	'posts_per_page' => -1
));
	echo '<select name="'.$field['id'].'" id="'.$field['id'].'">
			<option value="">Select One</option>'; // Select One
		foreach($items as $item) {
			echo '<option value="'.$item->ID.'"',$meta == $item->ID ? ' selected="selected"' : '','>'.$item->post_type.': '.$item->post_title.'</option>';
		} // end foreach
	echo '</select><br /><span class="description">'.$field['desc'].'</span>';
break;
您可以添加很多选项来过滤此查询,但我们使用的是对设置帖子类型的所有帖子的基本抓取。
- 查询所有帖子
- 打开选择字段并添加空白值
- 循环遍历每个帖子,并将 ID 设置为选项的值,并将标有帖子类型的标题设置为可供选择的显示文本
- 关闭循环和选择字段并添加说明
结论
如果到目前为止您一直在关注本系列的两个部分,那么您的最终盒子应该如下图所示:
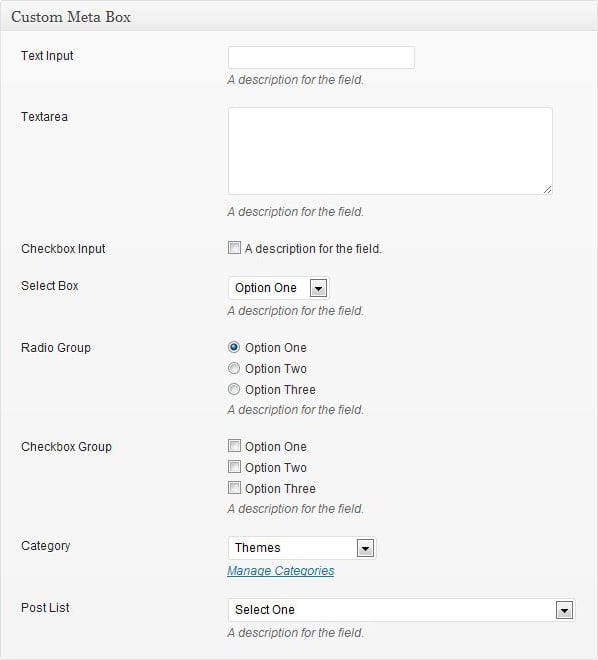
我们确实正在填写可重复使用的模板,用于创建可重复的自定义元框字段,并添加了这种高级甚至非正统的字段。我们将在下一篇文章中用一些更棘手但有用的字段(例如日期选择器和图像上传器)来结束该系列。
The above is the detailed content of Advanced: Reusable Custom Meta Box: Advanced Fields. For more information, please follow other related articles on the PHP Chinese website!

Hot AI Tools

Undresser.AI Undress
AI-powered app for creating realistic nude photos

AI Clothes Remover
Online AI tool for removing clothes from photos.

Undress AI Tool
Undress images for free

Clothoff.io
AI clothes remover

AI Hentai Generator
Generate AI Hentai for free.

Hot Article
Hot Tools

Notepad++7.3.1
Easy-to-use and free code editor

SublimeText3 Chinese version
Chinese version, very easy to use

Zend Studio 13.0.1
Powerful PHP integrated development environment

Dreamweaver CS6
Visual web development tools

SublimeText3 Mac version
God-level code editing software (SublimeText3)
Hot Topics
 1386
1386
 52
52

 Alipay PHP SDK transfer error: How to solve the problem of 'Cannot declare class SignData'?
Apr 01, 2025 am 07:21 AM
Alipay PHP SDK transfer error: How to solve the problem of 'Cannot declare class SignData'?
Apr 01, 2025 am 07:21 AM
Alipay PHP...
 Explain JSON Web Tokens (JWT) and their use case in PHP APIs.
Apr 05, 2025 am 12:04 AM
Explain JSON Web Tokens (JWT) and their use case in PHP APIs.
Apr 05, 2025 am 12:04 AM
JWT is an open standard based on JSON, used to securely transmit information between parties, mainly for identity authentication and information exchange. 1. JWT consists of three parts: Header, Payload and Signature. 2. The working principle of JWT includes three steps: generating JWT, verifying JWT and parsing Payload. 3. When using JWT for authentication in PHP, JWT can be generated and verified, and user role and permission information can be included in advanced usage. 4. Common errors include signature verification failure, token expiration, and payload oversized. Debugging skills include using debugging tools and logging. 5. Performance optimization and best practices include using appropriate signature algorithms, setting validity periods reasonably,
 Describe the SOLID principles and how they apply to PHP development.
Apr 03, 2025 am 12:04 AM
Describe the SOLID principles and how they apply to PHP development.
Apr 03, 2025 am 12:04 AM
The application of SOLID principle in PHP development includes: 1. Single responsibility principle (SRP): Each class is responsible for only one function. 2. Open and close principle (OCP): Changes are achieved through extension rather than modification. 3. Lisch's Substitution Principle (LSP): Subclasses can replace base classes without affecting program accuracy. 4. Interface isolation principle (ISP): Use fine-grained interfaces to avoid dependencies and unused methods. 5. Dependency inversion principle (DIP): High and low-level modules rely on abstraction and are implemented through dependency injection.
 How to automatically set permissions of unixsocket after system restart?
Mar 31, 2025 pm 11:54 PM
How to automatically set permissions of unixsocket after system restart?
Mar 31, 2025 pm 11:54 PM
How to automatically set the permissions of unixsocket after the system restarts. Every time the system restarts, we need to execute the following command to modify the permissions of unixsocket: sudo...
 Explain the concept of late static binding in PHP.
Mar 21, 2025 pm 01:33 PM
Explain the concept of late static binding in PHP.
Mar 21, 2025 pm 01:33 PM
Article discusses late static binding (LSB) in PHP, introduced in PHP 5.3, allowing runtime resolution of static method calls for more flexible inheritance.Main issue: LSB vs. traditional polymorphism; LSB's practical applications and potential perfo
 How to send a POST request containing JSON data using PHP's cURL library?
Apr 01, 2025 pm 03:12 PM
How to send a POST request containing JSON data using PHP's cURL library?
Apr 01, 2025 pm 03:12 PM
Sending JSON data using PHP's cURL library In PHP development, it is often necessary to interact with external APIs. One of the common ways is to use cURL library to send POST�...
 How to debug CLI mode in PHPStorm?
Apr 01, 2025 pm 02:57 PM
How to debug CLI mode in PHPStorm?
Apr 01, 2025 pm 02:57 PM
How to debug CLI mode in PHPStorm? When developing with PHPStorm, sometimes we need to debug PHP in command line interface (CLI) mode...
 Framework Security Features: Protecting against vulnerabilities.
Mar 28, 2025 pm 05:11 PM
Framework Security Features: Protecting against vulnerabilities.
Mar 28, 2025 pm 05:11 PM
Article discusses essential security features in frameworks to protect against vulnerabilities, including input validation, authentication, and regular updates.
