
 Backend Development
PHP Tutorial
Custom Plugins: A Comprehensive Guide to WordPress Taxonomies for Beginners
Backend Development
PHP Tutorial
Custom Plugins: A Comprehensive Guide to WordPress Taxonomies for Beginners
Custom Plugins: A Comprehensive Guide to WordPress Taxonomies for Beginners

In this series, we’ve been looking at WordPress taxonomies: what they are, how they work, how to distinguish the different types that exist, and how they are stored in the underlying database. p>
The only thing we have to do is assemble a plugin that demonstrates how to use the API to implement our own custom taxonomies. So, in this article, we will do exactly that.
Recall the first article in this series:
Classification is one of those words that most people have never heard of or used. Basically, a taxonomy is a way of grouping things together.
Throughout this series, we have been using photography and videography as classification examples. Therefore, for the plugin we are going to build, we will include hierarchical and non-hierarchical taxonomies related to these two classifications.
- The hierarchical taxonomy will include the basic taxonomy of photos and videos.
- Non-hierarchical classification will be used to specify the film type used. This can be black and white, color, sepia, or any color you want to specify.
Finally, the plugin will work with the existing standard post types that come with WordPress. This should provide the most flexibility as it relates to building the plugin, demonstrating the concept, and using it in your own installation.
My Custom Taxonomy
For the purposes of the example plugin, we'll call it My Custom Taxonomy, and we'll build it in the following stages:
- We will prepare the core plugin file, which contains the correct title text needed to display the plugin in the WordPress dashboard.
- We will set up the code required to execute the core plugin.
- We will write code to introduce the Photo and Video categories.
- We will write code to introduce the movie genre taxonomy.
- Then we will test the complete plugin.
1. Plug-in header
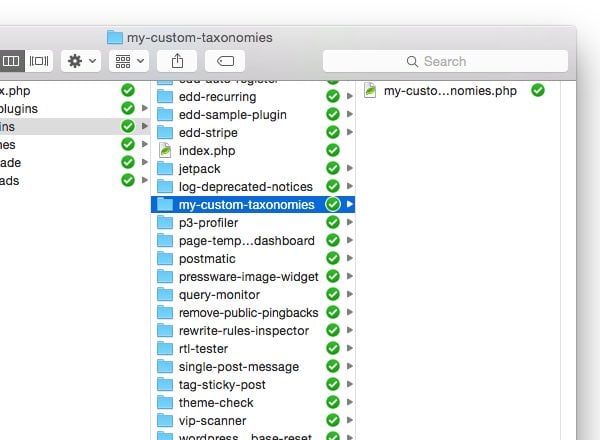
Before doing anything else, create a directory named my-custom-taxonomies in wp-content/plugins and introduce a directory named My custom taxonomy.php.
Add the following code comment block to the file:
<?php
/**
 * My Custom Taxonomies
 *
 * Demonstrates how to create custom taxonomies using the WordPress API.
 * Showcases both hierarchical and non-hierarchical taxonomies.
 *
 * @link              https://code.tutsplus.com/series/the-beginners-guide-to-wordpress-taxonomies--cms-706
 * @since             1.0.0
 * @package           Custom_Taxonomies
 *
 * @wordpress-plugin
 * Plugin Name:       My Custom Taxonomies
 * Plugin URI:        http://example.com/plugin-name-uri/
 * Description:       Demonstrates how to create custom taxonomies using the WordPress API.
 * Version:           1.0.0
 * Author:            Tom McFarlin
 * Author URI:        http://tommcfarlin.com/
 * License:           GPL-2.0+
 * License URI:       http://www.gnu.org/licenses/gpl-2.0.txt
 */
At this point, you should be able to log into your WordPress dashboard, view the name of the plugin, and activate it. Of course, nothing will actually happen because we haven't done anything to the source code yet.
Next, we need to create another file to actually power the plugin. This will be based on object-oriented programming principles, so we will create a file called class-my-custom-taxonomies.php.
Don't worry about filling it with any source code just yet. Let’s go back to my-custom-taxonomies.php and add a condition to ensure that the core plugin file cannot be run outside of the WordPress environment.
<?php

// If this file is called directly, abort.
if ( ! defined( 'WPINC' ) ) {
    die;
}
Place this directly under the code comment we provided above.
2. Execute core plug-in
At this point, we are ready to write the code that actually drives the plugin. So let's define a class and a basic function for initialization:
<?php

/**
 * The core plugin class file
 *
 * Defines the functions necessary to register our custom taxonomies with
 * WordPress.
 *
 * @link       http://code.tutsplus.com/series/the-beginners-guide-to-wordpress-taxonomies--cms-706
 * @since      1.0.0
 *
 * @package    Custom_Taxonomies
 * @author     Tom McFarlin <tom@tommcfarlin.com>
 */
class My_Custom_Taxonomies {

    /**
	 * Initializes the plugin by registering the hooks necessary
	 * for creating our custom taxonomies within WordPress.
	 *
	 * @since    1.0.0
	 */
	public function init() {

	}

}
After that, let's go back to my-custom-taxonomies.php and add code to include the file and the methods that create an instance of the class and execute it:
<?php

/** Loads the custom taxonomy class file. */
require_once( dirname( __FILE__ ) . '/class-my-custom-taxonomies.php' );

/**
 * Creates an instance of the My_Custom_Taxonomies class
 * and calls its initialization method.
 *
 * @since    1.0.0
 */
function custom_taxonomies_run() {

    $custom_tax = new My_Custom_Taxonomies();
	$custom_tax->init();

}
custom_taxonomies_run();
Now we have everything we need to start actually setting up hooks and callbacks to create custom taxonomies.
3. Introduction Photos and Videos
At this point, we are ready to start introducing our taxonomy. We first focus on two hierarchical taxonomies - Photo and Video.
In the class body of the class-my-custom-taxonomies.php file, add the following function:
<?php

/**
 * Creates the Photographs taxonomy that appears on all Post dashboard
 * pages.
 *
 * @since    1.0.0
 */
public function init_photographs() {

    $labels = array(
		'name'          => 'Photographs',
		'singular_name' => 'Photograph',
		'edit_item'     => 'Edit Photograph',
		'update_item'   => 'Update Photograph',
		'add_new_item'  => 'Add New Photograph',
		'menu_name'     => 'Photographs'
	);

	$args = array(
		'hierarchical'      => true,
		'labels'            => $labels,
		'show_ui'           => true,
		'show_admin_column' => true,
		'rewrite'           => array( 'slug' => 'photograph' )
	);

	register_taxonomy( 'photograph', 'post', $args );

}
This function is responsible for creating the Photo category and will be called from the init function at the appropriate time.
Now, let’s do the same thing with video :
<?php

/**
 * Creates the Videos taxonomy that appears on all Post dashboard
 * pages.
 *
 * @since    1.0.0
 */
public function init_videos() {

    $labels = array(
		'name'          => 'Videos',
		'singular_name' => 'Video',
		'edit_item'     => 'Edit Video',
		'update_item'   => 'Update Video',
		'add_new_item'  => 'Add New Video',
		'menu_name'     => 'Videos'
	);

	$args = array(
		'hierarchical'      => false,
		'labels'            => $labels,
		'show_ui'           => true,
		'show_admin_column' => true,
		'rewrite'           => array( 'slug' => 'video' )
	);

	register_taxonomy( 'video', 'post', $args );

}
Let's call these two functions in the init function. We do this by registering these functions using the init hook provided by WordPress:
<?php

public function init() {

    add_action( 'init', array( $this, 'init_photographs' ) );
    add_action( 'init', array( $this, 'init_videos' ) );

}
Here we should be able to go to Add New Post and see the new category options in the dashboard. If not, please double check your code against the code shared above.
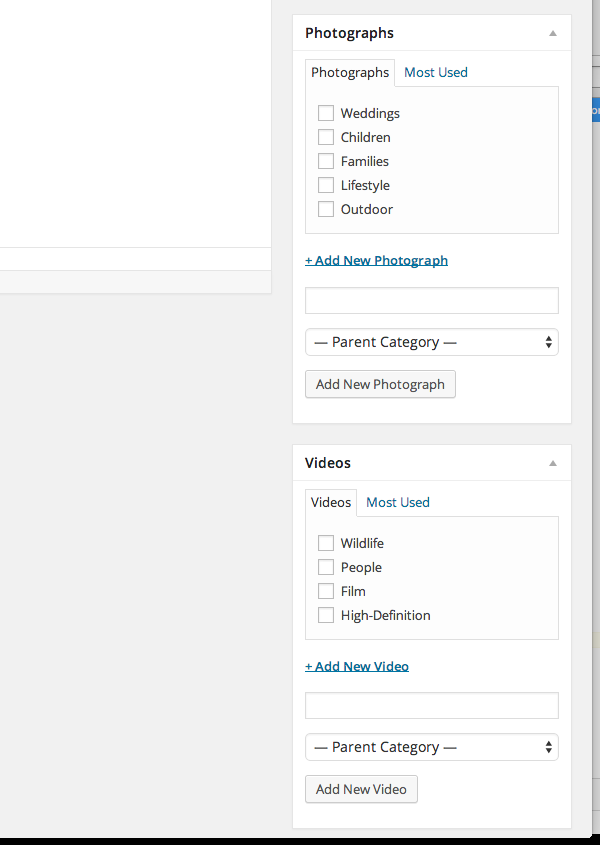
Now that we've covered our hierarchical taxonomy, let's move on to our Video Types - or our non-hierarchical - taxonomy.
4。介绍影片类型
这实际上与我们到目前为止编写的代码没有太大不同。实际上,主要区别在于,我们不是将 hierarchical 指定为 true,而是将其设置为 false。
<?php

/**
 * Creates the Film Type taxonomy that appears on all Post dashboard
 * pages.
 *
 * @since    1.0.0
 */
public function init_film_type() {

    $labels = array(
		'name'          => 'Film Type',
		'singular_name' => 'Film Type',
		'edit_item'     => 'Edit Film Type',
		'update_item'   => 'Update Film Type',
		'add_new_item'  => 'Add New Film Type',
		'menu_name'     => 'Film Type'
	);

	$args = array(
		'hierarchical'      => false,
		'labels'            => $labels,
		'show_ui'           => true,
		'show_admin_column' => true,
		'rewrite'           => array( 'slug' => 'film-type' )
	);

	register_taxonomy( 'film-type', 'post', $args );

}
这将导致不同类型的用户界面元素,看起来更像标签,而不是您在上面看到的类别选项。
最后,将以下行与其余钩子一起添加到 init 方法中:
<?php
add_action( 'init', array( $this, 'init_film_type' ) );
请注意,函数更像是分类标签。再次重申,这是分层分类法和非分层分类法的主要区别之一。
5。测试完整插件
现在我们准备好试用该插件了。假设您正确遵循了本教程中的所有内容,那么您应该能够创建新帖子,并使用照片类型或视频类型对其进行标记作为影片的一种类型,并在保存或更新您的帖子后保留更改。
如果没有,请根据此处引用的内容以及关联的 GitHub 存储库中引用的内容仔细检查您的代码。
结论
WordPress 分类法初学者指南到此结束。在整个系列中,我们广泛了解了分类法的定义、它们在 WordPress 中扮演的角色,甚至还实现了一些我们自己的分类法。
此时,您应该对这个概念以及如何将它们包含在您的下一个项目中有深入的了解。
如果没有,请随时在下面的字段中留下问题、评论或一般反馈。
The above is the detailed content of Custom Plugins: A Comprehensive Guide to WordPress Taxonomies for Beginners. For more information, please follow other related articles on the PHP Chinese website!

Hot AI Tools

Undresser.AI Undress
AI-powered app for creating realistic nude photos

AI Clothes Remover
Online AI tool for removing clothes from photos.

Undress AI Tool
Undress images for free

Clothoff.io
AI clothes remover

AI Hentai Generator
Generate AI Hentai for free.

Hot Article
Hot Tools

Notepad++7.3.1
Easy-to-use and free code editor

SublimeText3 Chinese version
Chinese version, very easy to use

Zend Studio 13.0.1
Powerful PHP integrated development environment

Dreamweaver CS6
Visual web development tools

SublimeText3 Mac version
God-level code editing software (SublimeText3)
Hot Topics
 1378
1378
 52
52

 Alipay PHP SDK transfer error: How to solve the problem of 'Cannot declare class SignData'?
Apr 01, 2025 am 07:21 AM
Alipay PHP SDK transfer error: How to solve the problem of 'Cannot declare class SignData'?
Apr 01, 2025 am 07:21 AM
Alipay PHP...
 Explain JSON Web Tokens (JWT) and their use case in PHP APIs.
Apr 05, 2025 am 12:04 AM
Explain JSON Web Tokens (JWT) and their use case in PHP APIs.
Apr 05, 2025 am 12:04 AM
JWT is an open standard based on JSON, used to securely transmit information between parties, mainly for identity authentication and information exchange. 1. JWT consists of three parts: Header, Payload and Signature. 2. The working principle of JWT includes three steps: generating JWT, verifying JWT and parsing Payload. 3. When using JWT for authentication in PHP, JWT can be generated and verified, and user role and permission information can be included in advanced usage. 4. Common errors include signature verification failure, token expiration, and payload oversized. Debugging skills include using debugging tools and logging. 5. Performance optimization and best practices include using appropriate signature algorithms, setting validity periods reasonably,
 Explain the concept of late static binding in PHP.
Mar 21, 2025 pm 01:33 PM
Explain the concept of late static binding in PHP.
Mar 21, 2025 pm 01:33 PM
Article discusses late static binding (LSB) in PHP, introduced in PHP 5.3, allowing runtime resolution of static method calls for more flexible inheritance.Main issue: LSB vs. traditional polymorphism; LSB's practical applications and potential perfo
 Framework Security Features: Protecting against vulnerabilities.
Mar 28, 2025 pm 05:11 PM
Framework Security Features: Protecting against vulnerabilities.
Mar 28, 2025 pm 05:11 PM
Article discusses essential security features in frameworks to protect against vulnerabilities, including input validation, authentication, and regular updates.
 Customizing/Extending Frameworks: How to add custom functionality.
Mar 28, 2025 pm 05:12 PM
Customizing/Extending Frameworks: How to add custom functionality.
Mar 28, 2025 pm 05:12 PM
The article discusses adding custom functionality to frameworks, focusing on understanding architecture, identifying extension points, and best practices for integration and debugging.
 How to send a POST request containing JSON data using PHP's cURL library?
Apr 01, 2025 pm 03:12 PM
How to send a POST request containing JSON data using PHP's cURL library?
Apr 01, 2025 pm 03:12 PM
Sending JSON data using PHP's cURL library In PHP development, it is often necessary to interact with external APIs. One of the common ways is to use cURL library to send POST�...
 Describe the SOLID principles and how they apply to PHP development.
Apr 03, 2025 am 12:04 AM
Describe the SOLID principles and how they apply to PHP development.
Apr 03, 2025 am 12:04 AM
The application of SOLID principle in PHP development includes: 1. Single responsibility principle (SRP): Each class is responsible for only one function. 2. Open and close principle (OCP): Changes are achieved through extension rather than modification. 3. Lisch's Substitution Principle (LSP): Subclasses can replace base classes without affecting program accuracy. 4. Interface isolation principle (ISP): Use fine-grained interfaces to avoid dependencies and unused methods. 5. Dependency inversion principle (DIP): High and low-level modules rely on abstraction and are implemented through dependency injection.
 What exactly is the non-blocking feature of ReactPHP? How to handle its blocking I/O operations?
Apr 01, 2025 pm 03:09 PM
What exactly is the non-blocking feature of ReactPHP? How to handle its blocking I/O operations?
Apr 01, 2025 pm 03:09 PM
An official introduction to the non-blocking feature of ReactPHP in-depth interpretation of ReactPHP's non-blocking feature has aroused many developers' questions: "ReactPHPisnon-blockingbydefault...
