

Clone WordPress in Linux

Copying WordPress has never seemed easy
I often like to launch a new WordPress website based on an existing website as a template. Configuration of themes, plugins, and settings is useful right from the start, unlike a fresh install where you have to repeat everything from scratch.
In Building an application image for resale on Digital Ocean, I detail the process of building an installable, pre-configured, and pre-optimized WordPress droplet. Essentially, it is a digital ocean of images that can launch a fully loaded WordPress website in minutes. More commonly, however, I want to add a WordPress website to one of my own existing servers.
There are many ways to do this, but I often find that they require a specific and detailed approach that I seem to have to relearn each time. I decided it was time to write a Linux shell script that would do all the work for me in a matter of minutes.
In this tutorial, I'll walk you through my research and generated WordPress clone script. I hope you like it - when I finished it I thought it worked pretty well.
Before we begin, please keep in mind that I do try to engage in the discussion below. If you have questions or topic suggestions, please leave a comment below or contact me on Twitter @reifman. You can also email me directly. I hope many of you will have better ideas and improvements to this script. I'm happy to hear from you.
Other Methods for WordPress Migration
Typically, you launch a new website by migrating your existing website to a new server (essentially copying it) and building on the copy while keeping the source website intact. There are several ways to achieve this.
In Migrating WordPress to a New Server Release with WordPress , I wrote about using the Duplicator plugin to do this, but I found the process cumbersome. It was also difficult to reacquaint myself with the replicator every time I needed to move the site.
I recently wrote about this in Backing up and restoring your WordPress site with CodeGuard for Envato Tuts+ . This service makes the process easier. Soon, we will publish How to Simplify Managing Multiple WordPress Websites , which describes the many powerful advantages of using ManageWP. It has cloning capabilities, but requires FTP — I avoid running FTP on my server for security reasons.
Also in Rachel McCollin’s two-part Envato Tuts+ series: Mobile WordPress: An Introduction and Mobile WordPress: Moving Your Site with Plugins. There is a tutorial on using BackupBuddy on WPBeginner. Finally, WPClone does not require FTP, but does require a clean WordPress installation to build.
You can learn a lot from all of these tutorials and services, but I wanted to see if I could create a command line script that would make cloning a WordPress site faster and easier every time.
Planning script
To write this tutorial, I relied heavily on other people's earlier work to get up to speed on bash scripting and WordPress website operations. I have never considered myself a professional Linux system administrator. Ultimately, I decided to build my clone script on top of Brian Gallagher's WordPress Bash installation script.
Note: These are Debian-based installation scripts; other versions of Linux (such as RedHat and CentOS) have different paths for Apache and different utilities.
Here's Gallagher's description of his basic script:
Download the latest WP version, update wp-config with the database name, username and password provided by the user, create and CHMOD the upload directory, copy all files to the root of the running script, and then delete itself!
There are a lot of well organized scripts out there, but I wanted to make something that would clone the live site. Let’s review the architecture of a typical WordPress configuration.
Initial components of a WordPress website
A typical WordPress installation has four main components for cloning:
- Directory tree of website
- database
- Network server configuration, such as Apache configuration file
- Domain Mapping
We also need information, access rights and security settings:
- Server management account and password
- MySql server username and password
- Source directory of the website
- Web server configuration file of the website
- Database name, username and password
Here's what we need to specify for the cloned site:
- Target directory for cloning website
- Clone database name, username and password
- Clone the web server configuration file of the website
What does the script need to do
- Get all settings via configuration variables or user input.
- Copy the website directory and restore it to the target directory.
- Export the source database and import it into the target database.
- Make sure these directories have appropriate permissions.
- Copy the server configuration file and update domain and directory settings.
- Reload the web server.
We must manually update the DNS for the new target domain. I recommend that you create DNS records before you start so that they are ready to go once you clone your website. There's nothing better than cloning your site and not being able to test the domain name because you're waiting for DNS.
Implementation method of cloning script
Now, we're ready to step through how the script's architecture works. Again, I first utilized Gallagher's WordPress installation script, and you need the initial bash line at the top:
#!/bin/bash -e
# Clone a WordPress site via Bash script
clear
echo "==================================================="
echo "Clone WordPress Script"
echo "==================================================="
Prepare your DNS settings
Before copying the site, you need to configure DNS for the cloned site. You can read about DNS configuration for a new WordPress site here. I’m also excited about this Envato Tuts+ tutorial “Introduction to Learning and Using DNS Records.”
Basically, you need to create an A record or CNAME that routes the desired clone URL to the server we are replicating to.
Setting permissions
On my server, I'm creating a bash script called clnewp.sh. It will require executable permissions:
chmod +x clonewp.sh
Then once it's done you can run it like this:
sudo bash clonewp.sh
I recommend running the script as sudo so you don't run into file permission issues.
Set default value
For testing purposes, I created a function that preloads the script with default settings. It helps me run tests over and over again without having to type everything in over and over again. I also think this might be useful for anyone who wants to modify the script or use it in other ways in the future.
The following are all default settings:
# Set Default Settings (helpful for testing)
default_mysql_user=$"root-admin"
default_mysql_pass=$"super-strong-password"
default_source_domain=$"gardening.io"
default_target_domain=$"cycling.io"
default_source_directory=$"/var/www/gardening"
default_target_directory=$"/var/www/cycling"
default_apache_directory=$"/etc/apache2/sites-available"
default_source_conf=$"gardening.conf"
default_target_conf=$"cycling.conf"
default_source_dbname=$"gardening"
default_source_dbuser=$"user_for_garden"
default_source_dbpass=$"pwd_garden"
default_target_dbname=$"cycling"
default_target_dbuser=$"user_for_cycling"
default_target_dbpass=$"pwd_cycling"
NOW=$(date +"%Y-%m-%d-%H%M")
I know this seems like a lot, but I find it useful to have a MySQL master user and password for database backups, database creation, and imports. However, it is also useful to have a site-specific database user and password to set target database permissions and search and replace in the wp-config.php file. It makes the final cloning process very seamless.
I use NOW timestamps to ensure that the archives we create are unique.
Request settings
The following code displays the default value to the user and allows them to accept it (press Enter) or replace it:
# Request Source Settings
read -p "Source Domain (e.g. "$default_source_domain"): " source_domain
source_domain=${source_domain:-$default_source_domain}
echo $source_domain
read -p "Source Directory (no trailing slash e.g. "$default_source_directory"): " source_directory
source_directory=${source_directory:-$default_source_directory}
echo $source_directory
read -p "Source Database Name (e.g. "$default_source_dbname"): " source_dbname
source_dbname=${source_dbname:-$default_source_dbname}
echo $source_dbname
read -p "Source Database User (e.g. "$default_source_dbuser"): " source_dbuser
source_dbuser=${source_dbuser:-$default_source_dbuser}
echo $source_dbuser
read -p "Source Database Pass (e.g. "$default_source_dbpass"): " source_dbpass
source_dbpass=${source_dbpass:-$default_source_dbpass}
echo $source_dbpass
# Request Source Settings
read -p "Source Conf File (e.g. "$default_source_conf"): " source_conf
source_conf=${source_conf:-$default_source_conf}
echo $source_conf
# Request Target Settings
read -p "Target Domain (e.g. "$default_target_domain"): " target_domain
target_domain=${target_domain:-$default_target_domain}
echo $target_domain
read -p "Target Directory (no trailing slash e.g. "$default_target_directory"): " target_directory
target_directory=${target_directory:-$default_target_directory}
echo $target_directory
read -p "Target Database Name (e.g. "$default_target_dbname"): " target_dbname
target_dbname=${target_dbname:-$default_target_dbname}
echo $target_dbname
read -p "Target Database User (e.g. "$default_target_dbuser"): " target_dbuser
target_dbuser=${target_dbuser:-$default_target_dbuser}
echo $target_dbuser
read -p "Target Database Pass (e.g. "$default_target_dbpass"): " target_dbpass
target_dbpass=${target_dbpass:-$default_target_dbpass}
echo $target_dbpass
read -p "Target Conf File (e.g. "$default_target_conf"): " target_conf
target_conf=${target_conf:-$default_target_conf}
echo $target_conf
Once we have collected all of the user's settings, we ask them if they want to get started:
echo "Clone now? (y/n)"
read -e run
if [ "$run" == n ] ; then
exit
else
echo "==================================================="
echo "WordPress Cloning is Beginning"
echo "==================================================="
Copy directory tree
Things are moving faster now. We create a tarball of the source site, create the target directory and extract the tarball there:
#backup source_directory
cd $source_directory
# add -v option to these if you want to see verbose file listings
tar -czf source_clone_$NOW.tar.gz .
#unzip clone in target directory
mkdir -p $target_directory
tar -xzf source_clone_$NOW.tar.gz -C $target_directory
#remove tarball of source
rm source_clone_$NOW.tar.gz
cd $target_directory
We also run WordPress’s standard file permissions to make sure everything is set up correctly and secure:
# Reset Directory Permissions
find $target_directory -type d -exec chmod 755 {} \;
find $target_directory -type f -exec chmod 644 {} \;
Update WP-Config file
Next, we use perl to search and replace the source database authentication with the target database information:
#set database details with perl find and replace
perl -pi -e "s/$source_dbname/$target_dbname/g" wp-config.php
perl -pi -e "s/$source_dbuser/$target_dbuser/g" wp-config.php
perl -pi -e "s/$source_dbpass/$target_dbpass/g" wp-config.php
echo "define('RELOCATE',true);" | tee -a wp-config.php
#echo "define('WP_HOME','http://$target_domain');" | tee -a wp-config.php
#echo "define('WP_SITEURL','http://$target_domain');" | tee -a wp-config.php
echo "================================"
echo "Directory duplicated"
echo "================================"
I also added the RELOCATE setting to the end of the file. If you wish, you can replace this with the static WP_HOME and WP_SITEURL settings.
Copy database
Next, we dump the database, create a new database with the permissions provided by the user, and import the database into it:
# Begin Database Duplication
# Export the database
mysqldump -u$mysql_user -p$mysql_pass $source_dbname > $target_directory/clone_$NOW.sql
# Create the target database and permissions
mysql -u$mysql_user -p$mysql_pass -e "create database $target_dbname; GRANT ALL PRIVILEGES ON $target_dbname.* TO '$target_dbuser'@'localhost' IDENTIFIED BY '$target_dbpass'"
# Import the source database into the target
mysql -u$mysql_user -p$mysql_pass $target_dbname < $target_directory/clone_$NOW.sql
echo "================================"
echo "Database duplicated"
echo "================================"
Once again I have found that it is best to use primary MySQL authentication for these activities while configuring the database settings based on the source site and single site clone settings.
Copy Web Server Configuration
Finally, we're ready to wrap things up and hit the start button. Rarely do I see such scripts take the extra step of managing a web server configuration. So I want to do that too.
I copied the source site's Apache .conf file into the cloned new .conf file. I'm using perl to do string replacement for domain and directory paths. I then activated the site using Apache and reloaded the web server:
#Activate Web Configuration
cp $default_apache_directory/$source_conf $default_apache_directory/$target_conf
#set database details with perl find and replace
perl -pi -e "s/$source_domain/$target_domain/g" $default_apache_directory/$target_conf
perl -pi -e "s|${source_directory}|${target_directory}|g" $default_apache_directory/$target_conf
a2ensite $target_conf
service apache2 reload
echo "================================"
echo "Web configuration added"
echo "================================"
echo "Clone is complete."
echo "Test at http://"$target_domain
echo "================================"
fi
And, that’s it. Here's how the script works in real life:
===================================================
Clone WordPress Script
===================================================
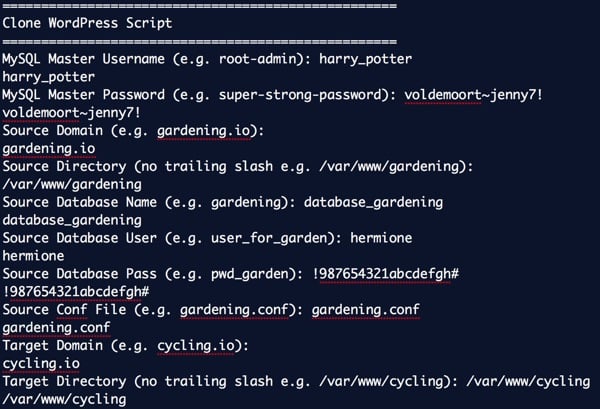
MySQL Master Username (e.g. root-admin): harry_potter
harry_potter
MySQL Master Password (e.g. super-strong-password): voldemoort~jenny7!
voldemoort~jenny7!
Source Domain (e.g. gardening.io):
gardening.io
Source Directory (no trailing slash e.g. /var/www/gardening):
/var/www/gardening
Source Database Name (e.g. gardening): database_gardening
database_gardening
Source Database User (e.g. user_for_garden): hermione
hermione
Source Database Pass (e.g. pwd_garden): !987654321abcdefgh#
!987654321abcdefgh#
Source Conf File (e.g. gardening.conf): gardening.conf
gardening.conf
Target Domain (e.g. cycling.io):
cycling.io
Target Directory (no trailing slash e.g. /var/www/cycling): /var/www/cycling
/var/www/cycling
Target Database Name (e.g. cycling): database_cycling
database_cycling
Target Database User (e.g. user_for_cycling): hedwig
hedwig
Target Database Pass (e.g. pwd_cycling):
pwd_for_cycling_not_hogwartz
Target Conf File (e.g. cycling.conf): 0007b-cycling.conf
0007b-cycling.conf
Clone now? (y/n)
y
===================================================
WordPress Cloning is Beginning
===================================================
tar: .: file changed as we read it
define('RELOCATE',true);
================================
Directory duplicated
================================
================================
Database duplicated
================================
Enabling site 0007b-cycling.
To activate the new configuration, you need to run:
service apache2 reload
* Reloading web server apache2 *
================================
Web configuration added
================================
Clone is complete.
Test at http://cycling.io
================================
On my small WordPress site, copying only takes 30 to 90 seconds!
Fine printing
There are more things you need to know.
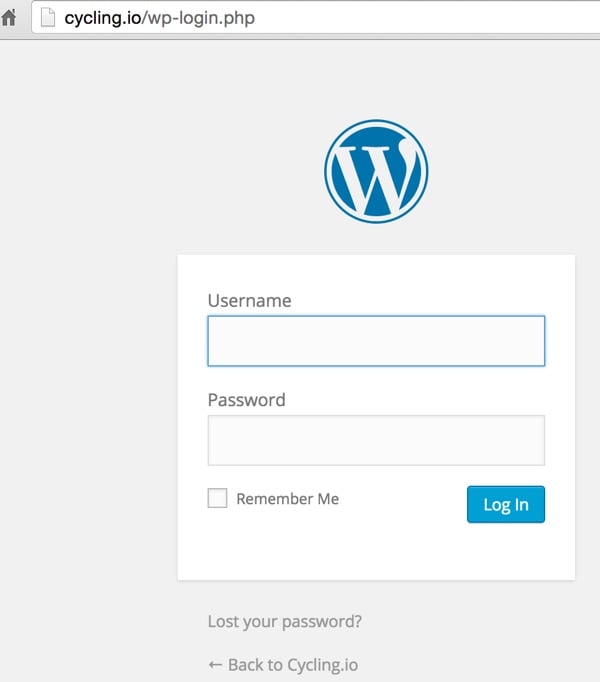
First log in directly to the path
First, to log in to the cloned website, you need to use the wp-login.php path instead of using wp-admin which redirects to the source website URL, for example http://clone.io/wp-login.php as follows picture:
Switch domain name
Since WordPress hardcodes most of the source domains in the database, I found that using the RELOCATE setting in wp-config.php can be easily updated via General > Settings. You can simply save the form with the new destination URL:
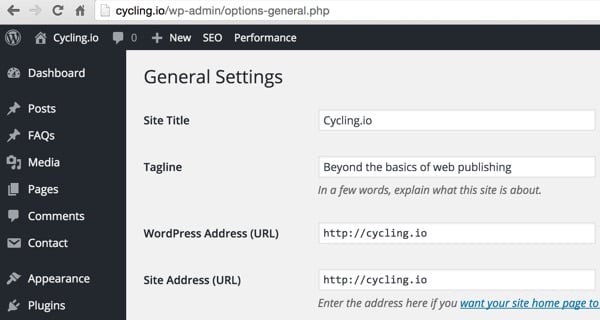
After saving the cloned target URL, you can remove RELOCATE settings-config.php from wp manually.
但是,一位同事建议您可能需要使用 InterconnectIT 的 WordPress 数据库搜索和替换等工具。 Envato Tuts+ 中的“跨主机、服务器和 URL 迁移 WordPress”中也对此进行了记录。
最终脚本
这是 wpclone.sh 的最终脚本 - 请随意更改默认值:
#!/bin/bash -e
# Clone a WordPress site via Bash script
clear
echo "==================================================="
echo "Clone WordPress Script"
echo "==================================================="
# Set Default Settings (helpful for testing)
default_mysql_user=$"root-admin"
default_mysql_pass=$"super-strong-password"
default_source_domain=$"gardening.io"
default_target_domain=$"cycling.io"
default_source_directory=$"/var/www/gardening"
default_target_directory=$"/var/www/cycling"
default_apache_directory=$"/etc/apache2/sites-available"
default_source_conf=$"gardening.conf"
default_target_conf=$"cycling.conf"
default_source_dbname=$"gardening"
default_source_dbuser=$"user_for_garden"
default_source_dbpass=$"pwd_garden"
default_target_dbname=$"cycling"
default_target_dbuser=$"user_for_cycling"
default_target_dbpass=$"pwd_cycling"
NOW=$(date +"%Y-%m-%d-%H%M")

#Request MySQL Admin
read -p "MySQL Master Username (e.g. "$default_mysql_user"): " mysql_user
mysql_user=${mysql_user:-$default_mysql_user}
echo $mysql_user
read -p "MySQL Master Password (e.g. "$default_mysql_pass"): " mysql_pass
mysql_pass=${mysql_pass:-$default_mysql_pass}
echo $mysql_pass

# Request Source Settings
read -p "Source Domain (e.g. "$default_source_domain"): " source_domain
source_domain=${source_domain:-$default_source_domain}
echo $source_domain
read -p "Source Directory (no trailing slash e.g. "$default_source_directory"): " source_directory
source_directory=${source_directory:-$default_source_directory}
echo $source_directory
read -p "Source Database Name (e.g. "$default_source_dbname"): " source_dbname
source_dbname=${source_dbname:-$default_source_dbname}
echo $source_dbname
read -p "Source Database User (e.g. "$default_source_dbuser"): " source_dbuser
source_dbuser=${source_dbuser:-$default_source_dbuser}
echo $source_dbuser
read -p "Source Database Pass (e.g. "$default_source_dbpass"): " source_dbpass
source_dbpass=${source_dbpass:-$default_source_dbpass}
echo $source_dbpass
# Request Source Settings
read -p "Source Conf File (e.g. "$default_source_conf"): " source_conf
source_conf=${source_conf:-$default_source_conf}
echo $source_conf
# Request Target Settings
read -p "Target Domain (e.g. "$default_target_domain"): " target_domain
target_domain=${target_domain:-$default_target_domain}
echo $target_domain
read -p "Target Directory (no trailing slash e.g. "$default_target_directory"): " target_directory
target_directory=${target_directory:-$default_target_directory}
echo $target_directory
read -p "Target Database Name (e.g. "$default_target_dbname"): " target_dbname
target_dbname=${target_dbname:-$default_target_dbname}
echo $target_dbname
read -p "Target Database User (e.g. "$default_target_dbuser"): " target_dbuser
target_dbuser=${target_dbuser:-$default_target_dbuser}
echo $target_dbuser
read -p "Target Database Pass (e.g. "$default_target_dbpass"): " target_dbpass
target_dbpass=${target_dbpass:-$default_target_dbpass}
echo $target_dbpass
read -p "Target Conf File (e.g. "$default_target_conf"): " target_conf
target_conf=${target_conf:-$default_target_conf}
echo $target_conf
echo "Clone now? (y/n)"
read -e run
if [ "$run" == n ] ; then
exit
else
echo "==================================================="
echo "WordPress Cloning is Beginning"
echo "==================================================="
#backup source_directory
cd $source_directory
# add -v option to these if you want to see verbose file listings
tar -czf source_clone_$NOW.tar.gz .
#unzip clone in target directory
mkdir -p $target_directory
tar -xzf source_clone_$NOW.tar.gz -C $target_directory
#remove tarball of source
rm source_clone_$NOW.tar.gz
cd $target_directory
# Reset Directory Permissions
find $target_directory -type d -exec chmod 755 {} \;
find $target_directory -type f -exec chmod 644 {} \;
#set database details with perl find and replace
perl -pi -e "s/$source_dbname/$target_dbname/g" wp-config.php
perl -pi -e "s/$source_dbuser/$target_dbuser/g" wp-config.php
perl -pi -e "s/$source_dbpass/$target_dbpass/g" wp-config.php
echo "define('RELOCATE',true);" | tee -a wp-config.php
#echo "define('WP_HOME','http://$target_domain');" | tee -a wp-config.php
#echo "define('WP_SITEURL','http://$target_domain');" | tee -a wp-config.php
echo "================================"
echo "Directory duplicated"
echo "================================"
# Begin Database Duplication
# Export the database
mysqldump -u$mysql_user -p$mysql_pass $source_dbname > $target_directory/clone_$NOW.sql
# Create the target database and permissions
mysql -u$mysql_user -p$mysql_pass -e "create database $target_dbname; GRANT ALL PRIVILEGES ON $target_dbname.* TO '$target_dbuser'@'localhost' IDENTIFIED BY '$target_dbpass'"
# Import the source database into the target
mysql -u$mysql_user -p$mysql_pass $target_dbname < $target_directory/clone_$NOW.sql
echo "================================"
echo "Database duplicated"
echo "================================"
#Activate Web Configuration
cp $default_apache_directory/$source_conf $default_apache_directory/$target_conf
#set database details with perl find and replace
perl -pi -e "s/$source_domain/$target_domain/g" $default_apache_directory/$target_conf
perl -pi -e "s|${source_directory}|${target_directory}|g" $default_apache_directory/$target_conf
a2ensite $target_conf
service apache2 reload
echo "================================"
echo "Web configuration added"
echo "================================"
echo "Clone is complete."
echo "Test at http://"$target_domain
echo "================================"
fi
如果您有建议和定制,请告诉我。在下面的评论中发表您的想法。
清理以进行扩展测试
以下行可能有助于您删除和撤消克隆的测试站点。您可以根据您的需要对其进行自定义:
  sudo rm -ifr /var/www/clone
  sudo a2dissite clone.conf
  sudo service apache2 reload
  sudo rm /etc/apache2/sites-available/clone.conf
  mysql -u root -p -e "drop database clone;"
更改 Wp-Config.php 中的安全密钥
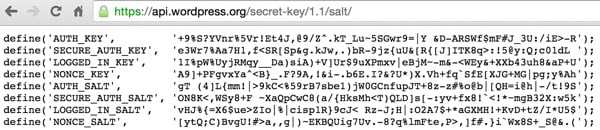
您还可以通过手动替换目标站点的 wp-config.php 中的身份验证密钥和盐来更好地保护您的新 WordPress 站点:
/**#@+
 * Authentication Unique Keys and Salts.
 *
 * Change these to different unique phrases!
 * You can generate these using the {@link https://api.wordpress.org/secret-key/1.1/salt/ WordPress.org secret-key
service}
 * You can change these at any point in time to invalidate all existing cookies. This will force all users to have
to log in again.
 *
 * @since 2.6.0
 */
define('AUTH_KEY',         '+9%S?YVnr%5Vr!Et4J,@9/Z^.kT_Lu~5SGwr9=|Y &D-ARSWf$mF#J_3U:/iE>-R');
define('SECURE_AUTH_KEY',  'e3Wr7%Aa7H1,f<SR[Sp&g.kJw,.)bR-9jz{uU&[R{[J]ITK8q>:!5@y:Q;c01dL ');
define('LOGGED_IN_KEY',    '1I%pW%UyjRMqy__Da)siA)+V]Ur$9uXPmxv|eBjM~-m&-<WEy&+XXb43uh8&aP+U');
define('NONCE_KEY',        'A9]+PFgvxYa^<B}_.F?9A,!&i-.b6E.I?&?U*)X.Vh+fq`SfE[XJG+MG|pg;y%Ah');
define('AUTH_SALT',        'gT (4]L{mm!|>9kC<%59rB7sbe1)jW0GCnfupJT+8z-z#%o@b|[QH=i@h|-/t!9S');
define('SECURE_AUTH_SALT', 'ON8K<,WSy8+F ~XaQpCwC8(a/{HksMh<T)QLD]s[-:yv+fx8!`<!*~mgB32X:w5k');
define('LOGGED_IN_SALT',   'vHJ%{=X6$ue>ZIo|%|cisp1R}9cJ< Rz-J;H|:O2A7$+*aGXMH!+KvD+tZ/I*U5$');
define('NONCE_SALT',       '[ytQ;C)BvgU!#>a,,g|)~EKBQUig7Uv.-8?q%lmFte,P>,]f#.}i`Wx8S+_S@&.(');
/**#@-*/
您只需访问 https://api.wordpress.org/secret-key/1.1/salt/ 并将它们剪切并粘贴到您的 wp-config.php 文件中即可:
现在,如果您是 Linux 脚本纯粹主义者,我将允许您更新 Gallagher 的 WordPress Bash 安装脚本。他的脚本复制了默认的 WordPress wp-config.php,因此他可以使用可预测的源字符串来替换他的脚本生成的密钥:
#set WP salts
perl -i -pe'
  BEGIN {
    @chars = ("a" .. "z", "A" .. "Z", 0 .. 9);
    push @chars, split //, "!@#$%^&*()-_ []{}<>~\`+=,.;:/?|";
    sub salt { join "", map $chars[ rand @chars ], 1 .. 64 }
  }
  s/put your unique phrase here/salt()/ge
' wp-config.php
我从未编写过正则表达式来替换我们源站点的动态预先存在的 wp-config.php 文件中的键值。如果您决定这样做,请在评论中分享并提前致谢。
有疑问吗?
我非常喜欢让这个脚本工作。或者,我至少应该说我喜欢在完成后运行它。我希望我很久以前就创建了它,因为它非常有效和高效。我可以克隆小型 WordPress 网站,并在大约 60 秒内让它们在我的服务器上运行。其他插件或复制选项都不是那么无缝。
如果您有任何疑问,请在下面发布。或者,您可以通过 Twitter @reifman 联系我或直接给我发电子邮件。请查看我的 Envato Tuts+ 讲师页面,查看我编写的其他教程,例如我的创业系列(使用 PHP 构建您的创业公司)。
相关链接
- WordPress Bash 安装脚本,作者:Brian Gallagher
- 移动 WordPress
- 用于完整 WordPress 备份的 Shell 脚本,作者:Konstantin Kovshenin
- CodeCanyon 上提供 WordPress 插件
The above is the detailed content of Clone WordPress in Linux. For more information, please follow other related articles on the PHP Chinese website!

Hot AI Tools

Undresser.AI Undress
AI-powered app for creating realistic nude photos

AI Clothes Remover
Online AI tool for removing clothes from photos.

Undress AI Tool
Undress images for free

Clothoff.io
AI clothes remover

AI Hentai Generator
Generate AI Hentai for free.

Hot Article
Hot Tools

Notepad++7.3.1
Easy-to-use and free code editor

SublimeText3 Chinese version
Chinese version, very easy to use

Zend Studio 13.0.1
Powerful PHP integrated development environment

Dreamweaver CS6
Visual web development tools

SublimeText3 Mac version
God-level code editing software (SublimeText3)
Hot Topics
 1378
1378
 52
52

 What is Linux actually good for?
Apr 12, 2025 am 12:20 AM
What is Linux actually good for?
Apr 12, 2025 am 12:20 AM
Linux is suitable for servers, development environments, and embedded systems. 1. As a server operating system, Linux is stable and efficient, and is often used to deploy high-concurrency applications. 2. As a development environment, Linux provides efficient command line tools and package management systems to improve development efficiency. 3. In embedded systems, Linux is lightweight and customizable, suitable for environments with limited resources.
 How to start apache
Apr 13, 2025 pm 01:06 PM
How to start apache
Apr 13, 2025 pm 01:06 PM
The steps to start Apache are as follows: Install Apache (command: sudo apt-get install apache2 or download it from the official website) Start Apache (Linux: sudo systemctl start apache2; Windows: Right-click the "Apache2.4" service and select "Start") Check whether it has been started (Linux: sudo systemctl status apache2; Windows: Check the status of the "Apache2.4" service in the service manager) Enable boot automatically (optional, Linux: sudo systemctl
 What to do if the apache80 port is occupied
Apr 13, 2025 pm 01:24 PM
What to do if the apache80 port is occupied
Apr 13, 2025 pm 01:24 PM
When the Apache 80 port is occupied, the solution is as follows: find out the process that occupies the port and close it. Check the firewall settings to make sure Apache is not blocked. If the above method does not work, please reconfigure Apache to use a different port. Restart the Apache service.
 How to monitor Nginx SSL performance on Debian
Apr 12, 2025 pm 10:18 PM
How to monitor Nginx SSL performance on Debian
Apr 12, 2025 pm 10:18 PM
This article describes how to effectively monitor the SSL performance of Nginx servers on Debian systems. We will use NginxExporter to export Nginx status data to Prometheus and then visually display it through Grafana. Step 1: Configuring Nginx First, we need to enable the stub_status module in the Nginx configuration file to obtain the status information of Nginx. Add the following snippet in your Nginx configuration file (usually located in /etc/nginx/nginx.conf or its include file): location/nginx_status{stub_status
 How to start monitoring of oracle
Apr 12, 2025 am 06:00 AM
How to start monitoring of oracle
Apr 12, 2025 am 06:00 AM
The steps to start an Oracle listener are as follows: Check the listener status (using the lsnrctl status command) For Windows, start the "TNS Listener" service in Oracle Services Manager For Linux and Unix, use the lsnrctl start command to start the listener run the lsnrctl status command to verify that the listener is started
 How to set up a recycling bin in Debian system
Apr 12, 2025 pm 10:51 PM
How to set up a recycling bin in Debian system
Apr 12, 2025 pm 10:51 PM
This article introduces two methods of configuring a recycling bin in a Debian system: a graphical interface and a command line. Method 1: Use the Nautilus graphical interface to open the file manager: Find and start the Nautilus file manager (usually called "File") in the desktop or application menu. Find the Recycle Bin: Look for the Recycle Bin folder in the left navigation bar. If it is not found, try clicking "Other Location" or "Computer" to search. Configure Recycle Bin properties: Right-click "Recycle Bin" and select "Properties". In the Properties window, you can adjust the following settings: Maximum Size: Limit the disk space available in the Recycle Bin. Retention time: Set the preservation before the file is automatically deleted in the recycling bin
 How to restart the apache server
Apr 13, 2025 pm 01:12 PM
How to restart the apache server
Apr 13, 2025 pm 01:12 PM
To restart the Apache server, follow these steps: Linux/macOS: Run sudo systemctl restart apache2. Windows: Run net stop Apache2.4 and then net start Apache2.4. Run netstat -a | findstr 80 to check the server status.
 How to optimize the performance of debian readdir
Apr 13, 2025 am 08:48 AM
How to optimize the performance of debian readdir
Apr 13, 2025 am 08:48 AM
In Debian systems, readdir system calls are used to read directory contents. If its performance is not good, try the following optimization strategy: Simplify the number of directory files: Split large directories into multiple small directories as much as possible, reducing the number of items processed per readdir call. Enable directory content caching: build a cache mechanism, update the cache regularly or when directory content changes, and reduce frequent calls to readdir. Memory caches (such as Memcached or Redis) or local caches (such as files or databases) can be considered. Adopt efficient data structure: If you implement directory traversal by yourself, select more efficient data structures (such as hash tables instead of linear search) to store and access directory information
