

Angular and MongoDB: Adding posts to a blog application

In the previous part of the Angular Blog tutorial series, you learned how to create a ShowPostComponent to display a list of blog posts on the home page. You fetched the records inserted from the MongoDB shell using the REST API endpoint you created.
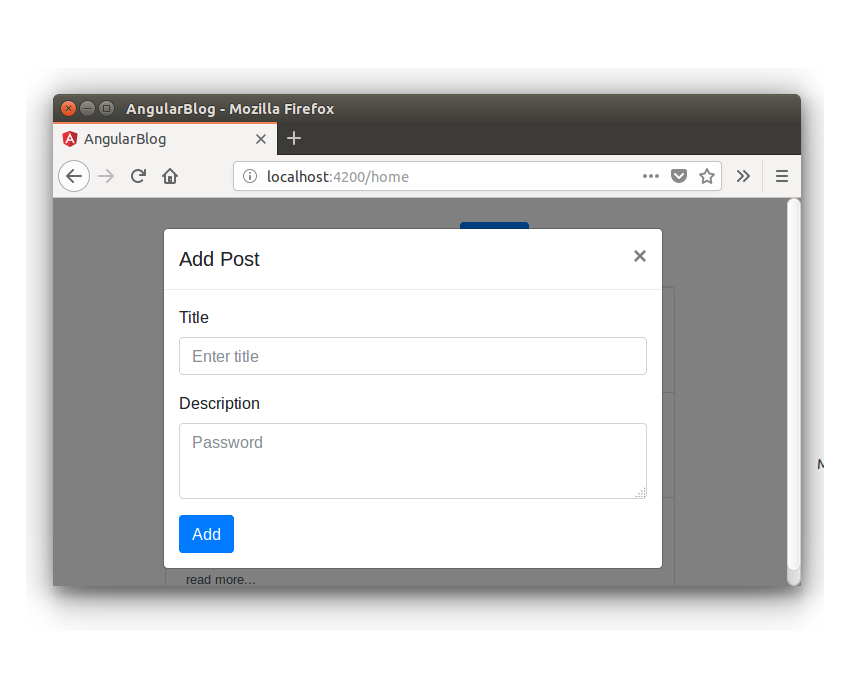
In this tutorial, you will create a new component named AddPostComponent to provide a user interface for adding new blog posts to a MongoDB database.
start using
Let's start by cloning the source code from the previous part of this tutorial series.
git clone https://github.com/royagasthyan/ShowPost AddPost
Navigate to the project directory and install the required dependencies.
cd AddPost/client
npm install
cd  AddPost/server
npm install
After installing dependencies, restart the client and server applications.
cd AddPost/client
npm start
cd  AddPost/server
node app.js
Point your browser to http://localhost:4200 and the application should be running.
Create Add Post Component
Let's start creating AddPostComponent. Create a folder named add-post in the src/app folder. In the add-post folder, create a file named add-post.component.ts and add the following code:
import { Component } from '@angular/core';
import { Post } from '../models/post.model';

@Component({
  selector: 'app-add-post',
  templateUrl: './add-post.component.html',
  styleUrls: ['./add-post.component.css']
})
export class AddPostComponent {

  constructor() {

  }

}
Create a file named add-post.component.html and the following HTML code:
<div class="modal fade" id="exampleModal" tabindex="-1" role="dialog" aria-labelledby="exampleModalLabel" aria-hidden="true">
<div class="modal-dialog" role="document">
<div class="modal-content">
<div class="modal-header">
<h5 class="modal-title" id="exampleModalLabel">Modal title</h5>
<button type="button" #closeBtn class="close" data-dismiss="modal" aria-label="Close">
<span aria-hidden="true">×</span>
</button>
</div>
<div class="modal-body">
<form>
<div class="form-group">
<label for="exampleInputEmail1">Title</label>
<input name="title" type="text" class="form-control" id="exampleInputEmail1" aria-describedby="emailHelp" placeholder="Enter title">
</div>
<div class="form-group">
<label for="exampleInputPassword1">Description</label>
<textarea name="description" class="form-control" id="exampleInputPassword1" placeholder="Password">
</textarea>
</div>
<button type="button" class="btn btn-primary">Add</button>
</form>
</div>
</div>
</div>
</div>
You will be shown the Add Post component as a popup window.
Now you need to add AddPostComponent to NgModule. Import AddPostComponent in the app.module.ts file.
import { AddPostComponent } from './add-post/add-post.component';
Add the component to the NgModule declarations list. Its appearance is as follows:
import { BrowserModule } from '@angular/platform-browser';
import { NgModule } from '@angular/core';
import { ROUTING } from './app.routing';
import { FormsModule } from '@angular/forms';
import { HttpClientModule } from '@angular/common/http';

import { RootComponent } from './root/root.component';
import { LoginComponent } from './login/login.component';
import { HomeComponent } from './home/home.component';
import { ShowPostComponent } from './show-post/show-post.component';
import { AddPostComponent } from './add-post/add-post.component';


@NgModule({
  declarations: [
    RootComponent,
    LoginComponent,
    HomeComponent,
    ShowPostComponent,
    AddPostComponent
  ],
  imports: [
    BrowserModule,
    ROUTING,
    FormsModule,
    HttpClientModule
  ],
  providers: [],
  bootstrap: [RootComponent]
})
export class AppModule { }
To trigger the add post popup, you have added the data-target attribute to the button in home.component.html.
<button type="button" class="btn btn-link" data-toggle="modal" data-target="#exampleModal">
  Add
</button>
Save the above changes and restart the application. Log into the app and click the Add link in the home page. You will see AddPostComponent appear as a popup.
Implement the function of adding posts
Add ngModel directives to the input elements of title and description.
<input name="title" type="text" [(ngModel)]="post.title" class="form-control" id="exampleInputEmail1" aria-describedby="emailHelp" placeholder="Enter title">
<textarea name="description" [(ngModel)]="post.description" class="form-control" id="exampleInputPassword1" placeholder="Password">
</textarea>
Add the click instruction in the button to call the method of saving the blog post.
<button (click)="addPost()" type="button" class="btn btn-primary">Add</button>
Import the Post model from src/app/models/post.model.ts in the add-post.component.ts file.
import { Post } from '../models/post.model';
Define the post variable in the add-post.component.ts file.
public post : Post;
Define the addPost method in the add-post.component.ts file. In the addPost method, you will validate the entered title and description and call the service method to invoke the REST API. The method is as follows:
addPost() {
  if(this.post.title && this.post.description){
  	// call the service method to add post
  } else {
  	alert('Title and Description required');
  }
}
Let's create the service file for the component AddPostComponent. Create a file called add-post.service.ts and add the following code:
import { Injectable } from '@angular/core';
import { HttpClient } from '@angular/common/http';
import { Post } from '../models/post.model';

@Injectable()
export class AddPostService {

    constructor(private http: HttpClient){

	}

}
Within AddPostService, create a method named addPost to make REST API calls.
addPost(post: Post){
	return this.http.post('/api/post/createPost',{
		title : post.title,
		description : post.description
	})
}
As shown in the code above, you use HttpClient to make API calls and return Observable.
In the addPost method inside the add-post.component.ts file, you will subscribe from addPost method class="inline"> add-post.service.ts file.
this.addPostService.addPost(this.post).subscribe(res =>{
  	// response from REST API call
});
Here is what the add-post.component.ts file looks like:
import { Component } from '@angular/core';
import { AddPostService } from './add-post.service';
import { Post } from '../models/post.model';

@Component({
  selector: 'app-add-post',
  templateUrl: './add-post.component.html',
  styleUrls: ['./add-post.component.css'],
  providers: [ AddPostService ]
})
export class AddPostComponent {

  public post : Post;

  constructor(private addPostService: AddPostService) {
      this.post = new Post();
  }

  addPost() {
  	if(this.post.title && this.post.description){
  		this.addPostService.addPost(this.post).subscribe(res =>{
  		    console.log('response is ', res)
  		});
  	} else {
  		alert('Title and Description required');
  	}
  }

}
Create a REST API for adding posts
Let’s create a REST API endpoint for adding blog posts to a MongoDB database. In the server/app.js file, create an API endpoint as follows:
app.post('/api/post/createPost', (req, res) => {
    // insert the details to MongoDB
})
First, you need to connect to the MongoDB database using the Mongoose client.
mongoose.connect(url, { useMongoClient: true }, function(err){
	if(err) throw err;
	console.log('connection established ');
});
After establishing the connection, you need to create a model object using the Post schema (defined in the server/model/post.js file).
const post = new Post({
	title: req.body.title,
	description: req.body.description
})
As shown in the code above, you create a Post object using the title and description passed in from the request req object. < /p>
Call the save method on the Post object to save the entry to MongoDB.
post.save((err, doc) => {
	if(err) throw err;
	return res.status(200).json({
		status: 'success',
		data: doc
	})
})
如上面的代码所示,一旦调用 save 方法回调且没有错误,它将返回 success 消息以及返回的对象 doc。
以下是 REST API 端点的最终外观:
app.post('/api/post/createPost', (req, res) => {
    mongoose.connect(url, { useMongoClient: true }, function(err){
		if(err) throw err;
		const post = new Post({
			title: req.body.title,
			description: req.body.description
		})
		post.save((err, doc) => {
			if(err) throw err;
			return res.status(200).json({
				status: 'success',
				data: doc
			})
		})
	});
})
保存上述更改并重新启动 Angular 和 Node 服务器。登录应用程序并尝试添加新的博客文章。单击添加按钮后,检查浏览器控制台,您将记录成功响应。
当博客文章详细信息成功添加到数据库后,您需要关闭弹出窗口。为了关闭弹出窗口,您需要以编程方式单击一个关闭按钮。
您将使用 @ViewChild 装饰器来访问关闭按钮。
在 AddPostComponent 中导入 ViewChild 和 ElementRef。
import { Component, ViewChild, ElementRef } from '@angular/core';
在 AddPostComponent 内,定义以下变量:
@ViewChild('closeBtn') closeBtn: ElementRef;
使用以下代码启动 closeBtn 单击:
this.closeBtn.nativeElement.click();
将上述代码添加到addPost方法的成功回调中。这是 addPost 方法,来自 add-post.component.ts。
addPost() {
  if(this.post.title && this.post.description){
  	this.addPostService.addPost(this.post).subscribe(res =>{
  		this.closeBtn.nativeElement.click();
  	});
  } else {
  	alert('Title and Description required');
  }
}
保存更改并重新启动客户端服务器。登录应用程序并尝试添加新的博客文章。成功保存博客文章详细信息后,弹出窗口将关闭。
刷新博客列表
需要注意的一件事是,新添加的博客文章不会显示在博客文章列表中。所以需要添加一个触发器来通知何时更新ShowPostComponent。您将使用通用服务在两个组件之间进行通信。
在 src/app 文件夹中创建一个名为 service 的文件夹。使用以下代码创建一个名为 common.service.ts 的文件:
import { Injectable } from '@angular/core';
import { Subject }    from 'rxjs/Subject';

@Injectable()
export class CommonService {

    public postAdded_Observable = new Subject();

	constructor(){

	}

	notifyPostAddition(){
		this.postAdded_Observable.next();
	}

}
如上面的代码所示,您已声明一个名为 postAdded_Observable 的 Subject 来跟踪添加到数据库中的新博客文章。每当新的博客文章添加到数据库时,您将调用 notifyPostAddition 方法,该方法将通知订阅者有关更新的信息。
在 app.module.ts 中导入 CommonService 并将其包含在 NgModule 提供商列表中。其外观如下:
import { BrowserModule } from '@angular/platform-browser';
import { NgModule } from '@angular/core';
import { ROUTING } from './app.routing';
import { FormsModule } from '@angular/forms';
import { HttpClientModule } from '@angular/common/http';

import { RootComponent } from './root/root.component';
import { LoginComponent } from './login/login.component';
import { HomeComponent } from './home/home.component';
import { ShowPostComponent } from './show-post/show-post.component';
import { AddPostComponent } from './add-post/add-post.component';
import { CommonService } from './service/common.service';


@NgModule({
  declarations: [
      RootComponent,
    LoginComponent,
    HomeComponent,
    ShowPostComponent,
    AddPostComponent
  ],
  imports: [
    BrowserModule,
    ROUTING,
    FormsModule,
    HttpClientModule
  ],
  providers: [CommonService],
  bootstrap: [RootComponent]
})
export class AppModule { }
在 show-post.component.ts 文件中导入 CommonService 并在构造方法中初始化。
import { CommonService } from '../service/common.service';
constructor(private showPostService: ShowPostService, private commonService: CommonService) {

}
在 ngOnInit 方法内,订阅 postAdded_Observable 变量并加载 getAllPost 方法。以下是 ngOnInit 方法的外观:
ngOnInit(){
    this.getAllPost();

    this.commonService.postAdded_Observable.subscribe(res => {
      this.getAllPost();
    });
}
在 add-post.component.ts 文件中导入 CommonService,并在添加博客文章后调用 notifyPostAddition 方法。以下是 AddPostComponent 中的 addPost 方法的外观:
addPost() {
  if(this.post.title && this.post.description){
  	this.addPostService.addPost(this.post).subscribe(res =>{
  	this.closeBtn.nativeElement.click();
    this.commonService.notifyPostAddition();
  	});
  } else {
  	alert('Title and Description required');
  }
}
保存以上更改并重新启动客户端服务器。登录到应用程序并添加新的博客文章。添加后,博客文章列表将更新为新的博客文章。
总结
在本教程中,您创建了 AddPostComponent 以将博客文章详细信息添加到 MongoDB 数据库。您使用 Mongoose 客户端创建了 REST API,用于将博客文章保存到 MongoDB 数据库。
在本系列的下一部分中,您将实现编辑和更新博客文章详细信息的功能。
本教程的源代码可在 GitHub 上获取。
到目前为止您的体验如何?请在下面的评论中告诉我您的宝贵建议。
The above is the detailed content of Angular and MongoDB: Adding posts to a blog application. For more information, please follow other related articles on the PHP Chinese website!

Hot AI Tools

Undresser.AI Undress
AI-powered app for creating realistic nude photos

AI Clothes Remover
Online AI tool for removing clothes from photos.

Undress AI Tool
Undress images for free

Clothoff.io
AI clothes remover

AI Hentai Generator
Generate AI Hentai for free.

Hot Article
Hot Tools

Notepad++7.3.1
Easy-to-use and free code editor

SublimeText3 Chinese version
Chinese version, very easy to use

Zend Studio 13.0.1
Powerful PHP integrated development environment

Dreamweaver CS6
Visual web development tools

SublimeText3 Mac version
God-level code editing software (SublimeText3)
Hot Topics
 1385
1385
 52
52

 What should I do if I encounter garbled code printing for front-end thermal paper receipts?
Apr 04, 2025 pm 02:42 PM
What should I do if I encounter garbled code printing for front-end thermal paper receipts?
Apr 04, 2025 pm 02:42 PM
Frequently Asked Questions and Solutions for Front-end Thermal Paper Ticket Printing In Front-end Development, Ticket Printing is a common requirement. However, many developers are implementing...
 Who gets paid more Python or JavaScript?
Apr 04, 2025 am 12:09 AM
Who gets paid more Python or JavaScript?
Apr 04, 2025 am 12:09 AM
There is no absolute salary for Python and JavaScript developers, depending on skills and industry needs. 1. Python may be paid more in data science and machine learning. 2. JavaScript has great demand in front-end and full-stack development, and its salary is also considerable. 3. Influencing factors include experience, geographical location, company size and specific skills.
 How to merge array elements with the same ID into one object using JavaScript?
Apr 04, 2025 pm 05:09 PM
How to merge array elements with the same ID into one object using JavaScript?
Apr 04, 2025 pm 05:09 PM
How to merge array elements with the same ID into one object in JavaScript? When processing data, we often encounter the need to have the same ID...
 Demystifying JavaScript: What It Does and Why It Matters
Apr 09, 2025 am 12:07 AM
Demystifying JavaScript: What It Does and Why It Matters
Apr 09, 2025 am 12:07 AM
JavaScript is the cornerstone of modern web development, and its main functions include event-driven programming, dynamic content generation and asynchronous programming. 1) Event-driven programming allows web pages to change dynamically according to user operations. 2) Dynamic content generation allows page content to be adjusted according to conditions. 3) Asynchronous programming ensures that the user interface is not blocked. JavaScript is widely used in web interaction, single-page application and server-side development, greatly improving the flexibility of user experience and cross-platform development.
 The difference in console.log output result: Why are the two calls different?
Apr 04, 2025 pm 05:12 PM
The difference in console.log output result: Why are the two calls different?
Apr 04, 2025 pm 05:12 PM
In-depth discussion of the root causes of the difference in console.log output. This article will analyze the differences in the output results of console.log function in a piece of code and explain the reasons behind it. �...
 TypeScript for Beginners, Part 2: Basic Data Types
Mar 19, 2025 am 09:10 AM
TypeScript for Beginners, Part 2: Basic Data Types
Mar 19, 2025 am 09:10 AM
Once you have mastered the entry-level TypeScript tutorial, you should be able to write your own code in an IDE that supports TypeScript and compile it into JavaScript. This tutorial will dive into various data types in TypeScript. JavaScript has seven data types: Null, Undefined, Boolean, Number, String, Symbol (introduced by ES6) and Object. TypeScript defines more types on this basis, and this tutorial will cover all of them in detail. Null data type Like JavaScript, null in TypeScript
 How to achieve parallax scrolling and element animation effects, like Shiseido's official website?
or:
How can we achieve the animation effect accompanied by page scrolling like Shiseido's official website?
Apr 04, 2025 pm 05:36 PM
How to achieve parallax scrolling and element animation effects, like Shiseido's official website?
or:
How can we achieve the animation effect accompanied by page scrolling like Shiseido's official website?
Apr 04, 2025 pm 05:36 PM
Discussion on the realization of parallax scrolling and element animation effects in this article will explore how to achieve similar to Shiseido official website (https://www.shiseido.co.jp/sb/wonderland/)...
 Can PowerPoint run JavaScript?
Apr 01, 2025 pm 05:17 PM
Can PowerPoint run JavaScript?
Apr 01, 2025 pm 05:17 PM
JavaScript can be run in PowerPoint, and can be implemented by calling external JavaScript files or embedding HTML files through VBA. 1. To use VBA to call JavaScript files, you need to enable macros and have VBA programming knowledge. 2. Embed HTML files containing JavaScript, which are simple and easy to use but are subject to security restrictions. Advantages include extended functions and flexibility, while disadvantages involve security, compatibility and complexity. In practice, attention should be paid to security, compatibility, performance and user experience.
