

Manage cloud instances using the Digital Ocean API

What is Digital Ocean?
Digital Ocean is one of the fastest growing web hosts, in part due to its fast SSD-based servers and cheap $5 per month hosting plans. Launching an instance on Digital Ocean for testing or long-term use is fast, easy, and affordable.
In Building Application Images for Resale at Digital Ocean, I showed you how to spin up a WordPress (or other application) instance and clone it repeatedly for clients. In this tutorial, I'll guide you through using the Digital Ocean API to programmatically manage our instances (also known as droplets) and automate common tasks. I'll also provide a sample code base for running very basic API operations written in Yii Framework for PHP; you can get the code on Github.
Digital Ocean API
The Digital Ocean API allows you to manage droplets and resources simply programmatically using HTTP requests. All the functionality you are familiar with in the Digital Ocean control panel is also available via the API, allowing you to script complex operations as your situation requires.
In this tutorial, we will integrate developer Antoine Corcy's Digital Ocean V2 PHP API library into a Yii-based console application. You don't need to know Yii to use this application, but you can learn more here: Introduction to the Yii Framework.
Digital Ocean API authenticates your account via OAuth and consists of nearly a dozen premium areas:
- Account: Provide basic information about your Digital Ocean account.
- Operation: Operation history log of Droplets in your account.
- Domain Names and Domain Records: Allows you to manage domain names used on droplets in your account and the DNS records associated with them.
- Droplets and Droplet Actions: Allows you to create, shut down, restart, snapshot, etc. for Droplets.
- Images and Image Actions: Allows you to enumerate and manage snapshot images taken for Droplets in your account.
- SSH Keys: Allows you to register an SSH key for installation when creating a droplet, so password security is not required.
- Region: Enumerates the geographical areas in which digital ocean drops can be created.
- Size: Enumerates the droplet sizes that can be used when creating droplets.
Now that you know some of the API, let's dive into our own application.
Set access key
In order to use the API, you need to activate a personal access token for your account. Sign in to your account and visit the Settings application page: https://cloud.digitalocean.com/settings/applications. Click to generate a new token , as shown below:

Write down your access token below - Digital Ocean will only show you once:

Now, let’s move to the sample console application.
Our console application
In this tutorial, we'll explore a small console application I built that performs some tasks related to managing Droplets. You can install the application yourself from the Tuts GitHub repository and customize or extend it to implement additional API functionality you want. I have posted a detailed installation guide for the console application on my website. You can also browse my general installation guide for the Digital Ocean app.
Configure API access
We are again using Antoine Corcy's Digital Ocean V2 PHP API library to access the API.
We built a component called Ocean.php that acts as a model for using his library. It is located at /app/protected/components/Ocean.php.
Yii loads your access token from the Ocean.ini file (as described in the Digital Ocean Console Application Installation Guide) and instantiates the digitalOcean API object.
<?php

use DigitalOceanV2\Adapter\BuzzAdapter;
use DigitalOceanV2\DigitalOceanV2;

class Ocean extends CComponent
{
  private $adapter;
  private $digitalOcean;

   function __construct() {
     // create an adapter with your access token which can be
     // generated at https://cloud.digitalocean.com/settings/applications
     $this->adapter = new BuzzAdapter(Yii::app()->params['ocean']['access_key']);
     // create a digital ocean object with the previous adapter
     $this->digitalOcean = new DigitalOceanV2($this->adapter);
  }
Get Droplet

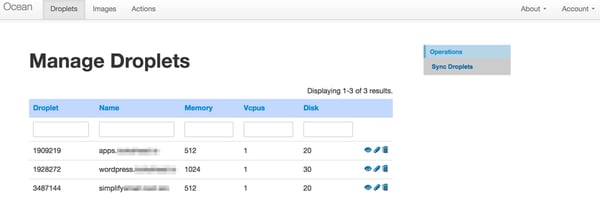
Now, let’s get the list of active Droplets. In /app/protected/models/Droplet.php, our sync method calls the Ocean component and gets the Droplet:
    public function sync() {
    $ocean = new Ocean();
    $droplets = $ocean->getDroplets();
    foreach ($droplets as $d) {
      $droplet_id = $this->add($d);
    }
  }
Ocean getDroplets The method is as follows:
  public function getDroplets() {
    // return the action api
    $action  = $this->digitalOcean->droplet();
    // return a collection of Action entity
    $actions = $action->getAll();
    return $actions;
  }
Note: The base console application only does one-way download synchronization of our droplet list. You can implement more functions yourself, including deleting drops that have been deleted in the cloud.
This is the add function of our Droplet model. If the droplet already exists, we just update the record:
public function add($droplet) {
     $d = Droplet::model()->findByAttributes(array('droplet_id'=>$droplet->id));
    if (empty($d)) {
      $d = new Droplet;
    }
    $d->user_id = Yii::app()->user->id;
      $d->droplet_id = $droplet->id;
      $d->name = $droplet->name;
      $d->vcpus = $droplet->vcpus;
      $d->memory = $droplet->memory;
      $d->disk = $droplet->disk;
      $d->status = $droplet->status;
      $d->active =1;
     $d->created_at = $d->created_at;
     $d->modified_at =new CDbExpression('NOW()');
     $d->save();
    return $d->id;
   }
如果您希望扩展模型的功能,Digital Ocean 提供了各种 Droplet API 操作,Corcy 在此列出了清晰的示例。
获取图像
接下来,我们将使用 API 来获取当前图像的列表。映像是快照,本质上是备份,是在给定时间点从服务器实例获取的。

我们的 Snapshot.php 模型有一个 sync 操作,它会请求图像列表并添加将它们分别写入数据库:
   public function sync() {
     $ocean = new Ocean();
     $snapshots = $ocean->getSnapshots();
     foreach ($snapshots as $i) {
       $image_id = $this->add($i);
       if ($image_id!==false) {
         echo $image_id;lb();
         pp($i);
       }
     }
   }
这是海洋组件 getSnapshots 代码:
  public function getSnapshots() {
    // return the action api
    $action  = $this->digitalOcean->image();
    // return a collection of Action entity
    $actions = $action->getAll();
    return $actions;
  }
这是快照模型 add 代码 - 我们忽略 Digital Ocean 的库存应用程序映像,这些映像被区分为公共:
   public function add($snapshot) {
      $i = Snapshot::model()->findByAttributes(array('image_id'=>$snapshot->id));
     if (empty($i)) {
       $i = new Snapshot;
       $i->created_at =new CDbExpression('NOW()');
     }
     if (isset($snapshot->public) and $snapshot->public ==1) {
       return false; // no need to save public images right now
     } else
       $i->user_id = Yii::app()->user->id;
       $i->image_id = $snapshot->id;
       $i->name = $snapshot->name;
       $i->region = $snapshot->regions[0];
       $i->active =1;
       $i->modified_at =new CDbExpression('NOW()');
      $i->save();
    return $i->id;
    }
自动化快照
正如我们在构建要在 Digital Ocean 进行转售的应用映像中所讨论的那样,自动创建可传输给客户和顾客的快照非常有用。遗憾的是,目前无法通过引用克隆或传输图像;每次您将快照转移到另一个帐户时,它就会消失。
由于 Digital Ocean 要求您将图像实例化为 Droplet,并在拍摄新快照之前将其关闭,因此重复创建快照是一个耗时的手动过程。 Digital Ocean 在拍摄快照后再次启动水滴并没有什么帮助,这只会减慢进程。
由于 API 在其他操作挂起时不接受请求,因此我们必须构建一个表来跟踪后台操作并使用 cron 作业来重复断电、快照操作。其工作原理如下:
访问图像页面,然后单击您想要克隆的快照的查看。然后,单击右侧的复制菜单选项。

这将创建一个 Droplet 并使用此 image_id 和droplet_id。 end_stage 是一个常量,您可以设置它来指示要创建的重复项的数量。

这是 Snapshot 模型的 replicate() 方法:
    public function replicate($id) {
        // look up image_id
      $snapshot = Snapshot::model()->findByAttributes(array('id'=>$id));
  	  // create the droplet
      $ocean = new Ocean();
      $droplet_id = $ocean->launch_droplet($snapshot->name,$snapshot->region,$snapshot->image_id);
  	  // add command to action table with droplet_id and image_id
      $a = new Action();
      $a->droplet_id = $droplet_id;
      $a->snapshot_id = $snapshot->image_id;
      $a->action = Action::ACTION_SNAPSHOT;
      $a->status = Action::STATUS_ACTIVE;
      $a->stage = 0;
    // user settable constant for number of replications to make
      $a->end_stage = Snapshot::NUMBER_REPLICATIONS;
      $a->last_checked = 0;
      $a->modified_at =new CDbExpression('NOW()');
      $a->created_at =new CDbExpression('NOW()');
      $a->save();
    }
cron 任务将 ping http://ocean.yourdomain.com/daemon/index 以定期处理操作表。任何未完成的逾期项目都将请求另一个快照。
这是 Action 模型的 process() 方法:
    public function process() {
	  set_time_limit(0);
	  // look for overdue actions
	  $todo = Action::model()->overdue()->findAllByAttributes(array('status'=>self::STATUS_ACTIVE));
	  foreach ($todo as $item) {
	    if ($item->action == self::ACTION_SNAPSHOT) {
          $result = Snapshot::model()->take($item->id);
	    }
	  }
	}
快照过程将关闭 Droplet,暂停 20 秒等待 Droplet 关闭,并请求快照。
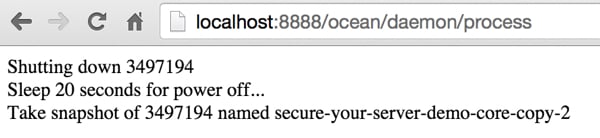
这是 Snapshot 模型的 take() 方法:
 public function take($action_id) {
    $result = false;
      $a = Action::model()->findByPk($action_id);
    $snapshot = Snapshot::model()->findByAttributes(array('image_id'=>$a->snapshot_id));
    $ocean = new Ocean();
    // attempt shutdown
    // take snapshot
    $result = $ocean->snapshot($a->stage,$a->droplet_id,$snapshot->name,$snapshot->region,$snapshot->image_id);
    // if snapshot was successful
    if ($result) {
      // increment stage
      $a->stage+=1;
      // if last snapshot replication complete, end action
      if ($a->stage >= $a->end_stage)
        $a->status = Action::STATUS_COMPLETE;
    }
	  // either way, update last_checked
    $a->last_checked = time();
    $a->save();
	  return $result;
  }
以下是 Ocean 组件中用于实际进行 API 调用的代码:
public function snapshot($stage,$droplet_id,$name,$region,$image_id,$begin=1,$count=3,$size='512mb') {
    $no_sleep = false;
    $name = str_replace("_","-",$name);
    $droplet  = $this->digitalOcean->droplet();
      try {
        echo 'Shutting down '.$droplet_id;lb();
        $shutdown = $droplet->shutdown($droplet_id);
      } catch (Exception $e) {
          $err = $e->getMessage();
          echo 'Caught exception: ',  $e->getMessage(), "\n";
          if (stristr ( $err , 'already powered off')===false)
            return false;
          else
            $no_sleep = true;
      }
    if (!$no_sleep) {
      echo 'Sleep 20 seconds for power off...';lb();
      sleep(20);
    }
    echo 'Take snapshot of '.$droplet_id.' named '.$name.'-copy-'.$stage;lb();
    try {
      $snapshot = $droplet->snapshot($droplet_id, $name.'-copy-'.$stage);
    } catch (Exception $e) {
        echo 'Caught exception: ',  $e->getMessage(), "\n";
        return false;
    }
    // shutdown and snapshot successful
    return true;
  }
如果您访问 Digital Ocean 网站查看 Droplet,您将看到正在进行的操作:
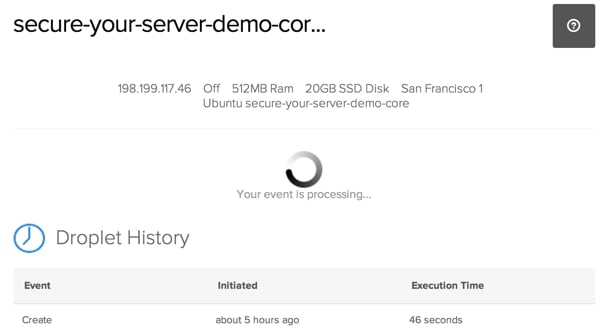
如果快照成功,则返回Snapshot模型以递增阶段。当阶段复制完成后,操作完成。
您可以访问 Digital Ocean 网站的图像页面来查看复制的快照:

创建图像后,您可以手动删除 Droplet,或者您可以扩展代码以在 STATUS_COMPLETE 已达到。如果您不删除 Droplet,我们将向您收取费用。
请注意,目前 API 不提供将快照传输到电子邮件地址的功能,因此您需要继续通过网络界面手动执行此操作。
下一步是什么?
我希望您喜欢本教程,并发现 Digital Ocean 是您的工具和托管提供商组合中的一项有用服务。在下一个教程中,我们将探索 Digital Ocean DNS 服务。
请随时在下面发表您的问题和评论。您也可以通过 Twitter @reifman 联系我或直接给我发电子邮件。请关注我的 Tuts+ 讲师页面,查看本系列后续文章。
相关链接
- 数字海洋 API
- Digital Ocean V2 PHP API 库
- 数字海洋控制台应用程序安装指南
The above is the detailed content of Manage cloud instances using the Digital Ocean API. For more information, please follow other related articles on the PHP Chinese website!

Hot AI Tools

Undresser.AI Undress
AI-powered app for creating realistic nude photos

AI Clothes Remover
Online AI tool for removing clothes from photos.

Undress AI Tool
Undress images for free

Clothoff.io
AI clothes remover

Video Face Swap
Swap faces in any video effortlessly with our completely free AI face swap tool!

Hot Article
Hot Tools

Notepad++7.3.1
Easy-to-use and free code editor

SublimeText3 Chinese version
Chinese version, very easy to use

Zend Studio 13.0.1
Powerful PHP integrated development environment

Dreamweaver CS6
Visual web development tools

SublimeText3 Mac version
God-level code editing software (SublimeText3)
Hot Topics
 1392
1392
 52
36
110
52
36
110

 Alipay PHP SDK transfer error: How to solve the problem of 'Cannot declare class SignData'?
Apr 01, 2025 am 07:21 AM
Alipay PHP SDK transfer error: How to solve the problem of 'Cannot declare class SignData'?
Apr 01, 2025 am 07:21 AM
Alipay PHP...
 Explain JSON Web Tokens (JWT) and their use case in PHP APIs.
Apr 05, 2025 am 12:04 AM
Explain JSON Web Tokens (JWT) and their use case in PHP APIs.
Apr 05, 2025 am 12:04 AM
JWT is an open standard based on JSON, used to securely transmit information between parties, mainly for identity authentication and information exchange. 1. JWT consists of three parts: Header, Payload and Signature. 2. The working principle of JWT includes three steps: generating JWT, verifying JWT and parsing Payload. 3. When using JWT for authentication in PHP, JWT can be generated and verified, and user role and permission information can be included in advanced usage. 4. Common errors include signature verification failure, token expiration, and payload oversized. Debugging skills include using debugging tools and logging. 5. Performance optimization and best practices include using appropriate signature algorithms, setting validity periods reasonably,
 How does session hijacking work and how can you mitigate it in PHP?
Apr 06, 2025 am 12:02 AM
How does session hijacking work and how can you mitigate it in PHP?
Apr 06, 2025 am 12:02 AM
Session hijacking can be achieved through the following steps: 1. Obtain the session ID, 2. Use the session ID, 3. Keep the session active. The methods to prevent session hijacking in PHP include: 1. Use the session_regenerate_id() function to regenerate the session ID, 2. Store session data through the database, 3. Ensure that all session data is transmitted through HTTPS.
 Describe the SOLID principles and how they apply to PHP development.
Apr 03, 2025 am 12:04 AM
Describe the SOLID principles and how they apply to PHP development.
Apr 03, 2025 am 12:04 AM
The application of SOLID principle in PHP development includes: 1. Single responsibility principle (SRP): Each class is responsible for only one function. 2. Open and close principle (OCP): Changes are achieved through extension rather than modification. 3. Lisch's Substitution Principle (LSP): Subclasses can replace base classes without affecting program accuracy. 4. Interface isolation principle (ISP): Use fine-grained interfaces to avoid dependencies and unused methods. 5. Dependency inversion principle (DIP): High and low-level modules rely on abstraction and are implemented through dependency injection.
 How to debug CLI mode in PHPStorm?
Apr 01, 2025 pm 02:57 PM
How to debug CLI mode in PHPStorm?
Apr 01, 2025 pm 02:57 PM
How to debug CLI mode in PHPStorm? When developing with PHPStorm, sometimes we need to debug PHP in command line interface (CLI) mode...
 How to automatically set permissions of unixsocket after system restart?
Mar 31, 2025 pm 11:54 PM
How to automatically set permissions of unixsocket after system restart?
Mar 31, 2025 pm 11:54 PM
How to automatically set the permissions of unixsocket after the system restarts. Every time the system restarts, we need to execute the following command to modify the permissions of unixsocket: sudo...
 Explain late static binding in PHP (static::).
Apr 03, 2025 am 12:04 AM
Explain late static binding in PHP (static::).
Apr 03, 2025 am 12:04 AM
Static binding (static::) implements late static binding (LSB) in PHP, allowing calling classes to be referenced in static contexts rather than defining classes. 1) The parsing process is performed at runtime, 2) Look up the call class in the inheritance relationship, 3) It may bring performance overhead.
 How to send a POST request containing JSON data using PHP's cURL library?
Apr 01, 2025 pm 03:12 PM
How to send a POST request containing JSON data using PHP's cURL library?
Apr 01, 2025 pm 03:12 PM
Sending JSON data using PHP's cURL library In PHP development, it is often necessary to interact with external APIs. One of the common ways is to use cURL library to send POST�...
