

How to hide photos on Android

How to hide photos using the Google Photos app
Google Photos is the default photo app on most Android devices and can be used to easily hide and keep photos private on your smartphone or tablet.
To do this, open the Google Photos app on your device and select Go to Libary Now select Utilities and then select ## on your device #LockFolder.
You don’t need to set this if you haven’t set up a “Locked” folder yet. Choose to set up a locked folder on your Android device, if you haven't done so already it will say "has not been shown here" in the Locked folder.
You will need to make sure your Android phone has a screen lock setting as the locked folder will require this setting to keep photos private in this folder. You can now move photos to a locked folder on your Android phone, where you won't be able to see them without using the screen lock on your device. To move photos from your photo library to a locked folder you need to select them and then click on three of the first eightdots and now select Move to Lock the folder and select Move. The photos will now be moved to the Locked Folder.
If you have a Google Pixel phone, on models older than Pixel 3, you can save photos directly to a Locked folder from the Pixel Camera app. To do this, open the Pixel Camera app on your device and select Photo Library in the upper right corner. Now select the locked folder and you can now take photos and save them to the locked folder. How to Hide Photos on Samsung Galaxy SmartphoneThe way you hide photos on your Samsung Galaxy smartphone is slightly different from other Android devices. Samsung has a secure folder protected by Samsung Knox on its devices. This can be done from the Notification Center on your device, open it and then swipe down to expand the Quick Switch menu. Then you will see theSecure Folder option, enable this option and it will be added to the notification center.
After enabling this feature, you need to set up that specific folder, to do this, swipe up from the home screen until the app drawer menu appears. Now select the Secure Folder and you will now need to add a four-digit Pin to the folder. Once done, open theGallery app on your Samsung Galaxy phone and select any photo you want to move to that folder, now select "More" at the bottom and then select "Move to Secure Folder". Any photos you select will now be moved to that folder on your Galaxy Phone. The folder will be protected by the PIN you set.
The above is the detailed content of How to hide photos on Android. For more information, please follow other related articles on the PHP Chinese website!

Hot AI Tools

Undresser.AI Undress
AI-powered app for creating realistic nude photos

AI Clothes Remover
Online AI tool for removing clothes from photos.

Undress AI Tool
Undress images for free

Clothoff.io
AI clothes remover

Video Face Swap
Swap faces in any video effortlessly with our completely free AI face swap tool!

Hot Article
Hot Tools

Notepad++7.3.1
Easy-to-use and free code editor

SublimeText3 Chinese version
Chinese version, very easy to use

Zend Studio 13.0.1
Powerful PHP integrated development environment

Dreamweaver CS6
Visual web development tools

SublimeText3 Mac version
God-level code editing software (SublimeText3)
Hot Topics


 How to have files automatically copied to another folder on Windows 11/10
Feb 19, 2024 am 11:24 AM
How to have files automatically copied to another folder on Windows 11/10
Feb 19, 2024 am 11:24 AM
In this article, we will show you how to automatically copy files to another folder on Windows 11/10. Creating backups is necessary to avoid data loss. Data loss can occur due to many reasons such as hard drive corruption, malware attack, etc. You can back up your data manually by using copy and paste method or using third-party tools. Did you know you can automatically back up data on your Windows computer? We'll show you how to do this in this article. How to have files automatically copied to another folder on Windows 11/10 How to use Task Scheduler to automatically copy files and folders to another destination folder on Windows 11/10? This article will provide you with detailed guidance. please
 Word is locked and cannot be typed or edited, nor can the review button be pressed?
Mar 15, 2024 pm 01:20 PM
Word is locked and cannot be typed or edited, nor can the review button be pressed?
Mar 15, 2024 pm 01:20 PM
What should I do if word is locked and cannot be typed or edited, or the review button cannot be pressed? Recently, when some friends were using Word to process documents, they encountered a situation where the document was locked and unable to be edited. Many people felt very distressed because this brought great obstacles to their work. So how should we solve it? The editor will introduce the method to you below. Method 1: Cancel "Restrict Editing" In order to edit the Word document, we can cancel the "Restrict Editing" option set and just enter the correct password. 2. First, after opening the Word document, click "Review" > "Restrict Editing" in the menu. 3. Appear&ldqu
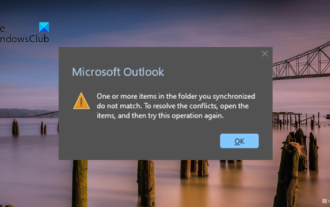 One or more items in the folder you synced do not match Outlook error
Mar 18, 2024 am 09:46 AM
One or more items in the folder you synced do not match Outlook error
Mar 18, 2024 am 09:46 AM
When you find that one or more items in your sync folder do not match the error message in Outlook, it may be because you updated or canceled meeting items. In this case, you will see an error message saying that your local version of the data conflicts with the remote copy. This situation usually happens in Outlook desktop application. One or more items in the folder you synced do not match. To resolve the conflict, open the projects and try the operation again. Fix One or more items in synced folders do not match Outlook error In Outlook desktop version, you may encounter issues when local calendar items conflict with the server copy. Fortunately, though, there are some simple ways to help
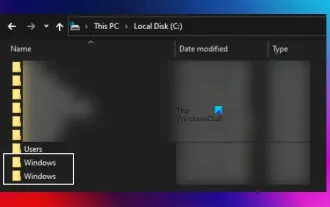 There are two Windows folders in the C drive; what should I do?
Mar 06, 2024 am 11:55 AM
There are two Windows folders in the C drive; what should I do?
Mar 06, 2024 am 11:55 AM
The Windows folder contains the Windows operating system and is an important folder in a Windows computer. By default, Windows is installed on the C drive. Therefore, C is the default directory for Windows folders. Every Windows computer has a Windows folder. However, some users reported that two Windows folders were found in the C drive. In this article, we will explain what you can do if you encounter such a situation. Two Windows folders in C drive It is rare to have two Windows folders in C drive. However, if you encounter such a situation, you can use the following suggestions: Run an anti-malware scan to try to find the correct
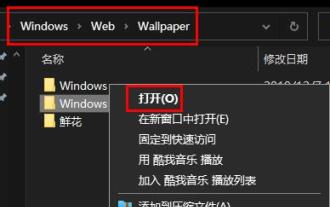 Find the default folder path and sharing details of win11 wallpapers
Jan 30, 2024 pm 03:15 PM
Find the default folder path and sharing details of win11 wallpapers
Jan 30, 2024 pm 03:15 PM
Many users change wallpapers when using their computers. I believe many users are also asking which folder the win11 wallpapers are in? The wallpapers that come with the system are in Wallpaper under the C drive, and the wallpapers saved by users are in the Themes folder of the C drive. Let this site carefully introduce the win11 default wallpaper path sharing for users. Share win11 default wallpaper path 1. The system comes with wallpaper: 1. First enter my computer, and then open the path: C: Windows Web Wallpaper. 2. User-saved wallpapers: 1. Wallpapers installed by users will be saved in: C: Users (user) xx (current user name) AppDataLocalM
 How to create a folder on Realme Phone?
Mar 23, 2024 pm 02:30 PM
How to create a folder on Realme Phone?
Mar 23, 2024 pm 02:30 PM
Title: Realme Phone Beginner’s Guide: How to Create Folders on Realme Phone? In today's society, mobile phones have become an indispensable tool in people's lives. As a popular smartphone brand, Realme Phone is loved by users for its simple and practical operating system. In the process of using Realme phones, many people may encounter situations where they need to organize files and applications on their phones, and creating folders is an effective way. This article will introduce how to create folders on Realme phones to help users better manage their phone content. No.
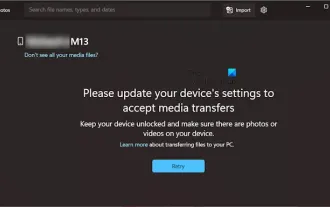 Please update your device settings to accept media transfers
Feb 19, 2024 pm 12:24 PM
Please update your device settings to accept media transfers
Feb 19, 2024 pm 12:24 PM
We will show you how to fix media transfer error when connecting your phone to PC via USB cable. When you try to import photos and videos from your phone to your computer, you may encounter a "Please update your device's settings to accept media transfers" error message displayed by the Photos app. Please update your device settings to accept media transfers Update your device settings to allow media transfers to resolve the error message. Restart your two devices Use different USB cables Check your Android phone settings Install the MTP USB device driver Use other methods to transfer your photos and videos Let’s get started. 1] Restart both devices It is recommended that you first try to restart your devices, including computers and phones, when you encounter a temporary failure. Heavy
 How to set password protection for win10 folder
Feb 29, 2024 am 09:00 AM
How to set password protection for win10 folder
Feb 29, 2024 am 09:00 AM
When using the win10 system, many people are worried about the leakage of confidential files in the computer. In fact, users only need to use the win10 folder password protection function to solve this problem. Today, the editor will help you enable this function. How to set password protection for win10 folders 1. First, you need to select the folder you want to encrypt, right-click the folder, and click Properties in the pop-up option bar. 2. In the properties interface, click Advanced Options in the lower right corner. 3. Enter the advanced properties interface, select the check box before encrypting content to protect data, and then click OK. 4. Then the system will automatically pop up the confirmation attribute change interface, click OK in the interface. 5. In this way, the password protection has been successfully set up, and there will be no impact when using the original account.