

Getting clever beyond the basics: Mouse and touch events

In the last Crafty series, you learned about different ways to move elements using your keyboard. While the keyboard can help you create a variety of games, some situations require you to control different mouse events to make the game more interesting. For example, consider a game in which balloons appear at random locations on the screen. If the user needs to click on the balloon to score points, then you definitely need a mouse component.
Similarly, when you develop a game for mobile devices, the Keyboard component will be of no use. In this case, you will have to rely on touch components to create your game. In this tutorial, you'll learn about mouse and touch components in Crafty.
Mouse component
Mouse Component is used to add basic mouse events to entities. The following is a list of all events contained in this component:
- MouseOver: This event is triggered when the mouse enters the entity.
-
MouseOut: This event is triggered when the mouse leaves the entity.
-
MouseDown: This event is triggered when the mouse button is pressed on the entity.
-
MouseUp: This event is triggered when the mouse button is released within the entity.
-
Click: This event is triggered when the mouse button is clicked within the entity.
-
DoubleClick: This event is triggered when the mouse button double-clicks an entity.
- MouseMove: This event is triggered when the mouse moves within the entity.
Remember that mouse events will only fire on an entity if you have added a Mouse component to the entity. Here is the code to bind the MouseMove event to the box in the demo below:
var Box = Crafty.e("2D, Canvas, Color, Mouse")
  .attr({
    x: 200,
    y: 100,
    w: 200,
    h: 200
  })
  .color("black")
  .origin("center")
  .bind('MouseMove', function() {
    this.rotation += 1;
  });
After the box is bound to the MouseMove event, every time the mouse moves on the box, the box will rotate 1 degree. .origin() The method is used to set the rotation point of the box to the center. It can also take other values, such as "upper left corner", "lower right corner", etc.
Try moving the cursor in and out of the box in the demo. Holding down the mouse button inside the box will trigger the MouseDown event and change the color of the box to red.
MouseEvent The object is also passed as a parameter to the callback functions of all these mouse events. It contains all the data related to that specific mouse event.
You can also use the mouseButton property to check which mouse button the user clicked. For example, you can use Crafty.mouseButtons.LEFT to detect left clicks. Likewise, middle clicks can be detected using Crafty.mouseButtons.MIDDLE.
MouseDragThe component provides entities with different drag and drop mouse events. However, there isn't much point in adding these events if the entity itself can't be dragged and dropped. You can add drag-and-drop functionality to entities using the Draggable component. This component listens for events from the MouseDrag component and moves the given entity accordingly. The MouseDrag component is automatically added to any entity that has a Draggable component.
Draggable component has three methods: .enableDrag(), .disableDrag() and .dragDirection().before Two methods enable and disable dragging on entities respectively. The third method is used to set the drag direction.
By default, entities will move in whatever direction the cursor moves. However, you can constrain the entity's movement to the vertical direction using this.dragDirection({x:0, y:1}). Likewise, you can use this.dragDirection({x:1, y:0}) to force the entity to move only in the horizontal direction.
You can also specify the direction directly in degrees. For example, to move an element 45 degrees, you would simply use this.dragDirection(45) instead of this.dragDirection({x:1, y:1} ).
In addition to dragging and dropping elements, you also need to know when dragging starts and stops. This can be accomplished using the StartDrag and StopDrag events. There is also a Dragging event, which is triggered when an entity is dragged.
Here is the code for dragging the red box in the demo below:
var hBox = Crafty.e("2D, Canvas, Color, Draggable")
  .attr({
    x: 50,
    y: 50,
    w: 50,
    h: 50
  })
  .color("red")
  .dragDirection(0)
  .bind('Dragging', function(evt) {
    this.color("black");
  })
  .bind('StopDrag', function(evt) {
    this.color("red");
  });
设置框的宽度、高度和位置后,我使用 .dragDirection(0) 来限制框在水平方向的移动。我还使用 .bind() 方法将实体绑定到 Dragging 和 StopDrag 方法。
将颜色更改为黑色可以向用户表明实体当前正在被拖动。您还可以使用 StartDrag 事件代替 Dragging 因为实体的颜色只需要更改一次。当您必须连续更改或监视被拖动实体的属性时,Dragging 事件更合适。例如,您可以使用以下代码在框到达所需位置后禁用对其的拖动。
hBox.bind('Dragging', function(evt) {
    this.color("black");
    if(this.x > 300) {
      this.disableDrag();
    }
});
如果需要访问实体的触摸相关事件,可以使用 Touch 组件。该组件使您可以访问四个不同的事件:
- TouchStart:当实体被触摸时触发此事件。
- TouchMove:当手指在实体上移动时会触发此事件。
- TouchCancel:当某些事件中断触摸事件时会触发此事件。
- TouchEnd:当手指在实体上抬起或离开该实体时,会触发此事件。
前三个事件可以访问TouchEvent对象,该对象包含有关触摸的所有信息。
某些游戏或项目可能需要您检测多次触摸。这可以通过使用 Crafty.multitouch(true) 启用多点触控来实现。传递此方法 true 或 false 可打开和关闭多点触控。
在您的项目中使用 Touch 组件之前,您应该知道它目前与 Draggable 组件不兼容。
结论
完成本教程后,您现在应该能够正确处理不同的鼠标事件或轻松创建基于拖放的游戏。请记住,我在本教程中使用了 Crafty 版本 0.7.1,并且演示可能无法与该库的其他版本一起使用。
在下一个教程中,您将学习如何使用精灵表在 Crafty 中为不同的游戏角色设置动画。
The above is the detailed content of Getting clever beyond the basics: Mouse and touch events. For more information, please follow other related articles on the PHP Chinese website!

Hot AI Tools

Undresser.AI Undress
AI-powered app for creating realistic nude photos

AI Clothes Remover
Online AI tool for removing clothes from photos.

Undress AI Tool
Undress images for free

Clothoff.io
AI clothes remover

AI Hentai Generator
Generate AI Hentai for free.

Hot Article
Hot Tools

Notepad++7.3.1
Easy-to-use and free code editor

SublimeText3 Chinese version
Chinese version, very easy to use

Zend Studio 13.0.1
Powerful PHP integrated development environment

Dreamweaver CS6
Visual web development tools

SublimeText3 Mac version
God-level code editing software (SublimeText3)
Hot Topics
 1359
1359
 52
52

 Is the microphone an input device or an output device?
Aug 22, 2022 pm 12:00 PM
Is the microphone an input device or an output device?
Aug 22, 2022 pm 12:00 PM
A microphone is an input device. Input devices are used to input commands, programs, data, text, graphics, images, audio and video information to the computer; microphones are energy conversion devices that convert sound signals into electrical signals, which can input audio information to the computer. So a microphone is an input device.
 Turn on split-screen interaction in win11
Dec 25, 2023 pm 03:05 PM
Turn on split-screen interaction in win11
Dec 25, 2023 pm 03:05 PM
In the win11 system, we can enable multiple monitors to use the same system and operate together by turning on split-screen interaction. However, many friends do not know how to turn on split-screen interaction. In fact, just find the monitor in the system settings. The following is Get up and study. How to open split-screen interaction in win11 1. Click on the Start menu and find "Settings" 2. Then find the "System" settings there. 3. After entering the system settings, select "Display" on the left. 4. Then select "Extend these displays" in the multi-monitor on the right.
 Python GUI programming: Get started quickly and easily create interactive interfaces
Feb 19, 2024 pm 01:24 PM
Python GUI programming: Get started quickly and easily create interactive interfaces
Feb 19, 2024 pm 01:24 PM
A brief introduction to python GUI programming GUI (Graphical User Interface, graphical user interface) is a way that allows users to interact with computers graphically. GUI programming refers to the use of programming languages to create graphical user interfaces. Python is a popular programming language that provides a rich GUI library, making Python GUI programming very simple. Introduction to Python GUI library There are many GUI libraries in Python, the most commonly used of which are: Tkinter: Tkinter is the GUI library that comes with the Python standard library. It is simple and easy to use, but has limited functions. PyQt: PyQt is a cross-platform GUI library with powerful functions.
 Vue3+TS+Vite development skills: how to interact with the backend API
Sep 08, 2023 pm 06:01 PM
Vue3+TS+Vite development skills: how to interact with the backend API
Sep 08, 2023 pm 06:01 PM
Vue3+TS+Vite development skills: How to interact with the back-end API Introduction: In web application development, data interaction between the front-end and the back-end is a very important link. As a popular front-end framework, Vue3 has many ways to interact with back-end APIs. This article will introduce how to use the Vue3+TypeScript+Vite development environment to interact with the back-end API, and deepen understanding through code examples. 1. Use Axios to send requests. Axios is
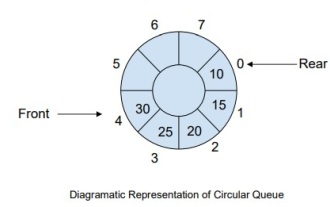 How to manage a complete circular queue of events in C++?
Sep 04, 2023 pm 06:41 PM
How to manage a complete circular queue of events in C++?
Sep 04, 2023 pm 06:41 PM
Introduction CircularQueue is an improvement on linear queues, which was introduced to solve the problem of memory waste in linear queues. Circular queues use the FIFO principle to insert and delete elements from it. In this tutorial, we will discuss the operation of a circular queue and how to manage it. What is a circular queue? Circular queue is another type of queue in data structure where the front end and back end are connected to each other. It is also known as circular buffer. It operates similarly to a linear queue, so why do we need to introduce a new queue in the data structure? When using a linear queue, when the queue reaches its maximum limit, there may be some memory space before the tail pointer. This results in memory loss, and a good algorithm should be able to make full use of resources. In order to solve the waste of memory
 Event processing library in PHP8.0: Event
May 14, 2023 pm 05:40 PM
Event processing library in PHP8.0: Event
May 14, 2023 pm 05:40 PM
Event processing library in PHP8.0: Event With the continuous development of the Internet, PHP, as a popular back-end programming language, is widely used in the development of various Web applications. In this process, the event-driven mechanism has become a very important part. The event processing library Event in PHP8.0 will provide us with a more efficient and flexible event processing method. What is event handling? Event handling is a very important concept in the development of web applications. Events can be any kind of user row
 How does uniapp implementation use JSBridge to interact with native
Oct 20, 2023 am 08:44 AM
How does uniapp implementation use JSBridge to interact with native
Oct 20, 2023 am 08:44 AM
How uniapp implements using JSBridge to interact with native requires specific code examples 1. Background introduction In mobile application development, sometimes it is necessary to interact with the native environment, such as calling some native functions or obtaining some native data. As a cross-platform mobile application development framework, uniapp provides a convenient way to interact with native devices, using JSBridge to communicate. JSBridge is a technical solution for the front-end to interact with the mobile native end.
 Win10 cannot find microphone input device
Jan 03, 2024 am 10:49 AM
Win10 cannot find microphone input device
Jan 03, 2024 am 10:49 AM
When using win10 system, we may encounter the problem that the input device cannot be used. What is the situation? Generally, you can update the driver or set it up. Let’s take a look at the specific tutorial. Win10 cannot find the input device microphone solution 1. Click: →→ in the start menu, 2. Make sure the item is turned on. If it is not open, click it and the problem will basically be solved. 3. Right-click the start menu and select Enter. 4. Check whether the original driver is installed and whether it is installed normally. PS: It is recommended to uninstall the driver and then install the driver from the motherboard's original CD, or go to the motherboard manufacturer's official website to download the original driver and reinstall it. 5. Right-click the volume icon on the computer taskbar and select
