
This tutorial is part of the "Build Your Startup with PHP" series on Envato Tuts. In this series, I'll guide you through launching a startup from concept to reality, using my meeting planner app as a real-life example. Every step of the way, I'll release the Meeting Planner code as an open source example that you can learn from. I will also address startup-related business issues that arise.
Last week I took a deep dive into Ajax, transforming the meeting scheduling experience into a fully Ajax-enabled model and eliminating the need for page refreshes. I'm about halfway through, focusing on simple elements.
In today's tutorial, I'll walk you through more complex content panels that require more troubleshooting, research, debugging, brainstorming, and recoding. As I said, there are times when I think I might have to drop this feature until after the beta is released. Please follow me as I take you through some of my personal nightmares(doing better now, don’t worry).
I'll also show you how to use Google's Chrome Developer Console to help me identify broken areas, which is especially difficult when using Ajax between PHP and JavaScript. Like the light at the end of a dark tunnel.
You may have seen our nifty Bootstrap switch that helps organizers and participants share their preferences and make the final choice of date time and location. Well, they shouldn't look like this after the Ajax update, but fixing it is an important part of this feature update:

If you haven’t tried Meeting Planner yet, go ahead and use the new interactive features to schedule your first meeting. I did participate in the comment thread below, so please let me know what you think! You can also reach me on Twitter @reifman. I would be particularly interested if you would like to suggest new features or topics for future tutorials.
As a reminder, all the code of Meeting Planner is written using PHP's Yii2 framework. If you want to learn more about Yii2, check out our parallel series "Programming with Yii2."
First, let's look at adding meeting participants via Ajax.
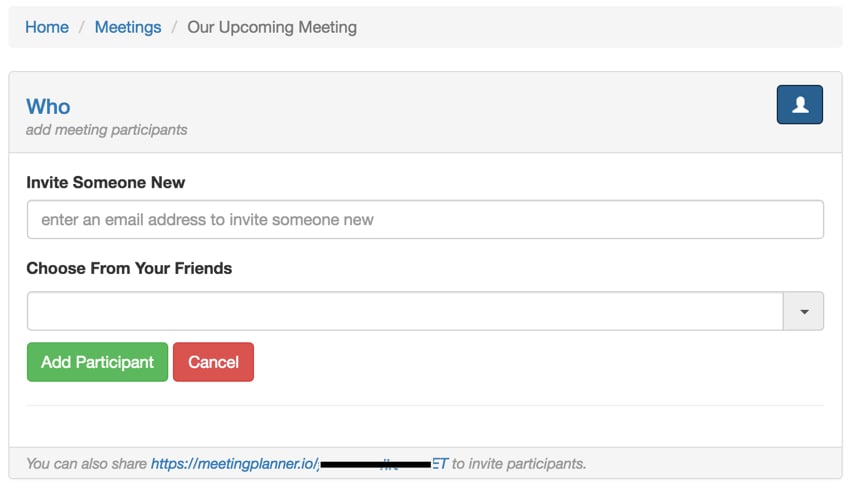
The code for adding participants is similar to what we introduced before. But I do want to see slightly different code that updates the list of participants and all the buttons that show their identities.
Previously, there was only one participant per meeting. I then enabled the group meeting and created a list of buttons to indicate to each participant:
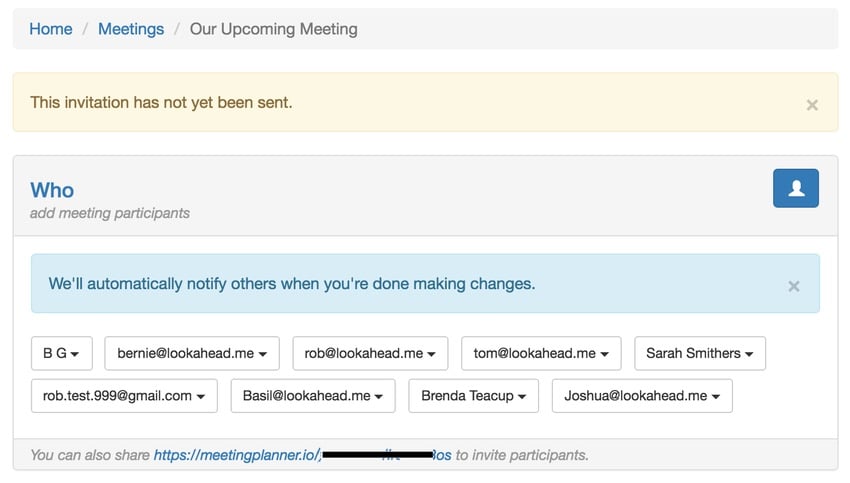
Whenever a participant is added, I refresh the entire list via Ajax.
The following is the jQuery function addParticipant() which calls getParticipantButtons() after each new button is added:
function addParticipant(id) {
  // ajax add participant
  // adding someone from new_email
  new_email = $('#new_email').val();
  friend_id = $('#participant-email').val(); // also an email. blank before selection
  friend_email = $('#participant-email :selected').text();  // placeholder text before select
  // adding from friends
  if (new_email!='' && (friend_id !== undefined && friend_id!='')) {
      displayAlert('participantMessage','participantMessageOnlyOne');
      return false;
  } else if (new_email!='' && new_email!==undefined) {
    add_email = new_email;
  } else if (friend_id!='') {
    add_email = friend_email;
  } else {
    displayAlert('participantMessage','participantMessageNoEmail');
    return false;
  }
    $.ajax({
     url: $('#url_prefix').val()+'/participant/add',
     data: {
       id: id,
       add_email:add_email,
      },
     success: function(data) {
       // see remove below
       // to do - display acknowledgement
       // update participant buttons - id = meeting_id
       // hide panel
       $('#addParticipantPanel').addClass("hidden");
       if (data === false) {
         // show error, hide tell
         displayAlert('participantMessage','participantMessageError');
         return false;
       } else {
         // clear form
         $('#new_email').val('');
         // odd issue with resetting the combo box
         $("#participant-email:selected").removeAttr("selected");
         $("#participant-email").val('');
         $("#participant-emailundefined").val('');
        // show tell, hide error
         getParticipantButtons(id);
         displayAlert('participantMessage','participantMessageTell');
         refreshSend();
         refreshFinalize();
         return true;
      }
     }
  });
}
This is getParticipantButtons() Function:
function getParticipantButtons(id) {
  $.ajax({
   url: $('#url_prefix').val()+'/participant/getbuttons',
   data: {
     id: id,
    },
    type: 'GET',
   success: function(data) {
     $('#participantButtons').html(data);
   },
 });
}
It makes an Ajax call to the ParticipantController.php actionGetbuttons() method:
public function actionGetbuttons($id) {
      $m=Meeting::findOne($id);
      $participantProvider = new ActiveDataProvider([
          'query' => Participant::find()->where(['meeting_id'=>$id]),
          'sort'=> ['defaultOrder' => ['participant_type'=>SORT_DESC,'status'=>SORT_ASC]],
      ]);
      $result = $this->renderPartial('_buttons', [
          'model'=>$m,
          'participantProvider' => $participantProvider,
      ]);
      return $result;
    }
Note: I like the abbreviation of "ParCon" instead of ParticipantController, because it sounds like a remote Star Trek command base, or to indicate that I have also been developing this startup on my own The head of the company. I did spend too much time on Ajax functionality.
Regardless, the above function repopulates the panel with all updated participants.
Now, let’s move on to date and time relying on one of the commonly used Bootstrap datetime picker widgets.
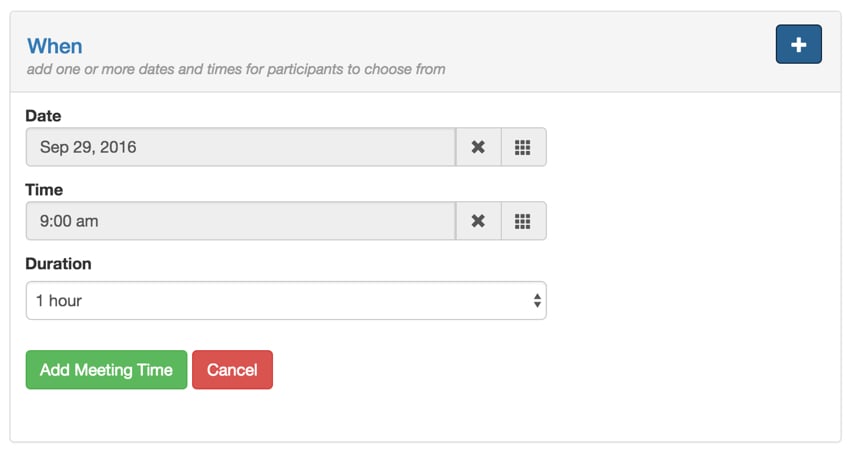
Date, time and location are the most complex functions in ajaxization. The form is not using Bootstrap widgets or the Google Maps API. The result was Bootstrap Switch Controllers - controllers that were not well designed or documented for Ajax.
Here is an example of a broken switch after Ajax submission adds position:

I'll go into detail on how to finally resolve this issue, but first let's take a look at meet-time/panel.php:
<?php
use yii\helpers\Html;
use yii\widgets\ListView;
use yii\bootstrap\Collapse;
use \kartik\switchinput\SwitchInput;
?>
<div id="notifierTime" class="alert-info alert fade in" style="display:none;">
<button type="button" class="close" data-dismiss="alert" aria-hidden="true">×</button>
<?php echo Yii::t('frontend',"We'll automatically notify the organizer when you're done making changes."); ?>
</div>
<div class="panel panel-default">
<!-- Default panel contents -->
<div class="panel-heading" role="tab" id="headingWhen">
<div class="row"><div class="col-lg-10 col-md-10 col-xs-10"><h4 class="meeting-view">
<a role="button" data-toggle="collapse" data-parent="#accordion" href="#collapseWhen" aria-expanded="true" aria-controls="collapseWhen"><?= Yii::t('frontend','When') ?></a>
</h4>
<span class="hint-text">
<?php if ($timeProvider->count<=1) { ?>
<?= Yii::t('frontend','add one or more dates and times for participants to choose from') ?>
<?php } elseif ($timeProvider->count>1) { ?>
<?= Yii::t('frontend','are listed times okay?'); ?>
<?php
}
?>
<?php if ($timeProvider->count>1 && ($model->isOrganizer() || $model->meetingSettings['participant_choose_date_time'])) { ?>
<?= Yii::t('frontend','you can also choose the time') ?>
<?php }?>
</span></div><div class="col-lg-2 col-md-2 col-xs-2"><div style="float:right;">
<?php
if ($model->isOrganizer() || $model->meetingSettings->participant_add_date_time) { ?>
<?= Html::a('', 'javascript:void(0);', ['class' => 'btn btn-primary glyphicon glyphicon-plus','title'=>'Add possible times','id'=>'buttonTime','onclick'=>'showTime();']); ?>
<?php
}
?>
</div>
</div>
</div> <!-- end row -->
</div> <!-- end heading -->
<div id="collapseWhen" class="panel-collapse collapse in" role="tabpanel" aria-labelledby="headingWhen">
<div class="panel-when">
<div class="when-form hidden">
<div id="timeMessage" class="alert-info alert fade in hidden">
<button type="button" class="close" data-dismiss="alert" aria-hidden="true">×</button>
<span id="timeMsg1"><?= Yii::t('frontend','We\'ll automatically notify others when you\'re done making changes.')?></span>
<span id="timeMsg2"><?= Yii::t('frontend','Please pick a date and time.')?></span>
</div>
<div id="addTime" class="hidden">
<!-- hidden add time form -->
<?= $this->render('_form', [
'model' => $meetingTime,
]) ?>
</div>
</div>
<table class="table" id="meeting-time-list" class="hidden">
<?php
if ($timeProvider->count>0):
?>
<!-- Table -->
<?= ListView::widget([
'dataProvider' => $timeProvider,
'itemOptions' => ['class' => 'item'],
'layout' => '{items}',
'itemView' => '_list',
'viewParams' => ['timezone'=>$timezone,'timeCount'=>$timeProvider->count,'isOwner'=>$isOwner,'participant_choose_date_time'=>$model->meetingSettings['participant_choose_date_time'],'whenStatus'=>$whenStatus],
]) ?>
<?php endif; ?>
</table>
</div>
</div>
</div>
您会注意到 timeMessage 提供预加载的警报,以便在某些 Ajax 条件下显示,正如我在上一集中回顾的那样。而且,很大程度上,代码开始遵循我在其他面板上使用的相同格式。
我尽可能地尝试以先前的方法为基础,并在ajax化每个内容面板时重用代码结构。
这是 Meeting.js 中的切换面板 JavaScript:
//show the panel
function showTime() {
  if ($('#addTime').hasClass( "hidden")) {
    $('#addTime').removeClass("hidden");
    $('.when-form').removeClass("hidden");
  }else {
    $('#addTime').addClass("hidden");
    $('.when-form').addClass("hidden");
  }
};

function cancelTime() {
  $('#addTime').addClass("hidden");
  $('.when-form').addClass("hidden");
}
当面板出现并且用户提交新的日期时间时,它会调用 addTime():
function addTime(id) {
    start_time = $('#meetingtime-start_time').val();
    start = $('#meetingtime-start').val();
    if (start_time =='' || start=='') {
      displayAlert('timeMessage','timeMsg2');
      return false;
    }
    // ajax submit subject and message
    $.ajax({
       url: $('#url_prefix').val()+'/meeting-time/add',
       data: {
         id: id,
        start_time: encodeURIComponent(start_time),
        start:encodeURIComponent(start),
      },
       success: function(data) {
         //$('#meeting-note').val('');
         insertTime(id);
         displayAlert('timeMessage','timeMsg1');
         return true;
       }
    });
    $('#addTime').addClass('hidden');
  }
这会调用 MeetingTimeController.php actionAdd() Ajax 函数:
    public function actionAdd($id,$start,$start_time) {
      Yii::$app->response->format = \yii\web\Response::FORMAT_JSON;
      $timezone = MiscHelpers::fetchUserTimezone(Yii::$app->user->getId());
      date_default_timezone_set($timezone);
      $model = new MeetingTime();
      $model->start = urldecode($start);
      $model->start_time = urldecode($start_time);
      if (empty($model->start)) {
        $model->start = Date('M d, Y',time()+3*24*3600);
      }
      $model->tz_current = $timezone;
      $model->duration = 1;
      $model->meeting_id= $id;
      $model->suggested_by= Yii::$app->user->getId();
      $model->status = MeetingTime::STATUS_SUGGESTED;
      $selected_time = date_parse($model->start_time);
      if ($selected_time['hour'] === false) {
        $selected_time['hour'] =9;
        $selected_time['minute'] =0;
      }
      // convert date time to timestamp
      $model->start = strtotime($model->start) +  $selected_time['hour']*3600+ $selected_time['minute']*60;
      $model->end = $model->start + (3600*$model->duration);
      $model->save();
      return true;
    }
当我开始通过 Ajax 添加新的日期时间或地点时,我在尝试重新初始化 Bootstrap Switch 控制器时遇到了困难,我在之前的“调度可用性和选择”一集中就开始使用该控制器。
我重新加载日期时间行,但页面上的所有开关控制器都已损坏。
问题的一部分是 Bootstrap Switch 的 Ajax 重新实例化没有详细记录。在黑暗中尝试了一些事情并在互联网上寻求帮助之后,我终于找到了解决办法。
$("input[name='meeting-time-choice']").map(function(){} 循环遍历每个开关控件,并且 $(this).bootstrapSwitch(property,value) 命令重置控件设置。花了一些时间才找到合适的控件 API。
function insertTime(id) {
    $.ajax({
     url: $('#url_prefix').val()+'/meeting-time/inserttime',
     data: {
       id: id,
      },
      type: 'GET',
     success: function(data) {
      $("#meeting-time-list").html(data).removeClass('hidden');
       $("input[name='time-chooser']").map(function(){
          //$(this).bootstrapSwitch();
          $(this).bootstrapSwitch('onText','<i class="glyphicon glyphicon-ok"></i> choose');
          $(this).bootstrapSwitch('offText','<i class="glyphicon glyphicon-remove"></i>');
          $(this).bootstrapSwitch('onColor','success');
          $(this).bootstrapSwitch('handleWidth',70);
          $(this).bootstrapSwitch('labelWidth',10);
          $(this).bootstrapSwitch('size','small');
        });
        $("input[name='meeting-time-choice']").map(function(){
          //$(this).bootstrapSwitch();
          $(this).bootstrapSwitch('onText','<i class="glyphicon glyphicon-thumbs-up"></i> yes');
          $(this).bootstrapSwitch('offText','<i class="glyphicon glyphicon-thumbs-down"></i> no');
          $(this).bootstrapSwitch('onColor','success');
          $(this).bootstrapSwitch('offColor','danger');
          $(this).bootstrapSwitch('handleWidth',50);
          $(this).bootstrapSwitch('labelWidth',10);
          $(this).bootstrapSwitch('size','small');
        });
     },
   });
   refreshSend();
   refreshFinalize();
  }
基本上,我必须从头开始重新配置每个控件所需的每个属性。这将上面的原始复选框转换回更丰富的开关控件。
在达到这一点之前,我在其他解决方法上浪费了很多时间。 Bootstrap Switch 是一个令人惊叹的控制器,也是 Meeting Planner 易用性的关键部分,但 ajaxifying 几乎让我崩溃。
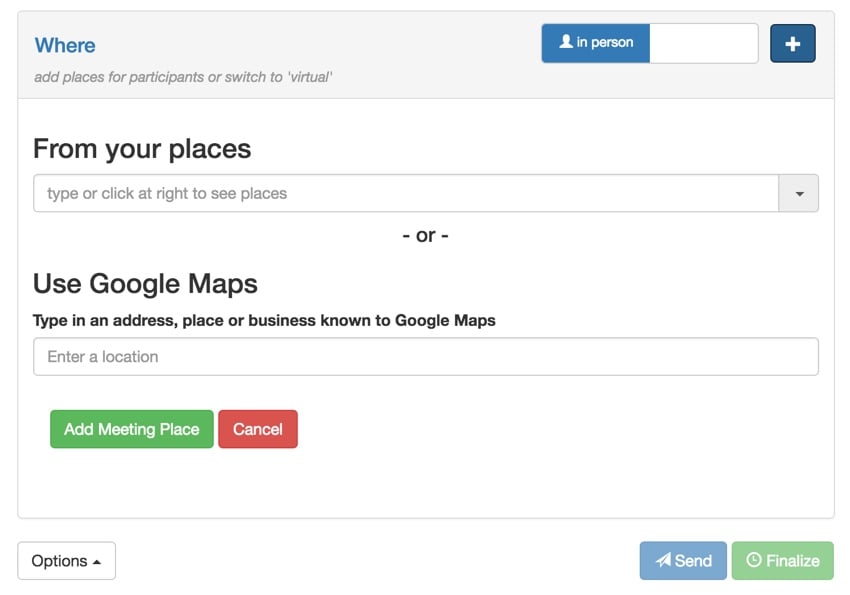
继续,添加会议地点与添加日期和时间类似,但我想使用此内容面板来深入研究使用 Google Chrome 浏览器开发人员工具对 Ajax 进行故障排除。
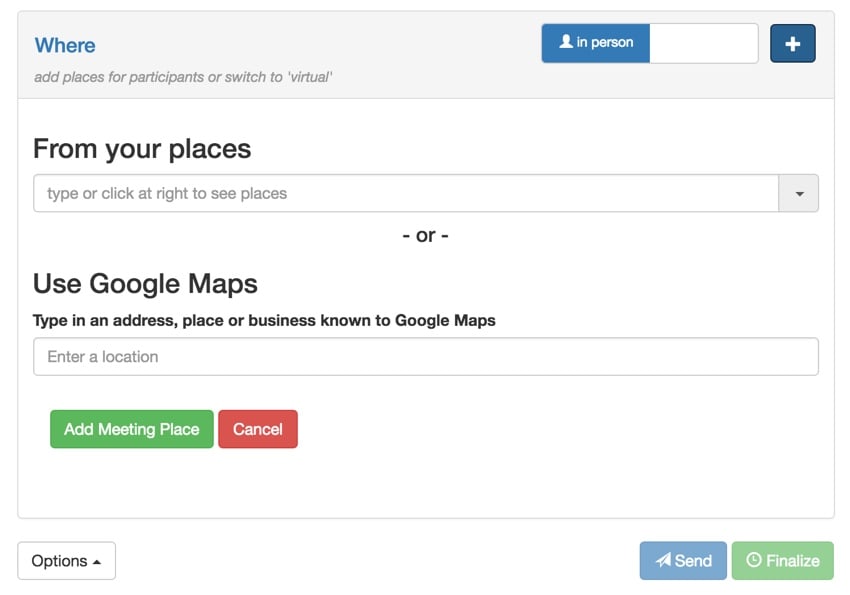
正如我之前所说,在 JavaScript 和 PHP 之间调试 Ajax 可能会变得极其混乱和令人沮丧。 Ajax bug 通常很难追踪。
在这种情况下,使用 Google Chrome 浏览器的开发者控制台帮助我突破了空白。
一般来说,使用 Ajax 时,您只是遇到了故障,没有任何迹象表明出了什么问题。
以下是我用来追踪错误的 Chrome 公开的逐步可见性。
通过使用控制台选项卡,我可以看到失败的 GET 请求。这是尝试请求添加会议地点时发生的服务器错误:

这帮助我确定了通过 ajax 请求的具体参数,在本例中为会议 id = 186。
查看网络选项卡还会显示这些调用及其参数:

当您单击特定查询时,您可以看到五个选项卡;这是标题选项卡:
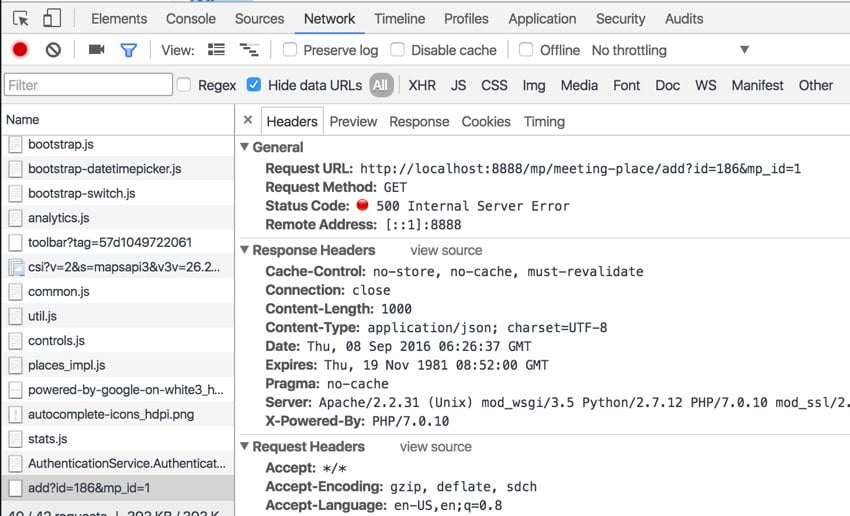
在本例中,预览选项卡突出显示了 Ajax 遇到的 MeetingPlaceController 中的 PHP 错误请求:

您可以看到这变得多么有用 - 特别是考虑到我必须重建大量代码才能实现所有这些调度特点。
以下是网络标签请求会议 ID = 186 地点的另一个示例:

预览标签显示所请求的视图文件不存在或至少不存在不在它应该在的地方:

Google Chrome 的开发者控制台帮助我完成了 Ajax 工作。
谢谢你,谷歌! 今天我什至不会拿我的天才模因来取笑你。
我希望您喜欢关于 Ajax 的这两集以及向快速、高效的会议安排和消除页面刷新的转变。会议安排是 Meeting Planner 的核心和灵魂,因此使其发挥出色至关重要。
I have personally learned a lot through this process and the changes have had a huge positive impact on the service.
Please try faster scheduling and share the meeting planner with your friends. As always, I'd be grateful if you share your experiences in the comments below, and I'm always interested in your suggestions. You can always contact me directly on Twitter @reifman.
I am about to launch an experiment with WeFunder based on the implementation of the SEC’s new crowdfunding rules. If you wish, you can follow our profile. I will also cover this in detail in a future tutorial.
Watch upcoming tutorials in the "Build Your Startup with PHP" series.
The above is the detailed content of Build Your Startup: Simplify Meeting Scheduling with Ajax. For more information, please follow other related articles on the PHP Chinese website!
 How to change word background color to white
 Latest ranking of digital currency exchanges
 How to defend cloud servers against DDoS attacks
 The main function of the arithmetic unit in a microcomputer is to perform
 What to do if 302 found
 How to set css dotted border
 oracle insert usage
 Delete exif information


