

Updating and deleting posts in a React-based blog application: Part 4

In the previous part of this tutorial series, you learned how to implement the add and display post functionality. In this part of the tutorial series on creating a blog application in React, you will implement functionality to update and delete blog posts.
start using
Let's start by cloning the source code for the final part of this series.
https://github.com/royagasthyan/ReactBlogApp-AddPost
After cloning the directory, navigate to the project directory and install the required dependencies.
cd ReactBlogApp-AddPost
npm install
Start the Node.js server and the application will run at http://localhost:7777/index.html#/.
Create update and delete views
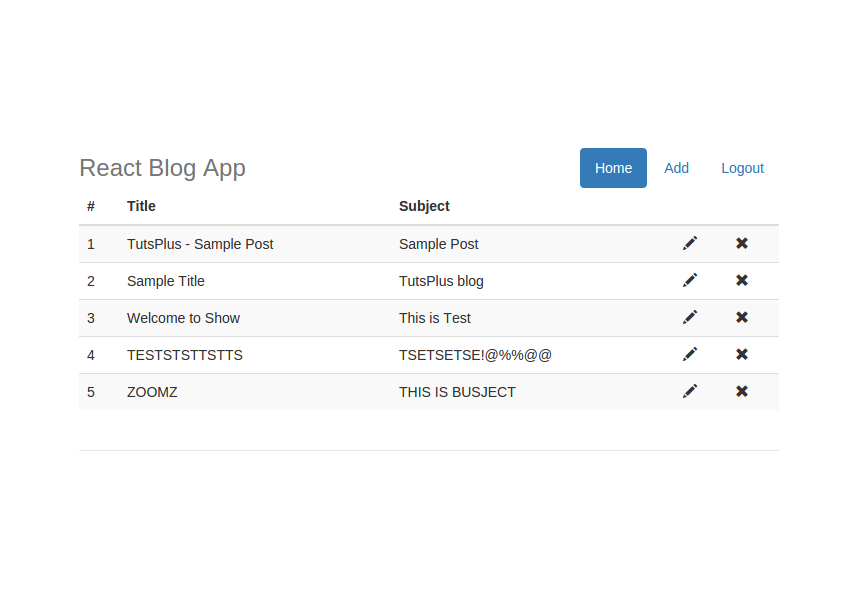
Let’s modify the list of blog posts to display the data in a table with update and delete icons. In the render method of the ShowPost component, replace the existing div with the table, as shown in the code:
<table className="table table-striped">
            <thead>
              <tr>
                <th>#</th>
                <th>Title</th>
                <th>Subject</th>
                <th></th>
                <th></th>
              </tr>
            </thead>
            <tbody>
              {
                this.state.posts.map(function(post,index) {
                   return <tr key={index} >
                            <td>{index+1}</td>
                            <td>{post.title}</td>
                            <td>{post.subject}</td>
                            <td>
                              <span className="glyphicon glyphicon-pencil"></span>
                            </td>
                            <td>
                              <span className="glyphicon glyphicon-remove"></span>
                            </td>
                          </tr>
                }.bind(this))
              }
            </tbody>
</table>
As shown in the code above, you have modified the existing code to display the posts in a table format. You mapped the posts variable to iterate over the posts collection and dynamically create the required tr and td.
Save the above changes and restart the server. Point your browser to http://localhost:7777/home#/ and you should be able to see a list of blog posts in tabular format.
Implement update release function
To implement update publishing functionality, you need to attach a click event to the edit icon. Modify the edit icon span as shown:
<span onClick={this.updatePost.bind(this,post._id)} className="glyphicon glyphicon-pencil"></span>
As shown in the code above, you have passed the post ID as a parameter to the updatePost method.
Create a method updatePost inside the ShowPost component.
updatePost(id){
  hashHistory.push('/addPost/' + id);
}
As shown in the code above, you have triggered a redirect to the add post page using the ID of the edited item. In the add post page you will get the details of the blog post with the passed ID and populate the details.
Modify the router to include the optional id parameter in the add post page.
<Route component={AddPost} path="/addPost(/:id)"></Route>
Inside the AddPost component, create a method called getPostWithId to get the blog post details using the id. Within the getPostWithId method, make an AJAX call to the getPostWithId API within app.js.
getPostWithId(){
  var id = this.props.params.id;
  var self = this;
  axios.post('/getPostWithId', {
    id: id
  })
  .then(function (response) {
    if(response){
      self.setState({title:response.data.title});
      self.setState({subject:response.data.subject});
    }
  })
  .catch(function (error) {
    console.log('error is ',error);
  });
}
You have updated the state variables title and subject with the response received from the getPostWithId API method.
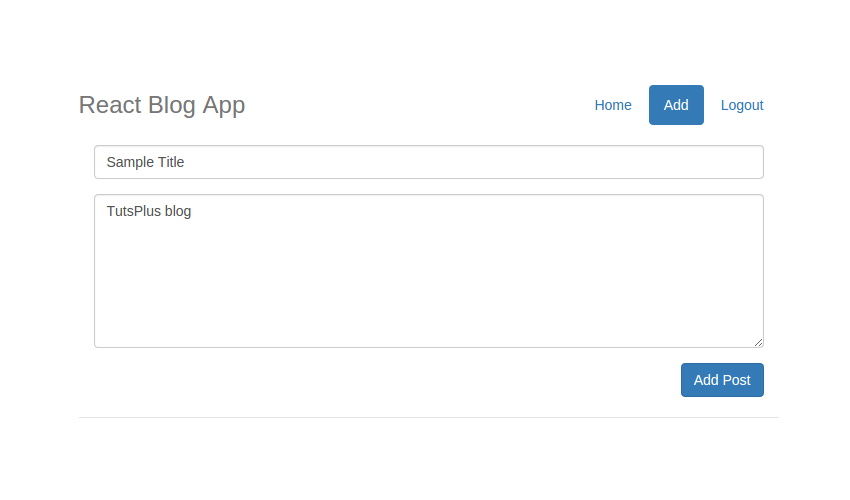
Modify the title and subject text boxes to display the value of the status variable.
<div className="form-group">
    <input value={this.state.title} type="text" onChange={this.handleTitleChange} className="form-control" id="title" name="title" placeholder="Title" required />
</div>

<div className="form-group">
    <textarea value={this.state.subject} className="form-control" onChange={this.handleSubjectChange} type="textarea" id="subject" placeholder="Subject" maxlength="140" rows="7"></textarea>
</div>
Now, let us create the getPostWithId API in app.js to make a database call to the MongoDB database to get the post details with a specific ID. This is the getPostWithId API method:
app.post('/getPostWithId', function(req,res){
  var id = req.body.id;
  post.getPostWithId(id, function(result){
    res.send(result)
  })
})
In the post.js file, create a method getPostWithId to query the database for details. Its appearance is as follows:
getPostWithId: function(id, callback){
	MongoClient.connect(url, function(err, db){
		 db.collection('post').findOne({
		 	_id: new mongodb.ObjectID(id)
		 },
		 function(err, result){
			assert.equal(err, null);
	    	if(err == null){
	    		callback(result)
	    	}
	    	else{
	    		callback(false)
	    	}
		});
	})
}
As shown in the code above, you used the findOne API to get the details of a blog post with a specific ID.
Save the above changes and try to run the program. Click the edit icon on the home page and it will redirect to the add post page and populate the title and subject.
Now, to update the blog post details you need to check the idaddPost in app.js within API methods. If this is a new post, id will be undefined.
Modify the AddPost method in the AddPost component to include the id state variable.
axios.post('/addPost', {
    title: this.state.title,
    subject: this.state.subject,
    id: this.state.id
})
In the addPost API method, you need to check if the id parameter is undefined . If undefined, it means this is a new post, otherwise the update method needs to be called. addPost The API method is as follows:
app.post('/addpost', function (req, res) {
  var title = req.body.title;
  var subject = req.body.subject;
  var id = req.body.id;
  if(id == '' || id == undefined)
    post.addPost(title, subject ,function(result){
      res.send(result);
    });
  }
  else{
    post.updatePost(id, title, subject ,function(result){
      res.send(result);
    });
  }
})
In the post.js file, create a method named updatePost to update the blog post details. You will utilize the updateOne API to update the details of a blog post with a specific id. Here's what the updatePost method looks like:
updatePost: function(id, title, subject, callback){
	MongoClient.connect(url, function(err, db) {
	  	db.collection('post').updateOne(
	  		{ "_id": new mongodb.ObjectID(id) },
	  		{ $set:
	  			{ "title" : title,
	  			  "subject" : subject
	  			}
	  		},function(err, result){
			assert.equal(err, null);
	    	if(err == null){
	    		callback(true)
	    	}
	    	else{
	    		callback(false)
	    	}
		});
	});
}
保存以上更改并重新启动服务器。登录应用程序并点击编辑图标。修改现有值并单击按钮更新详细信息。
实现删除帖子功能
要实现删除帖子功能,您需要将点击事件附加到删除图标。修改删除图标跨度如图:
<span onClick={this.deletePost.bind(this,post._id)} className="glyphicon glyphicon-remove"></span>
如上面的代码所示,您已将帖子 ID 作为参数传递给 deletePost 方法。
在 ShowPost 组件中创建一个名为 deletePost 的方法。
deletePost(id){

}
在ShowPost组件构造函数中绑定该方法。
this.deletePost = this.deletePost.bind(this);
要在 map 函数回调中使用 this,您需要将 this 绑定到 map 函数。修改map函数回调如图:
      {
        this.state.posts.map(function(post,index) {
           return
                    {index+1}
                    {post.title}
                    {post.subject}

                      <span onClick={this.updatePost.bind(this,post._id)} className="glyphicon glyphicon-pencil"></span>


                      <span onClick={this.deletePost.bind(this,post._id)} className="glyphicon glyphicon-remove"></span>


        }.bind(this))
      }
在 deletePost 方法中,在调用删除 API 之前添加确认提示。
deletePost(id){
  if(confirm('Are you sure ?')){
    // Delete Post API call will be here !!
  }
}
现在让我们在 app.js 文件中添加 deletePost API。 API 将从 AJAX 调用中读取帖子 ID 并从 MongoDB 中删除该条目。以下是 deletePost API 的外观:
app.post('/deletePost', function(req,res){
  var id = req.body.id;
  post.deletePost(id, function(result){
    res.send(result)
  })
})
如上面的代码所示,您将调用 post.js 文件中的 deletePost 方法并返回结果。让我们在 post.js 文件中创建 deletePost 方法。
deletePost: function(id, callback){

	MongoClient.connect(url, function(err, db){
		 db.collection('post').deleteOne({
		 	_id: new mongodb.ObjectID(id)
		 },
		 function(err, result){
			assert.equal(err, null);
	    	console.log("Deleted the post.");
	    	if(err == null){
	    		callback(true)
	    	}
	    	else{
	    		callback(false)
	    	}
		});
	})
}
如上面的代码所示,post.js 文件中的 deletePost 方法将使用 MongoClient 连接到MongoDB 中的博客数据库。使用从 AJAX 调用传递的 Id ,它将从数据库中删除该帖子。
更新 home.jsx 文件中 deletePost 方法内的代码,以包含对 deletePost API 的 AJAX 调用 app.js 文件。
deletePost(id){
  if(confirm('Are you sure ?')){
    var self = this;
    axios.post('/deletePost', {
      id: id
    })
    .then(function (response) {

    })
    .catch(function (error) {

    });
  }
}
删除博客文章后,您需要刷新博客文章列表以反映这一点。因此,创建一个名为 getPost 的新方法,并将 componentDidMount 代码移到该函数内。这是 getPost 方法:
getPost(){
  var self = this;
  axios.post('/getPost', {
  })
  .then(function (response) {
    console.log('res is ',response);
    self.setState({posts:response.data})
  })
  .catch(function (error) {
    console.log('error is ',error);
  });
}
修改componentDidMount代码,如图:
componentDidMount(){
  this.getPost();

  document.getElementById('homeHyperlink').className = "active";
  document.getElementById('addHyperLink').className = "";
}
在 deletePost AJAX 调用成功回调内,调用 getPost 方法来更新博客文章列表。
deletePost(id){
  if(confirm('Are you sure ?')){
    var self = this;
    axios.post('/deletePost', {
      id: id
    })
    .then(function (response) {
      self.getPost();
    })
    .catch(function (error) {
      console.log('Error is ',error);
    });
  }
}
保存以上更改并重新启动服务器。尝试添加新的博客文章,然后从网格列表中单击“删除”。系统将提示您一条删除确认消息。单击确定按钮后,该条目将被删除,并且博客文章列表将被更新。

总结
在本教程中,您了解了如何在 React 博客应用程序中实现删除和更新博客文章功能。在本教程系列的下一部分中,您将了解如何为登录用户实现个人资料页面。
请在下面的评论中告诉我们您的想法和建议。本教程的源代码可在 GitHub 上获取。
The above is the detailed content of Updating and deleting posts in a React-based blog application: Part 4. For more information, please follow other related articles on the PHP Chinese website!

Hot AI Tools

Undresser.AI Undress
AI-powered app for creating realistic nude photos

AI Clothes Remover
Online AI tool for removing clothes from photos.

Undress AI Tool
Undress images for free

Clothoff.io
AI clothes remover

Video Face Swap
Swap faces in any video effortlessly with our completely free AI face swap tool!

Hot Article
Hot Tools

Notepad++7.3.1
Easy-to-use and free code editor

SublimeText3 Chinese version
Chinese version, very easy to use

Zend Studio 13.0.1
Powerful PHP integrated development environment

Dreamweaver CS6
Visual web development tools

SublimeText3 Mac version
God-level code editing software (SublimeText3)
Hot Topics
 1386
1386
 52
52

 Is WordPress easy for beginners?
Apr 03, 2025 am 12:02 AM
Is WordPress easy for beginners?
Apr 03, 2025 am 12:02 AM
WordPress is easy for beginners to get started. 1. After logging into the background, the user interface is intuitive and the simple dashboard provides all the necessary function links. 2. Basic operations include creating and editing content. The WYSIWYG editor simplifies content creation. 3. Beginners can expand website functions through plug-ins and themes, and the learning curve exists but can be mastered through practice.
 What is the WordPress good for?
Apr 07, 2025 am 12:06 AM
What is the WordPress good for?
Apr 07, 2025 am 12:06 AM
WordPressisgoodforvirtuallyanywebprojectduetoitsversatilityasaCMS.Itexcelsin:1)user-friendliness,allowingeasywebsitesetup;2)flexibilityandcustomizationwithnumerousthemesandplugins;3)SEOoptimization;and4)strongcommunitysupport,thoughusersmustmanageper
 Can I learn WordPress in 3 days?
Apr 09, 2025 am 12:16 AM
Can I learn WordPress in 3 days?
Apr 09, 2025 am 12:16 AM
Can learn WordPress within three days. 1. Master basic knowledge, such as themes, plug-ins, etc. 2. Understand the core functions, including installation and working principles. 3. Learn basic and advanced usage through examples. 4. Understand debugging techniques and performance optimization suggestions.
 How much does WordPress cost?
Apr 05, 2025 am 12:13 AM
How much does WordPress cost?
Apr 05, 2025 am 12:13 AM
WordPress itself is free, but it costs extra to use: 1. WordPress.com offers a package ranging from free to paid, with prices ranging from a few dollars per month to dozens of dollars; 2. WordPress.org requires purchasing a domain name (10-20 US dollars per year) and hosting services (5-50 US dollars per month); 3. Most plug-ins and themes are free, and the paid price ranges from tens to hundreds of dollars; by choosing the right hosting service, using plug-ins and themes reasonably, and regularly maintaining and optimizing, the cost of WordPress can be effectively controlled and optimized.
 Should I use Wix or WordPress?
Apr 06, 2025 am 12:11 AM
Should I use Wix or WordPress?
Apr 06, 2025 am 12:11 AM
Wix is suitable for users who have no programming experience, and WordPress is suitable for users who want more control and expansion capabilities. 1) Wix provides drag-and-drop editors and rich templates, making it easy to quickly build a website. 2) As an open source CMS, WordPress has a huge community and plug-in ecosystem, supporting in-depth customization and expansion.
 How To Begin A WordPress Blog: A Step-By-Step Guide For Beginners
Apr 17, 2025 am 08:25 AM
How To Begin A WordPress Blog: A Step-By-Step Guide For Beginners
Apr 17, 2025 am 08:25 AM
Blogs are the ideal platform for people to express their opinions, opinions and opinions online. Many newbies are eager to build their own website but are hesitant to worry about technical barriers or cost issues. However, as the platform continues to evolve to meet the capabilities and needs of beginners, it is now starting to become easier than ever. This article will guide you step by step how to build a WordPress blog, from theme selection to using plugins to improve security and performance, helping you create your own website easily. Choose a blog topic and direction Before purchasing a domain name or registering a host, it is best to identify the topics you plan to cover. Personal websites can revolve around travel, cooking, product reviews, music or any hobby that sparks your interests. Focusing on areas you are truly interested in can encourage continuous writing
 Is WordPress still free?
Apr 04, 2025 am 12:06 AM
Is WordPress still free?
Apr 04, 2025 am 12:06 AM
The core version of WordPress is free, but other fees may be incurred during use. 1. Domain names and hosting services require payment. 2. Advanced themes and plug-ins may be charged. 3. Professional services and advanced features may be charged.
 Why would anyone use WordPress?
Apr 02, 2025 pm 02:57 PM
Why would anyone use WordPress?
Apr 02, 2025 pm 02:57 PM
People choose to use WordPress because of its power and flexibility. 1) WordPress is an open source CMS with strong ease of use and scalability, suitable for various website needs. 2) It has rich themes and plugins, a huge ecosystem and strong community support. 3) The working principle of WordPress is based on themes, plug-ins and core functions, and uses PHP and MySQL to process data, and supports performance optimization.
