Building a PhoneGap Android App: A Beginner's Guide to 'Hello World'
PhoneGap is an open source platform that allows you to create cross-platform mobile apps using HTML, JavaScript, and CSS. To interact with device hardware, PhoneGap provides a JavaScript API that interacts with features such as the onboard camera, GPS, and accelerometer.
Although PhoneGap is great for developing cross-platform applications, the code to develop an application for one platform or another will be different. One of the biggest differences to overcome is the required software requirements.
This tutorial will provide an in-depth introduction to setting up an Android development environment and will build a simple "Hello World" application.
If you want to take PhoneGap further, check out the range of PhoneGap scripts and app templates on Envato Market.
PhoneGap requirements for Android development
Java JDK
You need to install the Java Development Kit (JDK). Please follow the official instructions to set it up.
Android SDK
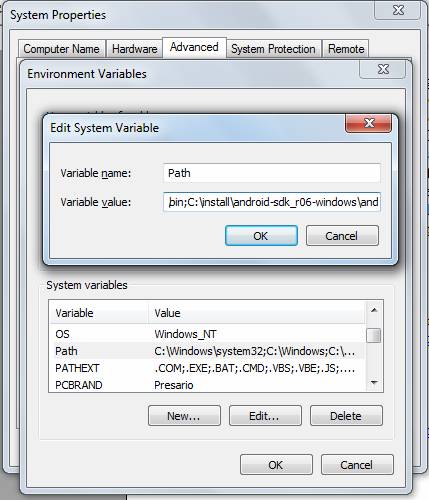
You also need the Android Software Development Kit. When installing the SDK, you need to set android-sdk-
eclipse
If Eclipse is not already installed on your computer, you will need to download and install it.
Eclipse ADT plug-in
You also need to install the ADT plug-in for Eclipse. ADT (Android Development Tools) is a plug-in for eclipse that provides a complete IDE for developing Android applications. ADT lets you create a new Android project, or it lets you create an Android project from an existing source (this is how we open the PhoneGap app for android on eclipse). Using ADT, you can also debug Android applications. Since ADT is well integrated with the android SDK, running the application from the IDE launches the android emulator directly.
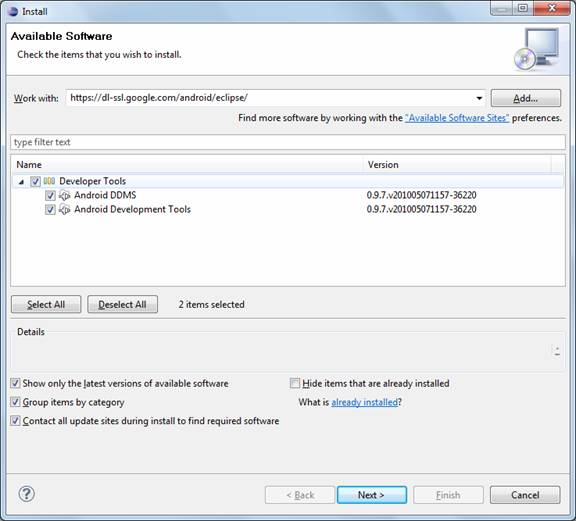
To install ADT, click Install New Software in the Eclipse Help window and enter the following site to use: http://dl-ssl.google.com/android/eclipse/. Then follow the wizard that appears to install ADT.
Android Platform and Components
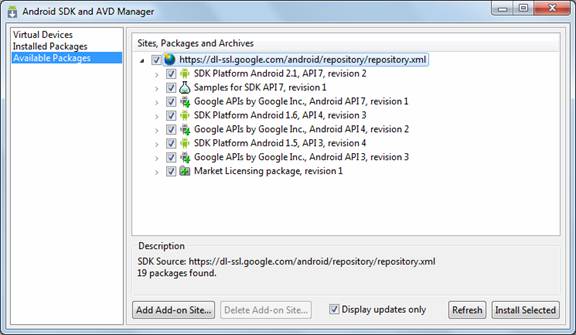
After installing ADT, you will need to install the Android platform and other components. To do this, go to Menu Options Window -> Android DK and AVD Manager and select Platform and API Level. Android api 2.2 is the latest at the time of writing this article.
Apache Ant
If you don't have apache ant installed, you can download it from http://ant.apache.org/bindownload.cgi. To install it, you just unzip the downloaded Zip file and set the bin folder in the ant directory of your PATH variable.
ruby
If you don't have Ruby installed yet, you can download it from this free installer. After installation, add the Ruby/bin path to your account's PATH variable.
PhoneGap Framework
Of course, you also need the PhoneGap framework itself.
Create your development workspace
Environment variable check:
The following path should be set in your account's PATH variable:
- Your system path/jdk/bin
- your_system_path/android-sdk/tools
- your_system_path/ruby/bin
- your_system_path/apache-ant/bin
In addition to this, you need to set the following variables:
- JAVA_HOME – Path to the JDK directory
- ANT_HOME – The path to the apache-ant directory
- ANDROID_HOME – Path to the Android SDK directory.
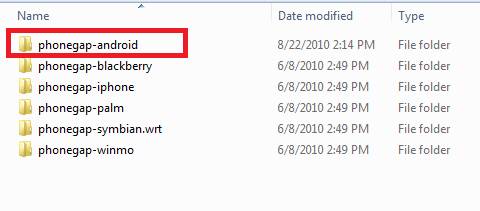
To create a workspace for the PhoneGap app on Android, go to the "phonegap-android" folder on the command prompt or terminal:
ruby ./droidgap "[android_sdk_path]" [name] [package_name] "[www]" "[path]"
- android_sdk_path: The location where you installed the SDK
- Name: The name of the new application.
- package_name: The name you want to give your application.
- www: The folder from which you want to copy the PhoneGap app files.
- Path: The application workspace for your project.
After running the command, if everything goes well, you will see the correct message like this:
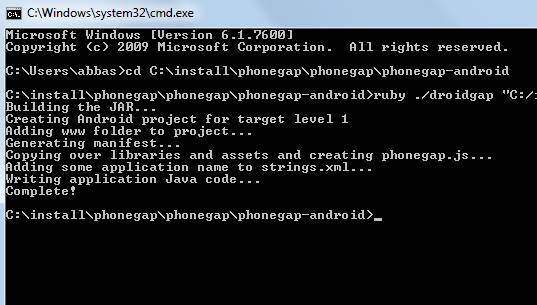
The above should create a complete workspace for your PhoneGap Android application.
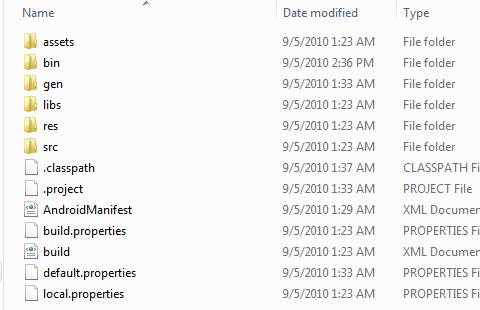
在 Eclipse 中设置您的项目
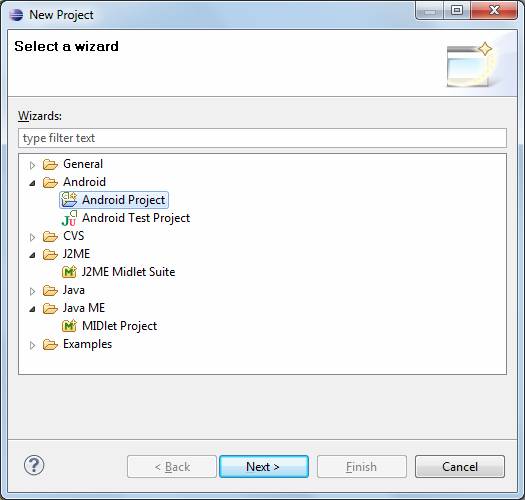
完成此操作后,可以在 Eclipse 中打开该工作区。在 Eclipse 中选择新项目,然后选择 Android 项目。
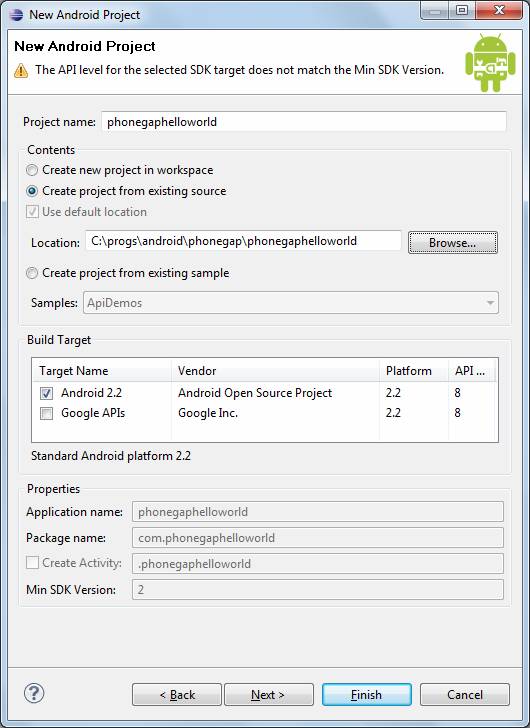
接下来选择“从现有源创建项目”并为项目命名,如下所示。
如果您尝试在 Eclipse 中构建并运行该项目,您将收到构建错误。这是因为您尚未添加在工作区的 libs 文件夹中创建的外部库 (phonegap.jar)。
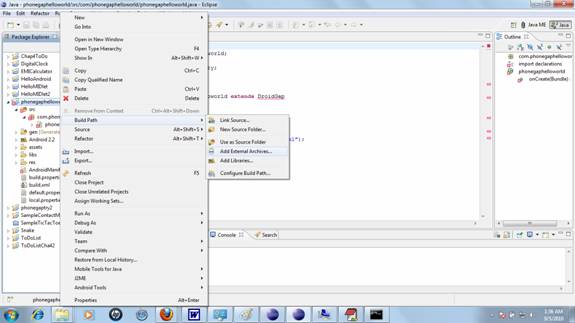
要添加该外部库,请右键单击该项目,然后选择“构建路径”->“添加外部存档”,然后选择 libs 文件夹中的phonegap.jar。
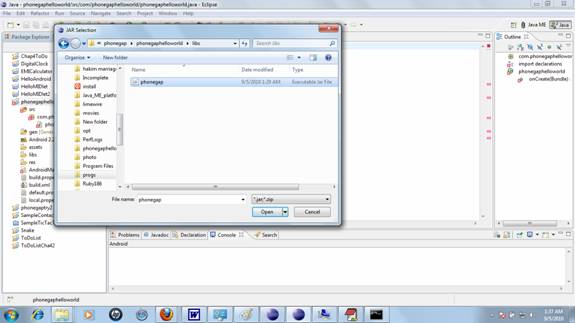
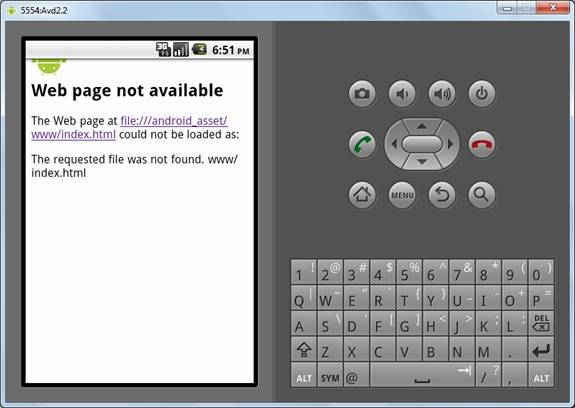
如果一切顺利,这应该会消除项目中的所有构建错误。现在尝试在模拟器中运行您的项目。您应该看到下面的屏幕。这是因为您尚未在项目中添加任何 PhoneGap HTML 或 JavaScript 文件。
在工作区的assets/www文件夹中,已经有一个名为phonegap.js的文件。在该文件夹中创建一个名为 index.html 的文件,其中包含以下代码:
<!DOCTYPE HTML>

<html>

  <head>

    <meta name="viewport" content="width=320; user-scalable=no" />

    <meta http-equiv="Content-type" content="text/html; charset=utf-8">

    <title>PhoneGap Android App</title>

              <script type="text/javascript" charset="utf-8" src="phonegap.js"></script>

              <script type="text/javascript" charset="utf-8">

                        var showMessageBox = function() {

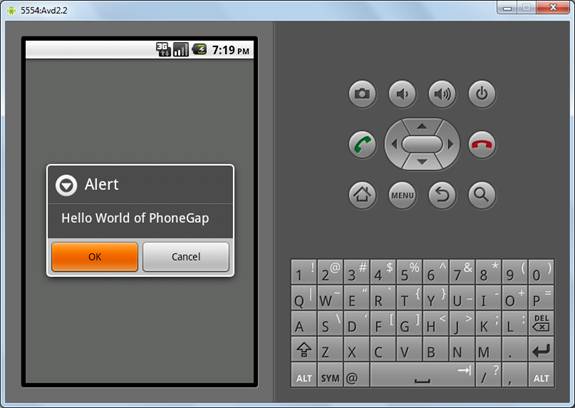
                             navigator.notification.alert("Hello World of PhoneGap");

                        }

                        function init(){

                             document.addEventListener("deviceready", showMessageBox, true);

                        }

  </script>

  </head>

  <body onload="init();"  >

  </body>

</html>
在代码行中:
<script type="text/javascript" charset="utf-8" src="phonegap.js"></script>
包括phonegap.js 文件,它可以让您调用android 的本机API。在加载主体时,init 函数会在 PhoneGap 事件 deviceready 上注册函数 showMessageBox,当 PhoneGap 完成处理以初始化程序的所有内容时会触发该函数,以便它可以调用 PhoneGap API。 showMessageBox 函数调用 PhoneGap API navigator.notification.alert,在屏幕上显示消息框。添加index.html并在Eclipse中刷新项目后运行应用程序,您将看到以下屏幕:
现在让我们为我们的应用程序添加更多功能。以下代码创建一个文本框来输入人员姓名,并创建一个按钮,单击该按钮会显示一个消息框:
<!DOCTYPE HTML>

<html>

  <head>

    <meta name="viewport" content="width=320; user-scalable=no" />

    <meta http-equiv="Content-type" content="text/html; charset=utf-8">

    <title>PhoneGap</title>


              <script type="text/javascript" charset="utf-8" src="phonegap.js"></script>

              <script type="text/javascript" charset="utf-8">

              var displayHello = function() {

                        var name =      document.getElementById("firstname").value;

                        navigator.notification.alert("name" + name);

            }

   </script>

  </head>

  <body onload="init();" id="bdy" >

            <div id="txt">

            <input   type="text" name="firstname" id="firstname" />

            </div>

            <div id ="btn">

    <a href="#" class="btn" onclick="displayHello();">Say Hello</a>

            </div>

        </div>

  </body>

</html>
在下面的代码行中,我们创建了一个文本框,您可以在其中输入您的姓名。
<input type="text" name="firstname" id="firstname" />
在行中
<a href="#" class="btn" onclick="displayHello();">Say Hello</a>
我们创建了一个链接,单击该链接会调用函数 displayHello,该函数从文本框中获取值并显示一个消息框,向用户输入的名称打招呼。
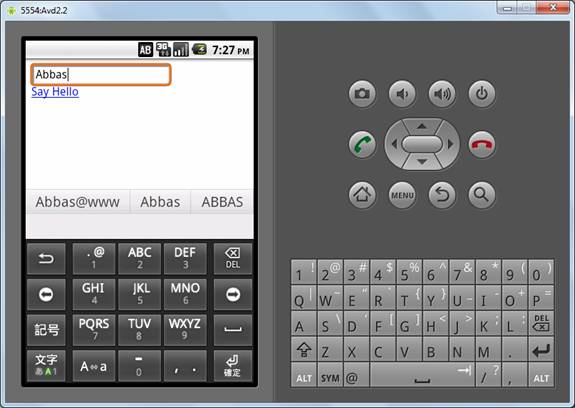
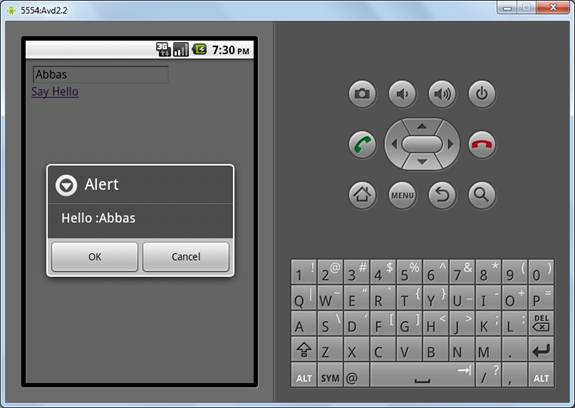
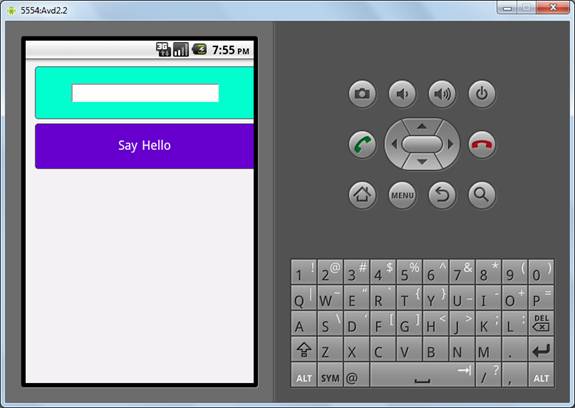
上面显示的 GUI 没有任何样式。您可以使用 CSS 文件美化显示并为其添加颜色。使用以下代码在 asset\www 文件夹中创建 master.css:
#bdy

{

            background:#F0F0F0;

}


#btn a{

            border: 1px solid #555;

            -webkit-border-radius: 5px;

            border-radius: 5px;

            text-align:center;

            display:block;

            float:left;

            background:#6600CC;

            width:308px;

            color:#FFF;

            font-size:1.1em;

            text-decoration:none;

            padding:1.2em 0;

            margin:3px 0px 3px 5px;

}


#txt{

            border: 1px solid #555;

            -webkit-border-radius: 5px;

            border-radius: 5px;

            text-align:center;

            display:block;

            float:left;

            background:#00FFCC;

            width:308px;

            color:#9ab;

            font-size:1.1em;

            text-decoration:none;

            padding:1.2em 0;

            margin:3px 0px 3px 5px;
}
在您的index.html中,在head标签之前添加以下行以链接到master.css:
<link rel="stylesheet" href="master.css" type="text/css" media="screen" title="no title" charset="utf-8">
现在,如果您运行该应用程序,您应该会看到如下所示的屏幕:
结论
要在 Android 上创建 PhoneGap 应用程序,许多不同的软件必须协同工作。这可能意味着您可能无法设置完整的环境来在 Android 上创建 PhoneGap 应用程序。然而,一旦所有软件就位,您就可以使用 HTML、JavaScript、CSS 等开放网络标准和 PhoneGap 自己的 API 轻松创建 PhoneGap 应用程序,以执行设备硬件特定处理。这为您省去了学习 Android 编程本机语言的麻烦,并且仍然拥有自定义、本机构建的 Android 应用程序的强大功能。
The above is the detailed content of Building a PhoneGap Android App: A Beginner's Guide to 'Hello World'. For more information, please follow other related articles on the PHP Chinese website!

Hot AI Tools

Undresser.AI Undress
AI-powered app for creating realistic nude photos

AI Clothes Remover
Online AI tool for removing clothes from photos.

Undress AI Tool
Undress images for free

Clothoff.io
AI clothes remover

AI Hentai Generator
Generate AI Hentai for free.

Hot Article

Hot Tools

Notepad++7.3.1
Easy-to-use and free code editor

SublimeText3 Chinese version
Chinese version, very easy to use

Zend Studio 13.0.1
Powerful PHP integrated development environment

Dreamweaver CS6
Visual web development tools

SublimeText3 Mac version
God-level code editing software (SublimeText3)

Hot Topics
 1377
1377
 52
52
 How do I create and publish my own JavaScript libraries?
Mar 18, 2025 pm 03:12 PM
Article discusses creating, publishing, and maintaining JavaScript libraries, focusing on planning, development, testing, documentation, and promotion strategies.
 How do I optimize JavaScript code for performance in the browser?
Mar 18, 2025 pm 03:14 PM
The article discusses strategies for optimizing JavaScript performance in browsers, focusing on reducing execution time and minimizing impact on page load speed.
 What should I do if I encounter garbled code printing for front-end thermal paper receipts?
Apr 04, 2025 pm 02:42 PM
Frequently Asked Questions and Solutions for Front-end Thermal Paper Ticket Printing In Front-end Development, Ticket Printing is a common requirement. However, many developers are implementing...
 How do I debug JavaScript code effectively using browser developer tools?
Mar 18, 2025 pm 03:16 PM
The article discusses effective JavaScript debugging using browser developer tools, focusing on setting breakpoints, using the console, and analyzing performance.
 How do I use source maps to debug minified JavaScript code?
Mar 18, 2025 pm 03:17 PM
The article explains how to use source maps to debug minified JavaScript by mapping it back to the original code. It discusses enabling source maps, setting breakpoints, and using tools like Chrome DevTools and Webpack.
 How do I use Java's collections framework effectively?
Mar 13, 2025 pm 12:28 PM
This article explores effective use of Java's Collections Framework. It emphasizes choosing appropriate collections (List, Set, Map, Queue) based on data structure, performance needs, and thread safety. Optimizing collection usage through efficient
 TypeScript for Beginners, Part 2: Basic Data Types
Mar 19, 2025 am 09:10 AM
Once you have mastered the entry-level TypeScript tutorial, you should be able to write your own code in an IDE that supports TypeScript and compile it into JavaScript. This tutorial will dive into various data types in TypeScript. JavaScript has seven data types: Null, Undefined, Boolean, Number, String, Symbol (introduced by ES6) and Object. TypeScript defines more types on this basis, and this tutorial will cover all of them in detail. Null data type Like JavaScript, null in TypeScript
 Getting Started With Chart.js: Pie, Doughnut, and Bubble Charts
Mar 15, 2025 am 09:19 AM
This tutorial will explain how to create pie, ring, and bubble charts using Chart.js. Previously, we have learned four chart types of Chart.js: line chart and bar chart (tutorial 2), as well as radar chart and polar region chart (tutorial 3). Create pie and ring charts Pie charts and ring charts are ideal for showing the proportions of a whole that is divided into different parts. For example, a pie chart can be used to show the percentage of male lions, female lions and young lions in a safari, or the percentage of votes that different candidates receive in the election. Pie charts are only suitable for comparing single parameters or datasets. It should be noted that the pie chart cannot draw entities with zero value because the angle of the fan in the pie chart depends on the numerical size of the data point. This means any entity with zero proportion


