

Explore models and animations in WebGL using Three.js

3D graphics in browsers have been a hot topic since their introduction. But if you were to create an application using plain old WebGL, it would take a long time. That's why some really useful libraries have emerged. Three.js is one of the most popular, and in this series, I'll show you how to make the most of it to create stunning 3D experiences for your users.
I hope you have a basic understanding of 3D space before starting this tutorial, as I won't be explaining topics like coordinates and vectors.
Preparation
As usual, we'll start with the code you created earlier. Download and unzip the resources I've provided and you're good to go.
Step 1: Instructions on Exporting the Model in Blender
Before we start the programming part, I will explain some issues that a lot of people have problems with. When you create a model in Blender and want to export it to Three.js format, you should keep the following points in mind:
- First, delete the parent-child relationship. The Three.js exporter will not export any animations if you leave it (this also applies to the skeleton modifier)
- Second, group the vertices. If you want the bones to move any vertices, you must group them and name the group with the name of the bone.
- Third, you can only have one animation. This may sound like a big problem, but I'll explain the solution later.
Additionally, when exporting you must ensure that these options are selected in the exporter: Skinning, Bones, and Skeletal Animation.
Step 2: Import model
Like almost everything in Three.js, importing models is very simple. There is a special class THREE.JSONLoader that will do everything for us. Of course, it only loads JSON models, but it is recommended to use them, so I will only introduce this loader (other loaders work almost the same way). Let’s initialize it first:
var loader = new THREE.JSONLoader;
var animation;
No parameters required. We also need to define an animation variable so we can access it later. Now we can load the model:
loader.load('./model.js', function (geometry, materials) {
	var skinnedMesh = new THREE.SkinnedMesh(geometry, new THREE.MeshFaceMaterial(materials));
	skinnedMesh.position.y = 50;
	skinnedMesh.scale.set(15, 15, 15);
	scene.add(skinnedMesh);

	animate(skinnedMesh);
});
load The method accepts two parameters: model path and callback function. This function will be called when the model is loaded (so at the same time you can show the loading bar to the user). The callback function will be called with two parameters: the geometry of the model and its material (they are exported with the model). In the callback, we are creating the mesh, but this time it is THREE.SkinnedMesh, which supports animation.
Next, we move the model up 50 units, place it on top of the cube, scale it 15x (since I tend to create small models in Blender) and add it to the scene. Next we call the animate function to set up and play the animation.
Step 3: Animation
Now we set up the animation. This is the source code of the animate function:
function animate(skinnedMesh) {
	var materials = skinnedMesh.material.materials;

	for (var k in materials) {
		materials[k].skinning = true;
	}

	THREE.AnimationHandler.add(skinnedMesh.geometry.animation);
	animation = new THREE.Animation(skinnedMesh, "ArmatureAction", THREE.AnimationHandler.CATMULLROM);
	animation.play();
}
First, we must enable skinning (animation) in all materials of the model. Next, we have to add the animation from the model to the THREE.AnimationHandler and create the THREE.Animation object. The parameters are in the following order: the mesh to animate, the name of the animation in the model, and the interpolation type (useful when you have a complex model like a human body, and want the mesh to curve smoothly). Finally, we play the animation.
But if you open the browser now, you will see that the model is not moving:
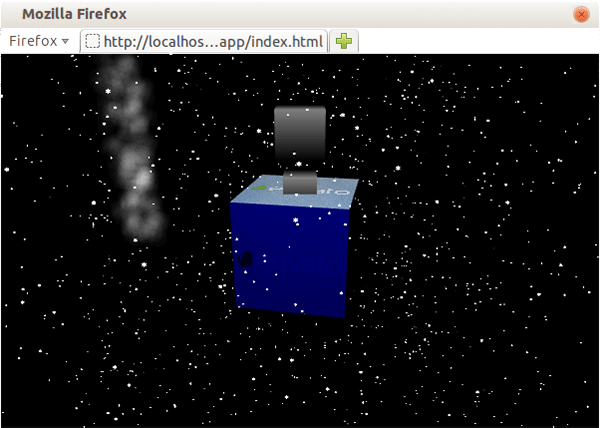
To solve this problem we have to add a line in the render function, below the articleSystem rotation:
if (animation) animation.update(delta);
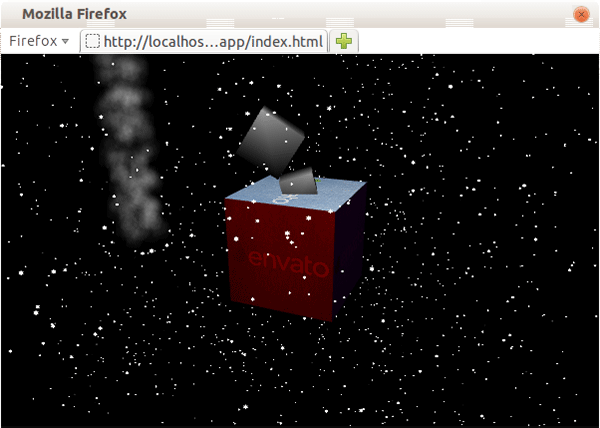
This will update the animation's timing so THREE.AnimationHandler knows which frame to render. Now open your browser and you should see the top cube curved to the left and right:
Step 4: Multiple animations
Yes, there is a workaround that only works for one animation sequence in the model, but it requires you to edit it. The idea is to add each animation to a sequence, and then, when that animation ends, the next one starts. Next, after exporting the model, you need to change the animation code. Let's say we have a standing animation from the start to the third second, and a walking animation from the third second to the end. Then in our render function we have to check which second the animation is and if it reaches the end time of the current sequence, stop it and start playing from the beginning:
var currentSequence = 'standing';

function (render) {
...
	if (animation) animation.update(delta);
	if (currentSequence == 'standing') {
		if (animation.currentTime > 4) {
			animation.stop();
			animation.play(false, 0); // play the animation not looped, from 0s
		}
	} else if (currentSequence == 'walking') {
		if (animation.currentTime <= 4 || animation.currentTime > 8) {
			animation.stop();
			animation.play(false, 4); // play the animation not looped, from 4s
		}
	}
...
}
您必须记住从正确的时间开始不循环的动画。如果用户的帧速率确实很低,这当然会出现问题,因为增量会更高,并且 animation.currentTime 可能远高于任何特定序列的限制,导致播放下一个序列的某些部分。但只有当增量约为 300-500 毫秒时才会引人注目。
现在要更改 animate 函数来播放行走动画,只需将这些参数添加到 animation.play 函数即可:
animation.play(false, 0);
此外,让我们允许用户使用 a 键在动画之间切换。将此代码添加到文件末尾,就在 render() 调用之前:
document.addEventListener('keyup', function (e) {
	if (e.keyCode == 'A'.charCodeAt(0)) {
		currentSequence = (currentSequence == 'standing' ? 'walking': 'standing');
	}
});
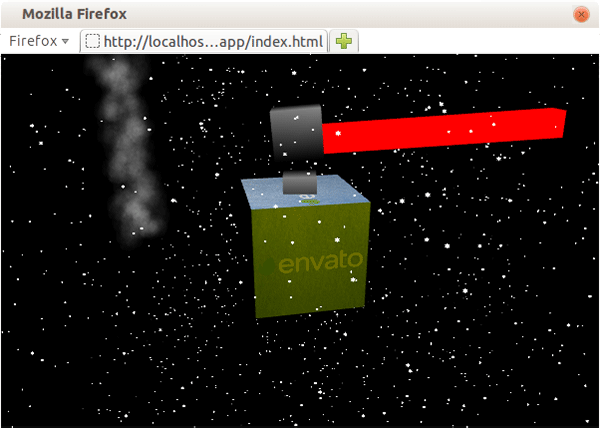
第 5 步:附着到骨骼
这种技术在角色扮演游戏中特别有用,但它也可以应用于其他类型。它涉及将另一个对象附加到动画对象的骨骼上:衣服、武器等。
让我们首先修改 loader.load 回调。在 scene.add(skinnedMesh') 下添加此代码:
item = new THREE.Mesh(new THREE.CubeGeometry(100, 10, 10), new THREE.MeshBasicMaterial({ color: 0xff0000 }));
item.position.x = 50;
pivot = new THREE.Object3D();
pivot.scale.set(0.15, 0.15, 0.15);
pivot.add(item);
pivot.useQuaternion = true;
skinnedMesh.add(pivot);
item 网格模拟您可能想要附加到动画对象的东西。为了使其围绕特定点而不是围绕中心旋转,我们将其添加到 pivot 对象并将其向右移动 50 个单位(宽度的一半)。我们必须将其缩放到 0.15,因为它将被添加到 skinnedMesh,其缩放比例为 15。最后,在将其添加到我们的动画对象之前,我们告诉它使用四元数。
基本上,四元数是一个数字系统,但由于 Three.js 为我们处理了所有事情,如果您不想,则不必深入研究这个主题(但如果您愿意,请查看其维基百科页)。它们用于旋转物体,而没有万向节锁定的风险。
现在,在 render 函数中,我们必须更新对象的位置和旋转:
pivot.position = new THREE.Vector3().getPositionFromMatrix(skinnedMesh.bones[2].skinMatrix);
pivot.quaternion.setFromRotationMatrix(skinnedMesh.bones[2].skinMatrix);
让我解释一下这里发生了什么。首先,我们将位置设置为与模型中最后一个骨骼的位置相同。我们使用 skinMatrix 属性来计算它。然后我们使用相同的属性来计算 pivot 旋转的四元数。之后,您可以打开浏览器,您应该看到红色光束附加到我们的模型上:
结论
我希望您从本教程中学到了一些新的有趣的技术。与往常一样,请随意尝试我们创建的应用程序。在本系列的下一个(也是最后一个)教程中,我将向您展示 OpenGL/WebGL 着色器的真正威力。
The above is the detailed content of Explore models and animations in WebGL using Three.js. For more information, please follow other related articles on the PHP Chinese website!

Hot AI Tools

Undresser.AI Undress
AI-powered app for creating realistic nude photos

AI Clothes Remover
Online AI tool for removing clothes from photos.

Undress AI Tool
Undress images for free

Clothoff.io
AI clothes remover

AI Hentai Generator
Generate AI Hentai for free.

Hot Article
Hot Tools

Notepad++7.3.1
Easy-to-use and free code editor

SublimeText3 Chinese version
Chinese version, very easy to use

Zend Studio 13.0.1
Powerful PHP integrated development environment

Dreamweaver CS6
Visual web development tools

SublimeText3 Mac version
God-level code editing software (SublimeText3)
Hot Topics
 1378
1378
 52
52

 How do I create and publish my own JavaScript libraries?
Mar 18, 2025 pm 03:12 PM
How do I create and publish my own JavaScript libraries?
Mar 18, 2025 pm 03:12 PM
Article discusses creating, publishing, and maintaining JavaScript libraries, focusing on planning, development, testing, documentation, and promotion strategies.
 How do I optimize JavaScript code for performance in the browser?
Mar 18, 2025 pm 03:14 PM
How do I optimize JavaScript code for performance in the browser?
Mar 18, 2025 pm 03:14 PM
The article discusses strategies for optimizing JavaScript performance in browsers, focusing on reducing execution time and minimizing impact on page load speed.
 What should I do if I encounter garbled code printing for front-end thermal paper receipts?
Apr 04, 2025 pm 02:42 PM
What should I do if I encounter garbled code printing for front-end thermal paper receipts?
Apr 04, 2025 pm 02:42 PM
Frequently Asked Questions and Solutions for Front-end Thermal Paper Ticket Printing In Front-end Development, Ticket Printing is a common requirement. However, many developers are implementing...
 How do I debug JavaScript code effectively using browser developer tools?
Mar 18, 2025 pm 03:16 PM
How do I debug JavaScript code effectively using browser developer tools?
Mar 18, 2025 pm 03:16 PM
The article discusses effective JavaScript debugging using browser developer tools, focusing on setting breakpoints, using the console, and analyzing performance.
 Who gets paid more Python or JavaScript?
Apr 04, 2025 am 12:09 AM
Who gets paid more Python or JavaScript?
Apr 04, 2025 am 12:09 AM
There is no absolute salary for Python and JavaScript developers, depending on skills and industry needs. 1. Python may be paid more in data science and machine learning. 2. JavaScript has great demand in front-end and full-stack development, and its salary is also considerable. 3. Influencing factors include experience, geographical location, company size and specific skills.
 How do I use source maps to debug minified JavaScript code?
Mar 18, 2025 pm 03:17 PM
How do I use source maps to debug minified JavaScript code?
Mar 18, 2025 pm 03:17 PM
The article explains how to use source maps to debug minified JavaScript by mapping it back to the original code. It discusses enabling source maps, setting breakpoints, and using tools like Chrome DevTools and Webpack.
 Getting Started With Chart.js: Pie, Doughnut, and Bubble Charts
Mar 15, 2025 am 09:19 AM
Getting Started With Chart.js: Pie, Doughnut, and Bubble Charts
Mar 15, 2025 am 09:19 AM
This tutorial will explain how to create pie, ring, and bubble charts using Chart.js. Previously, we have learned four chart types of Chart.js: line chart and bar chart (tutorial 2), as well as radar chart and polar region chart (tutorial 3). Create pie and ring charts Pie charts and ring charts are ideal for showing the proportions of a whole that is divided into different parts. For example, a pie chart can be used to show the percentage of male lions, female lions and young lions in a safari, or the percentage of votes that different candidates receive in the election. Pie charts are only suitable for comparing single parameters or datasets. It should be noted that the pie chart cannot draw entities with zero value because the angle of the fan in the pie chart depends on the numerical size of the data point. This means any entity with zero proportion
 TypeScript for Beginners, Part 2: Basic Data Types
Mar 19, 2025 am 09:10 AM
TypeScript for Beginners, Part 2: Basic Data Types
Mar 19, 2025 am 09:10 AM
Once you have mastered the entry-level TypeScript tutorial, you should be able to write your own code in an IDE that supports TypeScript and compile it into JavaScript. This tutorial will dive into various data types in TypeScript. JavaScript has seven data types: Null, Undefined, Boolean, Number, String, Symbol (introduced by ES6) and Object. TypeScript defines more types on this basis, and this tutorial will cover all of them in detail. Null data type Like JavaScript, null in TypeScript
