 Web Front-end
 HTML Tutorial
 Jump-start WordPress development with Twig and Timber images, menus, and users
Jump-start WordPress development with Twig and Timber images, menus, and users
So far, you have learned the basic concepts of using Twig with Timber while building a modular WordPress theme. We also explored block nesting and multiple inheritance using Twig based on the DRY principle. Today, we’ll look at how to display attachment images, WordPress menus, and users in your theme using Twig with the Timber plugin.
Image in wood
Images are one of the important elements of any WordPress theme. In normal WordPress coding practice, images are integrated with PHP within normal HTML image tags. However, Timber provides a fairly comprehensive approach to handling img (image) tags that is modular and clean.
An image is attached in the thumbnail field of the post. These can be easily retrieved via Twig files via {{ post.thumbnail }}. It's that simple!
usage
Let's start with a practical example. Our single.php file looks like this:
<?php
/**
 * Single Template
 *
 * The Template for displaying all single posts.
 *
 * @since 1.0.0
 */

// Context array
$context         = Timber::get_context();
$post            = new TimberPost();
$context['post'] = $post;

// Timber ender().
Timber::render( 'single.twig', $context );
Here, for very obvious reasons, I used the TimberPost() function. It is used throughout Timber to represent posts retrieved from WordPress, making them available to Twig templates.
Since the featured image is attached to the post data, we now need to retrieve it on the frontend. Therefore, its Twig file single.twig will look like this:
{# Sinlge Template: `single.twig` #}

{% extends "base.twig" %}

{% block content %}

    <div class="single_content">

        <img  src="/static/imghw/default1.png"  data-src="https://img.php.cn/upload/article/000/465/014/169381303714882.jpg"  class="lazy" / alt="Jump-start WordPress development with Twig and Timber images, menus, and users" >

    </div>

{% endblock %}
On line 9, the code {{ post.thumbnail.src }} retrieves the post's featured (thumbnail) image and displays it as follows:

You can retrieve any number of thumbnails using this code syntax.
You can also experiment more with these images when using Timber. For example, you can also resize them by:
<img src="/static/imghw/default1.png" data-src="https://img.php.cn/upload/article/000/465/014/169381303849158.jpg" class="lazy" / alt="Jump-start WordPress development with Twig and Timber images, menus, and users" >
You can add new dimensions to an image by using the resize() function, where the first parameter is width and the second parameter is height . If you want to scale the image proportionally, ignore the height attribute. Now the syntax becomes:
<img src="/static/imghw/default1.png" data-src="https://img.php.cn/upload/article/000/465/014/169381303849158.jpg" class="lazy" / alt="Jump-start WordPress development with Twig and Timber images, menus, and users" >
The frontend displays the same image as shown below:

If you want to explore more, try image recipes.
Use TimberImage()
Consider a scenario where a developer wants to get an image by image ID, or wants to display an external image through a URL, etc. For this extension method, Timber provides a class, TimberImage (), that represents an image retrieved from WordPress.
usage
Let’s take the single.php file as an example. It now looks like this:
<?php
/**
 * Single Template
 *
 * The Template for displaying all single posts.
 *
 * @since 1.0.0
 */

// Context array
$context         = Timber::get_context();
$post            = new TimberPost();
$context['post'] = $post;

// Using the TimberImage() function
// to retrieve the image via its ID i.e 8
$context['custom_img'] = new TimberImage( 8 );

// Timber ender().
Timber::render( 'single.twig', $context );
This time, I use the TimberImage() class which takes the image ID 8 as its parameter. The rest of the encoding routine is the same. Let's retrieve this image via the Twig file single.twig.
<img src="/static/imghw/default1.png" data-src="https://img.php.cn/upload/article/000/465/014/169381303714882.jpg" class="lazy" / alt="Jump-start WordPress development with Twig and Timber images, menus, and users" >
The value stored in the $context custom_img element, i.e. {{ custom_img }}, will retrieve the image by its ID to display on the frontend as follows:

To retrieve an image via external URL replacement, you can follow the following syntax.
<?php $context[ 'img' ] = new TimberImage( 'https://domain.com/link/image.jpg' ); ?>
This time, instead of the image ID, the frontend displays the external image URL, as shown below:

To explore more capabilities of this feature, you can check out the documentation.
Wood Menu
Now, how would you render a WordPress menu using Twig templates? This is a tricky thing. But hang in there! Timber provides you with the TimberMenu() class that helps you render a WordPress menu inside a Twig file as a complete loop. Let's take a look.
usage
The whole concept of retrieving menu items revolves around menu objects. There are two ways to define its context. The first is to make the menu object available on every page by adding the menu object to the global get_context() function, just like I did in the functions.php file. Secondly, you can add a specific menu by ID for a specific PHP template.
无论采用哪种方法,一旦菜单可供 Timber $context 数组使用,您就可以从中检索所有菜单项。但我更喜欢在全球范围内定义它。因此,转到 functions.php 文件并粘贴以下代码:
<?php
/**
 * Custom Context
 *
 * Context data for Timber::get_context() function.
 *
 * @since 1.0.0
 */
function add_to_context( $data ) {
    $data['foo'] = 'bar';
	$data['stuff'] = 'I am a value set in your functions.php file';
	$data['notes'] = 'These values are available everytime you call Timber::get_context();';
	$data['menu'] = new TimberMenu();
	return $data;
}
add_filter( 'timber_context', 'add_to_context' );
因此,我在这里定义了一个自定义函数调用 add_to_context。在这个函数内部有一些数据,我希望通过 get_context() 函数在每个 PHP 模板中都可以使用这些数据。在第 13 行,您可以找到 TimberMenu() 的实例,该实例针对 $data 数组中的元素菜单传递。
这将使 Twig 模板可以使用标准 WordPress 菜单作为我们可以循环访问的对象。 TimberMenu() 函数可以采用菜单项或 ID 等参数。
让我们创建一个名为 menu.twig 文件的 Twig 模板。
{# Menu Template: `menu.twig` #}

<nav>
    <ul class="main-nav">
        {% for item in menu.get_items %}
                <li class="nav-main-item {{ item.classes | join(' ') }}">
                    <a class="nav-main-link" href="{{ item.get_link }}">{{ item.title }}</a>
                </li>
        {% endfor %}
    </ul>
</nav>
上面的代码在此 Twig 模板内运行一个循环。第 5 行为每个菜单项运行 for 循环,并在无序列表中显示每个菜单 item 的标题。循环运行,直到 menu 对象的所有键值对都被迭代并列出在前端。
我继续将 menu.twig 模板包含在第 11 行的 base.twig 模板中。
{# Base Template: `base.twig` #}

{% block html_head_container %}

    {% include 'header.twig' %}

{% endblock %}

	<body class="{{body_class}}">

		{% include "menu.twig" %}

		<div class="wrapper">

			{% block content %}

			    <!-- Add your main content here. -->
			    <p>SORRY! No content found!</p>

			{% endblock %}

		</div>
		<!-- /.wrapper -->

	{% include "footer.twig" %}

	</body>

</html>
让我们预览一下我的演示网站的后端(外观 > 菜单),其中菜单包含两个父项和一个子项。
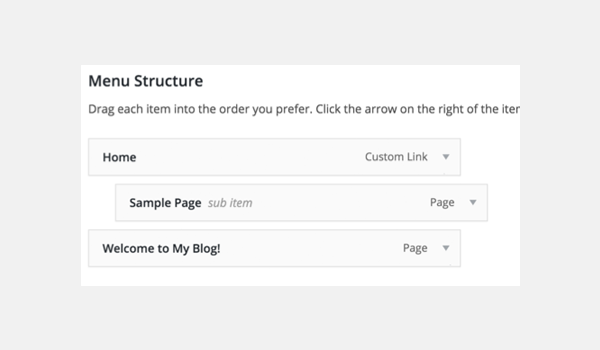
所以,让我们看一下帖子页面 - 因为我们的 single.twig 扩展了 base.twig,我们的菜单将自动出现在该页面上。
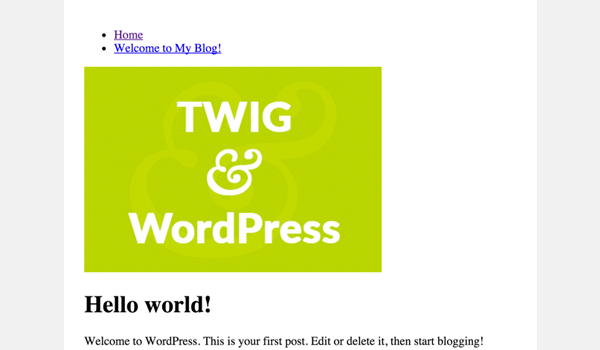
您可以看到,在我们单个帖子的顶部有一个菜单,其中包含两个父项。
子菜单项怎么样?让我们更新 menu.twig 文件以也包含子项目。
{# Menu Template: `menu.twig` #}

<nav>
    <ul class="main-nav">
        {% for item in menu.get_items %}
                <li class="nav-main-item {{ item.classes | join(' ') }}">
                    <a class="nav-main-link" href="{{ item.get_link }}">{{ item.title }}</a>

						{% if item.get_children %}

							<ul class="nav-drop">

								{% for child in item.get_children %}

								<li class="nav-drop-item">
									<a href="{{ child.get_link }}">{{ child.title }}</a>
								</li>

								{% endfor %}

							</ul>

						{% endif %}

                </li>
        {% endfor %}
    </ul>
</nav>
第 9 行到第 23 行打印子菜单项(如果有)。这次,前端显示我们第一个父项的子项。

有关 TimberMenu() 的更多详细信息,请查看文档。
Timber 中的用户
可以使用 TimberUser() 类从 WordPress 数据库检索用户。该类采用用户 ID 或 slug 作为参数来检索用户。
由于用户或博客作者与 WP 帖子相关联,我将使用 single.php 的代码,现在如下所示:
<?php
/**
 * Single Template
 *
 * The Template for displaying all single posts.
 *
 * @since 1.0.0
 */

// Context array
$context         = Timber::get_context();
$post            = new TimberPost();
$context['post'] = $post;

// Using the TimberImage() function
// to retrieve the image via its ID i.e 8
$context['custom_img'] = new TimberImage( 8 );

// Get the user object.
$context['user'] = new TimberUser();

// Timber ender().
Timber::render( 'single.twig', $context );
第 20 行初始化 TimberUser() 类并分配给上下文对象元素,即 user。让我们通过 Twig 模板显示作者姓名。
我的 single.twig 模板在第 #21 行末尾有一行新代码。
{# Sinlge Template: `single.twig` #}

{% extends "base.twig" %}

{% block content %}

    <div class="single_content">

        <img  src="/static/imghw/default1.png"  data-src="https://img.php.cn/upload/article/000/465/014/169381303929063.png"  class="lazy" / alt="Jump-start WordPress development with Twig and Timber images, menus, and users" >

    	{# <img  src="/static/imghw/default1.png"  data-src="https://img.php.cn/upload/article/000/465/014/169381303929063.png"  class="lazy" / alt="Jump-start WordPress development with Twig and Timber images, menus, and users" > #}

    	{# <img  src="/static/imghw/default1.png"  data-src="https://img.php.cn/upload/article/000/465/014/169381303929063.png"  class="lazy" / alt="Jump-start WordPress development with Twig and Timber images, menus, and users" > #}

    	{# <img  src="/static/imghw/default1.png"  data-src="https://img.php.cn/upload/article/000/465/014/169381303929063.png"  class="lazy" / alt="Jump-start WordPress development with Twig and Timber images, menus, and users" > #}

        <h1 id="post-title">{{ post.title }}</h1>

        <p>{{ post.get_content }}</p>

        <p>Author: {{ user }} </p>
    </div>

{% endblock %}
代码获取当前帖子的作者姓名并将其显示在前端。您可以使用 {{ 用户 | print_r }} 查看 TimberUser 对象中还有什么可用的。
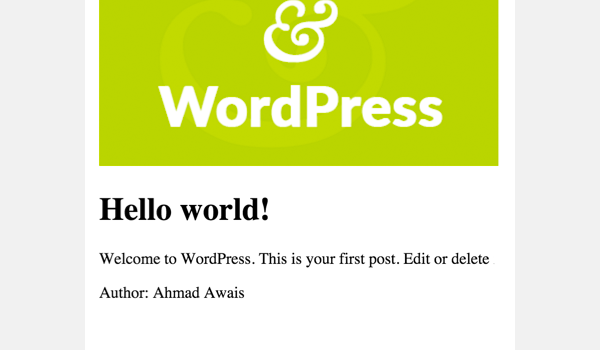
要了解有关此类的更多信息,请参阅文档。您可以在 ImagesMenusUsers 分支的 GitHub 存储库中找到本教程的代码。
结论
本文总结了整个系列。在这四篇文章中,我探索了如何使用 Timber 将 Twig 模板语言集成到 WordPress 主题中。
本系列的最终存储库可以在 GitHub 上找到,其中包含特定于教程的分支:
- 教程 #2:入门
- 教程 #3:WordPress 备忘单
- 教程 #4:TimberImages、TimberMenu 和 TimberUser
您可以查阅 Timber 的在线文档了解更多信息。
完成整个系列并实现所有解释的示例,我打赌您会喜欢 Twig。在下面的评论框中发表您的疑问。您也可以通过 Twitter 联系我。
The above is the detailed content of Jump-start WordPress development with Twig and Timber images, menus, and users. For more information, please follow other related articles on the PHP Chinese website!

Hot AI Tools

Undresser.AI Undress
AI-powered app for creating realistic nude photos

AI Clothes Remover
Online AI tool for removing clothes from photos.

Undress AI Tool
Undress images for free

Clothoff.io
AI clothes remover

AI Hentai Generator
Generate AI Hentai for free.

Hot Article

Hot Tools

Notepad++7.3.1
Easy-to-use and free code editor

SublimeText3 Chinese version
Chinese version, very easy to use

Zend Studio 13.0.1
Powerful PHP integrated development environment

Dreamweaver CS6
Visual web development tools

SublimeText3 Mac version
God-level code editing software (SublimeText3)

Hot Topics
 1378
1378
 52
52
 How to use Twig with CakePHP?
Jun 05, 2023 pm 07:51 PM
Using Twig in CakePHP is a way to separate templates and views, making the code more modular and maintainable. This article will introduce how to use Twig in CakePHP. 1. Install Twig. First install the Twig library in the project. You can use Composer to complete this task. Run the following command in the console: composerrequire "twig/twig:^2.0" This command will be displayed in the project's vendor
 How to use the Twig template engine in PHP for web development
Jun 25, 2023 pm 04:03 PM
With the continuous development of Web development technology, more and more developers are beginning to look for more flexible and efficient template engines to develop Web applications. Among them, Twig is a very excellent and popular PHP template engine. It is developed based on the Symfony framework and supports unlimited expansion. It is very suitable for building complex web applications. This article will introduce how to use the Twig template engine for web development in PHP. 1. Introduction to Twig template engine Twig is developed by FabienPoten
 Template library in PHP8.0: Twig
May 14, 2023 am 08:40 AM
Template library in PHP8.0: TwigTwig is a template library currently widely used in PHP Web applications. It has the characteristics of high readability, easy use and strong scalability. Twig uses simple and easy-to-understand syntax, which can help web developers organize and output HTML, XML, JSON and other text formats in a clear and orderly manner. This article will introduce you to the basic syntax and features of Twig and its use in PHP8.0. The basic syntax of Twig is similar to P
 Jump-start WordPress development with Twig and Timber images, menus, and users
Sep 04, 2023 pm 03:37 PM
So far, you have learned the basic concepts of using Twig with Timber while building a modular WordPress theme. We also studied block nesting and multiple inheritance using Twig based on the DRY principle. Today we will explore how to use Twig with the Timber plugin to display attachment images, WordPress menus, and users in your theme. Images in wood Images are one of the important elements of any WordPress theme. In normal WordPress coding practice, images are integrated with PHP within normal HTML image tags. However, Timber provides a fairly comprehensive approach to handling img (image) tags that is modular and clean.
 Advanced Skinning in PHP: How to Use Twig
Jun 19, 2023 pm 04:03 PM
In web development, page presentation is crucial. For PHP developers, when developing a dynamic website, it is easy to get stuck in a large number of HTML tags and PHP code. Once the style or layout needs to be modified, the code must be modified over and over again, which is extremely costly to maintain. To solve this problem, modern PHP frameworks usually provide a template engine. Among them, Twig is one of the more popular template engines. In this article we will cover how and why to use Twig for PHP
 How to use template engine Twig with CodeIgniter framework?
Jun 03, 2023 pm 12:51 PM
With the continuous development of open source and web development, developers' demand for various frameworks, tools and technologies continues to grow. As we all know, CodeIgniter is one of the most popular PHP frameworks. On its basis, combined with the modern template engine Twig, high-quality web applications can be built quickly and easily. Therefore, this article will introduce how to use the Twig template engine in the CodeIgniter framework. 1. What is TwigTwig is a modern, elegant and flexible PHP template
 Jump-start WordPress development with Twig: Blocks and Nesting
Aug 31, 2023 pm 06:29 PM
In my previous article, I covered integrating the Twig template engine with WordPress via Timber and how developers can send data from PHP files to Twig files. Let’s discuss how to create a basic template using Twig, the advantages of this DRY technique, and the Timber-Twig WordPress Cheatsheet. Creating Basic Templates in Twig Twig follows the DRY (Don’t Repeat Yourself) principle. One of the most important features of Twig is basic templates with nesting and multiple inheritance. While most people use PHP includes in a linear fashion, you can create unlimited levels of nested blocks to specifically control your page templates. Think of your base template as containing
 How to use Timber to debug template rendering of PHP functions?
Apr 23, 2024 pm 12:12 PM
Debug TimberPHP template rendering through the following steps: Install the Timber debugging plug-in. Enable debug mode in your config.php file. Use {{dump()}} to dump variables in your Twig template. Define the variables to dump in your PHP function. Use Timber to render the template. Through the above steps, the Timber debugging plug-in will display the value of the variable in the browser console, helping you quickly identify and solve rendering problems.


