

When you provide the title attribute, the browser will automatically display the tooltip. Internet Explorer will also use the alt attribute. However, in this tutorial, I'm going to show you how to quickly write a jQuery plugin that will replace your typical browser tooltips with something flashier.

One of the most useful tools in our web development goodie package are tool tips. The tooltip is a box
Appears when you hover your cursor over elements such as hyperlinks. Provide supplement
Information about this element. For example, links with little or no text (icons) can become confusing.
Provide an extra sentence or two in the tooltip that explains to the user what will happen if they click the tip.
This tutorial may fall into the intermediate category. These instructions assume you have at least
Basic understanding of HTML/CSS, slicing techniques, and jQuery.
If you need a refresher on jQuery, here are some recommended websites:
To give you a clear idea of the files involved in this tutorial, the file structure should look like this
Like when you're done.
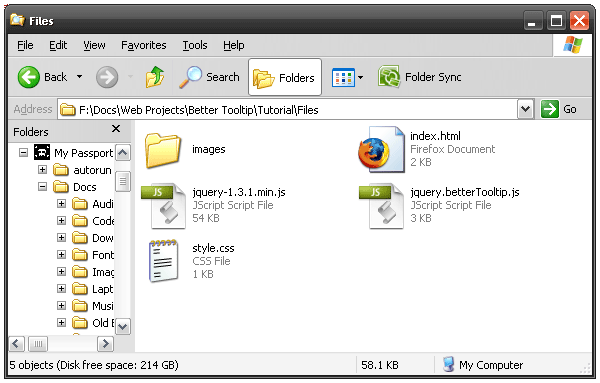
The following is a summary of each file/folder:
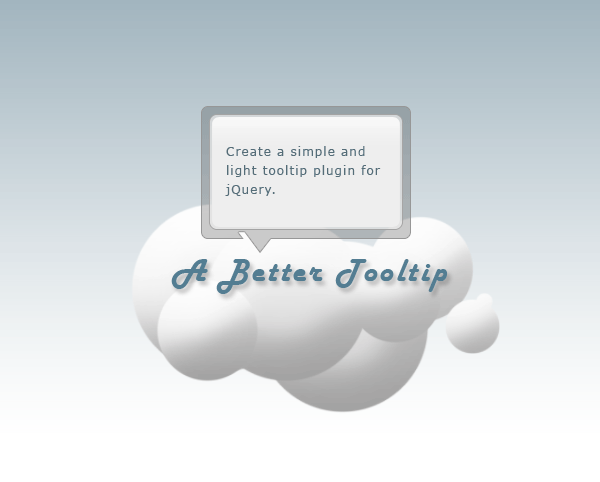
Open Photoshop or the software of your choice and create a beautiful tooltip. Rather than design
On a plain white background, it might be helpful to draw the tooltip on a background similar to your website.
This way it will blend together seamlessly. In most cases, there is no right or wrong way
to complete this step. Just use your imagination and creativity.
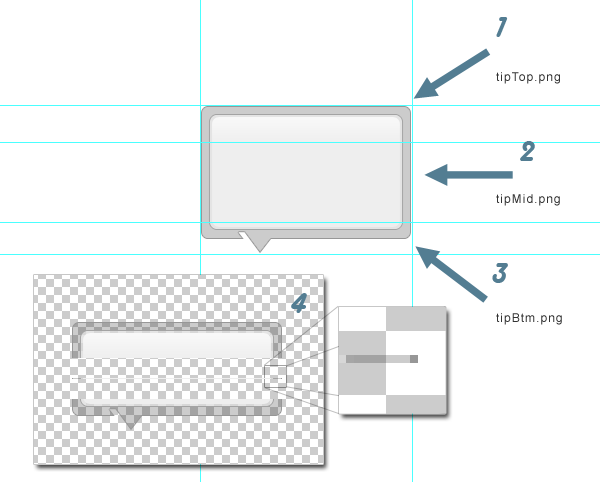
For this specific design, you will need to split the tooltip into 3 different images. This particular design requires a PNG to maintain transparency.
1) The top piece. 2) A thin 1 pixel slice that will be repeated vertically in the middle. 3) Bottom part. The fourth part of the image below shows these three
Cut out pieces.
Put these image files into a folder called "images".
Note: Internet Explorer does not like PNG transparency. Even IE 7 only partially supports it. If you make animation
PNG and JavaScript, any area with transparency will instantly turn black when moved. I am using this design
Fully aware that it will cause difficult problems in IE.
After the image is sliced, we can continue processing HTML and CSS markup. This will be the easiest part of the whole process
Tutorial.
This HTML tag will soon be moved to an external JavaScript file, so just type this anywhere
The most convenient and can be referenced in the future.
	<div class="tip">
		<div class="tipMid"></div>
		<div class="tipBtm"></div>
	</div>
There are three div tags. Both are nested within the parent object. The first div, "tip" will be used to tie everything together
And displays the top part of the tooltip, tipTop.png.
"tipMid" will ultimately hold the text that the tooltip will display. It will also repeat tipMid.png vertically within it.
"tipBtm" is used only to display the bottom part of the tooltip, tipBtm.png.
Inside index.html, add a bunch of padding text and some elements with the title attribute filled in. like:
<a href="#" title="This is the tooltip text">This is a link</a>
In the head of index.html you need to link to the stylesheet and two JavaScript files.
	<link href="style.css" rel="stylesheet" type="text/css" media="all" />
	<script type="text/javascript" src="jquery-1.3.1.min.js"></script>
	<script type="text/javascript" src="jquery.betterTooltip.js"></script>
这个工具提示使用的CSS比较简单,只需将以下内容添加到style.css
	.tip {
		width: 212px;
		padding-top: 37px;
		display: none;
		position: absolute;
		background: transparent url(images/tipTop.png) no-repeat top;}

	.tipMid {background: transparent url(images/tipMid.png) repeat-y; padding: 0 25px 20px 25px;}
	.tipBtm {background: transparent url(images/tipBtm.png) no-repeat bottom; height: 32px;}
让我解释一下上面的内容。
包装元素 .tip 用于将所有内容固定在一起。它的顶部内边距为 37 像素。
这是背景图像的高度。填充会将子元素向下推以显示
后面的图像。它还具有绝对位置,以便我们可以将其在页面顶部移动
内容。
另外两个类仅具有背景图像,并且在 .topMid 的情况下,通过填充来提供
将放置在里面的内容,一些呼吸的空间。
jQuery 本身就非常酷。但真正的魔力在于使用插件扩展它。当你把你的 将代码写入插件,就可以使其可重用。这样你就可以构建一个代码库而无需编写
相同的代码两次。
这是完整的工具提示插件:
	$.fn.betterTooltip = function(options){

		/* Setup the options for the tooltip that can be
		   accessed from outside the plugin              */
		var defaults = {
			speed: 200,
			delay: 300
		};

		var options = $.extend(defaults, options);

		/* Create a function that builds the tooltip
		   markup. Then, prepend the tooltip to the body */
		getTip = function() {
			var tTip =
			"<div class='tip'>" +
				"<div class='tipMid'>"	+
				"</div>" +
				"<div class='tipBtm'></div>" +
			"</div>";
			return tTip;
		}
		$("body").prepend(getTip());

		/* Give each item with the class associated with
		   the plugin the ability to call the tooltip    */
		$(this).each(function(){

			var $this = $(this);
			var tip = $('.tip');
			var tipInner = $('.tip .tipMid');

			var tTitle = (this.title);
			this.title = "";

			var offset = $(this).offset();
			var tLeft = offset.left;
			var tTop = offset.top;
			var tWidth = $this.width();
			var tHeight = $this.height();

			/* Mouse over and out functions*/
			$this.hover(function() {
				tipInner.html(tTitle);
				setTip(tTop, tLeft);
				setTimer();
			},
			function() {
				stopTimer();
				tip.hide();
			}
		);

		/* Delay the fade-in animation of the tooltip */
		setTimer = function() {
			$this.showTipTimer = setInterval("showTip()", defaults.delay);
		}

		stopTimer = function() {
			clearInterval($this.showTipTimer);
		}

		/* Position the tooltip relative to the class
		   associated with the tooltip                */
		setTip = function(top, left){
			var topOffset = tip.height();
			var xTip = (left-30)+"px";
			var yTip = (top-topOffset-60)+"px";
			tip.css({'top' : yTip, 'left' : xTip});
		}

		/* This function stops the timer and creates the
		   fade-in animation                          */
		showTip = function(){
			stopTimer();
			tip.animate({"top": "+=20px", "opacity": "toggle"}, defaults.speed);
		}
	});
};
现在您已经了解了代码的样子,是时候剖析它了。
首先,创建一个 .js 文件并将其命名为 jquery.betterTooltip.js 以使其与 jQuery 兼容
插件标准。
在该 .js 文件中,包含以下代码:
	$.fn.betterTooltip = function(){

	});
这将创建一个公共函数,可以从文档的 head 调用,或者
另一个外部 .js 文件。要调用您的插件,您需要从
中调用以下行
$(document).ready 页面事件。
	$(document).ready(function(){
		$('.tTip').betterTooltip();
	});
上面的行会将插件附加到类名为“tTip”的每个元素。同样,你
可以将其附加到您选择的任何元素。
为了避免必须为每个项目修改插件,公开一些内容非常重要
变量和设置,以便可以从插件本身外部对其进行调整。最终目标是
永远不要碰插件,只需调整其设置即可。为此,请将以下内容添加到第一个块
代码:
	$.fn.betterTooltip = function(options){
		/* Setup the options for the tooltip that can be
		   accessed from outside                      */

		var defaults = {
			speed: 200,
			delay: 300
		};

		var options = $.extend(defaults, options);
	});
这允许在调用插件时修改设置“速度”和“延迟”,如下所示:
$('.tTip').betterTooltip({speed: 600, delay: 600});
这些完全是可选的。如果未指定,插件将使用默认值。
还记得您为工具提示输入的 HTML 吗?现在它将正式亮相。
在这段代码中,jQuery“前置”内容操作用于注入工具提示
紧接着打开 body 标签。这样我们就可以确保工具提示
位于一切之上。
	/* Create a function that builds the tooltip
	   markup. Then, prepend the tooltip to the body */
	getTip = function() {
		var tTip =
		"<div class='tip'>" +
			"<div class='tipMid'>"	+
			"</div>" +
			"<div class='tipBtm'></div>" +
		"</div>";
		return tTip;
	}
	$("body").prepend(getTip());
这是 jQuery 插件最重要和最有用的方面之一。 $(this).each 函数
当插件被调用时,循环遍历与插件关联的每个页面元素。在本例中是
所有具有“tTip”类的元素。当它循环遍历每个元素时,它会应用属性和方法
您指定的。
	$(this).each(function(){

		var $this = $(this);
		var tip = $('.tip');
		var tipInner = $('.tip .tipMid');

		var tTitle = (this.title);
		this.title = "";

		var offset = $(this).offset();
		var tLeft = offset.left;
		var tTop = offset.top;
		var tWidth = $this.width();
		var tHeight = $this.height();

		/* Mouse over and out functions*/
		$this.hover(function() {
			tipInner.html(tTitle);
			setTip(tTop, tLeft);
			setTimer();
		},
		function() {
			stopTimer();
			tip.hide();
		}
	);
这相当简单。上半部分由一系列属性组成,例如高度、宽度、x 和 y 位置以及
甚至“tTip”元素的标题属性值。我使用 jQuery offset() CSS 方法来获取顶部和左侧位置。还有一个
分配给每个“tTip”类的悬停函数,该函数在鼠标悬停和移出时调用方法。下面将介绍这些方法
further down in the 教程。
$(this).each 函数的一个重要部分是这里删除 title 属性的这行代码:
this.title = "";
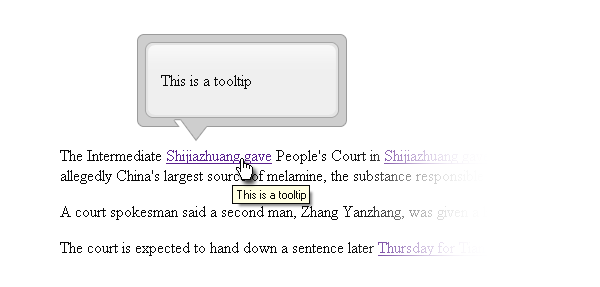
此工具提示的重点是交换通用
工具提示具有更好的引人注目的版本。如果不删除 title 属性,浏览器会显示
用于生成通用工具提示,您将获得双重工具提示。像这样:
		/* Delay the fade-in animation of the tooltip */
		setTimer = function() {
			$this.showTipTimer = setInterval("showTip()", defaults.delay);
		}

		stopTimer = function() {
			clearInterval($this.showTipTimer);
		}
setTimer 和 stopTimer 这两个方法用于在用户悬停时创建延迟
他们的光标悬停在具有“tTip”类的元素上以及工具提示出现时。这个
避免烦扰用户很重要。我相信当我们不小心悬停时,我们都会感到沮丧
隐藏在网站内容中的弹出广告之一。
setTimer 方法创建一个 setInterval 对象,该对象在分配的时间过去后调用“showTip()”。
为了让setInterval不至于无限循环,调用stopTimer方法来停止setInterval对象。
		/* Position the tooltip relative to the class
		   associated with the tooltip                */
		setTip = function(top, left){
			var topOffset = tip.height();
			var xTip = (left-30)+"px";
			var yTip = (top-topOffset-60)+"px";
			tip.css({'top' : yTip, 'left' : xTip});
		}
之前创建的 $(this).each 循环内的悬停函数调用 setTip()。其目的是定位
“tTip”元素正上方的工具提示。这是在淡入动画之前完成的。
		/* This function stops the timer and creates the
		   fade-in animation                          */
		showTip = function(){
			stopTimer();
			tip.animate({"top": "+=20px", "opacity": "toggle"}, defaults.speed);
		}
	});
};
最后但并非最不重要的一点是 showTip() 函数。这使用 jQuery 的 animate() UI 效果来淡入淡出工具提示
同时向下滑动。
完成并对结果感到满意后,您可以将插件从充满填充文本的基本 HTML 页面移动到
现实世界并加以利用。
This is a very basic example of what the tooltip plugin does. Now the fun part is making it more robust.
There are multiple ways to extend this plugin. The required enhancement is to detect
Position the tooltip relative to the browser window bounds and display the tooltip accordingly
It won't be cut off.
Thank you for reading this tutorial. I hope it gave you an idea of how to use jQuery to enhance your website
interface.
Comments begin! I'd like to hear your thoughts. Can this technology really help make it easier for users?
Or is this just another annoyance?
The above is the detailed content of Unleash the power of jQuery to enhance your tooltips. For more information, please follow other related articles on the PHP Chinese website!
 direct3d function is not available
 My computer can't open it by double-clicking it.
 Introduction to software development tools
 Usage of Type keyword in Go
 Introduction to the main work content of the backend
 Tutorial on buying and selling Bitcoin on Huobi.com
 How to use countif function
 What currency is PROM?


![[Web front-end] Node.js quick start](https://img.php.cn/upload/course/000/000/067/662b5d34ba7c0227.png)


