Showcase your event calendar with a free WordPress calendar plugin
Many businesses need to share event calendars with customers. For example, a restaurant can use an events calendar to promote special music events or holiday menus. Likewise, schools can use the events calendar on their website to keep students and teachers informed of any upcoming events at the school related to sports, exams or other activities.
The event calendar plugin is also helpful if individuals want to keep track of different things they should be doing. For example, you can use an events calendar plugin to mark important meetings and events, such as birthdays of friends and family.
In this tutorial, you will learn how to create events using the free My Calendar WordPress event management plugin. This plugin has many amazing features and we will use them in this tutorial.
What we will build
The focus of this tutorial is to create a calendar that allows companies to mark all the events they manage, such as parties, weddings, art exhibitions, etc. They will be able to see all future and past activity.
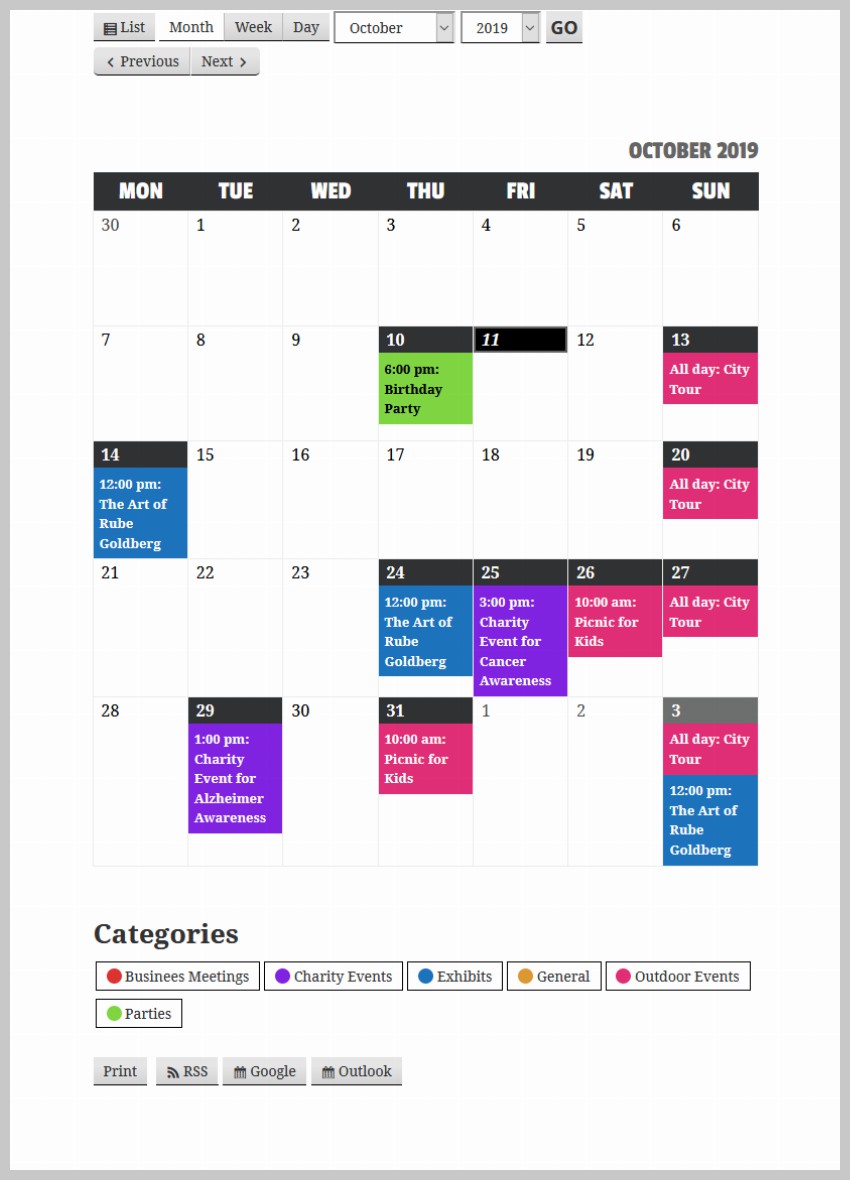
We will color code events for easier identification. Users will be able to click on any specific event category and only see matching events in the calendar. Clicking on any event will display a popup with all the basic information about the event, such as the time and location of the event.
We will start by installing the plugin. We will then change some settings to modify the input and output. After that, we'll create some event categories, add some event locations, and finally add the event to our calendar.
Additionally, you will most likely want to make some changes to the appearance of your events calendar so that it blends in with the rest of your website. So in the final step we'll add some of our own CSS rules to make some cosmetic changes to the calendar.
Create Event Calendar
set up
The first step in creating an event calendar is to install the "My Calendar" plugin. Once you have installed and activated the plugin, go to My Calendar > Settings in your admin dashboard. You'll see a bunch of tabs there.
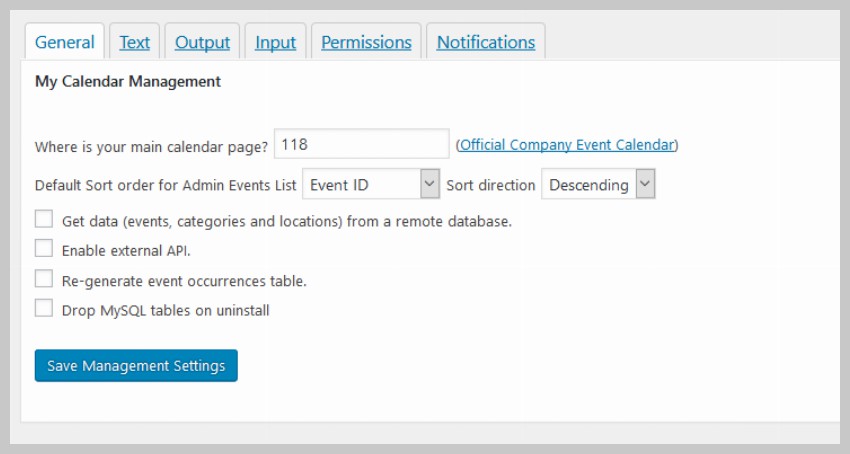
Click General and specify the ID of the page where you want the event calendar to appear. In our case it's 118. This step is optional, the plugin will automatically create an events calendar page for you when you publish your first event. However, it's good to know how to display an event calendar on a specific page.
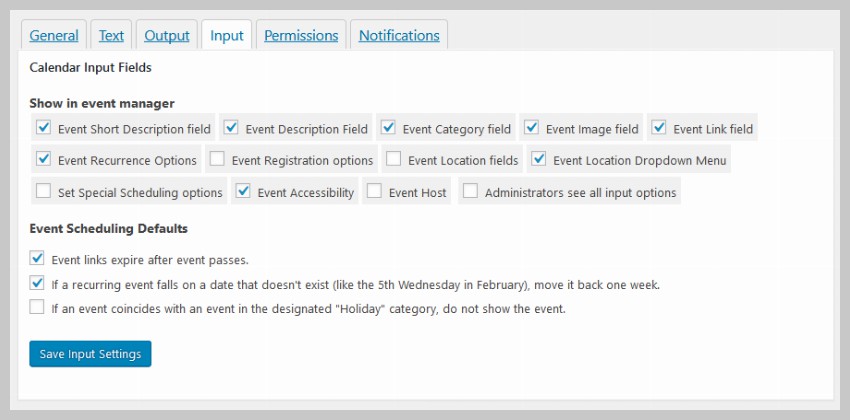
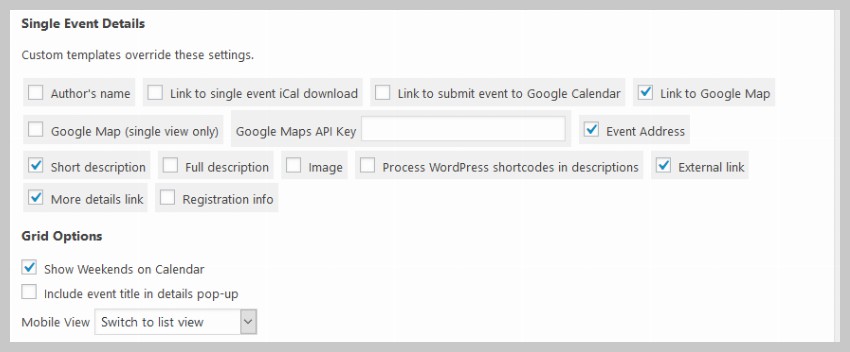
Whenever you create a new campaign using this plugin, you have to fill in some details about it. This may include many things such as the location of the event, a brief description, etc. Not all of these input fields are active by default. So you should now go to the Input tab and check the fields you want to display as shown in the image below.
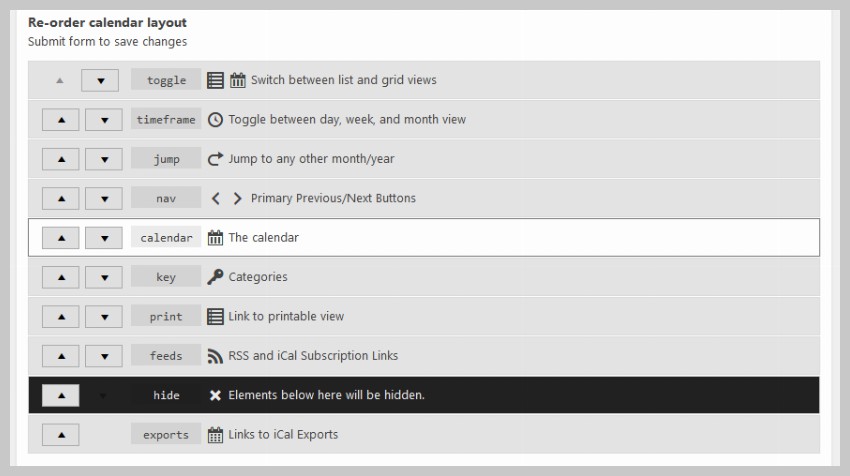
You may have noticed that in addition to the calendar itself, there are a lot of buttons and drop-down menus on the event calendar page. The order in which these buttons appear is controlled by the settings in the Output tag. You can drag elements up and down to display them in a specific order. Simply drag an element below the hidden row to prevent it from showing.
You can control what information is displayed to the user in the pop-up window after the user clicks on the event by toggling the checkbox under Single event details.
Create event category
Now that we have everything set up, it’s time to create the actual content for our events calendar.
We will start by adding some categories for labeling different events. This plugin gives users the option to view only specific categories of events. Once events are assigned to different categories, they can be filtered this way.
To add a new category to your calendar, simply go to My Calendar > Manage Categories and specify the category's name and label color. You can also choose to display an icon before a category by selecting an icon from the Category Icon drop-down list.
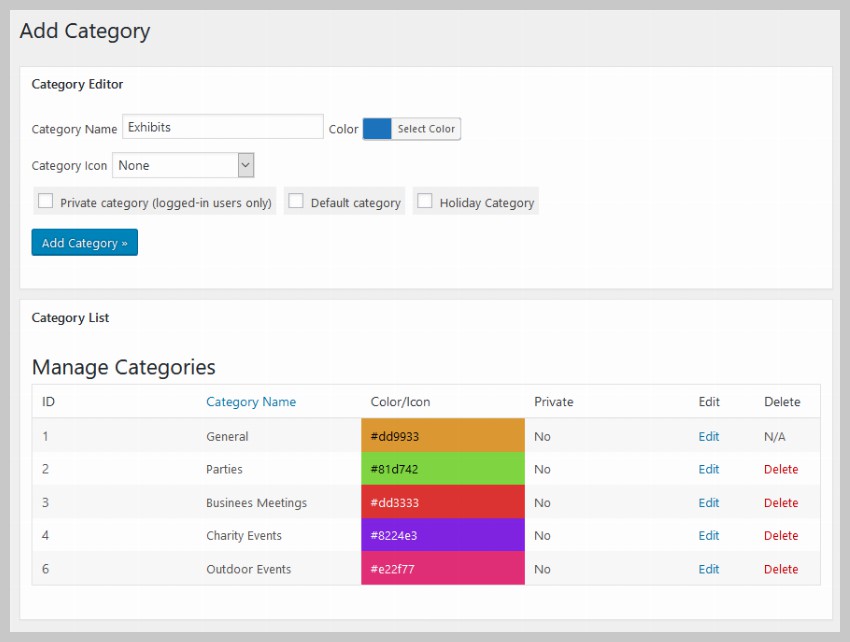
After adding all the details of the category, click the Add Category button to add the category to the event calendar.
Add event location
Any event you organize will take place somewhere. The plugin does a great job of specifying the location of different events.
You can add new locations to the Calendar plugin by going to My Calendar > Add New Location . The next page will contain a number of input fields asking for different details of the location. This includes common information such as street address, city, zip code, country, etc. You don't have to fill in all these values. Some of these details can be skipped.
Make sure you have entered the name of the location at the top. This will help you easily identify these locations in the drop-down menu when creating an event.
In this example, we will add a location for an art exhibition in Kentucky, USA. The address is fictitious, but it will give you an idea of how to fill in your details.
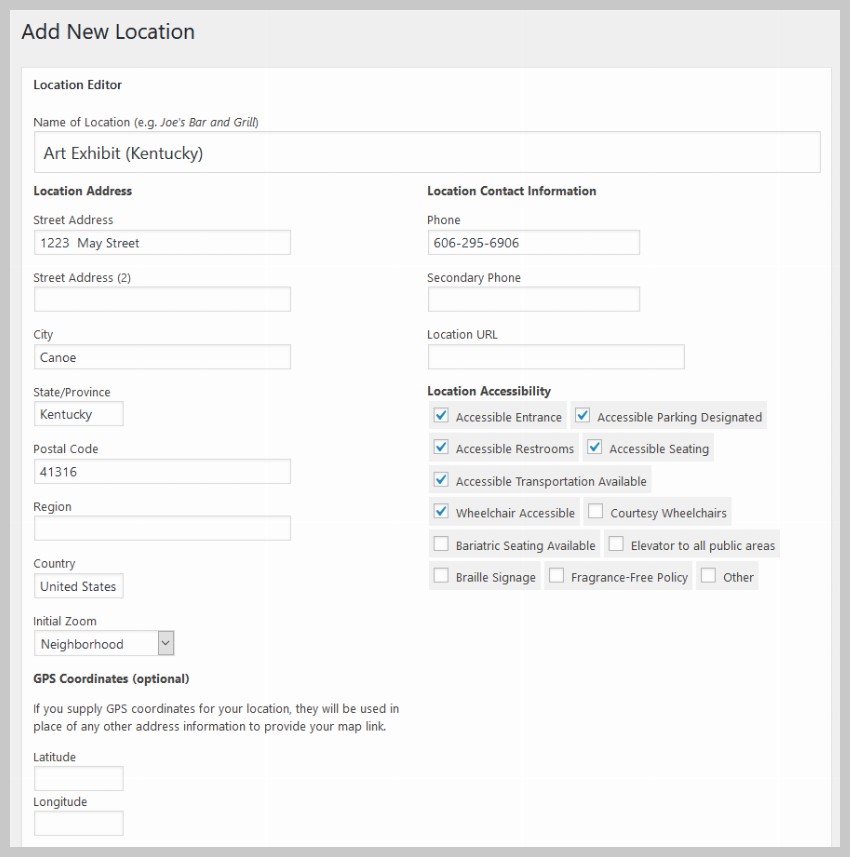
The plugin will provide users with a link to a Google Map containing the address you specify. This makes it easier to figure out exactly where the incident occurred. Any location you add to the plugin can be edited by clicking My Calendar > Manage Locations. Add event
We can now start adding events to our events calendar. To add an event, simply go to
My Calendar > Add New Event. Now, fill in the title and description of the event. Titles appear within the dates of the event calendar. When the user clicks on the
Read morelink in the popup, the description will appear on the campaign description page. Set the event category to Exhibition from the drop-down menu.
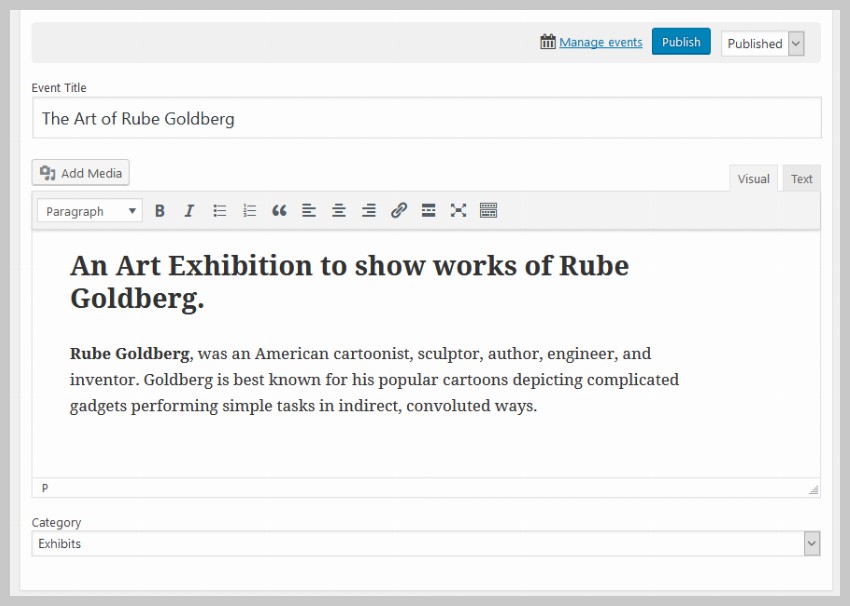 You can now specify the date and time of your event. It's likely that at least some of the events you add to your calendar are recurring events. In this case, adding all the recurring events to the calendar one by one will be very time-consuming.
To make things easier for you, the My Calendar plugin gives you the option to specify a recurrence pattern for events. This means you can specify how many times an event repeats and how often it repeats.
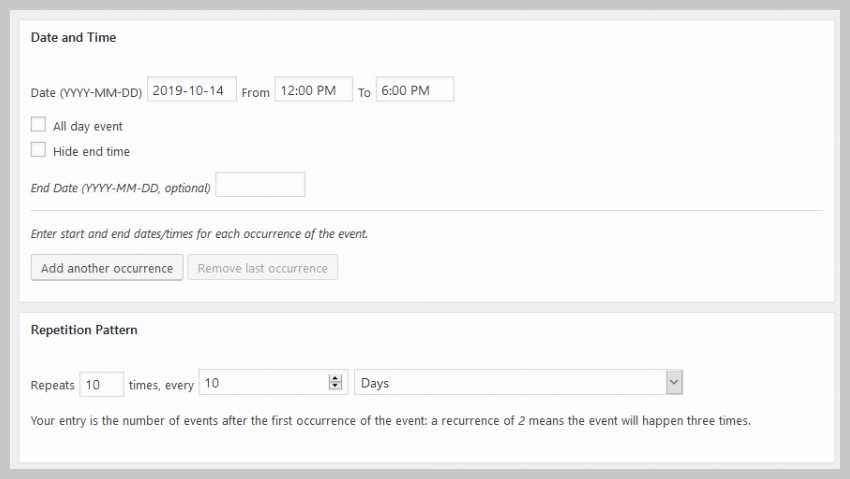 At the beginning of the tutorial we checked the box to enable the short description input field for the event. This allows us to provide a brief summary of the event, which is displayed in a popup window whenever the user clicks on an event in the calendar.
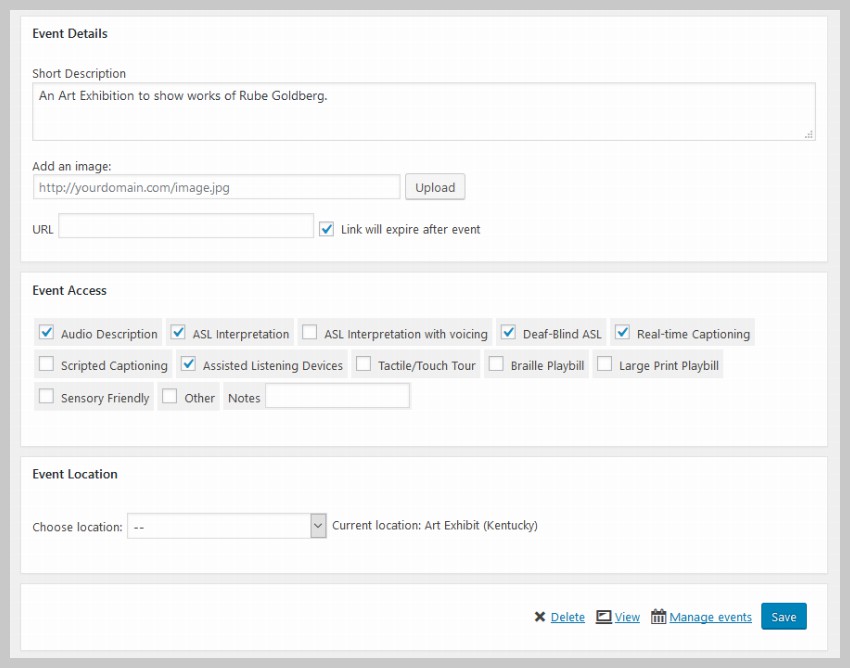 You can specify the location of the event at the bottom of the
page. In this example, just select Art Exhibition (Kentucky). After that, click the Publish button at the top or bottom of the page. Change the style of the event calendar
After completing all the steps in this tutorial, your events calendar will look like the image below. If it's styled differently than the image below, just go to
My Calendar>Style Editorand select the twentyeighteen.css file as the main stylesheet from the dropdown in the sidebar For calendar.
There are many other themes that can be applied to the calendar. Just choose the one you like best. Some of them (such as
inherit.css) are designed to provide as few styles as possible so that most of the styling rules in the theme are automatically applied to the calendar.
p>
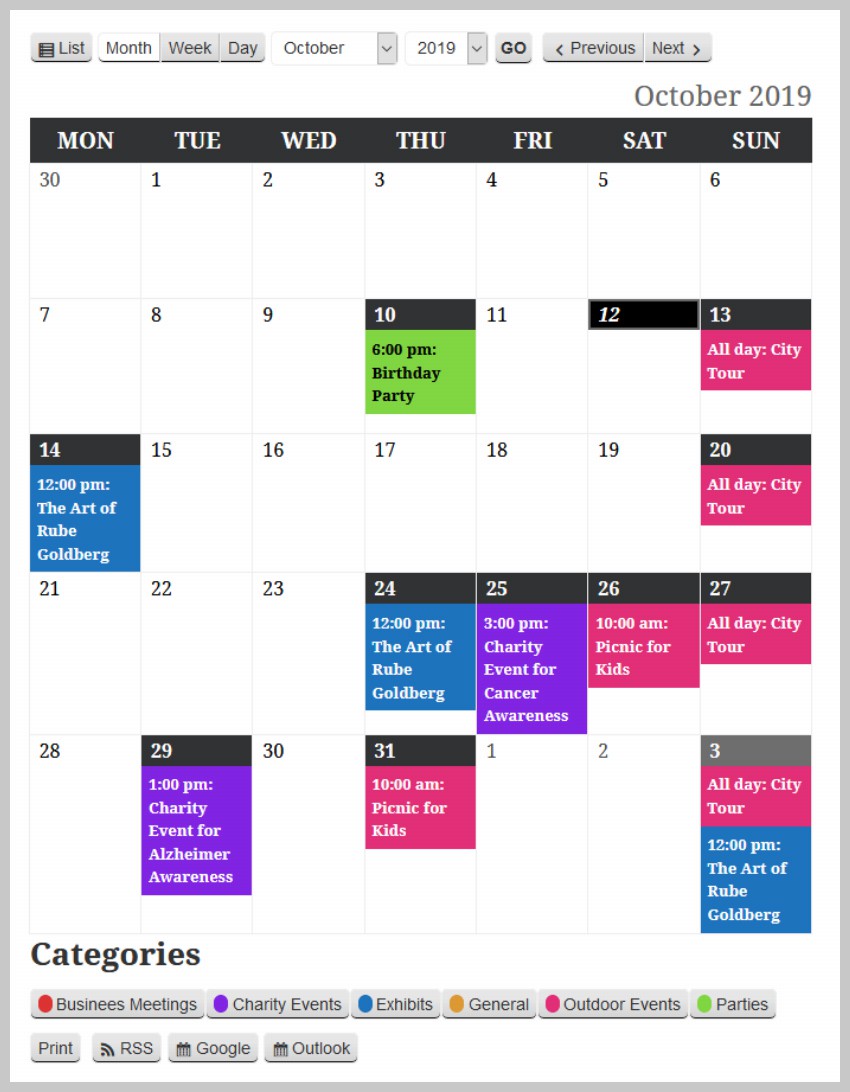 The style editor page displays all CSS rules applied to the calendar in the selected file. You can make various changes here and they will be reflected on the events calendar page.
Now, we will simply adjust the spacing and fonts applied to different elements, such as the table title, title, and category legend at the bottom. We'll also add some of our own style rules to adjust the calendar's appearance to our liking.
Here are all the rules we added to the event calendar. Just place them at the bottom of the style editor and the changes will be reflected on the event calendar page after clicking the
Save Changes button at the bottom.
.mc-main .my-calendar-header .no-icon,
.mc-main .mc_bottomnav .no-icon {
    display: inline-block;
	/* width: 12px; */
	width: 15px;
	height: 15px;
	vertical-align: middle;
	margin-right: .25em;
	border-radius: 12px;
	position: relative;
	top: -2px;
	border: 1px solid #fff;
}

.mc-main .my-calendar-header span, .mc-main .my-calendar-header a,
.mc-main .mc_bottomnav span, .mc-main .mc_bottomnav a,
.mc-main .my-calendar-header select, .mc-main .my-calendar-header input {
	color: #313233;
	color: var(--primary-dark);
	/* border: 1px solid #efefef;
	border: 1px solid var(--highlight-light); */
	border-radius: 5px;
	padding: 4px 6px;
	font-size: 14px;
	/* font-family: Arial; */
	background: #fff;
	background: var(--secondary-light);
}

.mc-main .my-calendar-header input:hover, .mc-main .my-calendar-header input:focus,
.mc-main .my-calendar-header a:hover, .mc-main .mc_bottomnav a:hover,
.mc-main .my-calendar-header a:focus, .mc-main .mc_bottomnav a:focus {
	background: black;
}

div.mc-print {
    margin-top: 2rem;
}

.mc_bottomnav.my-calendar-footer {
    margin-top: 5rem;
}

.mc-main button.close {
	top: 5px;
	left: 5px;
}

.mc-main .calendar-event .details, .mc-main .calendar-events {
	border: 5px solid #ececec;
	box-shadow: 0 0 20px #999;
}


.mc-main .mc-time .day {
	border-radius: 0;
}

.mc-main .mc-time .month {
	border-radius: 0;
	border-right: 1px solid #bbb;
}

.mc-main .my-calendar-header span, .mc-main .my-calendar-header a,
.mc-main .mc_bottomnav span, .mc-main .mc_bottomnav a,
.mc-main .my-calendar-header select, .mc-main .my-calendar-header input {
	color: #313233;
	color: var(--primary-dark);
	border-radius: 0px;
	padding: 4px 10px;
	font-size: 14px;
	background: #fff;
	background: var(--secondary-light);
	border-bottom: 1px solid black;
}

.mc-main th abbr, .mc-main .event-time abbr {
    border-bottom: none;
    text-decoration: none;
    font-family: 'Passion One';
    font-weight: 400;
    font-size: 2.5rem;
    line-height: 1;
}

.mc-main caption, .mc-main.list .my-calendar-month, .mc-main .heading {
    font-size: 2.5rem;
    color: #666;
    color: var(--highlight-dark);
    text-align: right;
    margin: 0;
    font-family: 'Passion One';
    text-transform: uppercase;
}

.mc-main .category-key li.current a {
    border: 1px solid #969696;
    background: #dadada;
}
 Final Thoughts
In this tutorial, we learned how to use the My Calendar plugin to create a basic events calendar for our website. The plugin makes it very easy to create and add events and simple descriptions.
However, the plugin is still missing some features, such as widgets and a more advanced description page that offers extra features such as payment options and the ability for users to add comments about the event. The plugin is also a bit difficult to style. If you want a more advanced event calendar plugin for your website, you should check out the WordPress event calendar plugin on CodeCanyon.
The above is the detailed content of Showcase your event calendar with a free WordPress calendar plugin. For more information, please follow other related articles on the PHP Chinese website!

Hot AI Tools

Undresser.AI Undress
AI-powered app for creating realistic nude photos

AI Clothes Remover
Online AI tool for removing clothes from photos.

Undress AI Tool
Undress images for free

Clothoff.io
AI clothes remover

Video Face Swap
Swap faces in any video effortlessly with our completely free AI face swap tool!

Hot Article

Hot Tools

Notepad++7.3.1
Easy-to-use and free code editor

SublimeText3 Chinese version
Chinese version, very easy to use

Zend Studio 13.0.1
Powerful PHP integrated development environment

Dreamweaver CS6
Visual web development tools

SublimeText3 Mac version
God-level code editing software (SublimeText3)

Hot Topics
 1387
1387
 52
52
 Where can I read Feilu novels for free? Feilu Novel reads free novel operation tutorials!
Mar 15, 2024 pm 03:10 PM
1. Where can I read Feilu novels for free? Feilu Novel reads free novel operation tutorials! 1. If you want to know where you can find free novels on the Feilu Novel App, then come and download the [Feilu Novel Free Version App] to experience it! Feilu Novel Free Edition app Category: News Reading Download Feilu Novel Free Edition app is an excellent mobile reading application, which provides users with a large number of high-quality novel resources. There are various types of novels on this platform, including fantasy, cultivation, history, romance, etc. Users can choose the genre they like to read. The reading experience of Feilu Novel Free Edition app is excellent. It has a good interface design, fast loading speed and smooth reading experience. 2. Open the downloaded app, enter the homepage, and click
 How to get all free Steam games at once
Feb 19, 2024 pm 07:50 PM
This article will introduce how to use SteamDB's free package tool to obtain all free games on Steam at once. The SteamDB Free Tier Tool is a website and browser extension that helps you quickly find and activate free games and DLC on Steam. How to get all the free games on Steam at once If you want to know how to get all the free games on Steam at once by using SteamDB's free package tool, please use the following steps: Visit steamdb.info to view all free packages (games and DLC) on Steam list of. Click on the “SignInViaSTeamtoUnlockThisPage” option. This option will redirect you
 Inventory of free and easy-to-use mobile phone screen recording software_A collection of easy-to-use mobile phone screen recording apps
Mar 02, 2024 pm 12:46 PM
The editor of this website recently took stock of some free and easy-to-use mobile phone screen recording software to help you record the screen anytime and anywhere on your mobile phone. For example, for live broadcasters and gamers, you can record your own beautiful moments. In a moment, I will give you a summary report below. I hope you like it. Inventory of free and easy-to-use mobile phone screen recording software 1, EV screen recording 1, the editor has been using this EV screen recording, it is really simple and practical, as an office artifact, it has no ads, no plug-ins, and takes up a lot of space. The memory space of your mobile phone is small, so the phone will not become laggy, and there are more video editing functions for everyone to use. The recorded video is very clear, and it supports the lossless transfer of video files between mobile devices and computer devices. Isn’t it very frustrating? You are excited. to
 3 ways to upgrade win11 for free
Jan 07, 2024 pm 04:33 PM
Although win11 has been released for a long time, most users still use win10, so how should we upgrade win11? In fact, there are many methods that can be used. Let’s take a look at the X ways to upgrade win11 for free. 3 ways to upgrade win11 for free: Method 1: Win11 push upgrade 1. First click on "Settings" in the lower left corner 2. Then open "Update and Security" 3. After opening, you can check whether you can upgrade. It's win11. If possible, click "Download and Install". Method 2: ISO direct installation 1. We can also download the iso file directly from this site. 2. After the download is completed, right-click to select the downloaded file and click "Load" 3. Then run
 Get Rich Every Day: Ace Racing Fushu's new car is available for free!
Feb 21, 2024 pm 06:51 PM
Ace Racing S19 new spring season new benefits are coming. The new legendary racing car Lucky Rat is now online. The free car pickup activity will also start simultaneously to help you get rich day by day in the new year. Get rid of the post-holiday syndrome and take a look at the details of this event. Get Rich Every Day: Ace Racing Fushu’s new car is available for free! The Year of the Rat congratulates the Dragon. With joy and reluctance, you say goodbye to the Spring Festival holiday. When you return to work and study, do you always feel that you have no energy and difficulty in concentrating? Let the new benefits of the Ace Speed Festival in the new spring season help you cheer up. Spirit, get rid of post-holiday syndrome! From February 18th to March 7th, the "0 Yuan to Drive a New Car" event will be launched for a limited time. After paying 1,500 gift points, drivers can drive the new legendary racing car Lucky Rat back.
 What are some free music apps?
Jul 28, 2023 pm 02:21 PM
Music apps for free listening: 1. Spotify, a very well-known music streaming platform, can search and play millions of songs on Spotify, and free users can obtain music content by watching ads; 2. Apple Music, very popular The popular music streaming application is closely integrated with iOS devices and is very convenient to use on Apple devices; 3. SoundCloud, a music sharing and social platform that allows users to upload and share their own music works; 4. YouTube Music.
 How to upgrade win7 ordinary home version to ultimate version for free
Jul 07, 2023 pm 09:21 PM
How to upgrade win7 normal home version to ultimate version for free? As we all know, win7 ultimate version is the highest version with the most complete functions and the most expensive price. Generally, the win7 pre-installed on computers is win7 home standard or advanced version, which has limited functions. Many people want to upgrade Win7 Home Edition Ultimate, so how to upgrade Win7 Home Standard Edition Ultimate? The editor will introduce it to you in detail. How to upgrade win7 ordinary home version to ultimate version for free 1. First open the computer desktop, select all programs in the menu, and click Windows Anytime Upgtrade. 2. Select Enter upgrade key in the pop-up window, 3. Enter the upgrade key in the key input window. KH2J9-PC326-T44D4-39H6V-
 How can Hequ chat be free? Hequ free chat setting tutorial
Mar 28, 2024 pm 09:42 PM
Taku APP is a relatively popular online dating software. The dating methods here are very good, and they can allow you to make all kinds of online friends, and everyone is very easy to talk to. They all have common interests and hobbies, but sometimes chatting here requires everyone to pay, which greatly affects everyone's use. If you want to chat, you have to spend money, which makes everyone very dissatisfied. In order to solve this problem One question, the editor also brought you a tutorial on how to set up his free chat, I hope it can help you. Taku free chat setting tutorial: 1. First open Taku APP; 2. Then verify the account; 3. Click to make friends; 4. Then select the type of online chat room; 5.


