

Database handling in Python: SQLite and Redis

In the information age we live in, we can see how much data the world is exchanging. We are basically creating, storing and retrieving data on a broad scale! There should be a way to handle all this - there's no way it could spread everywhere without any management, right? This is a database management system (DBMS).
A DBMS is a software system that allows you to create, store, modify, retrieve, and otherwise manipulate data in a database. Such systems also vary in size, from small systems running only on personal computers to large systems running on mainframes.
The focus of this tutorial is Python, not database design. Yes, Python is very capable of interacting with databases, and that's what I'm going to show you in this tutorial. You'll learn how to use Python to work with SQLite and Redis databases.
let's start!
Python Database API
As mentioned above, Python can interact with databases. But how can it do this? Python uses what is called the Python Database API to interact with databases. This API allows us to program different database management systems (DBMS). However, the process followed at the code level is the same for different DBMSs as follows:
- Establish a connection to the database of your choice.
- Create a cursor to communicate with data.
- Use SQL to manipulate data (Interaction).
- Tell the connection to apply SQL operations to the data and make them permanent (Commit), or tell it to abort these operations (Rollback), thereby returning the data to the interaction The state before it happened.
- Closethe connection to the database.
SQLite
SQLite is an open source, full-featured, standalone (needs little support from external libraries), serverless (no server is required to run the database engine, and is a locally stored database), zero-configuration (no installation or configuration required), A lightweight database management system based on SQL (can run SQL queries on SQLite tables) and uses a data file to store data.
It is worth mentioning that SQLite is used by large companies such as Google, Apple, Microsoft, etc., which makes it very reliable. In this tutorial we will use SQLite to interact with a database, more specifically we will use the sqlite3 module in Python.
Python and SQLite
As mentioned above, using a database involves five major steps. Let's see these steps in action.
1. Establish a connection to the database of your choice
This step is implemented as follows:
conn = sqlite3.connect('company.db')
As stated in the sqlite3 documentation:
To use this module, you must first create a Connection object that represents the database.
In the above code, please note that the data will be stored in the file company.db.
2. Create a cursor to communicate with data
The next step in working with the database is to create a cursor, as shown below:
curs = conn.cursor()
3. Use SQL to manipulate data
After connecting to the database and creating the cursor, we can now process (interact with) the data. In other words, we can now run SQL commands on database company.db.
Suppose we want to create a new table employee in database company. In this case, we need to run a SQL command. To do this, we will use the execute() method of the sqlite3 module. Therefore, the Python statement will look like this:
curs.execute('Create table employee (name, age)')
This statement will run a SQL command that will create a table named employee with two columns (fields) name and age .
We can now run a new SQL command to insert data into the table as follows:
curs.execute("Insert employee value ('Ali', 28)")
You can also insert multiple values at once, as shown below:
Values = [('Brad',54), ('Ross', 34), ('Muhammad', 28), ('Bilal', 44)]
In this case, instead of using the method executemany(), we will use the method execute() to execute the above multiple values.
curs.executemany('Insert employee value (?,?)', value)
4. Submit changes
In this step we want to apply (commit) the changes we made in the previous step. It's simple and looks like this:
conn.commit()
5. Close the connection to the database
After performing the operation and committing the changes, the final step is to close the connection:
conn.close()
Let's put all the steps in a script. The program will look like this (note that we must first import the sqlite3 module):
import sqlite3
conn = sqlite3.connect('company.db')
curs = conn.cursor()
curs.execute('create table employee (name, age)')
curs.execute("insert into employee values ('Ali', 28)")
values = [('Brad',54), ('Ross', 34), ('Muhammad', 28), ('Bilal', 44)]
curs.executemany('insert into employee values(?,?)', values)
conn.commit()
conn.close()
If you run the script, you should get a file named company.db in the current directory. Download this file as we will use it in the next step.
6. Let’s browse the database
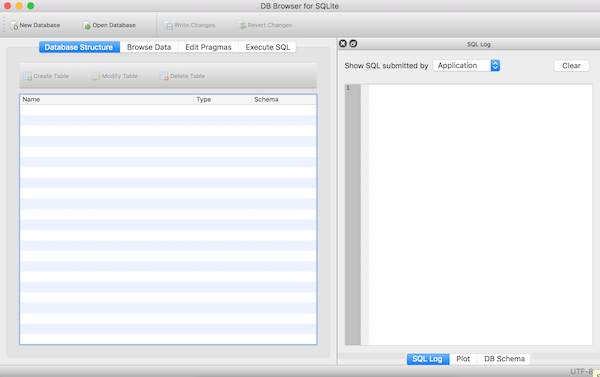
After creating the database and tables and adding some data, let's see what's inside company.db (the file you downloaded in the previous section). For this we will use a great tool: DB Browser for SQLite. Go ahead and download the tool to your computer. After opening the program, you should see a screen like this:
Open the database using the Open Database button at the top, in which case you should get the database structure as shown below:
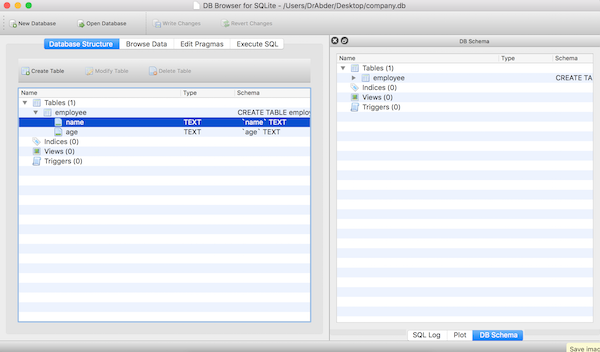
Please note that we listed the table employee, which contains two fields: name and age.
To confirm that the code above works and that the data has been added to the table, click the Browse Data tab. You should see something similar to the following:
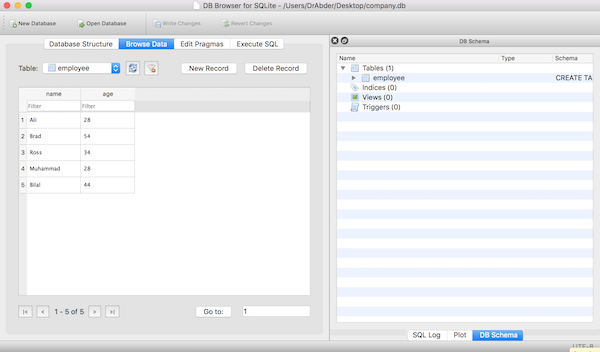
You can see that the database (company) and table (employee) have been created, and data has been successfully added to the table.
Redis
Remote Dictionary Server, referred to as Redis, is a powerful NoSQL database that can also act as an in-memory cache. Redis was developed by Salvatore Sanfilippo and is currently maintained by Redis Labs. The software is written in the C programming language and is open source (BSD license).
One of the most notable features of Redis is its data structure storage mechanism. You can store data in Redis using the same data types in Python (strings, sets, integers, lists, dictionaries, etc.). This makes Redis a popular choice among Python developers.
Redis and Python
In addition to its data structure storage mechanism, Python developers also prefer Redis over other NoSQL databases because of its large number of Python clients, the most popular choice of which is probably redis-py. Redis-py provides built-in commands for storing various data in a Redis server.
Now that we have a basic understanding of Redis, let's learn how to store data in it. Before proceeding, make sure you have a Redis server installed on your computer.
1. Install Redis.py client
First, create a new folder called redis-python for your Python script. Next, cd to the folder using Command Terminal and run the following command to install the Redis client:
pip install redis
Then, create a file named app.py in redis-python and open the file with a text editor. The next step is to create a Python script to add data to the database.
2. Connect the Redis client to the Redis server
First, in app.py, import redis and set the variables of the Redis server host and port address:
import redis
redis_host = 'localhost'
redis_port = 6379
Next, define the data to be added to the database. In this example we will create a simple Python dictionary:
user = {
    'ID': 1,
    'name': 'Kingsley Ubah',
    'email': 'ubahthebuilder@gmail.com',
    'role': 'Tech Writing',
}
Next, define the add_to_db function using try... except. In the try block we connect to the local Redis server and store the above dictionary in the database and then print the values on the console. If the code fails, we print the error object in a except block. The last part will run the function:
def add_to_db():
    try:
        r = redis.StrictRedis(host = redis_host, port = redis_port, decode_responses=True)
        r.hmset("newUserOne", user)
        msg = r.hgetall("newUserOne")
        print(msg)
    except Exception as e:
        print(f"Something went wrong {e}")

# Runs the function:
if __name__ == "__main__":
    add_to_db()
3. Start the server and run the code
First, run the Redis server by executing the following command on the command terminal:
redis-cli
Once the server is active, you can run the Python script using the following command:
python app.py
如果一切顺利,包含用户配置文件的字典将使用 newUserOne 键添加到 Redis。此外,您应该在终端控制台上看到以下输出:
{
  'ID': '1',
  'name': 'Kingsley Ubah',
  'email': 'ubahthebuilder@gmail.com',
  'role': 'Tech Writing',
}
这就是 Redis 的全部内容!
结论
本教程仅触及使用 Python 处理数据库的皮毛。您可以从 sqlite3 模块了解更多方法,您可以在其中执行不同的数据库操作,例如更新和查询数据库。
要了解有关 redis-py 的更多信息,请立即阅读其完整文档。玩得开心!
The above is the detailed content of Database handling in Python: SQLite and Redis. For more information, please follow other related articles on the PHP Chinese website!

Hot AI Tools

Undresser.AI Undress
AI-powered app for creating realistic nude photos

AI Clothes Remover
Online AI tool for removing clothes from photos.

Undress AI Tool
Undress images for free

Clothoff.io
AI clothes remover

AI Hentai Generator
Generate AI Hentai for free.

Hot Article
Hot Tools

Notepad++7.3.1
Easy-to-use and free code editor

SublimeText3 Chinese version
Chinese version, very easy to use

Zend Studio 13.0.1
Powerful PHP integrated development environment

Dreamweaver CS6
Visual web development tools

SublimeText3 Mac version
God-level code editing software (SublimeText3)
Hot Topics
 1386
1386
 52
52

 How to run programs in terminal vscode
Apr 15, 2025 pm 06:42 PM
How to run programs in terminal vscode
Apr 15, 2025 pm 06:42 PM
In VS Code, you can run the program in the terminal through the following steps: Prepare the code and open the integrated terminal to ensure that the code directory is consistent with the terminal working directory. Select the run command according to the programming language (such as Python's python your_file_name.py) to check whether it runs successfully and resolve errors. Use the debugger to improve debugging efficiency.
 Can visual studio code be used in python
Apr 15, 2025 pm 08:18 PM
Can visual studio code be used in python
Apr 15, 2025 pm 08:18 PM
VS Code can be used to write Python and provides many features that make it an ideal tool for developing Python applications. It allows users to: install Python extensions to get functions such as code completion, syntax highlighting, and debugging. Use the debugger to track code step by step, find and fix errors. Integrate Git for version control. Use code formatting tools to maintain code consistency. Use the Linting tool to spot potential problems ahead of time.
 Python: Automation, Scripting, and Task Management
Apr 16, 2025 am 12:14 AM
Python: Automation, Scripting, and Task Management
Apr 16, 2025 am 12:14 AM
Python excels in automation, scripting, and task management. 1) Automation: File backup is realized through standard libraries such as os and shutil. 2) Script writing: Use the psutil library to monitor system resources. 3) Task management: Use the schedule library to schedule tasks. Python's ease of use and rich library support makes it the preferred tool in these areas.
 Can vs code run in Windows 8
Apr 15, 2025 pm 07:24 PM
Can vs code run in Windows 8
Apr 15, 2025 pm 07:24 PM
VS Code can run on Windows 8, but the experience may not be great. First make sure the system has been updated to the latest patch, then download the VS Code installation package that matches the system architecture and install it as prompted. After installation, be aware that some extensions may be incompatible with Windows 8 and need to look for alternative extensions or use newer Windows systems in a virtual machine. Install the necessary extensions to check whether they work properly. Although VS Code is feasible on Windows 8, it is recommended to upgrade to a newer Windows system for a better development experience and security.
 What is vscode What is vscode for?
Apr 15, 2025 pm 06:45 PM
What is vscode What is vscode for?
Apr 15, 2025 pm 06:45 PM
VS Code is the full name Visual Studio Code, which is a free and open source cross-platform code editor and development environment developed by Microsoft. It supports a wide range of programming languages and provides syntax highlighting, code automatic completion, code snippets and smart prompts to improve development efficiency. Through a rich extension ecosystem, users can add extensions to specific needs and languages, such as debuggers, code formatting tools, and Git integrations. VS Code also includes an intuitive debugger that helps quickly find and resolve bugs in your code.
 Is the vscode extension malicious?
Apr 15, 2025 pm 07:57 PM
Is the vscode extension malicious?
Apr 15, 2025 pm 07:57 PM
VS Code extensions pose malicious risks, such as hiding malicious code, exploiting vulnerabilities, and masturbating as legitimate extensions. Methods to identify malicious extensions include: checking publishers, reading comments, checking code, and installing with caution. Security measures also include: security awareness, good habits, regular updates and antivirus software.
 Can vs code run python
Apr 15, 2025 pm 08:21 PM
Can vs code run python
Apr 15, 2025 pm 08:21 PM
Yes, VS Code can run Python code. To run Python efficiently in VS Code, complete the following steps: Install the Python interpreter and configure environment variables. Install the Python extension in VS Code. Run Python code in VS Code's terminal via the command line. Use VS Code's debugging capabilities and code formatting to improve development efficiency. Adopt good programming habits and use performance analysis tools to optimize code performance.
 How to use VSCode
Apr 15, 2025 pm 11:21 PM
How to use VSCode
Apr 15, 2025 pm 11:21 PM
Visual Studio Code (VSCode) is a cross-platform, open source and free code editor developed by Microsoft. It is known for its lightweight, scalability and support for a wide range of programming languages. To install VSCode, please visit the official website to download and run the installer. When using VSCode, you can create new projects, edit code, debug code, navigate projects, expand VSCode, and manage settings. VSCode is available for Windows, macOS, and Linux, supports multiple programming languages and provides various extensions through Marketplace. Its advantages include lightweight, scalability, extensive language support, rich features and version
